Page 2 - Table of contents; Childproof lock
en 2 Table of contents 1 Safety ............................................ 4 1.1 General information .................... 41.2 Intended use............................... 41.3 Restriction on user group........... 41.4 Safe installation .......................... 41.5 Safe use .......................
Page 4 - Safety; General information; WARNING ‒ Risk of injury!
en Safety 4 1 Safety Observe the following safety instructions. 1.1 General information ¡ Read this instruction manual carefully. ¡ Keep the instruction manual and the product information safefor future reference or for the next owner. ¡ Do not connect the appliance if it has been damaged in transi...
Page 5 - WARNING ‒ Risk of electric shock!
Safety en 5 WARNING ‒ Risk of electric shock! Incorrect installation is dangerous. ▶ Connect and operate the appliance only in accordance with thespecifications on the rating plate. ▶ Always use the supplied power cable for the new appliance. ▶ Connect the appliance to a power supply with alternati...
Page 8 - Damaged appliance
en Safety 8 ▶ Never let the power cord come into contact with sharp points oredges. ▶ Never kink, crush or modify the power cord. 1.6 Damaged appliance WARNING ‒ Risk of electric shock! If the appliance or the power cord is damaged, this is dangerous. ▶ Never operate a damaged appliance. ▶ Never op...
Page 9 - WARNING ‒ Risk of harm to health!
Safety en 9 WARNING ‒ Risk of harm to health! Children can lock themselves in the appliance, thereby puttingtheir lives at risk. ▶ With redundant appliances, unplug the power cord. Then cutthrough the cord and damage the lock on the appliance doorbeyond repair so that the appliance door will no lon...
Page 10 - Preventing material; Safe installation; Do not use a steam cleaner.
en Preventing 10 Preventing 2 Preventing material damage Preventing 2.1 Safe installation ATTENTION! Improper installation of the appliancemay cause damage. ▶ If the dishwasher is installed aboveor below other domestic appli-ances, follow the information on in-stallation in combination with adishwa...
Page 11 - WARNING; Activating the door lock; The door lock remains activ-; Deactivating the door lock; Open the appliance door.
Childproof lock en 11 3 Childproof lock 1 The childproof lock lets you protectchildren from possible hazards result-ing from the appliance.Depending on the features of themodel, the appliance comes with adoor lock. 3.1 Door lock The door lock is a mechanical safetysystem and makes it more difficult...
Page 12 - Environmental protec-; Disposing of packaging; Use the Eco 50° programme.; Installation and con-; The appliance has been tested
en Environmental protection and saving energy 12 4 Environmental protec- tion and saving energy Help protect the environment by us-ing your appliance in a way that con-serves resources and by disposing ofreusable materials properly. 4.1 Disposing of packaging The packaging materials are environ-men...
Page 13 - Installing and connecting; Installing the drainage connection; tion; Note
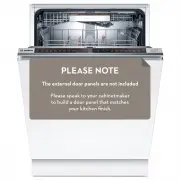
Installation and connection en 13 ¡ User manual ¡ Installation Instructions ¡ Warranty 1 ¡ Installation material ¡ Steam guard plate 1 ¡ Rubber apron 1 ¡ Mains cable ¡ Quick reference guide 1 5.2 Installing and connecting the appliance You can position your built-under orintegrable appliance in a f...
Page 14 - Electrical connection; Notes
en Installation and connection 14 5.5 Electrical connection Connect your appliance to the powersupply. Connecting the appliance to theelectricity supply Notes ¡ Please follow the Safety instruc-tions → Page 4 . ¡ Connect the appliance to alternat-ing current only, in the range of 220 - 240 V and 5...
Page 15 - Familiarising yourself with your appliance; You can find an overview of the parts of your appliance here.
Familiarising yourself with your appliance en 15 6 Familiarising yourself with your appliance 6.1 Appliance You can find an overview of the parts of your appliance here. 1 2 3 4 5 6 7 8 9 10 11 12 13 14 1 Rating plate Rating plate with E number and FD num-ber → Page 61 . The data you need for Cust...
Page 18 - Timer programming
en Familiarising yourself with your appliance 18 8 Timer programming Setting timer programming→ Page 39 9 Programme buttons Programmes → Page 19 10 Door opener 1 Opening the appliance door→ Page 38 1 Depending on the appliance specifications
Page 19 - Programmes; Programme
Programmes en 19 7 Programmes You can find an overview of the pro-grammes that can be selected here.Different programmes, which can befound on the control panel of yourappliance, are available dependingon the appliance configuration.The running time may vary depend-ing on the programme selected. Th...
Page 21 - tutes; Additional functions
Additional functions en 21 Programme Use Programme se-quence Additional func-tions 1 hr Programme Tableware: ¡ Cleaning mixedtableware andcutlery. Level of soiling: ¡ Removing com-mon householdfood remnantslightly dried-on. Time-optimised: ¡ Cleaning 65 °C ¡ Intermediaterinse ¡ Rinsing 70 °C ¡ Dryi...
Page 22 - Use
en Additional functions 22 panel of your appliance, are availabledepending on the appliance configur-ation. Additionalfunction Use VarioSpeed-Plus ¡ The running timeis shortened by20% to 66% de-pending on thewashing pro-gramme. ¡ Energy and waterconsumption areincreased. Half Load ¡ Switch on withs...
Page 23 - Features; Knife shelf
Features en 23 Additionalfunction Use ExtraDry ¡ For a better dryingresult the finalrinse temperatureis increased andthe drying phaseextended. ¡ Especially suitablefor drying plasticparts. ¡ There is a slightincrease in energyconsumption andthe running time isextended. Shine & Dry ¡ To avoid ma...
Page 24 - Slide the basket back in.
en Features 24 3. Press in the levers on the right andleft on the outside of the basket. The basket can then slip downslightly. 4. Raise or lower the basket evenly tothe right level. → "Basket heights", Page 28 Check that the basket is level onboth sides. 5. Slide the basket back in. Adjus...
Page 25 - Cutlery basket; Reorganising cutlery drawer; Depending on the appliance specifications
Features en 25 9.2 Bottom basket Arrange pans and plates in the bot-tom basket. a Cutlery basket 1 Large plates up to a diameter of31/34 cm 1 can be arranged as shown. 9.3 Cutlery basket Arrange cutlery in the cutlery basket,always without sorting it and with thesharp points downwards. 9.4 Cutlery ...
Page 26 - Tip; Adjusting etagere; Push the etagere down.
en Features 26 1. To fold down a side shelf, push thelever forwards and fold downthe side shelf . 2. To fold down the front prongs,push the lever forwards and folddown the prongs . 1 2 3 Tip If you want to return the cutlerydrawer to the original position, foldthe side shelf back up until it clic...
Page 27 - Folding down prongs; Small items holder
Features en 27 9.6 Folding prongs Use the folding prongs to positiontableware securely, e.g. plates. You can fold the prongs down to po-sition pans, bowls and glassesbetter. 1 Folding down prongs 1 If you do not need the prongs, foldthem down. 1. Push the lever forwards and folddown the prongs . 1...
Page 28 - Baking sheet spray head; Check that the appliance is al-; Inserting baking sheet spray head; Set the baskets at the right height.
en Features 28 9.9 Baking sheet spray head Use the baking sheet spray head toclean large items of tableware, e.g.trays, grilles and plates. Arrange max. 2 baking sheets and2 grilles as shown to ensure that thespray jet can reach all parts. Note: Check that the appliance is al- ways operated with t...
Page 29 - 0 Before using for the; Performing the initial; The appliance has; 1 Water softening sys-
first time en 29 Level Top basket Bottom basket 3 max. ø 21 cm 25 cm Appliance height 86.5 cm with cutlery basket Level Top basket Bottom basket 1 max. ø 24 cm 34 cm 2 max. ø 26.5 cm 30.5 cm 3 max. ø 29 cm 28 cm Appliance height 86.5 cm with cutlery drawer Level Top basket Bottom basket 1 max. ø 18...
Page 30 - Overview of water hardness settings; Hardness range; Setting water softening; Adding special salt
en Water softening system 30 11.1 Overview of water hardness settings You can find an overview of the water hardness values that can be selectedhere.You can find out how hard your water is from your local water company or byusing a water hardness tester. Water hardness°E Hardness range mmol/l Setti...
Page 31 - Switching off water; ter softening system
Water softening system en 31 ATTENTION! Detergent may damage the watersoftening system. ▶ Only fill the dispenser of the watersoftening system with special dish-washer salt. Special salt can damage the tub dueto corrosion. ▶ To make sure that any special saltthat escapes is washed out of thetub, ad...
Page 32 - 2 Rinse aid system; Adding rinse aid
en Rinse aid system 32 grammes. It will increase the run timeand consumption values, e.g. waterand electricity. Overview of consumption values with regeneration the water softeningsystem Here you can find an overview of the maximum additional running time andconsumption values during regeneration o...
Page 33 - max; Setting the amount of
Rinse aid system en 33 2. Add rinse aid up to the max mark. max 3. If rinse aid spills out, remove itfrom the tub.Spilled rinse aid can cause ex-cessive frothing during the washcycle. 4. Close the lid of the dispenser forrinse aid. a The lid clicks into position. 12.2 Setting the amount of rinse ai...
Page 34 - Suitable detergents; Separate detergents; and Rinse aid; Combined detergent
en Detergent 34 13 Detergent Find out which detergents are suit-able for your appliance. 13.1 Suitable detergents Only use detergents that are suitablefor dishwashers. Both separate andcombined detergents are suitable.For optimum washing and drying res-ults, use separate detergent, addingSpecial sa...
Page 35 - Unsuitable detergents; Detergent; gents
Detergent en 35 These products contain not only de-tergent but also rinse aid and salt re-placement substances (3in1) and,depending on the combination (4in1,5in1, ...), additional components suchas glass protection or stainless steelcleaner.According to manufacturers, com-bined detergents generally...
Page 36 - The lid clicks into position.
en Tableware 36 2. Add the detergent to the dry deter-gent dispenser. 15 ml 25 ml 50 ml If you are using tablets, one isenough. Insert the tablets in a hori-zontal position.If you are using powder or liquiddetergent, follow the manufac-turer's instructions and quantitiesfor dosage in the detergent ...
Page 37 - Damage to glass and; Cause; Arrange tableware; Tips
Tableware en 37 14.1 Damage to glass and tableware Avoid damage to glass and table-ware. Cause Recommenda-tion The followingtableware is notdishwasher-safe: ¡ Items of cut-lery and table-ware madefrom wood ¡ Decoratedglassware, an-tique andhand-craftedtableware ¡ Plastic partsnot resistant toheat ¡...
Page 38 - – To prevent damage to table-; Removing tableware; 5 Basic operation; Opening appliance door; If the childproof lock
en operation 38 ¡ For better washing and drying res-ults, position items with curves orrecesses at an angle so the watercan run off. 1. Remove large remnants of foodfrom your tableware.To save resources, do not pre-rinse tableware under running wa-ter. 2. Observe the following when arran-ging table...
Page 39 - ance; The additional functions which; ming; Press
operation en 39 2. If the childproof lock 1 is activated, press the catch of the lock to theright and open the appliancedoor . 2 1 15.2 Switching on the appli- ance ▶ Press .The Eco 50° programme is set bydefault.The Eco 50° programme is an es-pecially environmentally friendlyprogramme and ideal ...
Page 40 - Starting the programme; Activating button lock
en operation 40 15.6 Starting the programme ▶ Press . a The programme has ended whenthe display shows "0:00". Notes ¡ If you want to add more tablewarewhile the appliance is running, donot use the tablet collecting tray asa handle for the top basket. Youmight touch the partially dissolvedta...
Page 41 - 6 Basic settings; Overview of basic settings; Basic setting
Basic settings en 41 16 Basic settings You can configure the appliance to meet your needs. 16.1 Overview of basic settings The basic settings depend on the features of your appliance. Basic setting Display text Selection Description Water hardness H:04 1 H:00 - H:07 Set the water softening sys-tem ...
Page 42 - Changing basic settings; 7 Cleaning and servi-; Cleaning the tub
en Cleaning and servicing 42 Basic setting Display text Selection Description Eco drying o:01 1 o:00 - o:01 Activate or deactivate auto-matic door opening at theend of the Eco programme. Note Eco drying is deactivatedwhen ¡ Intensive drying isswitched on. ¡ The Eco 50° programmehas been selected in...
Page 43 - Cleaning products; Action; Performing Machine Care
Cleaning and servicing en 43 17.2 Self-cleaning interior 1 To remove deposits, the applianceself-cleans the interior at regular inter-vals.The programme sequence is auto-matically adjusted for self-cleaning,e.g. the cleaning temperature isbriefly increased. Consumption val-ues, e.g. water and elect...
Page 44 - Cleaning filters
en Cleaning and servicing 44 ¡ Follow the safety instructions andthe directions for use on the pack-agings of the machine careproducts. 1. Remove any coarse soiling in theinterior with a damp cloth. 2. Clean filters. 3. Add the machine care product tothe appliance. 4. Press . 5. Press . a The Mac...
Page 45 - Cleaning spray arms; Insert the lower spray arm.
Cleaning and servicing en 45 Carefully clean the rim of dirtbetween the coarse and the fine fil-ter. 6. Re-assemble the filter system.Make sure that the locking catcheson the coarse filter click into posi-tion. 7. Insert the filter system into the ap-pliance and turn the coarse filterclockwise.Make...
Page 46 - 8 Troubleshooting
en Troubleshooting 46 18 Troubleshooting You can rectify minor faults on your appliance yourself. Read the troubleshoot-ing information before contacting Customer Service. This will avoid unneces-sary costs. WARNING Risk of electric shock! Improper repairs are dangerous. ▶ Repairs to the appliance ...
Page 47 - Fault
Troubleshooting en 47 Fault Cause and troubleshooting Appliance door doesnot open at the end ofthe Eco 50° pro-gramme. The screws are included in the scope of supply.If the screws used here are too long, this may de-activate Eco drying. The safety device will switch Eco drying off. ▶ Call Customer ...
Page 59 - Clean wastewater pump; age and disposal; Removing the appliance
Transportation, storage and disposal en 59 18.1 Clean wastewater pump Large remnants of food or foreignbodies can block the wastewaterpump. As soon as the washing waterno longer drains properly, thewastewater pump must be cleaned. WARNING Risk of injury! Sharp and pointed objects or frag-ments of g...
Page 60 - Protect appliance from
en Transportation, storage and disposal 60 19.2 Protect appliance from frost If there is a risk of frost where the ap-pliance will be standing, e.g. in a holi-day home, empty the appliance com-pletely. ▶ Empty the appliance. → Page 60 19.3 Transporting the appli- ance To avoid damage to the applia...
Page 61 - 0 Customer Service; Under the terms of the manu-
Customer Service en 61 20 Customer Service If you have any queries, are unable torectify faults on the appliance your-self or if your appliance needs to berepaired, contact Customer Service.You can solve many problems your-self by consulting the information ontroubleshooting in these instructionsor...
Page 63 - 1 Technical specifications; Only applies to countries in the European Economic Area
Technical specifications en 63 21 Technical specifications Weight Max.: 60 kg Voltage 220 - 240 V, 50 Hz or 60 Hz Power rating 2000 - 2400 W Fuse 10 - 16 A Water pressure ¡ Min. 0.05 MPa (0.5 bar) ¡ Max. 1 MPa (10 bar) Inlet rate Min. 10 l/min Water temperature Cold water.Hot water max.: 60 °C Capa...
Page 64 - Register your new device on MyBosch now and profit directly from:
Thank you for buying a Bosch Home Appliance! Register your new device on MyBosch now and profit directly from: • Expert tips & tricks for your appliance• Warranty extension options• Discounts for accessories & spare-parts• Digital manual and all appliance data at hand• Easy access to Bosch H...


 Bosch SBI8EDS01A
User Manual
Bosch SBI8EDS01A
User Manual
 Bosch SBT8ZD801A
User Manual
Bosch SBT8ZD801A
User Manual
 Bosch SBV88TX06A
User Manual
Bosch SBV88TX06A
User Manual
 Bosch SBV8EDX01A
User Manual
Bosch SBV8EDX01A
User Manual
 Bosch SCE53M05AU
User Manual
Bosch SCE53M05AU
User Manual
 Bosch SGE53B55UC
User Manual
Bosch SGE53B55UC
User Manual
 Bosch SGI 55M26EU
User Manual
Bosch SGI 55M26EU
User Manual
 Bosch SGI 56E35EU
User Manual
Bosch SGI 56E35EU
User Manual
 Bosch SGS 43E52
User Manual
Bosch SGS 43E52
User Manual
 Bosch SGS 55E02EU
User Manual
Bosch SGS 55E02EU
User Manual
 Bosch SGS 55E08EU
User Manual
Bosch SGS 55E08EU
User Manual
 Bosch SGS 55E12EU
User Manual
Bosch SGS 55E12EU
User Manual
 Bosch SGU 65T12SK
User Manual
Bosch SGU 65T12SK
User Manual
 Bosch SGU53E15
User Manual
Bosch SGU53E15
User Manual
 Bosch SGV 43E23EU
User Manual
Bosch SGV 43E23EU
User Manual
 Bosch SGV 57T13EU
User Manual
Bosch SGV 57T13EU
User Manual
 Bosch SGV78C53UC
User Manual
Bosch SGV78C53UC
User Manual
 Bosch SGX78C55UC
User Manual
Bosch SGX78C55UC
User Manual