Bosch PCR915B91A - Manuals
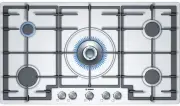
User Manual Bosch PCR915B91A


Summary
3 Content Safety considerations . . . . . . . . . . . . . . . . 5 For your safety . . . . . . . . . . . . . . . . . . . . . . . 5 What to do if you smell gas . . . . . . . . . . . . . . 5 Warnings . . . . . . . . . . . . . . . . . . . . . . . . . . . 5 Installation . . . . . . . . . . . . . . . . . ...
5 Safety considerations For your safety If the information in this manual is not followed exactly, a fire or explosion may result causing property damage, personal injury or death.Do not store articles on or against this appliance.Do not store flammable material near this appliance.Do not spray aero...
7 Installation Statutory requirements This installation must conform with the following: Ø Manufacturer’s Installation instructions Ø Local Gas Fitting Regulations Ø Municipal Building Codes, Ø Refer to AS/NZS 5601.1 for Gas Installations. Ø S.A.A. Wiring Code Ø Local Electrical Regulations Ø Any ot...
Bosch Hobs Manuals
-
 Bosch BH6B5B60A
User Manual
Bosch BH6B5B60A
User Manual
-
 Bosch NEM5066UC
User Manual
Bosch NEM5066UC
User Manual
-
Bosch NEM5066UC
Installation Manual
-
 Bosch NEM5466UC
User Manual
Bosch NEM5466UC
User Manual
-
 Bosch NEM5666UC
User Manual
Bosch NEM5666UC
User Manual
-
Bosch NEM5666UC
Installation Manual
-
Bosch NEM5666UC
Manual
-
 Bosch NET8068SUC
User Manual
Bosch NET8068SUC
User Manual
-
Bosch NET8068SUC
Installation Manual
-
Bosch NET8068SUC
Manual
-
 Bosch NET8069SUC
User Manual
Bosch NET8069SUC
User Manual
-
Bosch NET8069SUC
Manual
-
 Bosch NET8069UC
User Manual
Bosch NET8069UC
User Manual
-
Bosch NET8069UC
Manual
-
 Bosch NET8669SUC
User Manual
Bosch NET8669SUC
User Manual
-
Bosch NET8669SUC
Manual
-
 Bosch NET8669UC
User Manual
Bosch NET8669UC
User Manual
-
Bosch NET8669UC
Manual
-
 Bosch NETP068SUC
User Manual
Bosch NETP068SUC
User Manual
-
Bosch NETP068SUC
Installation Manual