Bosch HMD8451UC - Manuals
Bosch HMD8451UC Microwave – User Manual, Manual, Installation Manual in PDF format online.
Manuals:
User Manual Bosch HMD8451UC


Manual Bosch HMD8451UC


Summary
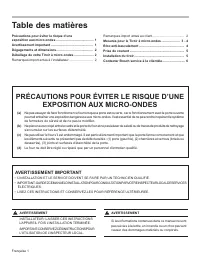
English 2 SPECIAL WARNING • INSTALLATION AND SERVICE MUST BE PERFORMED BY A QUALIFIED INSTALLER.• IMPORTANT: SAVE THIS INSTALLATION MANUAL FOR LOCAL ELECTRICAL INSPECTOR’S USE.• READ AND SAVE THESE INSTRUCTIONS FOR FUTURE REFERENCE. Precautions To Avoid Possible Exposure To Excessive Microwave Energ...
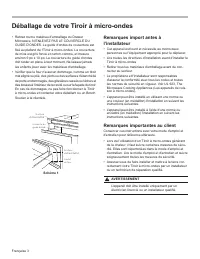
English 4 Unpacking Your Drawer Microwave • Remove all packing materials from inside the Drawer Microwave. DO NOT REMOVE THE WAVEGUIDE COVER. The Waveguide Cover is attached to the ceiling of the Drawer Microwave. The mica cover is dark grey and cardboard-like, and measures approximately 9" x 10...
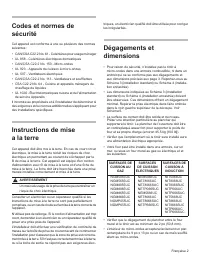
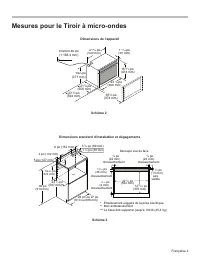
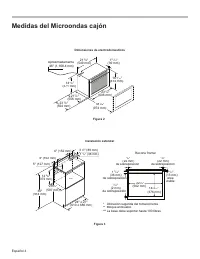
English 5 Figure 2 Figure 3 Standard Installation Dimensions and Clearances Appliance Dimensions Drawer Microwave Measurements 23 7 / 8 " (606 mm) 21 5 / 8 " (549 mm) Approx. 46" (1,168.4 mm) 1 11 / 16 " (39 mm) 23 3 / 8 " (594 mm) 21 7 / 8 " (556 mm) 38 3 / 8 " (974 mm) ...
Installation Manual Bosch HMD8451UC


Bosch Microwaves Manuals
-
 Bosch BEL523MS0
Manual
Bosch BEL523MS0
Manual
-
 Bosch BEL554MS0
Manual
Bosch BEL554MS0
Manual
-
 Bosch BEL554MS0A
User Manual
Bosch BEL554MS0A
User Manual
-
 Bosch BEL634GS1
Manual
Bosch BEL634GS1
Manual
-
 Bosch BEL653MB3A
User Manual
Bosch BEL653MB3A
User Manual
-
 Bosch BFL524MB0
Manual
Bosch BFL524MB0
Manual
-
 Bosch FEL053MS2A
User Manual
Bosch FEL053MS2A
User Manual
-
 Bosch HMB50152UC
User Manual
Bosch HMB50152UC
User Manual
-
Bosch HMB50152UC
Installation Manual
-
 Bosch HMB57152UC
User Manual
Bosch HMB57152UC
User Manual
-
Bosch HMB57152UC
Installation Manual
-
Bosch HMB57152UC
Manual
-
 Bosch HMC54151UC
User Manual
Bosch HMC54151UC
User Manual
-
Bosch HMC54151UC
Installation Manual
-
Bosch HMC54151UC
Manual
-
 Bosch HMC80152UC
User Manual
Bosch HMC80152UC
User Manual
-
Bosch HMC80152UC
Installation Manual
-
Bosch HMC80152UC
Manual
-
 Bosch HMC80242UC
User Manual
Bosch HMC80242UC
User Manual
-
Bosch HMC80242UC
Installation Manual