Page 3 - Contents
Contents Introduction ..............................................................4 Use .....................................................................4Insure your machine ..........................................4Important Information .........................................4Good Service ...
Page 4 - IntRoDUCtIon; Read and make sure you understand the
IntRoDUCtIon 4 Congratulations Thank you for purchasing a BlueBird lawn care product. Through your confidence in us, you have chosen an exceptionally high quality product.This manual is a valuable document. It describes your new BlueBird machine. Read the manual carefully before attempting to use th...
Page 5 - symbols anD DeCals; Decals
symbols anD DeCals 5 Used in this publication to notify the reader of a risk of personal injury , particularly if the reader DOES NOT follow the instructions given in the manual. Used in this publication to notify the reader of a risk of material damage , particularly if the reader DOES NOT follow t...
Page 6 - Decal Locations
symbols anD DeCals 6 Decal Locations 5 6 7 8 9 2 4 1 DANGER watch your feet 1. Warning for bagger 2. Caution graphics 3. Height setting 4. Warning for carbon monoxide 5. Seed application chart 6. Handle folding instructions 7. Seeder Dial 8. Open/Close (Seedbox) 9. 4 5 5 3
Page 7 - saFety; General Use; Read this manual carefully and make sure
saFety 7 General Use The object of this manual is to help you use your BlueBird machine safely and to give you information about how to maintain your machine. Please read the manual carefully before attempting to use the machine.If after reading the operator’s manual you are still unsure about the s...
Page 8 - Check that the machine is in serviceable condition; Maintenance; Maintenance Schedule; Preparations; Have first aid equipment at hand when using the
saFety 8 WARNING!The engine can become very hot. To avoid being burned, you must turn off the engine and wait until all parts have cooled before touching the engine. 8011-198 Check that the machine is in serviceable condition • prior to use; see the chapter Maintenance , Maintenance Schedule . Only ...
Page 9 - Operating; Do not use the machine on grades of more than
saFety 9 8011-041 The engine exhaust is poisonous. Never run the engine indoors. 8011-091 Keep your hands and feet away from moving parts. WARNING!Engine exhaust, some of its constituents and certain vehicle components contain or emit chemicals considered to cause cancer, birth defects or other repr...
Page 10 - Children
saFety 10 Movement/Transport To turn and steer the machine, press down on the • handle and turn on the back wheels.Turn off the engine and allow it to cool at least two • minutes before transport.Collapse the handle if the machine is equipped • with a collapsible handle.Be careful and use safe lifti...
Page 11 - Fuel System; Only store fuel in containers approved for that
saFety 11 Fuel System Only store fuel in containers approved for that • purpose.Never remove the fuel cap and fill the fuel tank • when the engine is running.Always stop the engine when refueling. • Do not smoke when filling the gasoline tank and • do not pour gasoline in the vicinity of sparks or o...
Page 12 - Never make adjustments with the engine running.
saFety 12 8011-027 Disconnect the spark plug cable before repair work. Maintenance Never make adjustments with the engine running. • Disengage the drive units, shut off the engine and • wait until all moving parts come to a complete stop before making adjustments, performing maintenance or cleaning ...
Page 13 - Engine Oil
13 assembly/ContRols Rotate the handle and tighten it in place. 1. Fill the engine with the manufacturer- 2. recommended oil. See section Lubrication, Engine Oil . Test the clutch. Make sure that the clutch 3. expansion spring disengages 6.35 mm (¼") easily. The engine RPM is preset by the manuf...
Page 14 - ContRols
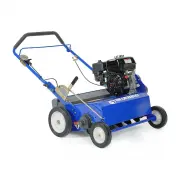
ContRols 14 The dethatcher is available in two basic designs 18" and 22" widths.The machine is equipped with a Briggs & Stratton, four-cycle engine. The 22" dethatcher can be equipped with a catcher. It is available as an accessory at your BlueBird dealer. The 22" dethatcher can ...
Page 15 - Cutting Unit; Depth Lever; Set blade or tine; Delta Blades; Set blades to penetrate the soil to; Engine; Refer to your engine manual.; Fueling
ContRols 15 Cutting Unit Depth Lever Use the depth lever to raise and lower the blades between working and transport position. The depth lever has a lock-out bolt that should be left in until the blades wear down. Then move the bolt to a lower hole to allow the blades to penetrate the soil. Flail Bl...
Page 16 - Cutting Blades; Flail Blades; NOTE: Do not use spring tines with bagger
ContRols 16 Cutting Blades Flail Blades Thatch is the dense layer of clippings, roots and stems that forms between the soil and the base of the grass. As thatch builds up, it prevents water, air and fertilizer from being absorbed into the soil. This causes shallow root development leading to vulnera...
Page 17 - opeRatIon; Seed Application; Preparing the Lawn; Aerate the lawn with a core-type ground aerator.; Seed Application Chart; For best results, sow in two directions with a 45°; Bagger Attachment and Removal
opeRatIon 17 Seed Application Preparing the Lawn Cut the grass to approximately ½" (1-1.5 cm) lower 1. than you normally would.Do not water before sowing. 2. Remove the layer of old grass cuttings (thatch). 3. Aerate the lawn with a core-type ground aerator. 4. Fertilize the lawn. 5. Seed Applic...
Page 18 - Before Starting; Starting
opeRatIon 18 IMPORTANT INFORMATIONClear the lawn of any debris.Clearly mark rocks and other fixed objects.Be especially sure to check for hidden electrical cables or similar in the surface of the lawn. Before Starting Mow the lawn ½" shorter than normal. • Allow the lawn to dry. Wet conditions c...
Page 19 - maIntenanCe; For those points
maIntenanCe 19 WARNING!No service operations may be performed on the engine or unit unless:The machine is securely parked where it will not tip or begin rolling.The engine is stopped.The ignition cable has been removed from the spark plug. 1) First change after 20 hours. 2) In dusty conditions maint...
Page 20 - Drive Belt; When checking the drive belt, allow the engine to; Check the belt for cracks, heat damage or worn
maIntenanCe 20 Drive Belt When checking the drive belt, allow the engine to 1. cool.Remove the spark plug cable. 2. Remove the belt guard (see illustration) on the left 3. side of the machine.Check that the belt is running in the proper track; 4. the pulleys should guide the belt in a straight line....
Page 21 - Flail blades
maIntenanCe 21 1 2 3 Flail blades Wear/Rotation/Replacing After you have used your dethatcher for some time, the blades will begin to wear on the striking edge. When this happens, their dethatching performance will diminish. A new combing edge may be obtained by rotating the entire rotor shaft assem...
Page 22 - Replacing worn flail blades; Allow the engine to cool.
maIntenanCe 22 Replacing worn flail blades Allow the engine to cool. 1. Disconnect the spark plug. 2. Tip the machine forward; see 3. Two Minute Rule in this section. Remove e-rings (locking washer type) that hold 4. the blade shaft (2) in place (see the illustration).Inspect the blade shafts and re...
Page 23 - Two Minute Rule; no longer than 2; Cleaning and Washing; pressure when cleaning
maIntenanCe 23 Spring tines Wear/Replacing Over time and due to wear, the tines will diminish in length. When the tines can no longer be adjusted to comb ¼" (6 mm) into the soil, the tines must be replaced.Spring tines can be replaced without removing the rotor shaft by using a ½" socket wre...
Page 24 - lUbRICatIon; Lubrication Schedule; Check engine oil daily, change every six months
lUbRICatIon 24 3 1 2 3 Stop the engine and remove the ignition cable before attempting to lubricate the machine.Wipe away excessive grease after lubrication. It is important to avoid getting lubricant on the belt or the drive surfaces on the belt pulleys. Should this happen, attempt to clean them wi...
Page 25 - tRoUblesHootInG; Symptom
tRoUblesHootInG 25 Symptom Cause Action Engine will not start User error Fuel valve closed. Open the fuel valve. Choke valve open Close the choke with cold engine. Engine switch in OFF position Turn the engine switch to ON Fuel system Fuel tank empty Fill with fuel Machine stored without observing p...
Page 26 - stoRaGe; Winter storage; Lubrication; Service
stoRaGe 26 WARNING!Never store an engine with fuel in the tank indoors or in poorly ventilated spaces where fuel vapor can come in contact with open flame, sparks or a pilot light such as in a boiler, hot water tank, clothing drier, etc.Han dle the fuel with caution. It is very flammable and careles...
Page 27 - teCHnICal Data
teCHnICal Data 27 *The power rating of the engines indicated is the average net power output (at specified rpm) of a typical production engine for the engine model measured to SAE standard J1349/ISO1585. Mass production engines may differ from this value. Actual power output for the engine installed...
Page 29 - seRVICe JoURnal; Action; Delivery Service; Check the machine for damage in transport.; After the first 20 hours
29 seRVICe JoURnal Action Date, stamp, signature Delivery Service Check the machine for damage in transport. q Where applicable, assembly accompanying components. q Check that the machine design corresponds to the customer order. q Check that the right amount of oil is in the engine and transmission...