Page 2 - Content
Content SPECIFICATION...............................................................................................................................................1 WARNING..................................................................................................................................
Page 4 - Warning
Warning 1. Read these Instructions - All the safety and operating instructions should be read before this product is operated.2. Keep these Instructions - The safety and operating instructions should be retained for future reference.3. Heed all Warnings - All warnings on the appliance and in the ope...
Page 5 - Safety Instructions
Please read and understand all the warnings provided below, as well as and those marked on the unit. This unit has been designed and manufactured to assure personal Only use power source that is specified in the User Manual or on the system. Keep the unit and power plug away from water. Avoid placin...
Page 6 - Installation diagram; Please install the machine as below (do not connect to power):
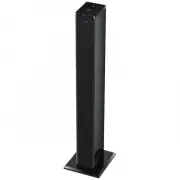
4 Base plate The tower Fix the Screws Screw washers Installation diagram Please install the machine as below (do not connect to power): Please remove the protective film before use.
Page 7 - Panel Controls; PANELS
Panel Controls PANELS USB PORT FAST FORWARD STANDBY FAST REWIND PLAY/PAUSE STOP PREVIOUS VOLUME -/+ NEXT SOURCE 5 NFC SENSOR R L AUDIO IN AUDIO IN FM AUDIO INPUT L/R AUDIO IN SOCKET FM ANTENNA POWER SWITCH POWER INPUT
Page 8 - Remote control
STANDBY USB AUDIO FM FAST FORWARD PLAY/PAUSE REPEAT DISPLAY MONO/STEREO MUTE NUMBER BUTTONS FREQUENCY PREVIOUS SAVE VOLUME+ VOLUME- FAST REWIND SEARCH NEXT BLUETOOTH 9 DISPLAY STOP Remote control 1. Align the remote control directly at the remote control sensor of the device (beside 2. The range of ...
Page 9 - Basic Operation
Basic Operation PREPARATION 1) Before the unit is turned on, please check if all the connections are right and safe. Then connect the main power. 2) Press the POWER ON/OFF button on the back panel to turn on the main power. 3) Press the STANDBY button to turn on the unit or to the standby mode. FAST...
Page 10 - FM operation
FM operation 1.2. Press SOURCE button or FM button to enter FM mode. 3. Extend the antenna as far as it can to get the best reception. 4. Press MO/ST button on remote control to turn on or off the stereo. If the reception is not good enough, it can turn on the stereo. The range of FM frequency is fr...
Page 11 - Bluetooth operation; BLUETOOTH PAIRING
Bluetooth operation BLUETOOTH PAIRING 1. Put the Bluetooth device (e.g. smart phone) within the 10m Bluetooth search range. Then turn on the Bluetooth function on the phone.2. Press BLUETOOTH button on remote or press SOURCE button on the panel to enter Bluetooth mode. The indicator flashes blue qui...
Page 12 - Audio operation; Disc Player
Audio operation Before connecting with the music devices, pay attention to the picture below.1. Each connection must be safe and firm. Disconnect the power cable before you have finished all the connections.2. The unit can connect with the Disc player/MP3 player/Smart phone/Computer or other music d...
Page 13 - USB connection; USB OPERATION
USB connection USB OPERATION 1. Insert USB stick to the USB port to connect with this unit.2. Press SOURCE button or USB button to enter USB mode. 3. Once the unit detects the USB stick, it starts playing music automatically.4. Please refer to BASIC OPERATION for playback control. Note: 1. Depending...
Page 14 - the nearest maintenance center.; Trouble shooting; The product can not be turned on; * Make sure you have turn ON the switch on the back of your product.; The remote control does not work; * The batteries are not inserted correctly.; NFC does not work
For your convenience, we have listed some methods to solve common problems you may encounter when you use the system. If the problem occurs repeatedly, contact the nearest maintenance center. Trouble shooting The product can not be turned on * Make sure you have turn ON the switch on the back of you...
Page 15 - Important information; Correct disposal of this product
Important information Correct disposal of this product Old appliances must be collected separately in order to optimize the recovery and recycling of the materials they contain, and reduce the impact on human health and the environment. The crossed out “wheeled bin” symbol reminds you of your obliga...