Page 2 - BLACKVUE; For manuals, customer support and FAQs go to
BLACKVUE DR590X-1CH For manuals, customer support and FAQs go to www.blackvue.com Руководства, служба технической поддержки и часто задаваемые вопросы представлены на сайте www.blackvue.com
Page 3 - Important safety information; The data can be damaged or malfunctions may occur.
Important safety information For user safety and to avoid property damage, read through this manual and follow these safety instructions to use the product correctly. y Do not disassemble, repair, or modify the product yourself. Doing so may cause fire, electric shock, or malfunction. For internal i...
Page 4 - FCC Compliance Information; Reorient or relocate the receiving antenna.
FCC Compliance Information This equipment has been tested and found to comply with the limits for a Class B digital device, pursuant to Part 15 of the FCC Rules. These limits are designed to provide reasonable protections against harmful interference in a residential installation. This equipment gen...
Page 5 - All elec trical and elec tronic produc ts should be disposed of
CAUTION Any changed or modifications in construction of this device which are not expressly approved by the party responsible for compliance could void the user’s authority to operate the equipment. There is a risk of explosion if the battery is replaced by an incorrect type.Dispose of used batterie...
Page 6 - ICC Compliance; undesired operation of the device.
ICC Compliance This Class [B] digital apparatus complies with Canadian ICES-003. This radio transmitter has been approved by Industry Canada to operate with the antenna types listed below with the maximum permissible gain and required antenna impedance for each antenna type indicated. Antenna types ...
Page 7 - In the box
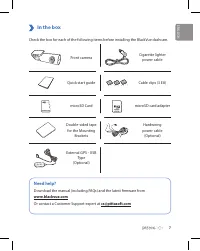
7 In the box Check the box for each of the following items before installing the BlackVue dashcam. Front camera Cigarette lighter power cable Quick start guide Cable clips (3 EA) microSD Card microSD card adapter Double-sided tape for the Mounting Brackets Hardwiring power cable (Optional) External ...
Page 8 - At a glance; The following diagrams explain each part of the BlackVue dashcam.; Front camera
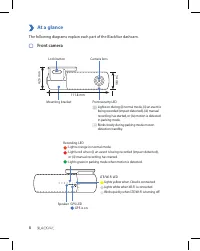
8 At a glance The following diagrams explain each part of the BlackVue dashcam. Front camera 34 mm Camera lens Mounting bracket Front security LED : Lights on during (i) normal mode, (ii) an event is being recorded (impact detected), (iii) manual recording has started, or (iv) motion is detected in ...
Page 10 - Install and power up; Warning
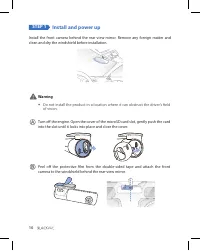
10 STEP 1 Install and power up Install the front camera behind the rear view mirror. Remove any foreign matter and clean and dry the windshield before installation. Warning y Do not install the product in a location where it can obstruct the driver's field of vision. Turn off the engine. Open the co...
Page 11 - for Hardwiring Power Cable setup.
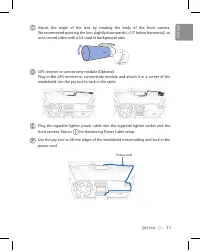
11 Adjust the angle of the lens by rotating the body of the front camera. We recommend pointing the lens slightly downwards (≈10° below horizontal), so as to record video with a 6:4 road to background ratio. GPS receiver or connectivity module (Optional):Plug in the GPS receiver or connectivity modu...
Page 12 - e (Optional) uses the automotive battery to; Note
12 Turn on the engine. The BlackVue dashcam will power up and start recording. Video files are stored on the microSD card. Turn off the engine. The dashcam will automatically stop recording and power down. To record in parking mode while the engine is off please connect the Hardwiring Power Cable (O...
Page 13 - Connect the GND cable to metal ground bolt.
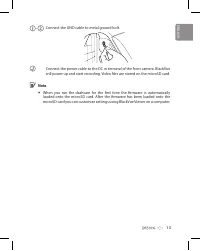
13 - Connect the GND cable to metal ground bolt. Connect the power cable to the DC in terminal of the front camera. BlackVue will power up and start recording. Video files are stored on the microSD card. Note y When you run the dashcam for the first time the firmware is automatically loaded onto the...
Page 14 - Playback; Playing video files on your; smartphone; “Pair” your smartphone with the BlackVue dashcam via direct Wi-Fi:; Settings; then select
14 STEP 2 Playback Playing video files on your smartphone (Android/iOS) Search for the BlackVue app in the Google Play Store or Apple App Store and install it on your smartphone. “Pair” your smartphone with the BlackVue dashcam via direct Wi-Fi: (i) Press the Wi-Fi button once to turn on Wi-Fi.(ii) ...
Page 15 - Select the video file you want to play from the video list.
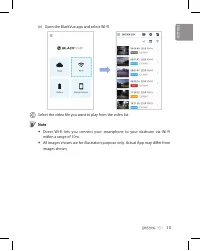
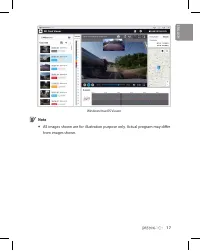
15 (v) Open the BlackVue app and select WI-FI. Select the video file you want to play from the video list. Note y Direct Wi-Fi lets you connect your smartphone to your dashcam via Wi-Fi within a range of 10m. y All images shown are for illustration purpose only. Actual App may differ from images sho...
Page 16 - computer; Remove the microSD card from the dashcam.; Downloads; and install it on your computer.
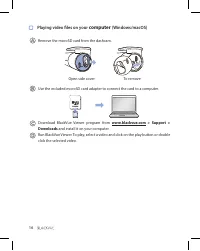
16 Playing video files on your computer (Windows/macOS) Remove the microSD card from the dashcam. Open side cover To remove Use the included microSD card adapter to connect the card to a computer. Download BlackVue Viewer program from www.blackvue.com > Support > Downloads and install it on yo...
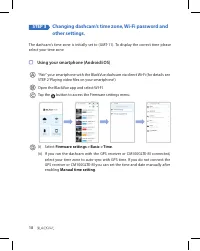
Page 18 - Tap the button to access the Firmware settings menu.; Manual time setting
18 STEP 3 Changing dashcam's time zone, Wi-Fi password and other settings. The dashcam's time zone is initially set to (GMT-11). To display the correct time please select your time zone. Using your smartphone (Android/iOS) “Pair” your smartphone with the BlackVue dashcam via direct Wi-Fi (for detail...
Page 20 - button to open the BlackVue settings panel.; Time zone setting; If you do not connect the GPS receiver or CM100GLTE-M:
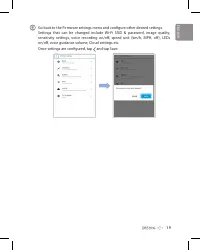
20 Changing the dashcam's time zone and other firmware settings on your computer (Windows/macOS) Run BlackVue Viewer program after connecting dashcam's microSD card to your computer. Click on the button to open the BlackVue settings panel. Settings Settings that can be changed include Wi-Fi SSID &am...
Page 22 - Register
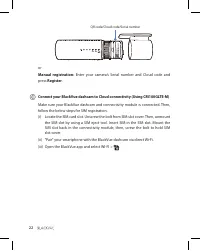
22 QR code/Cloud code/Serial number or Manual registration: Enter your camera’s Serial number and Cloud code and press Register . Connect your BlackVue dashcam to Cloud connectivity (Using CM100GLTE-M) Make sure your BlackVue dashcam and connectivity module is connected. Then, follow the below steps...
Page 23 - menu to use BlackVue Cloud Lite Service features.; Cloud Manual from
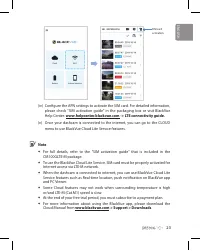
23 SIM card activation (iv) Configure the APN settings to activate the SIM card. For detailed information, please check "SIM activation guide" in the packaging box or visit BlackVue Help Center: www.helpcenter.blackvue.com -> LTE connectivity guide. (v) Once your dashcam is connected to t...
Page 24 - Tips for optimal performance; BlackVue Windows Viewe; Customer Support
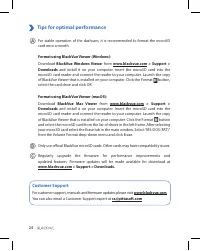
24 Tips for optimal performance For stable operation of the dashcam, it is recommended to format the microSD card once a month. Format using BlackVue Viewer (Windows): Download BlackVue Windows Viewe r from www.blackvue.com > Support > Downloads and install it on your computer. Insert the micr...
Page 25 - Product specifications:
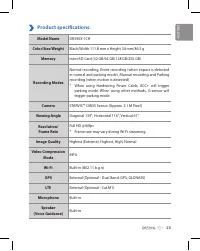
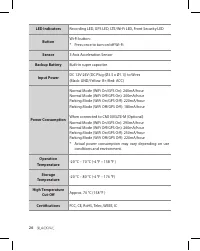
25 Product specifications: Model Name DR590X-1CH Color/Size/Weight Black/Width 111.8 mm x Height 34 mm/86.3 g Memory microSD Card (32 GB/64 GB/128 GB/256 GB) Recording Modes Normal recording, Event recording (when impact is detected in normal and parking mode), Manual recording and Parking recording...
Page 27 - Adaptive Format Free File Management System
27 Software BlackVue Viewer* Windows 7 or higher and Mac Yosemite OS X (10.10) or higher Application BlackVue Application (Android 5.0 or higher, iOS 9.0 or higher) Others Adaptive Format Free File Management System * STARVIS is a trademark of Sony Corporation. ENGLISH
Page 28 - Комплектация изделия; В помощь пользователю
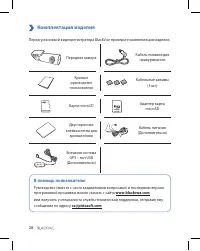
28 Комплектация изделия Перед установкой видеорегистратора BlackVue проверьте комплектацию изделия. Передняя камера Кабель питания для прикуривателя Краткое руководство пользователя Кабельные зажимы (3 шт.) Карта microSD Адаптер карты microSD Двусторонняя клейкая лента для кронштейнов Кабель питания...
Page 29 - Внешний вид; Передняя камера
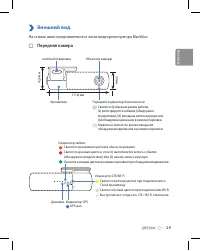
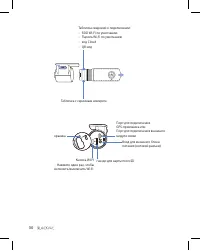
29 Внешний вид На схемах ниже представлены все части видеорегистратора BlackVue. Передняя камера 34 мм Объектив камеры Кронштейн Передний индикатор безопасности : Светится: (i) обычный режим работы, (ii) регистрируется событие (обнаружено воздействие), (iii) запущена запись вручную или (iv) обнаруже...
Page 31 - Установка и подключение питания; Внимание
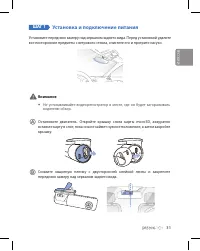
31 ШАГ 1 Установка и подключение питания Установите переднюю камеру над зеркалом заднего вида. Перед установкой удалите все посторонние предметы с ветрового стекла, очистите его и протрите насухо. Внимание y Не устанавливайте видеорегистратор в месте, где он будет загораживать водителю обзор. Остано...
Page 32 - , чтобы подключить силовой
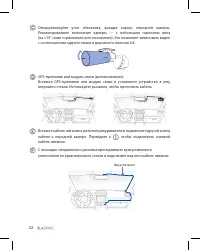
32 Откорректируйте угол объектива, вращая корпус передней камеры. Рекомендованное положение камеры — с небольшим наклоном вниз (на ≈10° ниже горизонтального положения). Это позволяет записывать видео с соотношением заднего плана и дорожного полотна 6:4. GPS-приемник или модуль связи (дополнительно):...
Page 33 - руководству владельца транспортного средства.
33 Запустите двигатель. Видеорегистратор BlackVue включится и начнет запись. Файлы видеозаписи сохраняются на карте microSD. Остановите двигатель. Видеорегистратор автоматически остановит запись и выключится. Чтобы сделать запись в режиме парковки, когда двигатель выключен, подключите силовой кабель...
Page 35 - Воспроизведение; Воспроизведение файлов видеозаписи на; смартфоне; Hастройки; в вашем смартфоне, выберите
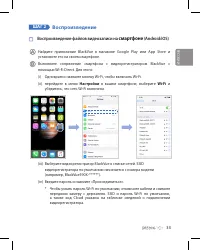
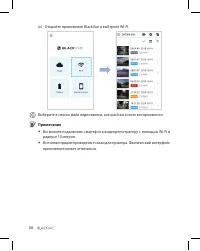
35 ШАГ 2 Воспроизведение Воспроизведение файлов видеозаписи на смартфоне (Android/iOS) Найдите приложение BlackVue в магазине Google Play или App Store и установите его на своем смартфоне.Выполните сопряжение смартфона с видеорегистратором BlackVue с помощью Wi-Fi Direct. Для этого:(i) Однократно на...
Page 36 - Примечание
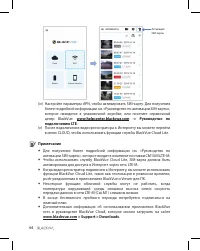
36 (v) Откройте приложение BlackVue и выберите WI-FI. Выберите в списке файл видеозаписи, который вы хотите воспроизвести. Примечание y Вы можете подключить смартфон к видеорегистратору с помощью Wi-Fi в радиусе 10 метров. y Все иллюстрации приведены только для примера. Фактический интерфейс приложе...
Page 37 - Воспроизведение видеозаписей на; ПК; Извлеките карту microSD из видеорегистратора.
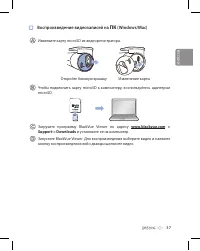
37 Воспроизведение видеозаписей на ПК (Windows/Mac) Извлеките карту microSD из видеорегистратора. Откройте боковую крышку Извлечение карты Чтобы подключить карту microSD к компьютеру, воспользуйтесь адаптером microSD. Загрузите программу BlackVue Viewer по адресу www.blackvue.com > Support > D...
Page 39 - Изменение часового пояса видеорегистратора,; Откройте приложение BlackVue и выберите WI-FI.; Настройка времени вручную
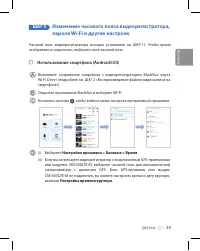
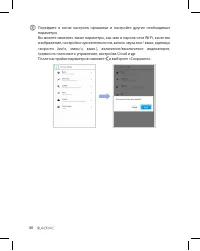
39 ШАГ 3 Изменение часового пояса видеорегистратора, пароля Wi-Fi и других настроек. Часовой пояс видеорегистратора исходно установлен на GMT-11. Чтобы время отображалось корректно, выберите свой часовой пояс. Использование смартфона (Android/iOS) Выполните сопряжение смартфона с видеорегистратором ...
Page 41 - компьютере; , чтобы открыть панель; Настройка часового пояса
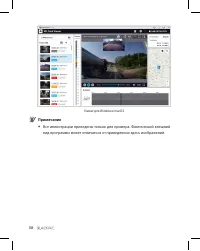
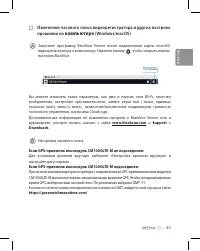
41 Изменение часового пояса видеорегистратора и других настроек прошивки на компьютере (Windows/macOS) Запустите программу BlackVue Viewer после подключения карты microSD видеорегистратора к компьютеру. Нажмите кнопку , чтобы открыть панель настроек BlackVue. Настройки Вы можете изменять такие парам...
Page 42 - Подключение к BLACKVUE CLOUD (опционально)
42 ШАГ 4 Подключение к BLACKVUE CLOUD (опционально) Вы можете пропустить этот шаг, если у вас нет модуля связи BlackVue, а также если вы не хотите использовать службу BLACKVUE CLOUD Lite.Если у вас есть модуль связи BlackVue (CM100GLTE-M), вы можете использовать приложение BlackVue, чтобы подключить...
Page 43 - Регистрация
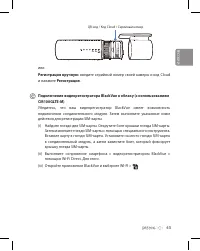
43 QR-код / Код Cloud / Серийный номер или Регистрация вручную: введите серийный номер своей камеры и код Cloud и нажмите Регистрация . Подключение видеорегистратора BlackVue к облаку (с использованием CM100GLTE-M) Убедитесь, что ваш видеорегистратор BlackVue имеет возможность подключения соединител...
Page 44 - подключению LTE; Для получения более подробной информации см. «Руководство по
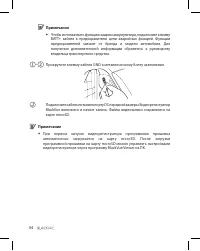
44 Активация SIM-карты (iv) Настройте параметры APN, чтобы активировать SIM-карту. Для получения более подробной информации см. «Руководство по активации SIM-карты», которое находится в упаковочной коробке, или посетите справочный центр BlackVue: www.helpcenter.blackvue.com -> Руководство по подк...
Page 45 - Советы по оптимизации производительности; BlackVue Windows Viewer; Техническая поддержка
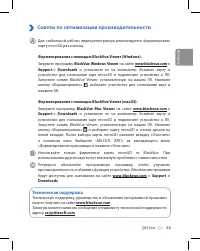
45 Советы по оптимизации производительности Для стабильной работы видеорегистратора рекомендуется форматировать карту microSD раз в месяц. Форматирование с помощью BlackVue Viewer (Windows): Загрузите программу BlackVue Windows Viewer на сайте www.blackvue.com > Support > Downloads и установит...
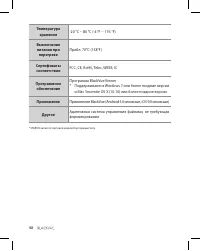
Page 46 - Технические характеристики устройства:; По диагонали 139°, по горизонтали 116°, по вертикали 61°
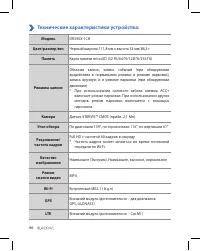
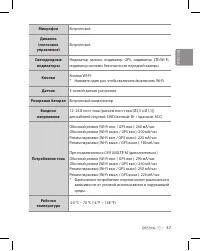
46 Технические характеристики устройства: Модель DR590X-1CH Цвет/размер/вес Черный/ширина 111,8 мм x высота 34 мм/86,3 г Память Карта памяти microSD (32 Гб/64 Гб/128 Гб/256 Гб) Режимы записи Обычная запись, запись событий (при обнаружении воздействия в нормальном режиме и режиме парковки), запись вр...
Page 49 - Notes
Page 50 - Product Warranty
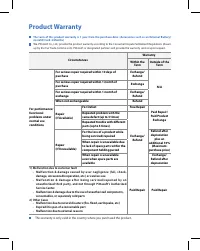
Product Warranty The term of this product warranty is 1 year from the purchase date. (Accessories such as an External Battery/ microSD Card: 6 Months) We, PittaSoft Co., Ltd., provide the product warranty according to the Consumer Dispute Settlement Regulations (drawn up by the Fair Trade Commission...
Page 51 - Гарантия
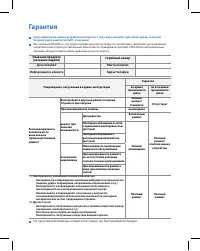
Гарантия Срок гарантии на данное устройство составляет 1 год с даты покупки. (для аксессуаров, таких как батарея/карта памяти microSD: 6 месяцев) Мы, компания PittaSoft Co., Ltd, предоставляем гарантию на продукт в соответствии с правилами урегулирования потребительских споров (составленными Комисси...
Page 52 - Headquarter
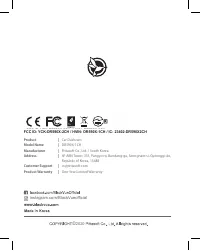
DR750X-2CH © 2020 DR750X-2CH instagram.com/BlackVueofficial ABN Tower 4F, 331, Pangyo-ro, Bundang-gu, Seongnam-si, Gyeonggi-do, Republic of Korea, 13499 Headquarter FCC ID: YCK-DR750X-2CH / HVIN : DR750X-2CH FCC ID: YCK-DR590X-2CH / HVIN: DR590X-1CH / IC: 23402-DR590X2CH Product | Car Dashcam Model ...