Page 4 - TA B L E O F CO N T E N T S; D A N G E R; S A F E T Y A L E R T K E Y; R E G I S T E R YO U R; C O N T E N T S
TA B L E O F CO N T E N T S It is the consumer’s responsibility to see that the unit is properly assem- bled, installed, and maintained. Failure to follow the instructions in this manual could result in bodily injury and/or property damage. ! D A N G E R Indicates an imminently hazardous situation w...
Page 5 - O U R C US TO M E R
TA B L E O F CO N T E N T S It is the consumer’s responsibility to see that the unit is properly assem- bled, installed, and maintained. Failure to follow the instructions in this manual could result in bodily injury and/or property damage. ! D A N G E R Indicates an imminently hazardous situation w...
Page 6 - F O R YO U R S A F E T Y; GENER AL SAFE T Y; P R E C AU T I O N S; W A R N I N G; This appliance is not; Do not use for purposes
If grease or other hot material drips from appliance onto valve, hose or regulator: S T E P 0 1 Turn off gas supply immediately. S T E P 0 2 Determine the cause and correct it. S T E P 0 3 Clean and inspect valve, hose and regulator before continuing. S T E P 0 4 Perform a leak test. (Please referen...
Page 7 - Poultry; NEVER partially cook meat
If grease or other hot material drips from appliance onto valve, hose or regulator: S T E P 0 1 Turn off gas supply immediately. S T E P 0 2 Determine the cause and correct it. S T E P 0 3 Clean and inspect valve, hose and regulator before continuing. S T E P 0 4 Perform a leak test. (Please referen...
Page 8 - GRIDDLE SAFE T Y INSTRUCTIONS; T U R N I N G G R I D D L E O F F
• Maximum weight on side shelf (if present) is 10 lbs. • The grease tray must be removed and emptied after each use. • Do not remove grease tray until griddle has completely cooled. • Do not obstruct the flow of combustion and ventilation air. • Clean griddle often, prefer- ably after each use. (Ple...
Page 10 - A S SE M B LY G U I D E; E X P LO D E D V I E W
A S SE M B LY G U I D E E X P LO D E D V I E W PARTS QTY 1.1a Bottom Panel 1 1.1b Right Panel 1 1.1c Left Panel 1 1.1d Back Panel 1 1.2a Baffle Panel 1 1.2b Background Panel 1 PARTS QTY 1.2c Front Panel 1 1.3a Control Knob 1 1.3b Zinc Tapping Screw 2 1.3c Knob Bezel 1 1.4 Gas Rail 1 1.5a Ignition Ne...
Page 11 - I L LUS T R AT E D PA R T S L I S T
I L LUS T R AT E D PA R T S L I S T 1 Body (1 piece) 2 Griddle Top with Hood (1 piece) 3 Side Shelf (1 piece) 4 Handle (1 piece) 5 Legs (1 piece) 6 Regulator (1 piece) 7 Grease cup (1 piece) NOT INCLUDED - LP Gas Bottle PARTS QTY 2.2 Hood 1 2.3 Hood Washers 2 2.4 Cap Nuts 2 2.5 Rotation Shafts 2 2.6...
Page 12 - A S S E M B LY I N S T R U C T I O N S; it is advised to
! W A R N I N G The manufacturer has made every effort to eliminate any sharp edges. However, you should handle all compo- nents with care to avoid accidental injury.Some parts may contain sharp edges, especially as noted in these instruc- tions. Wear protective gloves if necessary. ! W A R N I N G T...
Page 17 - GRIDDLE COOKING SURFACE:; This may cause warping.; C A U T I O N; the griddle’s seasoning.; Proceed to
S TO R I N G YO U R G R I D D L E Store griddle in a cool, dry loca- tion. Always cover griddle if stored outdoors. Choose from a variety of griddle covers offered by Blackstone. When protecting griddle with soft cover, use the “tenting” method to prevent water from accumulating on griddle top. “Ten...
Page 18 - The LP gas supply cylinder; PR O PA N E B OT T L E; OZ LIQUID PROPANE BOT TLE
D I S C O N N E C T I N G T H E 1 6 . 4 OZ L P B OT T L E S T E P 0 1 Griddle must be off and cool. S T E P 0 2 Disconnect regulator from the gas line by unscrewing the collar. S T E P 0 3 Unscrew LP bottle from the regulator. L P ( L I Q U E F I E D P E T R O L E U M G A S ) LP gas is nontoxic, odo...
Page 19 - Return bottle to
D I S C O N N E C T I N G T H E 1 6 . 4 OZ L P B OT T L E S T E P 0 1 Griddle must be off and cool. S T E P 0 2 Disconnect regulator from the gas line by unscrewing the collar. S T E P 0 3 Unscrew LP bottle from the regulator. L P ( L I Q U E F I E D P E T R O L E U M G A S ) LP gas is nontoxic, odo...
Page 20 - CA R E & M A I N T E N A N C E; GENER AL CARE; VA LV E C H E C K; G E N E R A L C L E A N I N G
CA R E & M A I N T E N A N C E Regularly clean your appliance between uses, especially after extended periods of storage. In order to extend the life and condition of unit, follow best practices detailed in this manual. Section 01 GENER AL CARE ! W A R N I N G When not in use, turn unit controls...
Page 21 - A clogged burner; a concentrated cleaner on; Damage to and; B U R N E R M A I N T E N A N C E; A F T E R E AC H US E; STAINLESS STEEL SURFACES:; S TO R AG E
! W A R N I N G A clogged burner tube can lead to a fire beneath the appliance. ! C A U T I O N DO NOT use Citrisol, abra- sive cleaners, de-greasers or a concentrated cleaner on plastic parts. Damage to and failure of parts may result. B U R N E R M A I N T E N A N C E In most circumstances, burnin...
Page 22 - GRIDDLE SE ASONING INSTRUCTIONS; V I D E O T U TO R I A L
Section 02 GRIDDLE SE ASONING INSTRUCTIONS For best results, we recommended seasoning the griddle before cooking on griddle top. S T E P 0 1 Make sure griddle top is wiped clean of debris. (Please reference the Cleaning Your Griddle section) Blackstone griddle tops are pre-treated with soy oil as a ...
Page 23 - may; W H Y D O I N E E D TO; Blackstone Seasoning and; G R I D D L E T R O U B L E S H O OT I N G; SYMPTOMS
Section 02 GRIDDLE SE ASONING INSTRUCTIONS For best results, we recommended seasoning the griddle before cooking on griddle top. S T E P 0 1 Make sure griddle top is wiped clean of debris. (Please reference the Cleaning Your Griddle section) Blackstone griddle tops are pre-treated with soy oil as a ...
Page 24 - CLE ANING THE BURNER ASSEMBLY; Additional Methods Include:
Section 03 CLE ANING THE BURNER ASSEMBLY Unit burners vary, however these instructions apply to all units. Clean burner assembly and check burner for damage. If any large cracks or holes are found, replace burner. S T E P 0 1 Turn gas OFF at control knobs and gas supply. Remove griddle top. S T E P ...
Page 25 - B U R N E R F L A M E C H E C K; com/blackstonegriddles; M ATC H L I G H T I N G
Section 03 CLE ANING THE BURNER ASSEMBLY Unit burners vary, however these instructions apply to all units. Clean burner assembly and check burner for damage. If any large cracks or holes are found, replace burner. S T E P 0 1 Turn gas OFF at control knobs and gas supply. Remove griddle top. S T E P ...
Page 26 - CLE ANING YOUR GRIDDLE; C L E A N I N G T H E G R I D D L E C O O K I N G SU R FAC E; DO NOT USE MORE THAN TWO
Section 04 CLE ANING YOUR GRIDDLE S T E P 0 1 To clean griddle after each use, cool griddle below 300° F. Scrape food debris with spatula or straight metal scraper. C L E A N I N G T H E G R I D D L E C O O K I N G SU R FAC E S T E P 0 2 Wipe down griddle surface with paper towel. S T E P 0 3 Divide...
Page 27 - S TO R I N G YO U R
Section 04 CLE ANING YOUR GRIDDLE S T E P 0 1 To clean griddle after each use, cool griddle below 300° F. Scrape food debris with spatula or straight metal scraper. C L E A N I N G T H E G R I D D L E C O O K I N G SU R FAC E S T E P 0 2 Wipe down griddle surface with paper towel. S T E P 0 3 Divide...
Page 28 - I G N I T I O N |; G R I D D L E O P E R AT I N G I N S T R U C T I O N S
S T E P 0 1 Make sure LP tank is properly connected to unit. Turn gas ON at LP cylinder by taking 20 seconds to turn knob halfway. ! W A R N I N G Do not lean over griddle while lighting. ! W A R N I N G If ignition does NOT occur in 5 seconds, turn burner controls OFF, wait 5 minutes and repeat lig...
Page 29 - T R O U B L E S H O OT I N G; PIE ZO-ELECTRIC IGNITION
S T E P 0 1 Make sure LP tank is properly connected to unit. Turn gas ON at LP cylinder by taking 20 seconds to turn knob halfway. ! W A R N I N G Do not lean over griddle while lighting. ! W A R N I N G If ignition does NOT occur in 5 seconds, turn burner controls OFF, wait 5 minutes and repeat lig...
Page 30 - GRIDDLE GAS FLOW
Section 02 GRIDDLE GAS FLOW SYMPTOMS 01. A flame is coming out of the air gate. SYMPTOMS 01. Burner flames are yellow or irregular. POSSIBLE CAUSES SOLUTION 01. Something is blocking the venturi in the burner tube. This is not allowing the propane to flow through the burner, causing the flame to bac...
Page 31 - B U R N E R F L A M E
Section 02 GRIDDLE GAS FLOW SYMPTOMS 01. A flame is coming out of the air gate. SYMPTOMS 01. Burner flames are yellow or irregular. POSSIBLE CAUSES SOLUTION 01. Something is blocking the venturi in the burner tube. This is not allowing the propane to flow through the burner, causing the flame to bac...
Page 32 - N O R T H AT L A N T I C I M P O R T S L LC
Q. What types of cooking oils can I use to season my griddle? A. We recommend the following oils for seasoning purposes: olive oil, vegetable oil, canola oil, coconut oil, flax seed oil and sesame oil. (Please reference the Griddle Seasoning Instructions section of the Care & Maintenance chapter...
Page 37 - STATION DE
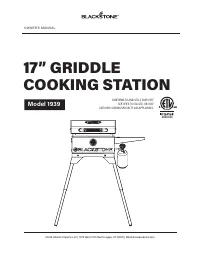
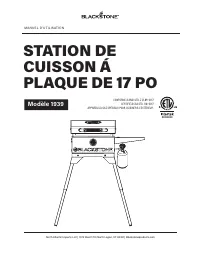
North Atlantic Imports LLC | 1073 West 1700 North Logan, UT 84321 | Blackstoneproducts.com MANUEL D ’UTILISATION 5003433 STATION DE CUISSON Á PLAQUE DE 17 PO Modèle 1939
Page 38 - SI VOUS SENTEZ DU
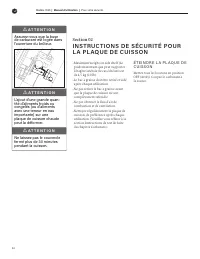
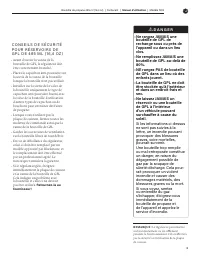
! D A N G E R En cas d’incendie, éloi- gnez-vous de l’appareil et appelez immédiatement votre service d’incendie. N’essayez pas d’éteindre un feu d’huile ou de graisse avec de l’eau. ! D A N G E R • Cet appareil est destiné à un usage extérieur uniquement et ne doit pas être utilisé dans un bâtiment...
Page 40 - TA B L E D E S M AT I È R E S; M E S S AG E S R E L AT I F S À; E N R E G I S T R E R VOT R E; C O N T E N U
TA B L E D E S M AT I È R E S Il incombe au consommateur de s’assurer que l’unité est correctement assemblée, installée et entretenue. Si vous ne suivez pas les instruc-tions de ce manuel, vous risquez des blessures corporelles et/ou des dégâts matériels. ! D A N G E R Indique une situation extrêmem...
Page 41 - N OT R E P E R S O N N E L D U
TA B L E D E S M AT I È R E S Il incombe au consommateur de s’assurer que l’unité est correctement assemblée, installée et entretenue. Si vous ne suivez pas les instruc-tions de ce manuel, vous risquez des blessures corporelles et/ou des dégâts matériels. ! D A N G E R Indique une situation extrêmem...
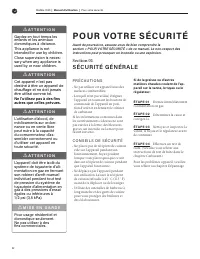
Page 42 - P O U R VOT R E S É CU R I T É; SÉCURITÉ GÉNÉR ALE; Cet appareil n’est pas; Ne l’utilisez pas à des fins
P R É C AU T I O N S D E S É C U R I T É LO R S D E L’ I N S TA L L AT I O N Cet appareil est certifié pour une utilisation aux États-Unis et au Canada. Ne pas modifier pour une utilisation dans un autre pays. Toute modification entraînerait un risque pour la sécurité. Utilisez cet appareil, tel qu’...
Page 44 - É T E I N D R E L A P L AQ U E D E; A T T E N T I O N
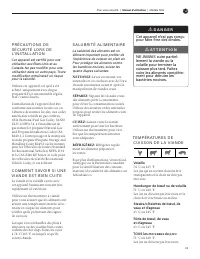
• Maximum weight on side shelf (Le poids maximum que peut supporter l’étagère latérale (le cas échéant) est de 4,5 kg (10 lb). • Le bac à graisse doit être retiré et vidé après chaque utilisation. • Ne pas retirer le bac à graisse avant que la plaque de cuisson ne soit complètement refroidie. • Ne p...
Page 46 - G U I D E D E M O N TAG E; V U E É C L AT É E
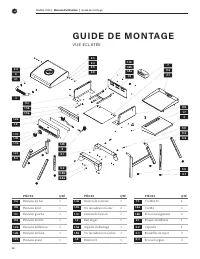
G U I D E D E M O N TAG E V U E É C L AT É E PIèCES QTÉ 1.1a Panneau du bas 1 1.1b Panneau droit 1 1.1c Panneau gauche 1 1.1d Panneau arrière 1 1.2a Panneau déflecteur 1 1.2b Panneau de fond 1 1.2c Panneau avant 1 PIèCES QTÉ 1.3a Bouton de controle 1 1.3b Vis taraudeuse en zinc 2 1.3c Lunette de bou...
Page 47 - L I S T E D E S P I È C E S I L LUS T R É E S
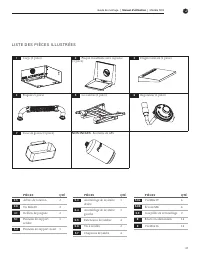
L I S T E D E S P I È C E S I L LUS T R É E S 1 Corps (1 pièce) 2 Plaque chauffante avec capuche (1 pièce) 3 Étagère latérale (1 pièce) 4 Poignée (1 pièce) 5 Les jambes (1 pièce) 6 Régulateur (1 pièce) 7 Tasse de graisse (1 pièce) NON INCLUS - Bouteille de GPL PIèCES QTÉ 2.5 Arbres de rotation 2 2.6...
Page 48 - I N S T R U C T I O N S D E M O N TAG E
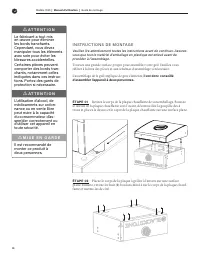
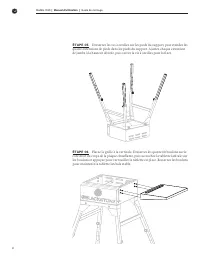
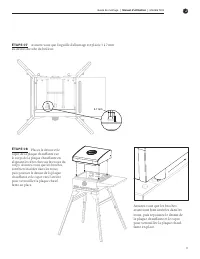
! A T T E N T I O N Le fabricant a tout mis en œuvre pour éliminer les bords tranchants. Cependant, vous devez manipuler tous les éléments avec soin pour éviter les blessures accidentelles. Certaines pièces peuvent comporter des bords tran- chants, notamment celles indiquées dans ces instruc- tions....
Page 53 - quer une déformation.; M I S E E N G A R D E; nera l’apprêtage de la
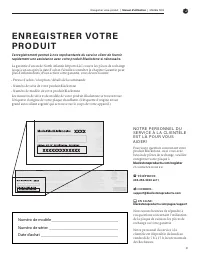
BESOIN D’AIDE? Enregistrez votre produit Blackstone sur blackstoneproducts.com/register et contactez le service client Blackstone pour les questions manquantes sur les pièces, l’assemblage et le fonctionnement: TÉLÉPHONE: 435-252-3030 ext 1 COURRIEL: [email protected] EN LIGNE: blackstoneproducts....
Page 54 - G P L ( G A Z D E; E X I G E N C E S R E L AT I V E S; CA R B U R A N T |; BOUTEILLE DE PROPANE LIQUIDE DE; La bouteille d’alimentation
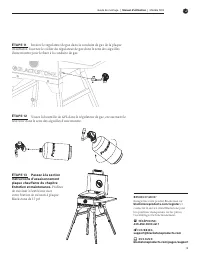
D É C O N N E X I O N D E L A B O U T E I L L E D E G P L D E 4 8 5 M L (1 6, 4 OZ ) É TAPE 01 La plaque de cuisson doit être éteinte et froide. É TAPE 02 Débranchez le régula- teur de la conduite de gaz en dévissant le collet. É TAPE 03 Dévissez la bouteille de GPL du régulateur. G P L ( G A Z D E ...
Page 56 - ENTRE TIEN GÉNÉR AL
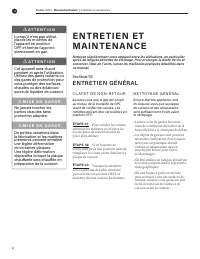
E N T R E T I E N E T M A I N T E N A N C E Nettoyez régulièrement votre appareil entre les utilisations, en particulier après de longues périodes de stockage. Pour prolonger la durée de vie et conserver l’état de l’unité, suivez les meilleures pratiques détaillées dans ce manuel. Section 01 ENTRE T...
Page 58 - peuvent avoir besoin
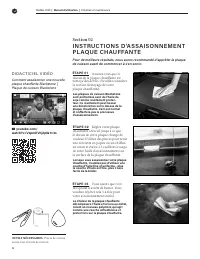
Section 02 INSTRUCTIONS D’ASSAISONNEMENT PL AQUE CHAUFFANTE Pour de meilleurs résultats, nous avons recommandé d’apprêter la plaque de cuisson avant de commencer à s’en servir. OUTILS NÉCESSAIRES : Pinces de cuisine, essuie-tout et huile de cuisson D I D AC T I C I E L V I D É O Comment assaisonner ...
Page 60 - NE T TOYAGE DU BRÛLEUR; V É R I F I C AT I O N D E L A; I N S T R U C T I O N S P O U R
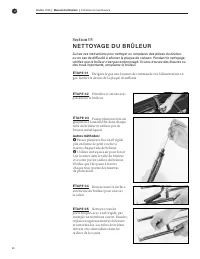
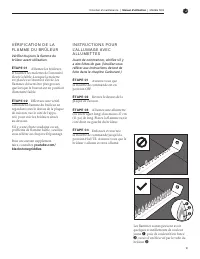
Section 03 NE T TOYAGE DU BRÛLEUR Suivez ces instructions pour nettoyer ou remplacer des pièces du brûleur, ou en cas de difficulté à allumer la plaque de cuisson. Pendant le nettoyage, vérifiez que le brûleur n’est pas endommagé. Si vous trouvez des fissures ou des trous importants, remplacez le brû...
Page 62 - NE T TOYAGE DE VOTRE PL AQUE; S TO C K AG E D E V OT R E
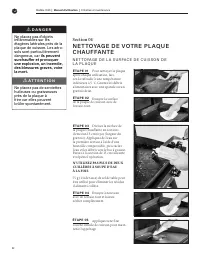
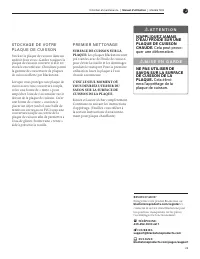
N E T TOYAG E D E L A SU R FAC E D E C U I S S O N D E L A P L AQ U E Section 04 NE T TOYAGE DE VOTRE PL AQUE CHAUFFANTE ! D A N G E R Ne placez pas d’objets inflammables sur les étagères latérales près de la plaque de cuisson. Les aéro- sols sont particulièrement dangereux, car ils peuvent surchauff...
Page 64 - PI É ZO - É L E C T R I Q U E; F O N C T I O N N E M E N T D E L A P L AQ U E C H AU F FA N T E
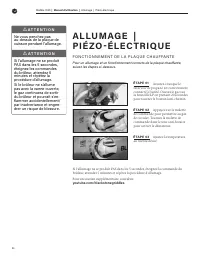
É TAPE 01 Assurez-vous que le réservoir de propane est correctement connecté à l’unité. Ouvrez le gaz sur la bouteille LP en prenant 20 secondes pour tourner le bouton à mi-chemin. A L LU M AG E | PI É ZO - É L E C T R I Q U E ! A T T E N T I O N Ne vous penchez pas au-dessus de la plaque de cuisson...
Page 65 - D É PA N N AG E; DÉPANNAGE DE L’ALLUMAGE
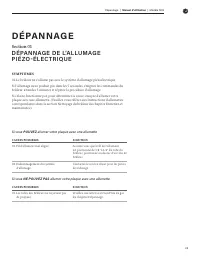
É TAPE 01 Assurez-vous que le réservoir de propane est correctement connecté à l’unité. Ouvrez le gaz sur la bouteille LP en prenant 20 secondes pour tourner le bouton à mi-chemin. A L LU M AG E | PI É ZO - É L E C T R I Q U E ! A T T E N T I O N Ne vous penchez pas au-dessus de la plaque de cuisson...
Page 67 - M O D È L E D E F L A M M E D E
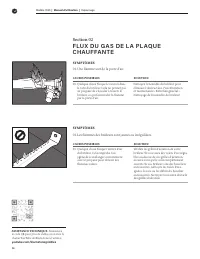
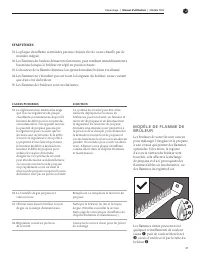
Section 02 FLUX DU GAS DE L A PL AQUE CHAUFFANTE ASSISTANCE TECHNIQUE. Numérisez le code QR pour plus de vidéos ou visitez la chaîne YouTube de Blackstone à l’adresse youtube.com/blackstonegriddles CAUSES POSSIBLES SOLUTION 01. Quelque chose bloque le venturi dans le tube du brûleur. Cela ne permet ...
Page 68 - G A R A N T I E D ’ U N A N D E N O R T H
Q. Quels types d’huiles de cuisson puis-je utiliser pour apprêter ma plaque de cuisson? R. Nous recommandons les huiles suivantes pour l’apprêtage : huile d’olive, huile végétale, huile de canola, huile de coco, huile de graines de lin et huile de sésame. (Veuillez vous référer à la section Instruct...
Page 73 - ESTACIÓN DE
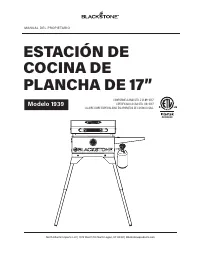
North Atlantic Imports LLC | 1073 West 1700 North Logan, UT 84321 | Blackstoneproducts.com MANUAL DEL PROPIE TARIO 5003433 ESTACIÓN DE COCINA DE PLANCHA DE 17” Modelo 1939
Page 76 - TA B L A D E CO N T E N I D O; P E L I G R O; L L AV E D E A L E R TA D E; R E G I S T R E S U; C O N T E N I D O
TA B L A D E CO N T E N I D O Es responsabilidad del consumidor asegurarse de que la unidad esté correctamente ensamblada, instalada y mantenida. El incumplimiento de las instrucciones de este manual puede provocar lesiones corpo-rales y / o daños a la propiedad. ! P E L I G R O Indica una situación...
Page 77 - PR E G U N TA S; ¡ N U E S T R O P E R S O N A L D E
TA B L A D E CO N T E N I D O Es responsabilidad del consumidor asegurarse de que la unidad esté correctamente ensamblada, instalada y mantenida. El incumplimiento de las instrucciones de este manual puede provocar lesiones corpo-rales y / o daños a la propiedad. ! P E L I G R O Indica una situación...
Page 78 - P O R S U S E G U R I DA D; SEGURIDAD GENER AL; A D V E R T E N C I A; Este aparato no está; No lo utilice para fines
P R E C AU C I O N E S • No utilice este aparato bajo superfi- cies combustibles elevadas. • Cuando no esté en uso, APAGUE el artefacto girando las perillas de control del artefacto a la posición APAGADO y cerrando la válvula de combustible. Si no se sigue exactamente la información en las declaraci...
Page 80 - A PAG A D O D E L A
• El peso máximo en el estante lateral (si está presente) es de 4.5 kg (10 lb). • La bandeja de grasa debe retirarse y vaciarse después de cada uso. • No retire la bandeja de grasa hasta que la plancha se haya enfriado completamente. • No obstruya el flujo de aire de combustión y ventilación. • Limp...
Page 82 - G U Í A D E M O N TA J E; V I S TA E N D E S P I E C E O R D E N A D O
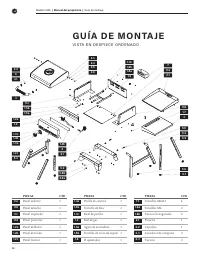
G U Í A D E M O N TA J E V I S TA E N D E S P I E C E O R D E N A D O PIEZAS CTD 1.1a Panel inferior 1 1.1b Panel derecho 1 1.1c Panel izquierdo 1 1.1d Panel posterior 1 1.2a Panel deflector 1 1.2b Panel de fondo 1 1.2c Panel frontal 1 PIEZAS CTD 1.3a Perilla de control 1 1.3b Tornillo de Zinc 2 1.3...
Page 83 - L I S TA D E P I E Z A S I LUS T R A D A
L I S TA D E P I E Z A S I LUS T R A D A 1 Cuerpo (1 pieza) 2 Plancha con capucha (1 pieza) 3 Estante lateral (1 pieza) 4 Manejar (1 pieza) 5 Legado (1 pieza) 6 Regulador (1 pieza) 7 Vaso de grasa (1 pieza) NO INCLUIDO - Botella de gas LP PIEZAS CTD 2.5 Ejes de rotación 2 2.6 Tornillos M6x20 2 4.1 M...
Page 84 - I N S T R U C C I O N E S D E M O N TA J E
! A D V E R T E N C I A El fabricante ha hecho todo lo posible para eliminar los bordes afilados. Sin embargo, debe manejar todos los componentes con cuidado para evitar lesiones accidentales. Algunas partes pueden contener bordes afilados, especialmente como se indica en estas instruc- ciones. Use ...
Page 89 - A L M AC E N A R SU PA R R I L L A; L A P R I M E R A L I M P I E Z A; causar deformaciones.; P R E C A U C I Ó N; curado de la plancha.
¿NECESITA AYUDA? Registre su producto Blackstone en blackstoneproducts.com/register y comuníquese con el Servicio al cliente de Blackstone si tiene preguntas sobre piezas faltantes, ensamblaje y operación: TELÉFONO: 435-252-3030 ext 1 CORREO ELECTRÓNICO: [email protected] EN LÍNEA: blackstoneprodu...
Page 90 - BOTELL A DE PROPANO LÍQUIDO DE; El cilindro de suministro
D E S C O N E C TA R L A B OT E L L A D E L P D E 1 6 . 4 OZ PAS O 0 1 La plancha debe estar apagada y fría. PAS O 0 2 Desconecte el regulador de la línea de gas desatornillando el cuello. PAS O 0 3 Desatornille la botella de LP del regulador. L P ( G A S D E P E T R Ó L E O L I C UA D O ) El gas LP...
Page 92 - CUIDADO GENER AL; NUNCA manipule piezas; Se pueden
C U I DA D O Y M A N T E N I M I E N TO Limpie regularmente su electrodoméstico entre usos, especialmente después de largos períodos de almacenamiento. Para extender la vida útil y las condiciones de la unidad, siga las mejores prácticas detalladas en este manual. Sección 01 CUIDADO GENER AL C O N T...
Page 93 - D E S P U É S D E C A D A US O; A L M AC E N A M I E N TO
M A N T E N I M I E N TO D E Q U E M A D O R E S En la mayoría de las veces, quemar los residuos después de la cocción mantendrá el quemador limpio. • Asegúrese de que el flujo de aire de combustión y ventilación no esté obstruido. • El quemador debe retirarse y limpi- arse anualmente o siempre que ...
Page 94 - pueden requerir condi-; SOLUCIÓN DE PROBLEMAS DE LA PLANCHA; ¿ Q U É AC E I T E E S M E J O R
Sección 02 INSTRUCCIONES DE CUR ACIÓN DE L A PL ANCHA Para obtener los mejores resultados, recomendamos curar la plancha antes de cocinar en la parte superior de la plancha. HERRAMIENTAS NECESARIAS: Pinzas de cocina, toallas de papel y aceite de cocina V I D E O T U TO R I A L Cómo sazonar una nueva...
Page 96 - C O N T R O L D E L L A M A D E L; I N S T R U C C I O N E S D E
Sección 03 LIMPIE Z A DEL CONJUNTO DEL QUEMADOR Siga estas instrucciones para limpiar y/o reemplazar pieza del conjunto del quemador o si tiene problemas para encender la plancha. Mientras limpia, revise el quemador para detectar daños. Si encuentra grietas u orificios grandes, reemplace el quemador...
Page 98 - LIMPIANDO SU PL ANCHA; L I M P I E Z A D E L A SU P E R F I C I E D E C O C C I Ó N
Sección 04 LIMPIANDO SU PL ANCHA L I M P I E Z A D E L A SU P E R F I C I E D E C O C C I Ó N D E L A P L A N C H A ! P E L I G R O No coloque artículos inflam- ables en estantes laterales cerca de la plancha. Los contenedores de aerosol son particularmente peligrosos porque pueden sobrecalentarse y...
Page 100 - F U N C I O N A M I E N TO D E P L A N C H A
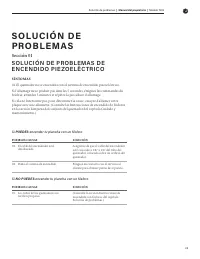
E N C E N D I D O | PI E ZO E L Ë C T R I CO F U N C I O N A M I E N TO D E P L A N C H A Para un encendido y funcionamiento correctos de la plancha, siga los pasos a continuación. Si no se produce el encendido, apague el gas girando la perilla en sentido horario y repita las instrucciones de encend...
Page 101 - S O LU C I Ó N D E; SOLUCIÓN DE PROBLEMAS DE
E N C E N D I D O | PI E ZO E L Ë C T R I CO F U N C I O N A M I E N TO D E P L A N C H A Para un encendido y funcionamiento correctos de la plancha, siga los pasos a continuación. Si no se produce el encendido, apague el gas girando la perilla en sentido horario y repita las instrucciones de encend...
Page 102 - FLUJO DE GAS DE L A PL ANCHA
Sección 02 FLUJO DE GAS DE L A PL ANCHA SÍNTOMAS 01. Una llama sale de la puerta de aire. SÍNTOMAS 01. Las llamas de los quemadores son amarillas o irregulares. SOPORTE TÉCNICO. Escanee el código QR para ver más videos o visite el canal de Blackstone en YouTube en youtube.com/ blackstonegriddles POS...
Page 103 - PAT R Ó N D E L L A M A D E
Sección 02 FLUJO DE GAS DE L A PL ANCHA SÍNTOMAS 01. Una llama sale de la puerta de aire. SÍNTOMAS 01. Las llamas de los quemadores son amarillas o irregulares. SOPORTE TÉCNICO. Escanee el código QR para ver más videos o visite el canal de Blackstone en YouTube en youtube.com/ blackstonegriddles POS...