Page 2 - SAFETY GUIDELINES - DEFINITIONS; IMPORTANT SAFETY; WARNING; READ ALL INSTRUCTIONS; AVOID DANGEROUS ENVIRONMENT.
SAFETY GUIDELINES - DEFINITIONS It is important for you to read and understand this manual. Theinformation it contains relates to protecting YOUR SAFETY andPREVENTING PROBLEMS. The symbols below are used to helpyou recognize this information. DANGER: Indicates an imminently hazardous situation which...
Page 3 - OUTDOOR USE EXTENSION CORDS
persons in the work area. Also use a hard hat, hearing protection,gloves, safety shoes and dust collection systems when specifiedor required. Safety glasses or the like are available at extra cost atyour local dealer or Black & Decker Service Center. • DON’T ABUSE CORD. Never carry appliance by ...
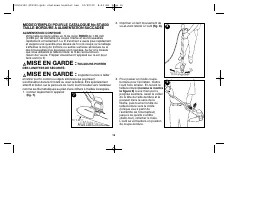
Page 4 - SAVE THESE INSTRUCTIONS; ASSEMBLY INSTRUCTIONS; figure 1
IMPORTANT WARNINGS FOR STRING TRIMMERS 1. Use the proper size and type of cutting line. Do not use metal wire, rope or the like. Do not use cutting line heavier than thatrecommended by the manufacturer. See the accessory section ofthis manual for more detailed information about the propercutting lin...
Page 5 - figure 4; LINE FEED; ALWAYS USE EYE PROTECTION.
DO NOT INSERT THE ENDS OFTHE EDGE GUIDE INTO THEFAN HOLES AS SHOWN INFIGURE 2A. 4. Remove the guard attachment screw from the guard. Slip theguard onto the trimmer housingand lineup the screw hole in theguard with the screw hole in thehousing (figure 3) . 5. Insert the guard attachment screw to secu...
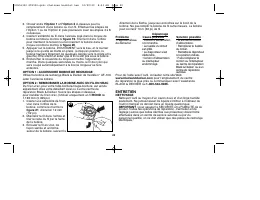
Page 10 - FULL TWO YEAR WARRANTY; Free warning label replacement:; MAINTENANCE; CLEANING; ACCESSORIES; SERVICE INFORMATION; Troubleshooting
replacement parts, contact the Black & Decker location nearestyou. To find your local service location, refer to the yellow pagedirectory under "Tools—Electric" or call: 1-800-544-6986. FULL TWO YEAR WARRANTY Black & Decker (U.S.) Inc. warrants this product for two yearsagainst any d...
Page 11 - Si la réponse est introuvable ou en l’absence d’accès à Internet,; CONSERVER CE MANUEL POUR UN USAGE ULTERIEUR.; VOICI DES RENSEIGNEMENTS IMPORTANTS A; • Fixer le protecteur avant dʼutiliser le coupe-bordure.; MODE D’EMPLOI
11 Merci d’avoir choisi Black & Decker! Consulter le site Web www.BlackandDecker.com/NewOwner pour enregistrer votre nouveau produit. A LIRE AVANT DE RETOURNER CE PRODUIT POUR QUELQUE RAISON QUE CE SOIT : Si des questions ou des problèmes surgissent après l’achat d’un produit Black & Decker,...
Page 14 - MESURES DE SÉCURITÉ RELATIVES AUX; CONSERVER CES MESURES.; DIRECTIVES DE MONTAGE
14 AVERTISSEMENT : CORDONS DE RALLONGE PRÉVUS POUR L’EXTÉRIEUR. Afin de minimiser les risques de secousses électriques, ne se servir que dʼun cordonde rallonge conçu pour lʼextérieur et portant une des mentionssuivantes : SW-A, SOW-A, STW-A, STOW-A, SJW-A, SJOW-A,SJTW-A ou SJTOW-A. • RÉPARATIONS ET ...
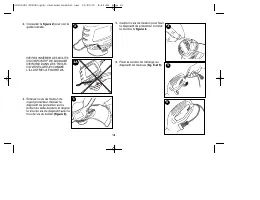
Page 15 - figure 2
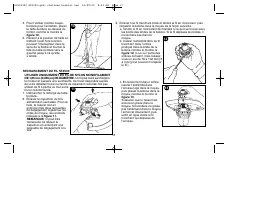
15 3. Consulter la figure 2 pour voir le guide installé. NE PAS INSÉRER LES BOUTSDU DISPOSITIF DE GUIDAGEDE BORD DANS LES TROUSDU VENTILATEUR COMMELʼILLUSTRE LA FIGURE 2A. 4. Enlever la vis de fixation du capot protecteur. Glisser ledispositif de protection sur leboîtier du taille-bordure et aligner...
Page 16 - ALIMENTATION CONTINUE; ROND
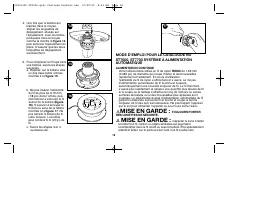
16 MODE D’EMPLOI POUR LE CATALOGUE No ST4500 TAILLE-BORDURE À ALIMENTATION SACCADÉE ALIMENTATION CONTINUE Votre taille-bordure utilise un fil de nylon ROND de 1,65 mm (0,065 po) de diamètre qui coupe lʼherbe et les broussaillesrapidement et facilement. Le fil tranchant sʼusera plus rapidementet exig...
Page 20 - ENTRETIEN; Dépannage
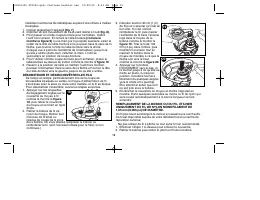
20 3. Choisir entre l’Option 1 et l’Option 2 ci-dessous pour le remplacement dʼune bobine ou dʼun fil. Effectuer les étapes delʼOption 1 ou de lʼOption 2, puis poursuivre avec les étapes 4 à 6ci-dessous. 4. Insérer lʼextrémité du fil dans lʼanneau logé dans le moyeu de bobine comme le montre la figu...
Page 22 - para registrar su nuevo producto.; LEA EL MANUAL ANTES DE DEVOLVER; Si tiene una consulta o algún inconveniente con su producto; CONSERVE ESTE MANUAL PARA FUTURAS CONSULTAS.; INFORMACION CLAVE QUE USTED; • Coloque la guarda antes de recortar u orillar.; MANUAL DE INSTRUCCIONES
22 Gracias por elegir Black & Decker! Visite www.BlackandDecker.com/NewOwner para registrar su nuevo producto. LEA EL MANUAL ANTES DE DEVOLVER ESTE PRODUCTO POR CUALQUIER MOTIVO: Si tiene una consulta o algún inconveniente con su producto Black & Decker, visite HTTP://WWW.BLACKANDDECKER.COM/...
Page 23 - EVITE CONDICIONES AMBIENTALES PELIGROSAS.; PAUTAS DE SEGURIDAD/DEFINICIONES; ADVERTENCIAS E
23 • compuestos en insecticidas, herbicidas y pesticidas• arsénico y cromo de madera tratada químicamente Para reducir su exposición a estos químicos, utilice equipo deseguridad aprobado como máscaras contra polvo diseñadasespecíficamente para filtrar partículas microscópicas. ADVERTENCIA: Emplee la...
Page 25 - ADVERTENCIAS IMPORTANTES PARA; CONSERVE ESTAS INSTRUCCIONES; INSTRUCCIONES DE ENSAMBLAJE; figura 1
25 ADVERTENCIA: PARA EXTENSIONES PARA INTEMPERIE. Para reducir los riesgos de choque eléctrico, únicamente utilice extensiones fabricadas para trabajo a laintemperie, como los tipos SW-A, SOW-A, STW-A, STOW-A, SJW-A, SJOW-A, SJTW-A o SJTOW-A. • REPARACIONES Y SERVICIO. Las reparaciones, el mantenimi...
Page 26 - figura 4; ALIMENTACIÓN DE LA CUERDA; REDONDA
26 NO INSERTE LOS EXTREMOSDE LA GUÍA PARA BORDESDENTRO DE LOS ORIFICIOSDEL VENTILADOR COMO SEMUESTRA EN LA FIGURA 2A. 4. Retire del protector el tornillo que lo sostiene. Deslice el protectoren la cubierta de la podadora yalinee el orificio para el tornillo enel protector con el orificio para eltorn...
Page 28 - figura
28 CUERDA DE RECARGA ST4500 UTILICE SOLAMENTE CUERDA DE MONOFILAMENTO DE NAILON DE 1,65 mm (0,065 pulg.) DE DIÁMETRO. Una cuerda más pesada sobrecargará el motor y provocará sobrecalentamiento. Puede conseguir esta cuerda a través de su distribuidor local o centro de mantenimiento autorizado. No use...
Page 34 - PRODUCT INFOMATION ·
34 · GARANTÍA BLACK & DECKER · BLACK & DECKER WARRANTY. SOLAMENTE PARA PROPOSITOS DE MEXICO Distributor Name · Sello firma del distribuidor Date of purchase · Fecha de compra Invoice No. · No. de factura PRODUCT INFOMATION · IDENTIFICACION DEL PRODUCTO Cat. No. · Catalogo ó Modelo Serial Num...
Page 35 - Vea “Herramientas
35 2 AÑOS DE GARANTIA Este producto cuenta con dos años de garantía a partir de lafecha de compra contra cualquier defecto de su funcionamiento,así como cualquier falla debido a materiales empleados para sufabricación ó mano de obra defectuosa.Nuestra garantía incluye la reparación o reposición del ...