Page 2 - PRODUCT REGISTRATION; SAFETY INFORMATION
Page 2 Thank you for purchasing our BLACK+DECKER product. This easy-to-use manual will guide you in getting the best use of your Beer Kegerator.Remember to record the model and serial numbers. They are on a label on the rear. Staple your receipt to your manual. You will need it to obtain warranty se...
Page 3 - correct electrical supply.; DANGER; WARNING; CAUTION
Page 3 SAFETY INFORMATION 1. Use this appliance only for its intended purpose as described in this operation manual. 2. This appliance must be properly installed in accordance with the installation instructions before it is used. See the installation section for more details. 3. This appliance must ...
Page 4 - SAVE THESE INSTRUCTIONS; HOUSEHOLD USE ONLY
Page 4 16. To reduce the risk of injury, do not allow children to play in or on the appliance. Close supervision is necessary when the appliance is used near children. 17. The appliance door must be closed during operation. Do not leave the door open when children are near the dispenser. 18. Do not ...
Page 5 - GAS WARNINGS
Page 5 SAFETY INFORMATION IMPORTANT SAFETY PRECAUTIONS OF CO2 (CARBON DIOXIDE) GAS WARNING 1. CO₂ gas can be dangerous! CO₂ cylinders contain high-pressure compressed gas, which can be hazardous if not handled properly. Make sure you read and understand all the procedures for the CO2 cylinders. 2. A...
Page 8 - PROPER LOCATION; USE OF EXTENSION CORDS; WARNING: RISK OF FIRE; ELECTRICAL REQUIREMENTS
Page 8 SET UP & USE PROPER LOCATION • To ensure that your beer kegerator works to the maximum efficiency it was designed for, keep it in a location where there is proper air circulation and electrical outlets. • Choose a location where the beer kegerator will be away from heat and will not be ex...
Page 9 - INSTALLATION GUIDE; This is very important!; Installing the Casters
Page 9 SET UP & USE INSTALLATION GUIDE Read the installation guide carefully to ensure you understand all instructions before installing the beer kegerator. If after completing the process you are still unsure whether the beer kegerator has been properly installed, we recommend that you contact ...
Page 10 - INSTALLING THE BEER TAP
Page 10 INSTALLING THE BEER TAP Follow the steps below to install the beer tap. • Place the beer tower rubber washer on top of the unit prior to installing the dispenser. (See illustration A) . • To install the dispenser, place it on top of the kegerator unit, and screw into place. Three screws are ...
Page 11 - INSTALLING THE GUARDRAIL; INSTALLING THE CO2 REGULATOR AND THE CO2 CYLINDER
Page 11 SET UP & USE INSTALLING THE GUARDRAIL Following these steps below to install the guardrail. 1. Place the guardrail on top of the cabinet. 2. Align all support feet of the guardrail with the holes on the top of the unit. INSTALLING THE CO2 REGULATOR AND THE CO2 CYLINDER Follow these steps...
Page 13 - TAPPING THE BEER KEGERATOR INSTALLING KEG TAP (SINGLE-
Page 13 SET UP & USE TAPPING THE BEER KEGERATOR INSTALLING KEG TAP (SINGLE- VALVE TYPE BARREL) Follow these steps below to tap the beer keg. 1. Make sure the black pull handle of the tap is in the closed (up) position before installing it on the kegerator (Fig.1 - below). Insert the keg coupler ...
Page 14 - OPERATING YOUR BEER KEGERATOR
Page 14 SET UP & USE OPERATING YOUR BEER KEGERATOR Dispensing Beer Follow the steps below to dispense beer. 1. Make sure that the beer kegerator is plugged in properly to a 115V, 60Hz, 1.1 Amps grounded AC power outlet. 2. Place the drip tray under the beer tap to avoid excessive beer stains. 3....
Page 15 - OPERATING THE UNIT AS A REFRIGERATOR
Page 15 SET UP & USE OPERATING THE UNIT AS A REFRIGERATOR 1. Make sure that the beer kegerator is plugged in properly to a 115V, 60Hz, 1.1 Amps grounded AC power outlet. 2. Adjust the temperature using the mechanical control dial. This unit can be programmed from 35.6 – 50.0 degrees Fahrenheit. ...
Page 16 - CLEANING AND CARE; PROTECTING YOUR INVESTMENT
Page 16 CLEANING AND CARE PROTECTING YOUR INVESTMENT Keeping your kegerator clean maintains appearance and prevents odor build-up. Wipe up any spills immediately and clean the kegerator at least twice a year. When cleaning, take the following precautions: WARNING: Always unplug the electrical power ...
Page 17 - IMPORTANT; DO NOT RETURN THIS PRODUCT TO THE STORE; If you have a problem with this product, please contact the
Page 17 TROUBLESHOOTING & WARRANTY BEFORE YOU CALL FOR SERVICE IF THE APPLIANCE FAILS TO OPERATE: A) Check to make sure that the kegerator/refrigerator is plugged in securely. If it is not, remove the plug from the outlet, wait 10 seconds and plug it in again securely. B) Check for a blown circu...
Page 18 - LIMITED WARRANTY
Page 18 LIMITED WARRANTY Any repair, replacement, or warranty service, and all questions about this product should be directed to W Appliance at 844-299-0879 from the USA or Puerto Rico. W Appliance warrants to the original purchaser that the product will be free from defects in material, parts and ...
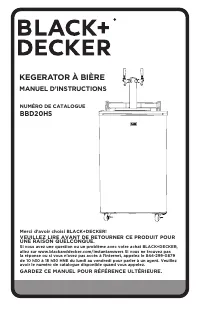
Page 21 - MANUEL D’INSTRUCTIONS; VEUILLEZ LIRE AVANT DE RETOURNER CE PRODUIT POUR; KEGERATOR À BIÈRE
Page 21 MANUEL D’INSTRUCTIONS Merci d’avoir choisi BLACK+DECKER! VEUILLEZ LIRE AVANT DE RETOURNER CE PRODUIT POUR UNE RAISON QUELCONQUE. Si vous avez une question ou un problème avec votre achat BLACK+DECKER, allez sur www.blackanddecker.com/instantanswers Si vous ne trouvez pas la réponse ou si vou...
Page 22 - ENREGISTREMENT DU PRODUIT; INFORMATIONS DE SÉCURITÉ
Page 22 Merci d’avoir acheté notre produit BLACK+DECKER. Ce manuel facile à utiliser vous guidera pour tirer le meilleur parti de votre Kegerator À Bière. N’oubliez pas d’enregistrer les numéros de modèle et de série. Ils sont sur une étiquette à l’arrière. Agrafez votre reçu à votre manuel. Vous en...
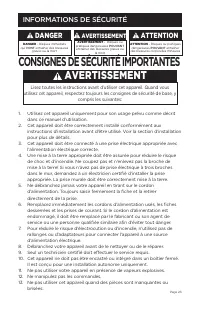
Page 23 - dans ce manuel d’utilisation.; compris les suivantes:; AVERTISSEMENT; CONSIGNES DE SÉCURITÉ IMPORTANTES
Page 23 INFORMATIONS DE SÉCURITÉ 1. Utilisez cet appareil uniquement pour son usage prévu comme décrit dans ce manuel d’utilisation. 2. Cet appareil doit être correctement installé conformément aux instructions d’installation avant d’être utilisé. Voir la section d’installation pour plus de détails....
Page 24 - GARDEZ CES INSTRUCTIONS; USAGE DOMESTIQUE UNIQUEMENT
Page 24 14. Ne pas utiliser cet appareil à des fins commerciales. 15. Cet appareil est conçu pour une utilisation à l’intérieur uniquement et ne doit pas être utilisé à l’extérieur. 16. Pour réduire le risque de blessure, ne laissez pas les enfants jouer dans ou sur l’appareil. Une surveillance étro...
Page 25 - AVERTISSEMENTS DE GAZ
Page 25 INFORMATIONS DE SÉCURITÉ PRÉCAUTIONS DE SÉCURITÉ IMPORTANTES POUR LE CO2 GAZ (DIOXYDE DE CARBONE) AVERTISSEMENT 1. Le gaz CO₂ peut être dangereux! Les cylindres de CO₂ contiennent du gaz comprimé à haute pression, qui peut être dangereux s’il n’est pas manipulé correctement. Assurez-vous de ...
Page 26 - CONFIGURATION ET UTILISATION; PIÈCES ET CARACTÉRISTIQUES
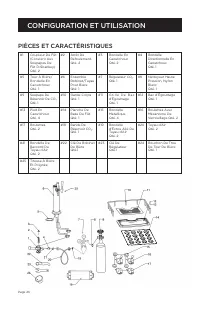
Page 26 CONFIGURATION ET UTILISATION PIÈCES ET CARACTÉRISTIQUES #1 Coupleur De Fût (Convient Aux Soupapes De Fût D-Shankey) Qté. 2 #2 Arrêt De Refoulement. Qté. 2 #3 Rondelle En Caoutchouc Qté. 2 #4 Rondelle Directionnelle En Caoutchouc Qté. 1 #5 Tour À Bière/ Rondelle En Caoutchouc Qté. 1 #6 Ensemb...
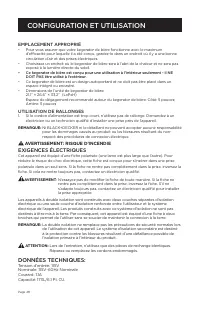
Page 28 - EMPLACEMENT APPROPRIÉ; UTILISATION DE RALLONGES; AVERTISSEMENT: RISQUE D’INCENDIE; EXIGENCES ÉLECTRIQUES
Page 28 CONFIGURATION ET UTILISATION EMPLACEMENT APPROPRIÉ • Pour vous assurer que votre kegerator de bière fonctionne avec le maximum d’efficacité pour laquelle il a été conçu, gardez-le dans un endroit où il y a une bonne circulation d’air et des prises électriques. • Choisissez un endroit où le k...
Page 29 - Installation des Roulettes
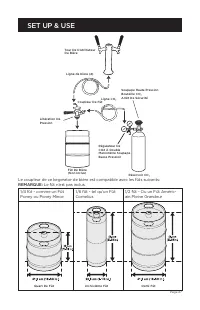
Page 29 CONFIGURATION ET UTILISATION GUIDE D’INSTALLATION Lisez attentivement le guide d’installation pour vous assurer de comprendre toutes les instructions avant d’installer le kegerator de bière. Si après avoir terminé le processus, vous n’êtes toujours pas sûr que le kegerator de bière a été cor...
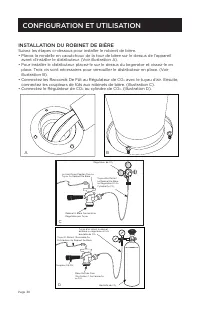
Page 30 - INSTALLATION DU ROBINET DE BIÈRE
Page 30 INSTALLATION DU ROBINET DE BIÈRE Suivez les étapes ci-dessous pour installer le robinet de bière. • Placez la rondelle en caoutchouc de la tour de bière sur le dessus de l’appareil avant d’installer le distributeur. (Voir illustration A). • Pour installer le distributeur, placez-le sur le de...
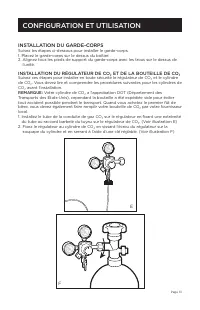
Page 31 - INSTALLATION DU GARDE-CORPS; INSTALLATION DU RÉGULATEUR DE CO2 ET DE LA BOUTEILLE DE CO2
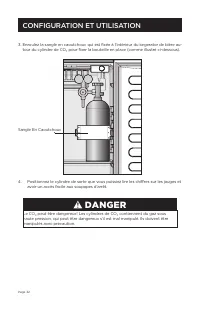
Page 31 CONFIGURATION ET UTILISATION INSTALLATION DU GARDE-CORPS Suivez les étapes ci-dessous pour installer le garde-corps. 1. Placez le garde-corps sur le dessus du boîtier. 2. Alignez tous les pieds de support du garde-corps avec les trous sur le dessus de l’unité. INSTALLATION DU RÉGULATEUR DE C...
Page 33 - TIRAGE DU KEGERATOR DE BIÈRE INSTALLATION DE LA TIREUSE
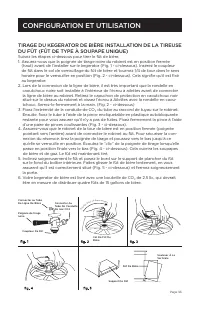
Page 33 CONFIGURATION ET UTILISATION TIRAGE DU KEGERATOR DE BIÈRE INSTALLATION DE LA TIREUSE DU FÛT (FÛT DE TYPE À SOUPAPE UNIQUE) Suivez les étapes ci-dessous pour tirer le fût de bière. 1. Assurez-vous que la poignée de tirage noire du robinet est en position fermée (haut) avant de l’installer sur...
Page 34 - UTILISATION DE VOTRE KEGERATOR DE BIÈRE
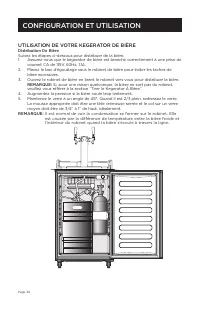
Page 34 CONFIGURATION ET UTILISATION UTILISATION DE VOTRE KEGERATOR DE BIÈRE Distribution De Bière Suivez les étapes ci-dessous pour distribuer de la bière. 1. Assurez-vous que le kegerator de bière est branché correctement à une prise de courant CA de 115V, 60Hz, 1.1A. 2. Placez le bac d’égouttage ...
Page 35 - FONCTIONNEMENT DE L’APPAREIL COMME REFRIGERATEUR
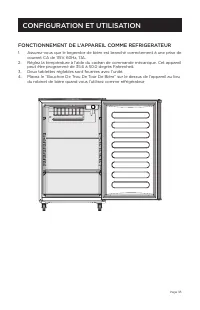
Page 35 CONFIGURATION ET UTILISATION FONCTIONNEMENT DE L’APPAREIL COMME REFRIGERATEUR 1. Assurez-vous que le kegerator de bière est branché correctement à une prise de courant CA de 115V, 60Hz, 1.1A. 2. Réglez la température à l’aide du cadran de commande mécanique. Cet appareil peut être programmé ...
Page 36 - NETTOYAGE ET ENTRETIEN; PROTÉGER VOTRE INVESTISSEMENT
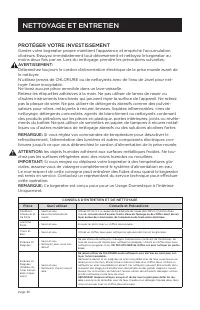
Page 36 NETTOYAGE ET ENTRETIEN PROTÉGER VOTRE INVESTISSEMENT Garder votre kegerator propre maintient l’apparence et empêche l’accumulation d’odeurs. Essuyez immédiatement tout déversement et nettoyez le kegerator au moins deux fois par an. Lors du nettoyage, prendre les précautions suivantes: AVERTI...
Page 37 - NE PAS RETOURNER CE PRODUIT AU MAGASIN; Si vous avez un problème avec ce produit, veuillez contacter le
Page 37 DÉPANNAGE ET GARANTIE AVANT D’APPELER LE SERVICE SI L’APPAREIL NE FONCTIONNE PAS: A) Vérifiez que le kegerator/réfrigérateur est bien branché. Si ce n’est pas le cas, enlevez la fiche de la prise, attendez 10 secondes et rebranchez-la solidement. B) Vérifiez la présence d’un fusible de circu...
Page 38 - GARANTIE LIMITÉE
Page 38 GARANTIE LIMITÉE Tout service de réparation, de remplacement ou de garantie, ainsi que toute question concernant ce produit, doivent être adressés à W Appliance au 844-299-0879 des États-Unis ou de Porto Rico. W Appliance garantit à l’acheteur original que le produit sera exempt de défauts d...
Page 40 - Imprimé en Chine
Page 40 BLACK & DECKER, BLACK+DECKER, les logos et noms de produits BLACK & DECKER et Black +DECKER ainsi que le schéma de couleurs orange et noir sont des marques de commerce de The Black & Decker Corporation, utilisées sous licence. Tous droits réservés. Le produit dans cette boîte peu...
Page 41 - MANUAL DE INSTRUCCIONES; NÚMERO DE CATÁLOGO
Page 41 MANUAL DE INSTRUCCIONES NÚMERO DE CATÁLOGO BBD20HS DISPENSADOR DE CERVEZA REFRIGERADO ¡Gracias por elegir BLACK+DECKER! POR FAVOR, LEA ANTES DE DEVOLVER ESTE PRODUCTO POR CUALQUIER MOTIVO. Si tiene una pregunta o experimenta un problema con su compra BLACK+DECKER, ingrese a www.blackanddecke...
Page 42 - REGISTRO DEL PRODUCTO; INFORMACIÓN DE SEGURIDAD
Page 42 Gracias por comprar nuestro producto BLACK+DECKER. Este manual fácil de usar le guiará para obtener el mejor resultado al usar su dispensador de cerveza refrigerado. Recuerde anotar los números de modelo y de serie. Están en una etiqueta en la parte trasera. Grape o adjunte su recibo de comp...
Page 43 - precauciones de seguridad básicas siempre que use este aparato,; PELIGRO; ADVERTENCIA; PRECAUCIÓN; INSTRUCCIONES DE SEGURIDAD IMPORTANTES
Page 43 SAFETY INFORMATION 1. Use este aparato solamente para su propósito previsto como se describe en este manual de uso. 2. Este aparato debe ser instalado debidamente de acuerdo con las instrucciones de instalación antes de que sea utilizado. Consulte la sección de instalación para más detalles....
Page 44 - SOLO PARA USO DOMÉSTICO
Page 44 13. No use este aparato cuando falten piezas o estén rotas. 14. No utilice este aparato para fines comerciales. 15. Este aparato está diseñado solo para uso en interiores y no debe usarse al aire libre. 16. Para reducir el riesgo de lesiones, no permita que los niños jueguen dentro o sobre e...
Page 45 - ADVERTENCIAS SOBRE GASES
Page 45 INFORMACIÓN DE SEGURIDAD PRECAUCIONES DE SEGURIDAD IMPORTANTES SOBRE EL GAS CO2 (DIÓXIDO DE CARBONO) ADVERTENCIA 1. ¡El gas CO₂ puede ser peligroso! Los cilindros de CO₂ contienen gas comprimido a alta presión, que puede ser peligroso si no se maneja adecuadamente. Asegúrese de leer y compre...
Page 46 - CONFIGURACIÓN Y USO; PIEZAS Y CARACTERÍSTICAS
Page 46 CONFIGURACIÓN Y USO PIEZAS Y CARACTERÍSTICAS #1 Acoplador para barril (se adapta a válvulas/ acopladores de barril tipo D) Cantidad: 2 #2 Tapón de reflujo Cantidad: 2 #3 Arandela de goma Cantidad: 2 #4 Arandela direccional de goma Cantidad: 1 #5 Tirador de cerveza / Arandela de goma Cantidad...
Page 48 - USO DE CABLES DE EXTENSIÓN; ADVERTENCIA: RIESGO DE INCENDIO; REQUISITOS ELÉCTRICOS
Page 48 CONFIGURACIÓN Y USO UBICACIÓN ADECUADA: • Para asegurarse de que su dispensador de cerveza refrigerado funcione con la máxima eficiencia según lo diseñado, manténgalo en un lugar donde haya una circulación de aire adecuada y tomas de corriente. • Elija un lugar donde el dispensador de cervez...
Page 49 - ¡Esto es muy; Instalación de las ruedas
Page 49 CONFIGURACIÓN Y USO GUÍA DE INSTALACIÓN Lea atentamente esta guía de instalación para asegurarse de que entiende todas las instrucciones antes de intentar instalar el dispensador de cerveza refrigerado. Si después de completar la instalación aún no está seguro de si el dispensador de cerveza...
Page 50 - INSTALACIÓN DEL GRIFO DE CERVEZA
Page 50 INSTALACIÓN DEL GRIFO DE CERVEZA Siga los pasos a continuación para instalar el grifo de cerveza. • Coloque la arandela de goma del tirador de cerveza en la parte superior del aparato antes de instalar el dispensador (ver fig. A). • Para instalar el dispensador, colóquelo en la parte superio...
Page 51 - INSTALACIÓN DE LA BARANDILLA; INSTALACIÓN DEL REGULADOR DE CO2 Y DEL CILINDRO DE CO2
Page 51 CONFIGURACIÓN Y USO INSTALACIÓN DE LA BARANDILLA Siga los pasos a continuación para instalar la barandilla. 1. Coloque la barandilla en la parte superior de la carcasa. 2. Alinee todas las patas de soporte de la barandilla con los orificios en la parte superior del aparato. INSTALACIÓN DEL R...
Page 53 - INSTALACIÓN DE LA VÁLVULA EN EL BARRIL (BARRIL CON VÁL-
Page 53 CONFIGURACIÓN Y USO INSTALACIÓN DE LA VÁLVULA EN EL BARRIL (BARRIL CON VÁL- VULA ÚNICA) Siga los pasos a continuación para instalar la válvula en el barril de cerveza. 1. Asegúrese de que el tirador negro del grifo esté en la posición cerrada (hacia arriba) antes de instalarlo en el dispensa...
Page 54 - USO DE SU DISPENSADOR DE CERVEZA REFRIGERADO
Page 54 CONFIGURACIÓN Y USO USO DE SU DISPENSADOR DE CERVEZA REFRIGERADO Servir cerveza Siga los pasos siguientes para servir cerveza. 1. Asegúrese de que el dispensador de cerveza esté conectado correctamente a una toma de corriente de CA con conexión a tierra de 115 V, 60 Hz y 1,1 amperios. 2. Col...
Page 55 - USO DEL APARATO COMO UN REFRIGERADOR
Page 55 CONFIGURACIÓN Y USO USO DEL APARATO COMO UN REFRIGERADOR 1. Asegúrese de que el dispensador de cerveza esté conectado correctamente a una toma de corriente de CA con conexión a tierra de 115 V, 60 Hz y 1,1 amperios. 2. Ajuste la temperatura con el dial de control. Este aparato se puede progr...
Page 56 - LIMPIEZA Y CUIDADO; PROTECCIÓN DE SU INVERSIÓN
Page 56 LIMPIEZA Y CUIDADO PROTECCIÓN DE SU INVERSIÓN Mantener su dispensador de cerveza limpio conserva su apariencia y evita la acumu- lación de olores. Limpie los derrames de inmediato y limpie el dispensador al menos dos veces al año. Al limpiarlo, tome las siguientes precauciones: ADVERTENCIA: ...
Page 57 - IMPORTANTE; NO DEVUELVA ESTE PRODUCTO A LA TIENDA; Si tiene un problema con este producto, comuníquese con el
Page 57 RESOLUCIÓN DE PROBLEMAS Y GARANTÍA ANTES DE LLAMAR AL SERVICIO TÉCNICO SI EL APARATO NO FUNCIONA: A) Asegúrese de que el dispensador/refrigerador esté enchufado firmemente. Si no lo está, retire el enchufe de la toma de corriente, espere 10 segundos y vuelva a conectarlo firmemente. B) Compr...
Page 58 - SOLUCIÓN DE PROBLEMAS Y GARANTÍA; GARANTÍA LIMITADA
Page 58 SOLUCIÓN DE PROBLEMAS Y GARANTÍA GARANTÍA LIMITADA Cualquier reparación, recambio, o servicio de garantía, y todas las preguntas sobre este producto deben ser dirigidas a W Appliance Co. al 844-299-0879 desde EE.UU. o Puerto Rico. W Appliance Co. garantiza al comprador original que el produc...


 Black & Decker BCRDK32B
User Manual
Black & Decker BCRDK32B
User Manual
 Black & Decker BCRDK32V
User Manual
Black & Decker BCRDK32V
User Manual
 Black & Decker BCRDK32W
User Manual
Black & Decker BCRDK32W
User Manual
 Black & Decker BCRK17B
User Manual
Black & Decker BCRK17B
User Manual
 Black & Decker BCRK17V
User Manual
Black & Decker BCRK17V
User Manual
 Black & Decker BCRK17W
User Manual
Black & Decker BCRK17W
User Manual
 Black & Decker BCRK25B
User Manual
Black & Decker BCRK25B
User Manual
 Black & Decker BCRK25V
User Manual
Black & Decker BCRK25V
User Manual
 Black & Decker BCRK25W
User Manual
Black & Decker BCRK25W
User Manual
 Black & Decker BCRK32B
User Manual
Black & Decker BCRK32B
User Manual
 Black & Decker BCRK32V
User Manual
Black & Decker BCRK32V
User Manual
 Black & Decker BCRK32W
User Manual
Black & Decker BCRK32W
User Manual
 Black & Decker BCRK43B
User Manual
Black & Decker BCRK43B
User Manual
 Black & Decker BCRK43V
User Manual
Black & Decker BCRK43V
User Manual
 Black & Decker BCRK43W
User Manual
Black & Decker BCRK43W
User Manual