Page 3 - MPORTANT SAFETY INSTRUCTIONS; READ ALL INSTRUCTIONS; To reduce the risk of fire,; IMPORTANT
w w w . b i s s e l l . c o m I MPORTANT SAFETY INSTRUCTIONS 3 When using an electrical appliance, basic precautions should be observed, including the following: READ ALL INSTRUCTIONS BEFORE USING STEAM MOP. Always connect to a properly Earthed outlet. Unplug from outlet when not in use and before c...
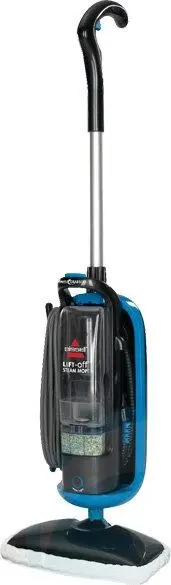
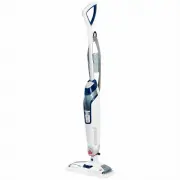
Page 4 - roduct view
w w w . b i s s e l l . c o m 4 P roduct view Steam on Demand Trigger Lower Cord Wrap Water Purification System Detachable Steam Pod Lower Body Base Quick Release™ Cord Wrap Steam Trigger Detachable Pod Release Power Cord Steam Control Knob Removable Water Tank Easy Carrying Handle Ready Light Maneu...
Page 5 - ssembly
w w w . b i s s e l l . c o m A ssembly 5 Lower Body Base Your Lift-Off Steam Mop assembles quickly and easily. The only thing you will need for assembly is a Phillips head screwdriver. Your Lift-Off Steam Mop is packaged with the following items:Handle AssemblyLower Body base Detachable Steam Pod w...
Page 6 - perations; Features and accessories
w w w . b i s s e l l . c o m O perations 6 Features and accessories Removable water tank The water tank is located on the front of the Lift-Off Steam Mop. It can be refilled with water any time during use. Distilled or demineralized water may be used in place of tap water. Do not use chemicals with...
Page 7 - Getting ready
w w w . b i s s e l l . c o m 7 O perations Getting ready 1. Attach mop pad A. Set the mop pad flat on the floor. B. Line up the mop head and place it inside the mop pad with cord located at rear of mop head. Tighten cord to ensure tight fit. 2. Fill water tank A. Remove tank by lifting straight up ...
Page 8 - Cleaning hard floors continued; Steam cleaning all living areas
w w w . b i s s e l l . c o m O perations 8 Cleaning hard floors continued 1. When the ready light illuminates, begin cleaning by slowly passing over surface while pressing the steam on demand trigger to emit steam as needed. 2. To sanitize an area of your floor, (attack invisible germs and bacteria...
Page 9 - aintenance and care; Replacing the water filter
w w w . b i s s e l l . c o m 9 M aintenance and care CAUTION: Upright storage of the Lift-Off Steam Mop with a wet mop pad may result in the formation of white marks on your floor. To remove the white marks, clean area with vinegar. Tip: Using distilled or demineralized water will maximize the perf...
Page 10 - roubleshooting; Item; eplacement parts - BISSELL Lift-Off Steam Mop; Thank you for selecting a BISSELL product.; Please do not return this product to the store.; For any questions or concerns, BISSELL is happy to be
w w w . b i s s e l l . c o m T roubleshooting 10 Item Part No. Part Name 1 3252-2 Water Filter 2 203-2275 Water Tank with Cap and Insert 3 203-2276 Cap and Insert Assembly 4 203-2274 White Flat Surface Pad 5 71X9 Microfiber Mop Pads - 2 pack 6 3252-1 Eucalyptus Mint Natural Aroma 7 59V4 Steam Mop S...
Page 11 - arranty BISSELL Lift-Off Steam Mop; Limited Two Year Warranty; For Australian inquiries:; For all other inquiries:; BISSELL Consumer Care:
w w w . b i s s e l l . c o m 11 W arranty BISSELL Lift-Off Steam Mop This warranty gives you specific legal rights, and you may also have other rights which may vary from country to country. If you need additional instruction regarding this warranty or have questions regarding what it may cover, pl...
Page 12 - warranty, please call BISSELL Consumer Care:; Or visit the BISSELL website -
w w w . b i s s e l l . c o m B ISSELL consumer care 12 For information about repairs or replacement parts, or questions about your warranty, please call BISSELL Consumer Care: Or visit the BISSELL website - www.bissell.com When contacting BISSELL, have model number of cleaner available.Please recor...