Page 2 - Congratulations on your BIBO purchase!; Please note
2 USER’S MANUAL Congratulations on your BIBO purchase! Congratulations and thank you for buying a BIBO. You are moments away from enjoying pure, iltered water – boiling and chilled – at the touch of a button. We want you to get the most from your BIBO, so before you use it please read this manual ca...
Page 3 - Contents
BIBO BRIGHTER WATER 3 Contents Meet your BIBO page 4 • BIBO over view• The touch screen panel Safety Information page 6 Using your BIBO page 8 • Initial connection to the electrical supply• Impor tant: before using your BIBO for the irst time • Main features• Menu options and personal settings BIBO ...
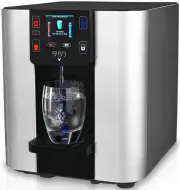
Page 4 - Meet your BIBO; BIBO overview
4 USER’S MANUAL Meet your BIBO BIBO overview 1. Touch screen panel 9. Refrigeration condenser 2. Drip tray cover 10. Hot tank switch 3. Removable drip tray 11. Water inlet 4. 7cm TFT LCD screen 12. Rear panel 5. Water outlets 13. Cooling fan 6. Front panel 14. Mains fuse 7. Overlow reservoir 15. Pow...
Page 5 - The touch screen panel
BIBO BRIGHTER WATER 5 The touch screen panel 1 13 14 9 8 12 17 16 11 15 7 2 3 4 5 6 10 1 2 3 4 5 6 7 8 9 10 11 12 13 14 15 16 Calendar (Day - Month - Year) Ambient (mixed hot and cold) water key Menu and set key Clock (24 hour) Cold water key (also acts as ‘select’ key in menu mode) Water outlet ind...
Page 6 - Safety Information
6 USER’S MANUAL Safety Information IMPORTANT SAFETY INSTRUCTIONS READ CAREFULLY AND KEEP FOR FUTURE REFERENCE WARNING: FOR CORRECT OPERATION OF THIS APPLIANCE IT IS ESSENTIAL TO OBSERVE THE MANUFACTURER’S INSTRUCTIONS. • Your BIBO is intended to be used in household and similar applications such as:...
Page 8 - Using your BIBO; Initial connection to an electrical supply
8 USER’S MANUAL Using your BIBO Initial connection to an electrical supply Once your BIBO has been plugged in to a power supply, the screen will initially display your BIBO logo; this means it is operating correctly. Select your preferred language and then follow the instructions on the screen, addi...
Page 9 - Main features; To dispense hot water:; To dispense cold water
BIBO BRIGHTER WATER 9 Main features To dispense hot water: Your BIBO has a safety lock so you must irst touch then touch Hot water will low until you touch any key to stop the water. If you require near-boiling water touch the dispenser will display the following: Once boiling has inished you can di...
Page 10 - Menu options and personal settings; Water temperature settings
10 USER’S MANUAL Menu options and personal settings To enter the menu touch on the panel, then follow the on-screen prompts. The menu allows you to control temperature settings, water quantity settings, time and date settings, energy saving mode, child lock settings, ilters and UV lamp change settin...
Page 11 - Water quantity settings
BIBO BRIGHTER WATER 11 Water quantity settings Select the water quantity (QTY) setting in the menu then follow the screen prompts to set the hot, cold and ambient (mix) water quantities as follows: Time setting (day - month - year) Select Calendar settings and enter the time adjustment screen. Follo...
Page 13 - Child lock setting; MAXI filter and UV filter maintenance settings
BIBO BRIGHTER WATER 13 If you want to turn your BIBO on before the programmed time, touch any key and the screen will display this: Touch the key to conirm you want it to turn on. When your BIBO switches back on from the ‘Power on/off ’ mode, the hot tank will take approximately 5 minutes to heat ba...
Page 14 - Language settings
14 USER’S MANUAL Language settings You can change the operating language of your BIBO at any time by choosing ‘Language’ from the main menu and selecting your preferred language from the options available. Ring/beep setting You can programme your BIBO to beep ever y time a key is pressed by choosing...
Page 15 - BIBO information and maintenance; Replacing the MAXI filter cartridge
BIBO BRIGHTER WATER 15 BIBO information and maintenance Replacing the MAXI filter cartridge BIBO’s MAXI ilter should be replaced every 6 months. When the ilter needs replacing, your BIBO’s display will aler t you. This message will appear once replacement is due: Remove the lid on the top of your BI...
Page 16 - Performance Data Sheet- MAXI Filter Cartridge
16 USER’S MANUAL IMPORTANT NOTICE: Read this Performance Data Sheet and compare the capabilities of this unit with your actual water treatment needs. It is recommended that you have your water supply tested to determine your actual water treatment needs. SUBSTANCE REDUCTION The MAXI Filter Car tridg...
Page 17 - Replacing the UV filter lamp
BIBO BRIGHTER WATER 17 Replacing the UV filter lamp The UV lamp should be replaced once a year. When it needs replacing, BIBO’s display will aler t you. This message will appear once replacement is due: When your BIBO was installed you received a key to release the UV lamp. Put the key into the slot...
Page 18 - Cleaning your BIBO
18 USER’S MANUAL Once the UV lamp has been replaced, select ‘Replacement’ from the menu, select ‘UV’ and touch the to conirm replacement. The counter will be reset to ‘360 days left’. Safety information: • This appliance contains a UV-C emitter. Unintended use of the appliance or damage to the housi...
Page 19 - Disconnecting your BIBO when moving home
BIBO BRIGHTER WATER 19 When you come back: 1. Turn on the water supply to your BIBO by twisting the blue tap so the lever is in line with the water pipe. 2. Turn the hot tank switch at the back your BIBO to on (‘1’). 3. Touch the hot water key , make sure the water lows, and then touch the hot water...
Page 20 - Technical information; SPECIFICATION
20 USER’S MANUAL Technical information SPECIFICATION PARAMETER Electrical speciication Voltage Frequency Power rating 240 Volts 50 Her tz 1,700 Watts Heating system Power rating Heating capacity Hot water temperature 1,500 Watts 15 Litres/hour* 70-96ºC (Adjustable) Chilling system Refrigerant Power ...
Page 21 - Troubleshooting; FAULT; Your warranty
BIBO BRIGHTER WATER 21 Troubleshooting If a fault should occur, please irst use the troubleshooting guide below to determine the fault type, then follow the steps listed to resolve the issue. This should help you resolve the fault with minimum effor t. If you ind that your BIBO is not working proper...
Page 22 - Installing your BIBO; Installation Instructions; your BIBO will be located.
22 USER MANUAL Installing your BIBO Installation Instructions WATER SUPPLY MAINS SAFETY TIPS We strongly recommend that one of our professional BIBO Ser vice Technicians installs your BIBO to ensure compliance with AS/NZS 3500.4 and any applicable local plumbing and electrical regulations. Should yo...
Page 23 - Setting Up; UNTIL YOUR BIBO HAS FILLED ITSELF WITH WATER.
23 Setting Up (Picture 1) (Picture 1) CONNECTION TO YOUR BIBO 10. Carefully drill an 8mm hole through the bench top about 5cm (2”) out from the wall directly behind where your BIBO will be located. (NOTE: if the bench top is granite or similar a diamond drill bit is required and we recommend this ta...
Page 24 - Call us on