Page 2 - CONDITIONS OF GUARANTEE...................................................13; CONTENTS
2 YOUR COOKER HOOD’S SPECIFICATIONS ….……………..………….2 IMPORTANT SAFETY INFORMATION……………………………….…3-4 CARING FOR THE ENVIRONMENT…………………………………………5 USING YOUR COOKER HOOD………………………………..……………..6 MAINTAINING AND CLEANING YOUR COOKER HOOD ……….7-9 INSTALLATION INSTRUCTIONS ……………………….……...….10-11 ELECTRICAL CON...
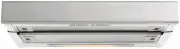
Page 4 - DIMENSIONS; Your Cooker Hood is fitted with
4 To fully enjoy using your appliance long into the future, please firstly familiarise yourself with its specifications, safety advice and operational instructions included in this manual. You will also need this manual to ensure that your Cooker Hood has been installed properly. DIMENSIONS Width: 6...
Page 5 - Important Safety Information:; Please read this before installing & using.
5 o Any installation work must be carried out by a qualified electrician or competent person. o The hood must be installed in accordance with the installation instructions and all measurements followed. o If the cooker hood is installed for use above a gas appliance then the provision for ventilatio...
Page 6 - Do not connect the
6 o o Ensure the ducting for the extractor function has the same diameter as the outlet hole all the way through. o Keep young children from using, playing with or tampering with the cooker hood. Older children and infirm persons should be supervised if they are using the cooker hood. o Your cooker ...
Page 7 - damaged in any way.; Never attempt to use it; Note; : Before discarding an old appliance, switch off and; Environmental Note
7 damaged in any way. Never attempt to use it without the grease filters fitted or if the filters are excessively greasy! Never flambé cook under this cooker hood . Note : Before discarding an old appliance, switch off and disconnect it from the power supply. Cut off and render any plug useless. C...
Page 8 - cooking and at least 15 minutes after you have finished cooking.; One switch controls the; The other is to control the light.; LIGHT ON/OFF switch – Slide the ‘C-1’ switch in figure above from ‘0’ to ‘1’.; Using your Cooker Hood:
8 To use your cooker hood: 1) Make sure it has been properly installed. 2) Find the CONTROL PANEL. It is located centrally on the hood’s front surface, on the underside of the unit. 3) The CONTROL PANEL contains two rows of switches. These perform separate functions. You will need to understand what...
Page 9 - Cleaning; Clean the external parts with; Cleaning your Cooker Hood:
9 IMPORTANT: Before cleaning, always ensure that you have switched your cooker hood OFF at the omni-polar switch, set at the wall from the cable: Cleaning Clean the external parts with mild liquid detergents on a damp cloth. Never use abrasive powder, corrosive solvents or brushes. Never inser...
Page 10 - You can now clean the anti-grease filter grilles.; Soak them for about one hour in hot water with a; Refit the grease grilles when dry.; Maintenance – Changing the Light Bulb and Carbon Filter
10 First remove the grille by pulling down on it. Undo the side catches. You can now clean the anti-grease filter grilles. Soak them for about one hour in hot water with a grease-loosening detergent then rinse off thoroughly with hot water. Repeat the process if needed. Refit the grease grille o...
Page 11 - INSTALLATION INSTRUCTIONS - Electrical
11 The active carbon filter must be replaced regularly, at least once every four months, to allow normal operation when in recirculation mode. Before starting to fit the carbon filter, turn the omni-polar switch OFF Changing the Carbon Filter – Note: carbon filters cannot be cleaned! 1) Remove the g...
Page 12 - INSTALLATION INSTRUCTIONS
12 o The power cable must be connected to the terminals marked L (live) and N (neutral) in the hood and fixed with a cable clamp. o The cooker hood’s power cable must be fitted upstream from the electrical connection using an omni-polar switch with a contact distance of at least 3mm. NOTE: (UK only)...
Page 13 - Drill where indicated. SEE DIAGRAMS BELOW. Using a drill with a
9 1) Your Cooker Hood should only be fitted into the underside of a dedicated cabinet / kitchen unit. DO NOT position it any less than 700 mm (70 cm) above the hob or let other cabinets overhang the hob. 2) Remove the metal anti-grease grille. 3) Drill where indicated. SEE DIAGRAMS BELOW. Using a dr...
Page 14 - Symptom; The cooker hood will not start!; Troubleshooting
10 If something has gone wrong with your Cooker Hood, checking against this chart might prevent you from having to call for service. Symptom Solution The cooker hood will not start! Check that the hood is connected to the electricity supply. Check that the fan speed control is set properly. The ...