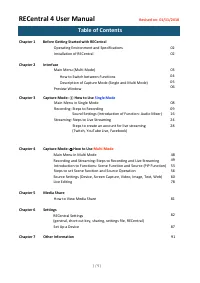
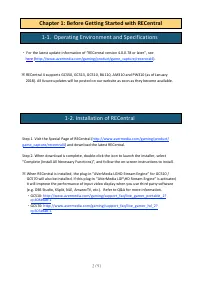
Page 2 - Operating Environment and Specifications; Chapter 1: Before Getting Started with RECentral
2 / 91 ・ For the latest update information of “RECentral version 4.0.0. 7 8 or later”, see he r e ( http://www.avermedia.com/gaming/product/game_capture/recentral4 ). ※ RECentral 4 supports GC550, GC51 3 , GC51 0 , BU110, AM310 and PW3 10 (as of January 201 8 ). All future updates will be posted on ...
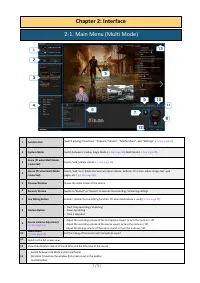
Page 3 - Multi Mode; Interface
3 / 91 1 Function Dial Switch among 3 functions: “ Capture / Stream ”, “ Media S har e ”, and “Settings”. ( → See page 04 ) 2 Capture Mode Switch between 2 modes: Single Mode ( → See page 0 8 ), Multi Mode ( → See page 48 ). 3 Scene ( ※ when Multi Mode is selected) Select / add / delete scenes. ( → ...
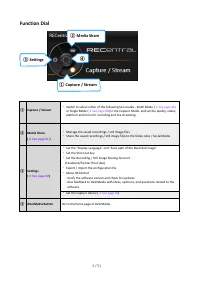
Page 4 - Function Dial; AVerMedia Button; Media Share
4 / 91 Function Dial ① Capture / Stream ・ Switch to select either of the following two modes - Multi Mode ( → See page 48 ) or Single Mode ( → See page 0 8 ) in the Capture Mode, and set the quality, codec, platform and more for recording and live streaming. ② Media Share ( → See page 81 ) ・ Manage ...
Page 5 - Explanation of Capture Mode; Multi
5 / 91 Single Mode ( → See page 8 ) ( R ecommended for users who want to use PC comfortably while recording and streaming files and videos in a simple and stable way) (Recommended for users who want to use the PiP function and multiple devices.) Select only one capture device at a time to record and...
Page 7 - only
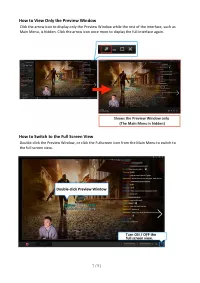
7 / 91 How to View Only the Preview Window Click the arrow icon to display only the Preview Window while t he rest of the interface , such as Main Menu , is hidden. Click the arrow icon once more to display the full interface again. How to Switch to the Full S creen V iew Double-click the Preview Wi...
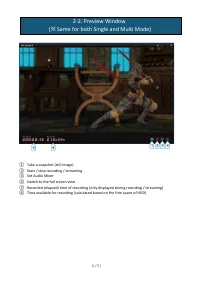
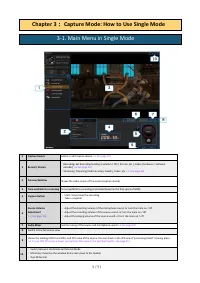
Page 8 - Chapter 3; in
8 / 91 1 Capture Device Select or edit c apture device ( → See page 1 0 ) 2 Record / Stream 3 Preview Window Show s the video screen of the source (capture device) 4 Time available for recording Time available for recording (calculated based on the free space of HDD) 5 Capture Button ・ Start / stop ...
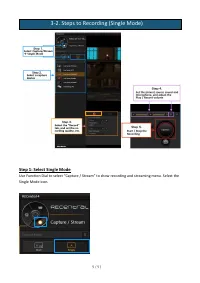
Page 9 - Step 1: Select Single Mode; Use Function Dial to
9 / 91 Step 1: Select Single Mode Use Function Dial to select “ Capture / Stream ” to show r ecording and s treaming menu. Select the Single Mode icon. 3-2. Steps to Recording (Single Mode)
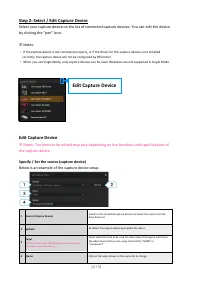
Page 10 - Select your capture device; Notes: The items to be; Edit
1 0 / 91 Step 2: Select / Edit Capture Device Select your capture device o n the list of connected capture devices. You can edit the device by clicking the “ p en” icon. ※ Notes: ・ If the capture device is not connected properly, or if the driver for this capture device is not installed correctly, t...
Page 12 - Optimal
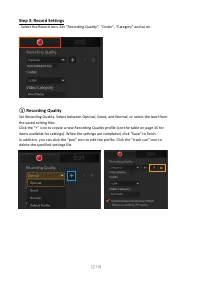
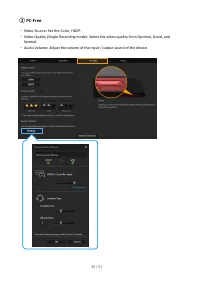
1 2 / 91 Step 3: Record S ettings Select the Record icon. Set “ R ecording Q uality”, “Codec”, “ C ategory” and so on. ① Recording Quality Set Recording Quality. Select between Optimal , G ood, and Normal , or select the level from the saved setting files. Click the “+” icon to create a new Recordin...
Page 13 - card; Hardware Encoder
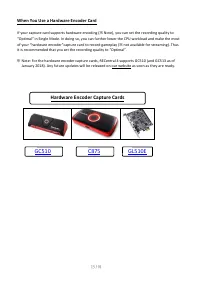
1 3 / 91 When You Use a Hardware Encoder Card If you r capture card supports h ardware e ncod ing ( ※ Note) , you can set the recording quality to “ Optimal ” in Single Mode . In doing so , you can further lower the CPU workload and make the most of your “hardware encoder”capture card to record game...
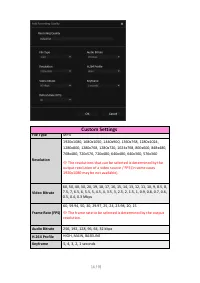
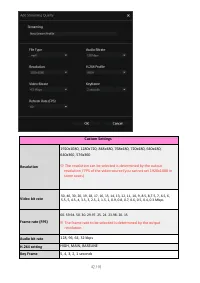
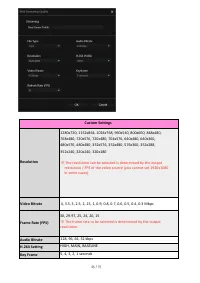
Page 14 - Custom Settings; File Type; The resolution; Audio; seconds
1 4 / 91 Custom Settings File Type MP4 1920x1080, 1680x1050, 1440x900, 1360x768, 1280x1024, 1280x800, 1280x768, 1280x720, 1024x768, 800x600, 848x480, 768x480, 720x576, 720x480, 640x480, 640x360, 576x360 ※ The resolution s that can be selected is determined by the output resolution of a video source ...
Page 15 - Codec
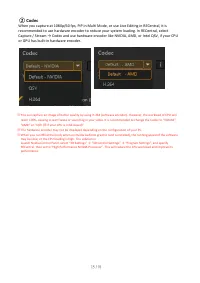
1 5 / 91 ※ You can capture an image of better quality by using H.264 (software encoder). However, the workload of CPU will reach 100%, causing screen fr eeze or sound lag in your video . It is recommended to change the Codec to “NVIDIA”, “AMD” or “QSV ( ※ i f your CPU is Intel-based )" . ※ The h...
Page 16 - video; Step 4: Sound Settings; of; How to View Sound Settings
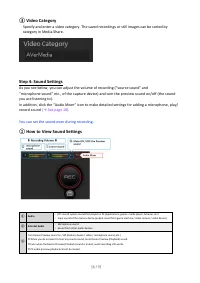
1 6 / 91 ③ Video Category Specify and enter a video category. The saved r ecording s or s till i mage s can be sorted by category in Media Share . Step 4: Sound Settings As you see below, you can adjust the volume of recording (“source sound” and “microphone sound” etc., of the capture device) and t...
Page 17 - How to Adjust Volume / Mute
1 7 / 91 ② How to Adjust Volume / Mute Click the s ource s ound or m icrophone s oun d icon to turn the mute on or off.
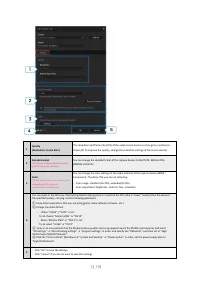
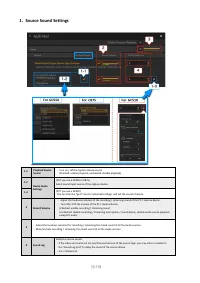
Page 19 - Source Sound Settings
19 / 91 1. Source Sound Settings 1-1 Play back D evice Sound ・ Turn on / off the Capture Device sound ( Checked : e nable playback ; u nchecked : d isable playback ) 1-2 Device Audio Settings ( ※ If you use a GC550 or C875 ) Select sound input source of the capture device. 1-3 ( ※ If you use a GC510...
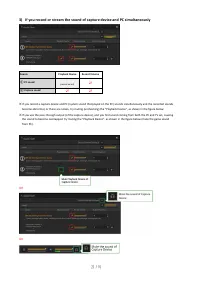
Page 20 - OR
20 / 91 Settings Example: 1) If you only record or stream the sound of capture device Source Play back Device Record Volume ① PC sound __ (cannot be set) ② Capture sound ☑ ☑ 2) If you only record or stream the PC sound PC sound = system sound that played on the PC (applications, games, m edia p laye...
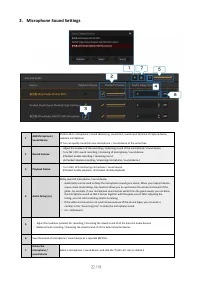
Page 22 - Microphone Sound Settings
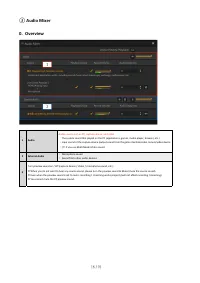
22 / 91 2. Microphone Sound Settings 1 Add Microphone / Sound Device Click to add a m icrophone / s ound d evice (e.g. sound card, sound input terminal of capture device, webcam microphone ). ※ You can specify more than one microphone / sound device at the same time. 2 Record Volume ・ Adjust the lou...
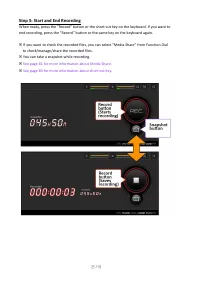
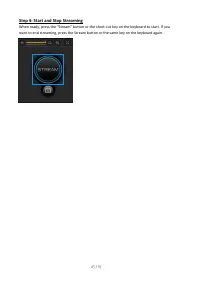
Page 23 - Step 5: Start and End Recording; If you want to check the recorded file
23 / 91 Step 5: Start and End Recording When ready, press the “Record” button or the short-cut key on the keyboard. If you want to end recording, press the “Record” button or the same key on the keyboard again. ※ If you want to check the recorded file s , you can select “ Media Share ” from Function...
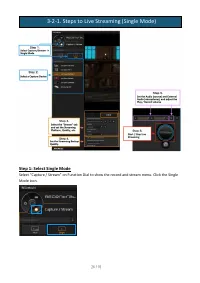
Page 24 - Select
2 4 / 91 Step 1: Select Single Mode Select “ Capture / Stream ” on Function Dial to show the r ecord and s tream menu. Click the Single Mode icon. 3-2-1. Steps to Live Streaming (Single Mode)
Page 25 - up; lect a; tab; Detailed description of Codec: See page 1
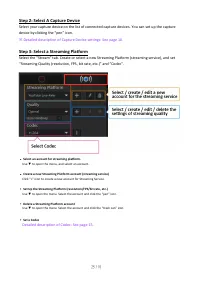
2 5 / 91 Step 2: Select A Capture Device Select your capture device o n the list of connected capture devices. You can set up the capture device by clicking the “ p en” icon. ※ Detailed description of Capture D evice settings: See page 1 0 . Step 3: Se lect a Streamin g Platform Select the “Stream” ...
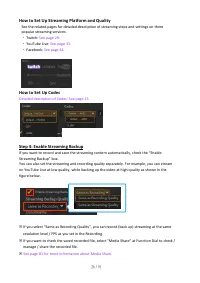
Page 26 - related; How to Set; Streaming Backup
2 6 / 91 How to Set Up Streaming Platform and Quality See the related pages for detailed description of streaming steps and settings on three popular s treaming s ervice s . ・ Twitch: See page 2 9. ・ YouTube Live: See page 3 3. ・ Facebook: See page 4 4. How to Set Up Codec Detailed description of Co...
Page 27 - Step 5: Set the Sound; Step 6: Start and Stop Streaming; YouTube
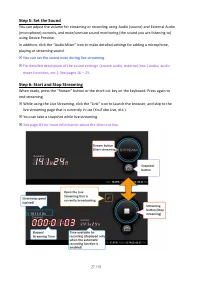
2 7 / 91 Step 5: Set the Sound You can adjust the volume for streaming or recording using Audio (source) and External Audio ( microphone ) controls , and mute/unmute sound monitoring (the sound you are listening to) using Device Preview . In addition, click the “ Audio Mixer ” icon to make detailed ...
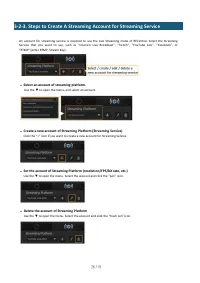
Page 28 - Select an account of streaming platform.
28 / 91 An account for streaming service is required to use the Live Streaming mode of RECentral. Select the Streaming Service that you want to use, such as “niconico Live Broadcast”, “Twitch”, “YouTube Live”, “Facebook”, or “RTMP” (enter RTMP, Stream Key). ・ Select an account of streaming platform....
Page 29 - Step 1: Create a New Account; Step 2: Set the Server
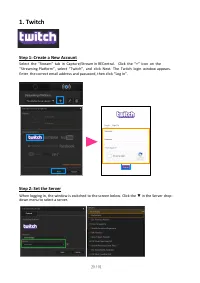
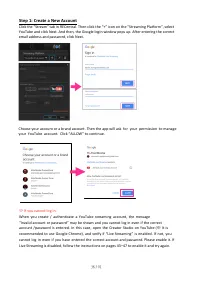
2 9 / 91 1 . Twitch Step 1: Create a New Account Select the “Stream” tab in Capture/Stream in RECentral . Click the “+” icon on the “Streaming Platform”, select “Twitch”, and click Next. The Twitch login window appears. Enter the correct email address and password, then click “Log In”. Step 2: Set t...
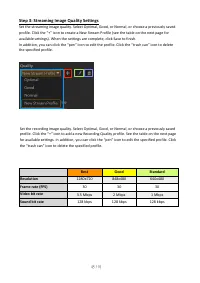
Page 30 - Step 3: Streaming Image Quality settings
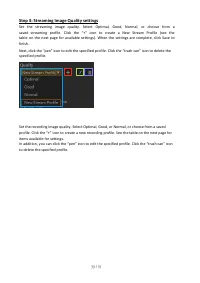
3 0 / 91 Step 3: Streaming Image Quality settings Set the streaming image quality. Select Optimal , G ood, Normal , or choose from a saved streaming profile . Click the “+” icon to create a N ew S tream P rofile (see the table on the next page for available settings). When the settings are complete,...
Page 31 - The resolution can be selected is determined by the output
3 1 / 91 Streaming Quality S ettings Resolution 1920x1080, 1680x1050, 1440x900, 1360x768, 1280x1024, 1280x800, 1280x768, 1280x720, 1024x768, 800x600, 848x480, 768x480, 720x576, 720x480, 640x480, 640x360, 576x360 ※ The resolution can be selected is determined by the output resolution / FPS of the vid...
Page 32 - Step 4: Start and Stop Streaming
3 2 / 91 Step 4: Start and Stop Streaming When ready, press the “Stream” button or the short-cut key on the keyboard to start. If you want to end streaming, press the “Stream” button or the same key on the keyboard again.
Page 33 - Creator Studio
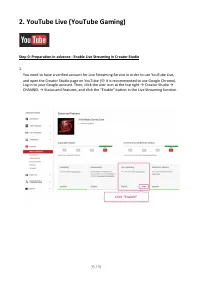
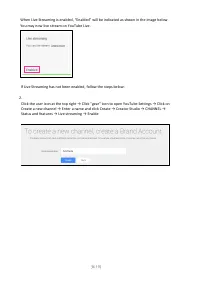
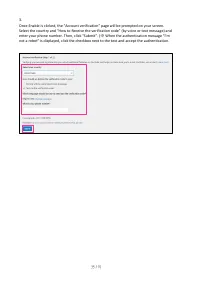
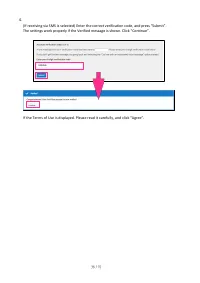
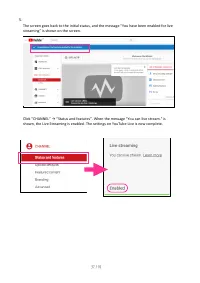
3 3 / 91 2 . YouTube Live (YouTube Gaming) Step 0: Preparation in advance - Enable Live Streaming in Creator Studio 1. You need to have a verified account for Live Streaming Service in order to use YouTube Live, and open the Creator Studio page on YouTube ( ※ it is recommended to use Google Chrome)....
Page 39 - Log in and switch to the following screen.
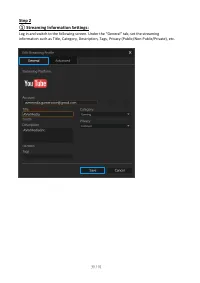
39 / 91 Step 2 ① Streaming Information Settings: Log in and switch to the following screen. Under the “General” tab , set the streaming information such as Title, Category, Description, Tag s , Privacy (Public/Non-Public/Private), etc.
Page 40 - Optimization; at; into; ing; A user
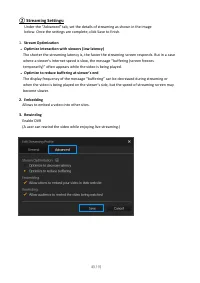
4 0 / 91 ② Streaming Settings: 1. Stream Optimization ・ Optimize i nteraction with v iewers (low latency) The shorter the streaming latency is, the faster the streaming screen responds. But in a case where a viewer’s I nternet speed is slow, the message “buffering (screen freezes temporarily)” often...
Page 41 - Step 3: Streaming Image Quality Settings
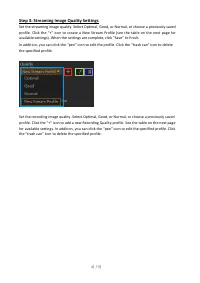
4 1 / 91 Step 3: Streaming Image Quality Settings Set the streaming image quality. Select Optimal , G ood, or Normal , or choose a previously saved profile . Click the “+” icon to create a N ew S tream Profile (see the table on the next page for available settings). When the settings are complete, c...
Page 42 - Video bit rate; The frame rate to be selected is determined by the
4 2 / 91 Custom Settings Resolution 1920x1080, 1280x720, 848x480, 768x480 , 720x480, 640x480, 640x360, 576x360 ※ The resolution can be selected is determined by the output resolution / FPS of the video source (you cannot set 1920x1080 in some cases). Video bit rate 50, 40, 30, 20, 19, 18, 17, 16, 15...
Page 43 - When ready, press the
4 3 / 91 Step 4: Start and Stop Streaming When ready, press the " Stream " button or the short-cut key on the keyboard to start. If you want to end streaming, press the Stream button or the same key on the keyboard again.
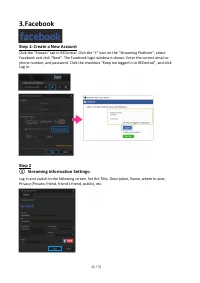
Page 44 - Step 2
4 4 / 91 3 .Facebook Step 1: Create a New Account Click the “Stream” tab in RECentral. Click the “+” icon on the “Streaming P latform " , select Facebook and click “Next”. The Facebook login window is shown. Enter the correct e mail or phone number, and password. Click the checkbox “ Keep me l o...
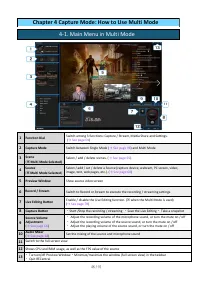
Page 48 - among; source; RAM; Chapter 4 Capture Mode: How; to Use Multi; Quit RECentral
48 / 91 1 Function Dial Switch among 3 functions: Capture / Stream , Media Shar e and Settings. ( → See page 04 ) 2 Capture Mode Switch between Single Mode ( → See page 0 8 ) and Multi Mode. 3 Scene ( ※ Multi Mode S elected) Select / add / delete scenes. ( → See page 5 5 ) 4 Source ( ※ Multi Mode S ...
Page 49 - In the
49 / 91 1: Select Multi Mode In the Function Dial , select “ Capture / Stream ”, then s elect the Multi Mode icon. 4-2. Steps to Recording and Live Streaming (Multiple Mode)
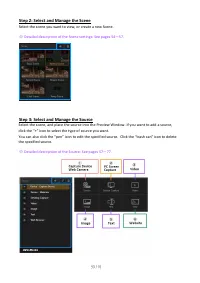
Page 50 - Step 2: Select and Manage the Scene; Select the scene you want to view, or create a new Scene.; Step 3: Select and Manage the Source; Select the scene, and place the source into the
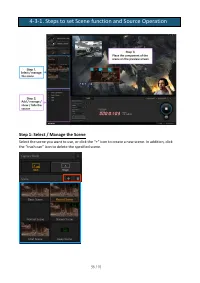
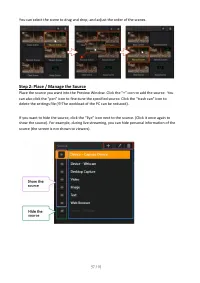
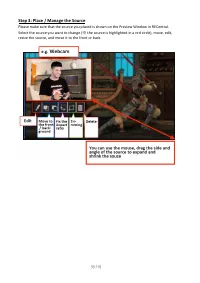
50 / 91 Step 2: Select and Manage the Scene Select the scene you want to view, or create a new Scene. ※ Detailed description of the Scene settings: See pages 54 — 57 . Step 3: Select and Manage the Source Select the scene, and place the source into the Preview Window . If you want to add a source, c...
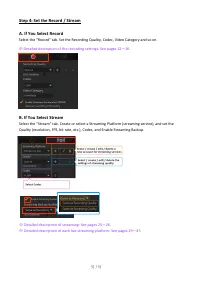
Page 51 - A. If You Select Record; B. If You Select Stream
51 / 91 Step 4: Set the Record / Stream A. If You Select Record Select the “Record” tab . Set the R ecording Q uality, Codec, Video Ca tegory and so on. ※ Detailed description of the recording settings: See pages 1 2— 1 6 . B. If You Select Stream Select the “Stream” tab . Create or select a Streami...
Page 52 - Step 5: Sound Settings; You can adjust the
52 / 91 Step 5: Sound Settings You can adjust the r ecording / s treaming volume (Source Sound, Microphone Sound etc. of the Capture device), and turn ON / OFF the Preview Sound (the sound you are listening to). You can also click the “ Audio Mixer ” icon to make detailed settings of playing/recordi...
Page 53 - If You Select Record
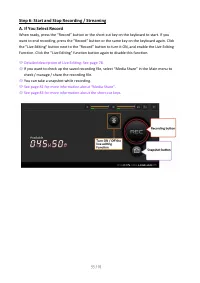
53 / 91 Step 6: Start and Stop Recording / Streaming A. If You Select Record When ready, press the “Record” button or the short-cut key on the keyboard to start. If you want to end recording, press the “Record” button or the same key on the keyboard again. Click the “Live Editing " button next t...
Page 54 - B. If You Select Streaming; While
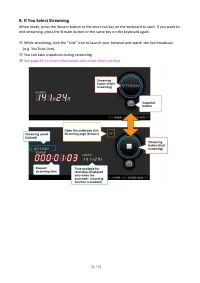
5 4 / 91 B. If You Select Streaming When ready, press the Stream button or the short-cut key on the keyboard to start. If you want toend streaming, press the Stream button or the same key on the keyboard again. ※ While s treaming, click the “Link” icon to launch your browser and watch the live broad...
Page 56 - rash can” icon to delete the specified scene.
5 6 / 91 Step 1: Select / Manage the Scene Select the scene you want to use, or click the “+” icon to create a new scene. In addition, click the “ t rash can” icon to delete the specified scene. 4-3-1. Steps to set Scene function and Source Operation
Page 60 - ideo
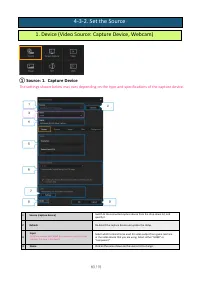
60 / 91 ① Source: 1. Capture Device The settings shown below may vary depending on the type and specification s of the capture device. 1 S ource (capture device) Switch to the connected capture device from the drop-down list, and specify it. 2 Re-detect the capture device and update the status. 3 In...
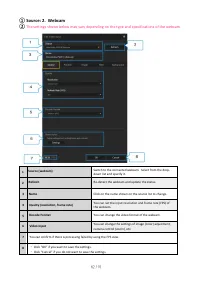
Page 62 - am; The
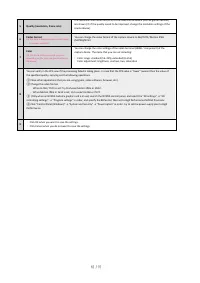
62 / 91 ① Source: 2. Web c am ② The settings shown below may var y depending on the type and specification s of the webcam . 1 S ource ( webcam ) Switch to the connected webcam . Select from the drop- down list and specify it. 2 Re-detect the webcam and update the status. 3 Name Click on the name sh...
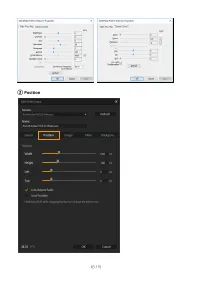
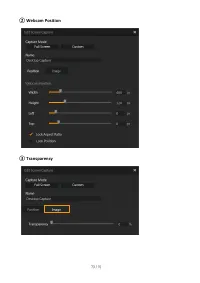
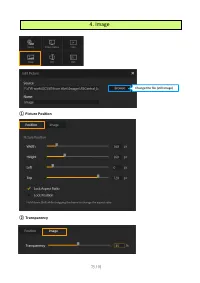
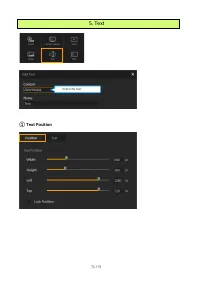
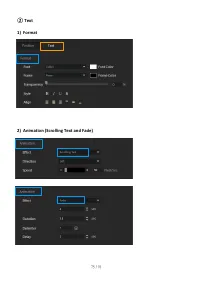
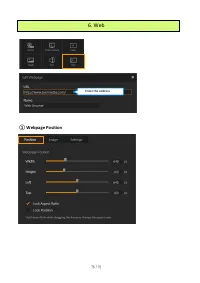
Page 63 - Position
Page 65 - Open the menu by
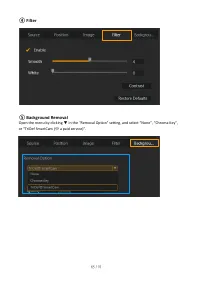
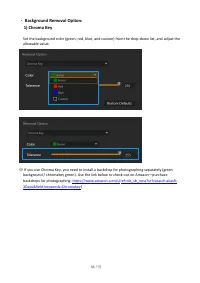
6 5 / 91 ④ Filter ⑤ Background Removal Open the menu by clicking ▼ in the "R emoval Option" setting , and se lect “ N one ”, “Chroma Key”, or “TriDef SmartCam ( ※ a paid service)”.
Page 66 - If you use Chroma Key, you need to install
66 / 91 ・ Background Removal Option: 1) Chroma Key Set the background color (green, red, blue, and custom) from the drop-down list, and adjust the allowable value. ※ If you use Chroma Key, you need to install a b ackdrop for photographing separately (green background / c hromakey green). Use the lin...
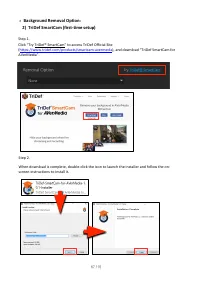
Page 67 - SmartCam” to access TriDef Official Site
6 7 / 91 ・ Background Removal Option : 2) TriDef SmartCam (first-time setup ) Step 1. Click “Try TriDef ® SmartCam” to access TriDef Official Site ( https://www.tridef.com/products/smartcam-avermedia ), and download “TriDef SmartCam for A V erMedia”. Step 2. When download is complete, double-click t...
Page 68 - Precautions for Use; user g
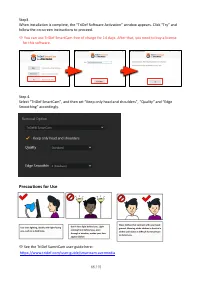
68 / 91 Step3. When installation is complete, the “TriDef Software Activation” window appears. Click “Try” and follow the on-screen instructions to proceed. ※ You can use TriDef SmartCam free of charge for 14 days. After that, you need to buy a license for this software. Step 4. Select “TriDef Smart...
Page 69 - Capture Mode; Select the Capture M
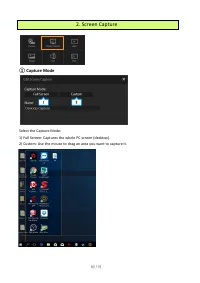
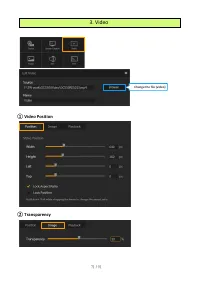
69 / 91 ① Capture Mode Select the Capture M ode : 1) Full S creen: Captures the whole PC screen (desktop). 2) Custom: Use the mouse to drag an area you want to capture it. 2. Screen Capture 1 2
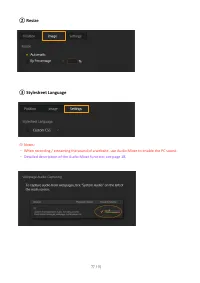
Page 77 - When recording / streaming the sound of
77 / 91 ② R esize ③ Stylesheet Language ※ Notes: ・ When recording / streaming the sound of a w ebsite, use Audio Mixer to enable the PC sound. ・ Detailed description of the Audio Mixer f unction: s ee page 1 8 .
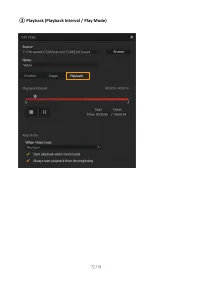
Page 78 - How to View Live Editing
7 8 / 91 L ive Editing is the function in which you can view and cut the videos cached in your storage . When the storage is full, older footages will be overwritten. ※ Notes: How to View Live Editing ① - ③ T ime mark s of the start/stop point of the video clip created (delimiter) ④ S pecified time ...
Page 81 - How to View
81 / 91 Use Function Dial to select “ Media Share ” to display the f ile m anag ing and s haring menu. 1 Folders of video / still image files are sorted by category or created date 2 Video / s till Image l ist (videos / still image files classified in this category): Double-click the video / still i...
Page 84 - Export
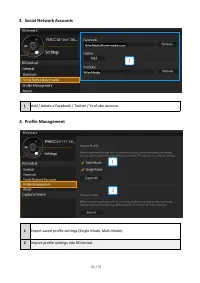
84 / 91 3. Social Network Accounts 4. Profile Management 1 Export saved profile settings (Single M ode, Multi Mode ). 2 Import profile setting s into RECentral. 1 Add / delete a Facebook / Twitter / YouTube account. 1 1 2
Page 86 - are
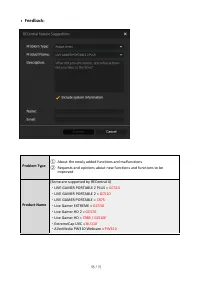
86 / 91 ・ Feedback: Problem Type Product Name (Some are support ed by RECentral 4 ) ・ LIVE GAMER PORTABLE 2 PLUS = GC513 ・ LIVE GAMER PORTABLE 2 = GC510 ・ LIVE GAMER PORTABLE = C875 ・ Live Gamer EXTREME = GC550 ・ Live Gamer HD 2 = GC570 ・ Live Gamer HD = C985 / GL510E ・ ExtremeCap UVC = BU110 ・ AVer...
Page 87 - Set; ON; p a Device
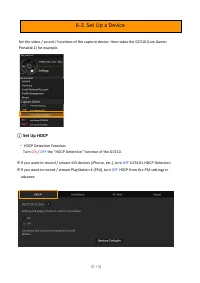
87 / 91 Set the video / sound / functions of the capture device. Here takes the GC510 (Live Gamer Portable 2) for example. ① Set U p HDCP ・ HDCP Detection Function: Turn ON / OFF the “HDCP Detection” function of the GC510 . ※ If you want to record / stream iOS device s (iPhone, etc.), turn OFF GC510...
Page 88 - launch RECentral; When; actions; Press and; uit
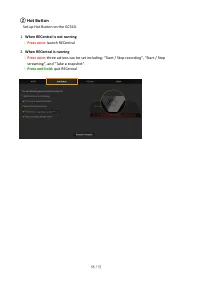
88 / 91 ② Hot B utton Set up Hot B utton on the GC510 . 1. When RECentral i s not running - Press once : launch RECentral 2. When RECentral is running - Press once : t hree actions can be set including : “Start / Stop r ecording”, “Sta r t / Stop s treaming”, and “Take a s napshot”. - Press and h ol...
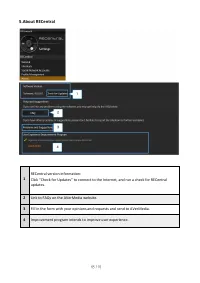
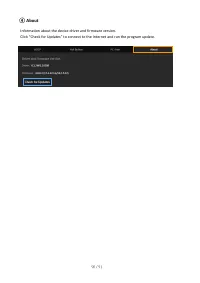
Page 90 - About; about
90 / 91 ④ About I nformation about the d evice d river and f irmware version . Click “Check for Update s ” to connect to the Internet and run the p rogram u pdate.
Page 91 - Protecting Customer Privacy; dealing with customers; Contact Information; Chapter 7: Other Information; , repairs after purchase and
91 / 91 Protecting Customer Privacy ・ AVerMedia Technologies collects customer 's personal information only for the purpose of dealing with customers and providing them service . In addition, the customer personal information collected will not be disclosed to any third party without prior approval ...