Page 2 - TABLE OF CONTENTS
TABLE OF CONTENTS Range Safety 3 Important Safe guides 4 The Anti-tip Bracket 5 Help Us Help You … 6 Parts and Features 7 - 9 Before Using Your Gas Range 10 Important Precautions and Recommendations 11 - 13 How to use the top burners 14 - 15 How to use the Gas oven 16 - 19 Oven light 20 Care and Mai...
Page 3 - RANGE SAFETY; IN THE COMMONWEALTH OF MASSACHUSETTS
RANGE SAFETY Your safety and the safety of others are very important. We have provided many important safety messages in this manual and on your appliance. Always read and obey all safety messages. This is the Safety Alert Symbol. This symbol alerts you to potential hazards that can kill or injure y...
Page 4 - IMPORTANT SAFE GUIDES
IMPORTANT SAFE GUIDES Before the appliance is used, it must be properly positioned and installed as described in this manual, so read the manual carefully. To reduce the risk of fire, electrical shock or injury when using the appliance, follow basic precaution, including the following: • • It is rec...
Page 5 - THE ANTI-TIP BRACKET; WARNING; ALL RANGES CAN TIP; Slide range forward.
THE ANTI-TIP BRACKET The range will not tip during normal use. However, the range can tip if you apply too much force or weight to the open door without the anti-tip bracket fastened down properly. To reduce the risk of tipping the appliance, the appliance must be secured by properly installed anti-...
Page 6 - IF YOU NEED SERVICE
HELP US HELP YOU... Read this guide carefully. It is intended to help you operate and maintain your new Gas Range properly. Keep it handy to answer your questions. If you don't understand something or you need more assistance, please call: Avanti Customer Service 800-220-5570 Keep proof of original ...
Page 7 - PARTS & FEATURES
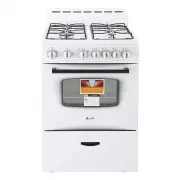
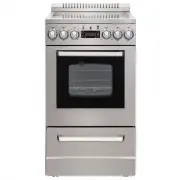
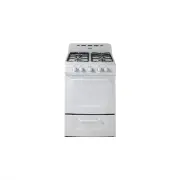
PARTS & FEATURES 1 Backsplash 2 Oven Vent 3 Sealed Burners (Total 4) 4 Control Panel 5 Oven Door Handle 6 Oven Door 7 Drawer Handle 8 Drawer 9 Leveling Legs (Total 4) 10 Anti-tip Bracket 11 Cooktop 12 Pan Supports (Total 2) 13 Inlet Pipe 14 Regulator 15 Power Cord 16 Back Plate 1 2 3 4 5 6 7 8 9...
Page 8 - COOKTOP; Auxiliary; CONTROL PANEL; Oven Controls
COOKTOP BTU/hr Ratings 20” 24” 1 Auxiliary 2800 2500 2 Right Semi-rapid 4600 4300 3 Left Semi-rapid 4600 4300 4 Rapid 8800 8000 CONTROL PANEL Models: GR2011CW / GR2012CB / GR2013CSS Oven Controls Cooktop Control 1 Oven Light ON / OFF Knob 3 Front Left Burner Control Knob 2 Oven Temperature Control...
Page 10 - BEFORE USING YOUR GAS RANGE; Before Using Your Gas Range
BEFORE USING YOUR GAS RANGE WARNING!! HAVE THIS RANGE INSTALLED BY A QUALIFIED INSTALLER. Improper installation, adjustment, alteration, services, or maintenance can cause injury or property damage. Consult a qualified installer, service agency, or the gas supplier. Before Using Your Gas Range √ R...
Page 11 - YOUR PRODUCT IS PRE-INSTALLED WITH NATURAL
Important: This appliance is designed and manufactured solely for the cooking of domestic (household) food and is not suitable for any non-domestic application and therefore CANNOT be used in a commercial environment. The appliance guarantee will be void if the appliance is used within a non-domes...
Page 12 - IMPORTANT PRECAUTIONS AND RECOMMENDATIONS
IMPORTANT PRECAUTIONS AND RECOMMENDATIONS √ After having unpacked the appliance, check to ensure that it is not damaged and that the oven door closes correctly. In case of doubt, do not use it and consult your supplier or a professionally qualified technician. √ Packing elements (i.e. plastic bags, ...
Page 13 - GENERAL INFORMATION; Do not obstruct the flow of combustion and ventilation air.; CAUTION; Do not try to light any appliance.
IMPORTANT PRECAUTIONS AND RECOMMENDATIONS FOR USE OF ELECTRICAL APPLIANCES Use of any electrical appliance implies the necessity to follow a series of fundamental rules. In particular: ✓ Never touch the appliance with wet hands or feet; ✓ Do not operate the appliance barefooted; ✓ Do not allow chi...
Page 14 - ELECTRICAL GROUNDING INSTRUCTIONS; FOR PERSONAL SAFETY, THIS APPLIANCE MUST BE PROPERLY GROUNDED.; remove the grounding prong from the plug.; REPLACEMENT PARTS; nearest AVANTI parts distributor in your area.; CARBON MONOXIDE WARNING
WARNING!! ELECTRICAL GROUNDING INSTRUCTIONS FOR PERSONAL SAFETY, THIS APPLIANCE MUST BE PROPERLY GROUNDED. This appliance is equipped with a three-prong grounding plug for your protection against shock hazard and should be plugged directly into a properly grounded socket. Do not cut or remove the ...
Page 15 - HOW TO USE THE TOP BURNERS; GAS BURNERS; LIGHTING GAS BURNERS
HOW TO USE THE TOP BURNERS GAS BURNERS Gas flow to the burners is adjusted by turning the knobs which control the valves. Turning the knob so that the indicator line points to the symbols printed on the panel achieves the following functions: When knob is rotated to the maximum position it will pe...
Page 16 - CHOICE OF BURNER; HOW TO USE THE GAS OVEN; GENERAL FEATURES
CHOICE OF BURNER The symbols printed on the panel above the gas knobs indicate the correspondence between the knob and the burner. The most suitable burner is to be chosen according to the diameter and volume capacity of the container to be warmed. It is important that the diameter of the pots or ...
Page 17 - OVEN BURNER; OVEN THERMOSTAT; GAS OVEN SETTING
OVEN BURNER Carries out normal “oven cooking”. The gas flow to the burner is regulated by a thermostat which allows to maintain the desired oven temperature. The control of the temperature is assured by a thermostatic probe positioned inside the oven. The probe must be always kept in its housing, in...
Page 18 - IGNITION OF THE OVEN BURNER
IGNITION OF THE OVEN BURNER The thermostat allows the automatic control of the temperature. The gas delivery to the oven burner is controlled by a two way thermostatic tap (oven and broil burners) with flame-failure device. To light the oven burner operate as follows: 1) Open the oven door to its fu...
Page 20 - OVEN LIGHT; BROILING; Never obstruct the oven vent slots on the backsplash.
OVEN LIGHT The range is equipped with a light that illuminates the oven to enable visually controlling the food that is cooking. This light is controlled by a knob on the control panel. BROILING Very important: the broil burner must always be used with the oven door closed. Position the oven rack on...
Page 21 - GAS VALVES
CARE & MAINTENANCE GENERAL RECOMMENDATION Important: Before any operation of cleaning and maintenance disconnect the appliance from the electrical supply. It is advisable to clean when the appliance is cold and especially for cleaning the enameled parts. 、 Avoid leaving alkaline or acidic substa...
Page 22 - OVEN RACK INSTALLATION AND REMOVAL
BURNERS AND GRIDS ✓ These parts can be removed and cleaned with appropriate products. ✓ After cleaning, the burners and their flame distributors must be well dried and correctly replaced. ✓ It is very important to check that the burner flame distributor and the cap has been correctly positioned - fa...
Page 23 - REMOVABLE STORAGE DRAWER; Lift the left small hook upward, at; Do not store flammable material in the oven or in the bottom drawer.; REMOVING THE OVEN DOOR; hook
REMOVABLE STORAGE DRAWER ① Lift the left small hook upward, at the same time, push the right small hook downward.(see the picture ) ② Pull the drawer out. ③ To replace the drawer, align the drawer with the rails and push inward. Do not store flammable material in the oven or in the bottom drawer. RE...
Page 25 - PROBLEMS WITH YOUR GAS RANGE?; TROUBLESHOOTING GUIDE
PROBLEMS WITH YOUR GAS RANGE? You can solve many common appliance problems easily, saving you the cost of a possible service call. Try the suggestions below to see if you can solve the problem before calling the servicer. TROUBLESHOOTING GUIDE FIND YOUR PROBLEM HERE POSSIBLE CAUSE HOW TO FIX IT Surf...
Page 26 - SERVICE FOR YOUR GAS RANGE
Range not set for appropriate gas input. See range conversion section of installation manual. Smoke or odor on initial oven operation. This is normal. Range is not level. Poor installation. Place oven rack in center of oven. Place a level on the rack. Adjust leveling legs. Weak or unstable floor. Be...
Page 27 - YOUR AVANTI PRODUCTS WARRANTY; WARRANTY – GAS RANGE; LENGTH OF WARRANTY
YOUR AVANTI PRODUCTS WARRANTY WARRANTY – GAS RANGE LENGTH OF WARRANTY WE WILL PAY FOR FULL ONE YEAR WARRANTY FROM DATE OF PURCHASE ON ALL PARTS EXCEPT GLASS PARTS. IN RENTAL OR COMMERCIAL USE, THE WARRANTY PERIOD IS 90 DAYS. REPLACEMENT PARTS AND REPAIR LABOR TO CORRECT DEFECTS IN MATERIALS OR WORKM...
Page 28 - EN MASSACHUSETTS; ANTES DE EMPEZAR
INSTRUCCIONES EN ESPAÑOL SEGURIDAD DE LA COCINA Su seguridad y la seguridad de otros son muy importantes. Hemos incluido muchos mensajes de seguridad en este manual y también en su artefacto. Siempre lea y siga todos los mensajes de seguridad. Este es el símbolo de Alerta de Seguridad. Este símbolo ...
Page 29 - MEDIDAS DE SEGURIDAD IMPORTANTES
MEDIDAS DE SEGURIDAD IMPORTANTES Antes de usar su electrodoméstico, debe posicionarlo e instalarlo tal como describimos en este manual, por lo tanto lea el manual cuidadosamente. Para reducir el riesgo de fuego, choque eléctrico o daño cuando use el electrodoméstico, siga estas precauciones básicas,...
Page 30 - EL ELEMENTO ANTI-VOLTEO; ADVERTENCIA; LA PERSONA PUEDE SUFRIR DAÑOS; Deslice la cocina hacia adelante.
• Piezas de repuesto – Solo debe utilizar piezas de reemplazo autorizadas por Avanti para darle mantenimiento a la cocina. Piezas de repuesto están disponibles en los Distribuidores de Fabrica autorizados. Contáctese con el Centro de Servicio de Avanti más cercano a ud. EL ELEMENTO ANTI-VOLTEO La co...
Page 31 - PIEZAS Y CARACTERISTICAS
PIEZAS Y CARACTERISTICAS 1 Panel Anti-salpicaduras 2 Ventilación del horno 3 Hornillas 4 Panel del controles 5 Manija de la puerta del horno 6 Puerta del horno 7 Manija de la gaveta de almacenamiento 8 Gaveta de almacenamiento 9 Patas niveladoras (4) 10 Elemento Anti-volteo 11 Superficie 12 Rejillas...
Page 32 - PERILLAS PARA EL HORNO
COCINA PANEL DE CONTROLES Modelos: GR2011CW / GR2012CB / GR2013CSS DESCRIPCION DE LOS CONTROLES PERILLAS PARA EL HORNO PERILLAS PARA LAS HORNILLAS 1 Interruptor para la luz del horno 3 Hornilla delantera izquierda 2 Control de temperatura del horno 4 Hornilla posterior izquierda 5 Hornilla pos...
Page 34 - ANTES DE USAR SU COCINA A GAS; Antes de usar su Cocina a gas
ANTES DE USAR SU COCINA A GAS ADVERTENCIA!! ASEGURESE QUE ESTA COCINA SEA INSTALADA POR UN TECNICO CALIFICADO. Instalación, ajustes, alteraciones, servicio o mantenimiento inapropiados pueden causar daños personales o a la propiedad. Consulte con un instalador calificado, agencia de servicios o prov...
Page 35 - PRECAUCIONES & RECOMENDACIONES; PRECAUCIONES Y RECOMENDACIONES IMPORTANTES
Se aconseja seguir las siguientes instrucciones: ✓ Limpie el interior del horno con un trapito limpio, humedecido con agua y detergente neutral, luego seque cuidadosamente. ✓ Coloque las rejillas y bandeja del horno en su lugar. ✓ Encienda el horno a la temperatura máxima para eliminar cualquier res...
Page 36 - Nunca toque el electrodoméstico con las manos o pies mojados
✓ Para evitar cualquier posible riesgo, el electrodoméstico solamente debe ser instalado por un técnico calificado. Cualquier reparación hecha por personas no calificadas puede resultar en choque eléctrico o corto circuito. Para evitar cualquier daño posible a su persona o al electrodoméstico, no in...
Page 37 - INFORMACION GENERAL; basada en consideración a la seguridad.; INSTRUCCIONES DE CONEXION ELECTRICA A TIERRA; PARA SEGURIDAD PERSONAL, ESTE ELECTRODOMESTICO DEBE SER
INFORMACION GENERAL ADVERTENCIA!! 1. Este electrodoméstico no se debe usar para calentar la habitación. Esta información está basada en consideración a la seguridad. 2. La pared detrás de este electrodoméstico y el piso bajo este electrodoméstico deben estar sellados y no tener aperturas. 3. Mante...
Page 38 - PIEZAS DE REEMPLAZO; ADVERTENCIA: MONOXIDO DE CARBONO
PIEZAS DE REEMPLAZO Solo debe utilizar piezas de reemplazo autorizadas por Avanti para darle mantenimiento a la cocina. Piezas de repuesto están disponibles en los Distribuidores de Fabrica autorizados. Contáctese con el Centro de Servicio de Avanti más cercano a ud. QUÉ HACER SI HUELE A GAS • NO IN...
Page 39 - COMO USAR LAS HORNILLAS; HORNILLAS A GAS; ENCENDIENDO LAS HORNILLAS DE GAS; SELECCIONANDO EL USO DE LAS HORNILLAS
COMO USAR LAS HORNILLAS HORNILLAS A GAS El flujo de gas a las hornillas se ajusta al girar las perillas que controlan las válvulas. Girando la perilla para que la línea indicadora apunte a los símbolos marcados en el panel logra las siguientes funciones: La posición de rotación máxima permite que ...
Page 40 - COMO USAR EL HORNO DE GAS; CARACTERISTICAS GENERALES
Los símbolos marcados en el panel arriba de las presillas indica la correspondencia entre la perilla y la hornilla La hornilla más apropiada se debe elegir de acuerdo al diámetro y capacidad volumétrica del recipiente que se va a usar. Es muy importante que el diámetro de las ollas o sartenes coinci...
Page 41 - CALENTADOR DEL HORNO; TERMOSTATO DEL HORNO; TEMPERATURAS DEL HORNO A GAS
CALENTADOR DEL HORNO Permite cocción normal del horno. El flujo de gas al CALENTADOR se regula con un termostato que permite que la temperatura del horno se mantenga constante. El control de la temperatura se asegura con un termostato localizado en el interior del horno. El termostato se debe mant...
Page 42 - ENCENDIDO DEL CALENTADOR DEL HORNO
ENCENDIDO DEL CALENTADOR DEL HORNO El termostato permite el control automático de la temperatura. El suministro de gas al calentador del horno se controla con una llave termostática de dos lados (calentador del horno y de la parrilla) con un elemento de llama-falla. Para encender el calentador del...
Page 44 - LUZ DEL HORNO
LUZ DEL HORNO La cocina está equipada con una luz que ilumina el horno la cual permite control visual para los alimentos que está cocinando. Esta luz se controla con un botón de presión en el panel de control. USANDO LA PARRILLA (BROILING) Muy importante: el calentador de la parrilla se debe usa...
Page 45 - Mantenga los niños fuera de alcance.
ADVERTENCIA!! ADVERTENCIA-NOTA MUY IMPORTANTE Nunca obstruya las aperturas de ventilación del panel anti-salpicaduras. No use la parrilla sin la bandeja de cocción. Importante: Siempre use guantes protectores apropiados cuando inserte o remueva la bandeja de parrilla, rejillas, ollas, cacerolas u ot...
Page 46 - CUIDADO Y MANTENIMIENTO; RECOMENDACIONES GENERALES; Receptáculo polarizado de 3 puntas conectado a tierra.; PARTES ESMALTADAS
CUIDADO Y MANTENIMIENTO RECOMENDACIONES GENERALES Receptáculo polarizado de 3 puntas conectado a tierra. ADVERTENCIA: Riesgo de choque eléctrico Enchufe a un receptáculo de 3 puntas conectado a tierra. No remueva la tercera punta del enchufe. No use un adaptador. Fuego, choque eléctrico o muerte p...
Page 47 - DENTRO DEL HORNO; VALVULAS DE GAS; HORNILLAS Y REJILLAS
DENTRO DEL HORNO Esto se debe limpiar regularmente, Con el horno tibio, limpie las paredes internas con un trapito mojado en agua jabonosa muy caliente u otro producto similar. VALVULAS DE GAS En el caso que haya fallas en las válvulas de gas, llame al Departamento de Servicio. NOTA : El bombill...
Page 48 - INSTALACION Y RETIRO DE LA REJILLA DEL HORNO
En electrodomésticos con encendido eléctrico, verifique que el electrodo “ S ” est é siempre limpio para asegurar producción de chispas sin problemas. El enchufe de encendido debe ser limpiado cuidadosamente. INSTALACION Y RETIRO DE LA REJILLA DEL HORNO GAVETA DE ALMACENAJE REMOVIBLE La gaveta s...
Page 50 - INSTALACION DEL ELEMENTO ANTI-VOLTEO
INSTALACION DEL ELEMENTO ANTI-VOLTEO Para reducir el riesgo que la cocina se voltee debido a uso indebido de esta o de la puerta del horno, la cocina debe ser asegurada a su sitio instalando correctamente el elemento anti-volteo empacado con el electrodoméstico. • Coloque el elemento anti-volteo e...
Page 51 - Registration Information; Avanti Registration Card
Registration Information Thank you for purchasing this fine Avanti product. Please fill out this form and return it to the following address within 100 days from the date of purchase and receive these important benefits: Avanti Products, LLC. P.O.Box 520604 – Miami, Florida 33152 Protect your prod...
Page 52 - PRINTED IN CHINA


 Avanti DER20P3S
User Manual
Avanti DER20P3S
User Manual
 Avanti DER24P3S
User Manual
Avanti DER24P3S
User Manual
 Avanti DGR20P3S
User Manual
Avanti DGR20P3S
User Manual
 Avanti DGR24P3S
User Manual
Avanti DGR24P3S
User Manual
 Avanti ERU200P3S
User Manual
Avanti ERU200P3S
User Manual
 Avanti GR2011CW
User Manual
Avanti GR2011CW
User Manual
 Avanti GRO20P0W
User Manual
Avanti GRO20P0W
User Manual