Page 2 - TABLE OF CONTENTS
2 TABLE OF CONTENTS Help Us Help You … 3 Range Safety 4 Important Safeguides 5 The Anti-tip Bracket 6 Parts and Features 7 Important Safety Instructions 8 – 9 Installation Instructions 10 Before Using Your Electric Range 10 Important Precautions and Recommendations 11 Installation of Your Electric R...
Page 3 - Please write these numbers here:; IF YOU NEED SERVICE
3 HELP US HELP YOU... Read this guide carefully. It is intended to help you operate and maintain your new appliance properly. Keep it handy to answer your questions. If you don't understand something or you need more help, please call: Avanti Customer Service 800-220-5570 Keep proof of original purc...
Page 4 - RANGE SAFETY; Your safety and the safety of others are very important.; Warning means that failure to heed this; PROP. 65 WARNING FOR CALIFORNIA RESIDENTS
4 RANGE SAFETY Your safety and the safety of others are very important. We have provided many important safety messages in this manual and on your appliance. Always read and obey all safety messages. This is the Safety Alert Symbol. This symbol alerts you to potential hazards that can kill or injure...
Page 5 - IMPORTANT SAFEGUIDES; Do not obstruct the flow of ventilation air.
IMPORTANT SAFEGUIDES Before the appliance is used, it must be properly positioned and installed as described in this manual, so read the manual carefully. To reduce the risk of fire, electrical shock or injury when using the appliance, follow basic precaution, including the following: • It is recomm...
Page 6 - THE ANTI-TIP BRACKET
6 THE ANTI-TIP BRACKET The range will not tip during normal use. However, the range can tip if you apply too much force or weight to the open door without the anti-tip bracket fastened down properly. To reduce the risk of tipping the appliance, the appliance must be secured by properly installed ant...
Page 9 - This Unit Is For Indoor Use Only
9 • Do Not Soak Removable Heating Elements – Heating elements should never be immersed in water. • Do Not Cook on Broken Cook-top – If cook-top should break, cleaning solutions and spillovers may penetrate the broken cook-top and create a risk of electric shock. Contact a qualified technician immedi...
Page 10 - NOTICE; Before you use this range for the first time; INSTALLATION INSTRUCTIONS; IMPORTANT – SAVE FOR THE LOCAL ELECTRICAL INSPECTOR’S USE.
WARNING HAVE THIS RANGE INSTALLED BY A QUALIFIED INSTALLER. Improper installation, adjustment, alteration or maintenance can cause injury or property damage. Consult a qualified installer or service agency. NOTICE Before you use this range for the first time : The heating elements have a protective ...
Page 11 - IMPORTANT PRECAUTIONS AND RECOMMENDATIONS; After use, ensure that the knobs are in
11 Ø IMPORTANT PRECAUTIONS AND RECOMMENDATIONS After having unpacked the range, check to ensure that it is not damaged, and the oven door closes correctly. In case of doubt, do not use it and consult your supplier or a professionally qualified technician. Packing elements (i.e. plastic bags, polysty...
Page 12 - WARNING
12 Ø INSTALLATION OF ELECTRIC RANGE • The electric range must be installed by a qualified technician. Make sure you have everything necessary for correct installation. It is the installer’s responsibility to comply with installation clearances specified in the manual. • Cabinet opening dimensions th...
Page 15 - Make the locations of 2 holes of ant-tip bracket on the floor.
15 Ø LEVELING THE RANGE The range must be level to obtain proper operating. The four screws type leveling legs located on the corners at the bottom of range should be adjusted by turning them clockwise to make the range higher or counter-clockwise to lower the range until the range is level. Use a l...
Page 16 - OPERATING YOUR RANGE; CONTROL PANEL; Front Left Burner Knob
16 OPERATING YOUR RANGE Ø CONTROL PANEL MODEL: DER20P3S 1. Front Left Burner Knob 2. Rear Left Burner Knob 3. Oven Temperature Selector Knob 4. Oven Indicator Light (Green) 5. Hot Surface Indicator Light (Red) 6. Cooktop Indicator Light (Green) 7. Oven Function Selector Knob 8. Front Right Burner Kn...
Page 17 - To turn the oven light ON or OFF simply press the OVEN LIGHT /; OPERATING INDICATOR LIGHTS; The OVEN and BURNERS indicating lights will come; OVEN RACK
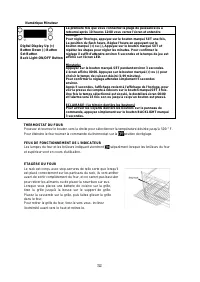
17 Ø USING THE TIMER DIGITAL KITCHEN TIMER Digital Display Up (+) Button Down (-) Button Set Button Oven Light/Back Light ON/OFF Button When you first plug in the range or power has returned after 10 hours you will see 12:00 in the display and hear an alarm tone. CLOCK: To set the clock, press the S...
Page 18 - distributed by radiation.; Do not broil without using the broiler; After use, turn the Oven Function Control and Oven Temperature
18 Ø HOW TO USE THE OVEN The oven is controlled by two separate knobs, the Broil / Oven Control Knob is used to select the mode of operation used for cooking and the Oven Temperature Knob which is used to set the desired cooking temperature. When the Broil / Oven Control knob is in the or “standby” ...
Page 19 - This range is equipped with an automatic rotisserie for roasting.
19 Always remember that when the oven is hot, outside surfaces of the range get hot. IMPORTANT: Always use suitable protective gloves when inserting/removing the broiler pan, shelves, pans and other cooking utensils from the oven. OVEN RACK The rack is designed with stop-locks so that when placed co...
Page 20 - USING THE SURFACE UNITS; NEVER COOK DIRECTLY ON THE GLASS, ALWAYS USE APPROPRIATE COOKWARE.; BURNER CONTROL KNOB
20 Ø USING THE SURFACE UNITS • Use care when touching the cooktop. The glass surface of the cooktop will retain heat after the controls have been turned off. • Do not use the cooktop if broken. If the glass should break, cleaners and or spills may penetrate the broken cooktop and present a risk of e...
Page 21 - CARE AND MAINTENANCE; GENERAL INFORMATION; Lift the left small hook upward, at; Do not store flammable material in the oven or in the bottom drawer.; REPLACING THE OVEN LIGHT
21 CARE AND MAINTENANCE Ø GENERAL INFORMATION • CAUTION: Before any operation of cleaning and maintenance disconnect the appliance from the electrical supply. • It is advisable to clean when the appliance is cold and especially for cleaning the enameled parts. • Avoid leaving alkaline or acidic subs...
Page 22 - PROBLEM
22 PROBLEMS WITH YOUR ELECTRIC RANGE? You can solve many common appliance problems easily, saving you the cost of a possible service call. Try the suggestions below to see if you can solve the problem before calling the servicer. TROUBLESHOOTING GUIDE PROBLEM POSSIBLE CAUSE Surface units will not ma...
Page 23 - SERVICE FOR YOUR APPLIANCE; AVANTI PRODUCTS CUSTOMER SERVICES; WIRING DIAGRAM
23 SERVICE FOR YOUR APPLIANCE We are proud of our customer service organization and the network of professional service technicians that provide service on your Avanti appliances . With the purchase of your Avanti appliance, you can have the confidence that if you ever need additional information or...
Page 24 - WHAT IS COVERED – LIMITED ONE-YEAR WARRANTY
24 YOUR AVANTI PRODUCTS WARRANTY Staple your sales receipt here. Proof of original purchase date is needed to obtain service under warranty. WHAT IS COVERED – LIMITED ONE-YEAR WARRANTY Avanti Products warrants that the product is free from defects in materials and/or workmanship for a period of twel...
Page 25 - INSTRUCCIONES EN ESPAÑOL
25 INSTRUCCIONES EN ESPAÑOL Antes de usar su artefacto, debe posicionarlo correctamente e instalarlo tal como se describe en este manual, así que lea el manual cuidadosamente. Para reducir el riesgo de incendio, choque eléctrico o daño cuando use la cocina, siga las precauciones básicas, incluyendo ...
Page 30 - OPERANDO SU COCINA
30 MODELO: DER24P3S OPERANDO SU COCINA MODELO: DER20P3S 1. Perilla de la hornilla delantera izquierda 2. Perilla de la hornilla trasero izquierdo 3. Perilla selectora de temperatura del horno 4. Luz indicadora del horno 5. Luz indicadora de superficie caliente 6. Luz indicadora de la estufa 7. Peril...
Page 31 - Reloj / Contador de tiempo digital; LUCES INDICADORAS; Para encender la luz del horno encendido o apagado
31 Reloj / Contador de tiempo digital Ø LUCES INDICADORAS La luz del horno o la de las hornillas se encenderán independientemente cuando el horno o las hornillas respectivamente se enciendan. Ø LUZ DEL HORNO El horno está equipado con una luz que ilumina el horno para permitir el control de la comid...
Page 32 - Calentador de BAKE 2100 W (elemento inferior); TERMOSTATO DEL HORNO; puerta completamente y luego retire los alimentos.
32 CÓMO USAR EL HORNO El horno se controla mediante dos perillas separadas, la perilla de control de modo se usa para seleccionar el modo de operación utilizado para cocinar y la perilla de temperatura del horno que se usa para ajustar la temperatura de cocción deseada. Cuando la perilla de control ...
Page 33 - REJILLA DEL HORNO; Este aparato está equipado con un asador automático para asar.; USANDO LAS UNIDADES DE SUPERFICIE
33 Recuerde que cuando el horno esté caliente, las superficies externas también estarán calientes. IMPORTANTE Siempre use guantes de cocina protectores cuando coloque o retire la bandeja de asar, las rejillas, recipientes u otros utensilios de cocina fuera del horno. REJILLA DEL HORNO La rejilla est...
Page 34 - CONSEJOS PARA USAR LA COCINA; energía y acortar los tiempos de cocción.
34 CONSEJOS PARA USAR LA COCINA Las características físicas de las ollas y sartenes influencian el desempeño de cualquier cocina. Por tanto, debe enfatizar la importancia de usar el equipo de cocina apropiado. o Use equipo de cocina con fondos planos y tapas que ajusten bien, para conservar energía ...
Page 36 - PROBLEMAS CON SU COCINA ELECTRICA?
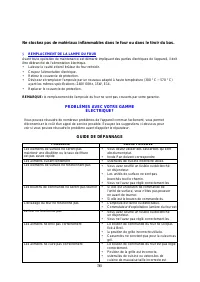
36 PROBLEMAS CON SU COCINA ELECTRICA? Ud. Puede resolver muchos problemas comunes a los electrodomésticos fácilmente, ahorrándose el costo de una posible llamada al servicio técnico. Pruebe las sugerencias mencionadas abajo para ver si puede resolver el problema antes de llamar al servicio técnico. ...
Page 37 - SI VOUS AVEZ BESOIN DE SERVICE
37 AIDEZ NOUS À VOUS AIDER ... Lisez attentivement ce guide. Il est destiné à vous aider à utiliser et à maintenir votre nouvel appareil correctement. Garde-le à portée de main pour répondre à vos questions. Si vous ne comprenez pas quelque chose ou vous avez besoin de plus d'aide, s'il vous plaît a...
Page 39 - APPAREIL SÉCURITÉ
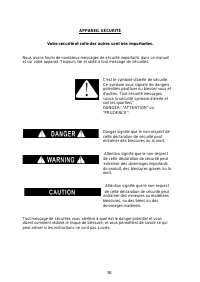
APPAREIL SÉCURITÉ Avant L’appareil est utilisé, il doit être correctement positionné et installé comme décrit dans ce manuel, afin de lire attentivement le manuel. Pour réduire le risque d'incendie, choc ou de blessure électrique lors de l'utilisation du l’appareil, Suivez les précautions de bases, ...
Page 40 - ATTENTION
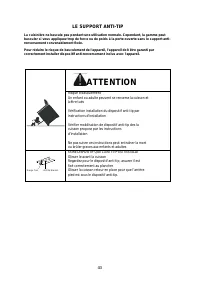
40 LE SUPPORT ANTI-TIP La cuisinière ne bascule pas pendant une utilisation normale. Cependant, la gamme peut basculer si vous appliquez trop de force ou de poids à la porte ouverte sans le support anti- renversement convenablement fixée. Pour réduire le risque de basculement de l'appareil, l'appare...
Page 41 - PIÈCES ET CARACTÉRISTIQUES
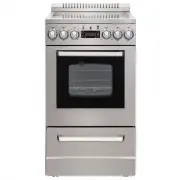
41 PIÈCES ET CARACTÉRISTIQUES 1. Dosseret avec orifice du four intégré 2. Table de cuisson 3. Panneau de contrôle 4. Poignée four 5. Porte du four 6. Tiroir de rangement 7. Poignée tiroir de rangement 8. Pieds de nivellement (4)
Page 42 - Lisez toutes les instructions avant d'utiliser la gamme.
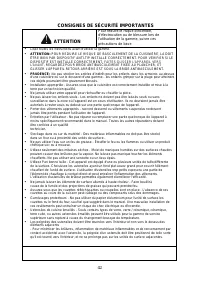
42 CONSIGNES DE SÉCURITÉ IMPORTANTES ATTENTION Pour réduire le risque d'incendie, d'électrocution ou de blessure lors de l'utilisation de la gamme, suivre ces précautions de base: • Lisez toutes les instructions avant d'utiliser la gamme. • ATTENTION: POUR REDUIRE LE RISQUE DE BASCULEMENT DE LA CUIS...
Page 43 - Cette unité est à usage intérieur uniquement; -GUARDES CES CONSIGNES
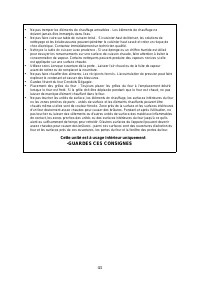
43 • Ne pas tremper les éléments de chauffage amovibles - Les éléments de chauffage ne doivent jamais être immergés dans l'eau. • Ne pas faire cuire sur table de cuisson brisé - Si cuisinier-haut doit briser, les solutions de nettoyage et les éclaboussures peuvent pénétrer le cuisinier haut cassé et...
Page 44 - INSTRUCTIONS D'INSTALLATION; IMPORTANT - CONSERVER POUR L'UTILISATION DU INSPECTEURS LOCAUX.; AVEZ CETTE GAMME INSTALLÉE PAR UN INSTALLATEUR QUALIFIÉ.; CONSULTER UN INSTALLATEUR QUALIFIÉ OU UNE AGENCE DE SERVICE.; IMPORTANTS; Avant yous utiliser cette plage pour la première fois
INSTRUCTIONS D'INSTALLATION IMPORTANT - CONSERVER POUR L'UTILISATION DU INSPECTEURS LOCAUX. Ø AVANT D'UTILISER VOTRE CUISINIÈRE ÉLECTRIQUE • Retirez l'emballage extérieur et intérieur. • Vérifiez que vous avez toutes les pièces suivantes: • 2 grilles de four • 1 Plateau et Grille • 1 Anti-tip Bracke...
Page 45 - PRÉCAUTIONS ET RECOMMANDATIONS IMPORTANTES
45 Ø PRÉCAUTIONS ET RECOMMANDATIONS IMPORTANTES Après avoir déballé la plage, vérifiez qu'il ne soit pas endommagé et la porte du four ferme correctement. En cas de doute, ne pas l'utiliser et de consulter votre fournisseur ou un technicien professionnel qualifié. éléments d'emballage (par exemple d...
Page 46 - INSTALLATION DE L’CUISINIÈRE ÉLECTRIQUE
46 dangereuses soient rendues inoffensives, en particulier en ce qui concerne les enfants qui pourraient jouer avec de vieux appareils. Retirez la porte avant de l'éliminer pour éviter l'emprisonnement. Ø INSTALLATION DE L’CUISINIÈRE ÉLECTRIQUE • La gamme électrique doit être installé par un technic...
Page 47 - CONNEXION ÉLECTRIQUE; AVERTISEMENT; bang c
47 Ø CONNEXION ÉLECTRIQUE • L’appareil correctement réinstallée et garrondie by une qualifié technicienne conformité avec le National Electrical Code ANSI / NFPA n ° 70 (dernière édition) et les exigences locales du code électrique. L'installation doit être faite par un électricien agréé. • La gamme...
Page 49 - Assembler la décharge de traction dans le trou sur le; FILS CORDON INSTALLATION; Branchez les rondelles et serrer les écrous.
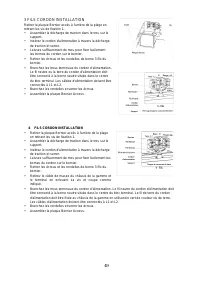
49 3 FILS CORDON INSTALLATION Retirer la plaque Bornier accès à l'arrière de la plage en retirant les vis de fixation 1. • Assembler la décharge de traction dans le trou sur le support. • Insérez le cordon d'alimentation à travers la décharge de traction et serrer. • Laissez suffisamment de mou pour...
Page 50 - Fixer le support au sol à l'aide des vis fournies.
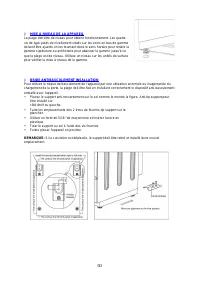
50 Ø MISE À NIVEAU DE LA APPAREIL La plage doit être de niveau pour obtenir fonctionnement. Les quatre vis de type pieds de nivellement situés sur les coins en bas de gamme doivent être ajustés en les tournant dans le sens horaire pour rendre la gamme supérieure ou antihoraire pour abaisser la gamme...
Page 51 - UTILISATION DE VOTRE APPAREIL; PANNEAU DE CONTRÔLE
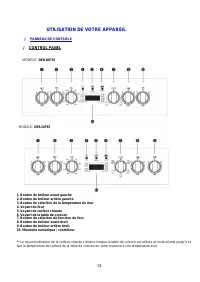
51 MODELE: DER24P3S UTILISATION DE VOTRE APPAREIL Ø PANNEAU DE CONTRÔLE º CONTROL PANEL MODELE: DER20P3S 1. Bouton de brûleur avant gauche 2. Bouton du brûleur arrière gauche 3. Bouton de sélection de la température du four 4. Voyant du four 5. Voyant de surface chaude 6. Voyant de la table de cuiss...
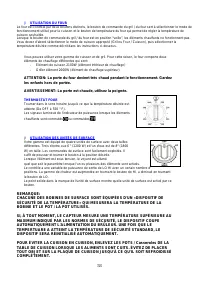
Page 52 - Pour éteindre le four tourner la commande du thermostat sur la; FEUX DE FONCTIONNEMENT DE L'INDICATEUR; Les lampes du four et les brûleurs indiquant viendront; ÉTAGÈRE DU FOUR
52 Numérique Minuteur THERMOSTAT DU FOUR Poussez et tournez le bouton vers la droite pour sélectionner la température désirée jusqu'à 500 ° F. Pour éteindre le four tourner la commande du thermostat sur la position de réglage. FEUX DE FONCTIONNEMENT DE L'INDICATEUR Les lampes du four et les brûleurs...
Page 53 - UTILISATION DU FOUR; Élément de cuisson 2100W (élément inférieur de chauffage); THERMOSTAT FOUR; chauffants sont commutés; UTILISATION DES UNITÉS DE SURFACE
53 Ø UTILISATION DU FOUR Le four est contrôlé par deux boutons distincts, le bouton de commande du gril / du four sert à sélectionner le mode de fonctionnement utilisé pour la cuisson et le bouton de température du four qui permet de régler la température de cuisson souhaitée. Lorsque le bouton de c...
Page 54 - CONSEILS DE CUISINE; entrer en contact avec les éléments.; et les voyants sont
54 IMPORTANT: Pour allumer, toujours appuyer légèrement le bouton de commande vers l'intérieur puis tourner. Ø CONSEILS DE CUISINE Les caractéristiques physiques des pots et des casseroles influencent les performances de tous les systèmes de cuisson. Par conséquent, l'accent doit être mis sur l'impo...
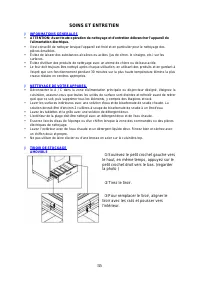
Page 55 - SOINS ET ENTRETIEN; INFORMATIONS GÉNÉRALES; Soulevez le petit crochet gauche vers
55 SOINS ET ENTRETIEN Ø INFORMATIONS GÉNÉRALES • ATTENTION: Avant toute opération de nettoyage et d'entretien débrancher l'appareil de l'alimentation électrique. • Il est conseillé de nettoyer lorsque l'appareil est froid et en particulier pour le nettoyage des pièces émaillées. • Évitez de laisser ...
Page 56 - REMPLACEMENT DE LA LAMPE DU FOUR; PROBLÈMES AVEC VOTRE GAMME; PROBLÈME
56 Ne stockez pas de matériaux inflammables dans le four ou dans le tiroir du bas. Ø REMPLACEMENT DE LA LAMPE DU FOUR Avant toute opération de maintenance est démarré impliquant des parties électriques de l'appareil, il doit être débranché de l'alimentation électrique. • Laissez la cavité et broil b...
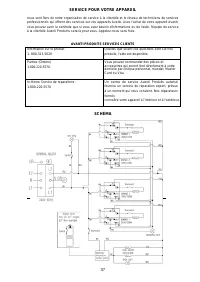
Page 57 - SERVICE POUR VOTRE APPAREIL; AVANTI PRODUITS SERVICES CLIENTS; Un centre de service Avanti Produits autorisé; SCHÉMA
57 SERVICE POUR VOTRE APPAREIL nous sont fiers de notre organisation de service à la clientèle et le réseau de techniciens de services professionnels qui offrent des services sur vos appareils Avanti. Avec l'achat de votre appareil Avanti, vous pouvez avoir la certitude que si vous avez besoin d'inf...
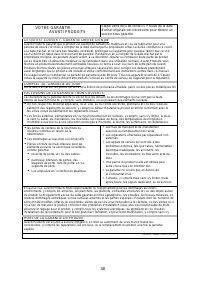
Page 58 - CE QUI EST COUVERT - GARANTIE LIMITÉE D'UN AN
58 VOTRE GARANTIE AVANTI PRODUITS Staple votre reçu de vente ici. Preuve de la date d'achat originale est nécessaire pour obtenir un service sous garantie. CE QUI EST COUVERT - GARANTIE LIMITÉE D'UN AN Avanti Products garantit que le produit est exempt de défauts de matériaux et / ou de fabrication ...
Page 59 - Registration Information; Avanti Products LLC; Avanti Registration Card; Is This Product Used In The:
59 Registration Information Thank you for purchasing this fine Avanti product. Please fill out this form and return it to the following address within 100 days from the date of purchase and receive these important benefits: Avanti Products LLC P.O.Box 520604 – Miami, Florida 33152 Ø Protect your pro...
Page 60 - PRINTED IN CHINA


 Avanti DER20P3S
User Manual
Avanti DER20P3S
User Manual
 Avanti DGR20P3S
User Manual
Avanti DGR20P3S
User Manual
 Avanti DGR24P3S
User Manual
Avanti DGR24P3S
User Manual
 Avanti ERU200P3S
User Manual
Avanti ERU200P3S
User Manual
 Avanti GR2011CW
User Manual
Avanti GR2011CW
User Manual
 Avanti GR2414CW
User Manual
Avanti GR2414CW
User Manual
 Avanti GRO20P0W
User Manual
Avanti GRO20P0W
User Manual