Page 2 - TABLE OF CONTENTS
2 TABLE OF CONTENTS Help Us Help You … 3 Appliance Safety 4 Important Safeguides 5 Parts and Features 6 Important Safety Instructions 7 - 8 Installation Instructions 9 Before Using Your Electric Cooktop 9 Important Precautions and Recommendations 10 Installation of Your Electric Cooktop 11 Electrica...
Page 3 - Read this guide carefully.; It is intended to help you operate and; Avanti Customer Service; Date of Purchase; IF YOU NEED SERVICE; THIS APPLIANCE IS NOT
3 HELP US HELP YOU... Read this guide carefully. It is intended to help you operate and maintain your new appliance properly. Keep it handy to answer your questions. If you don't understand something or you need more help, please call: Avanti Customer Service 800-220-5570 Keep proof of original purc...
Page 4 - APPLIANCE SAFETY; Your safety and the safety of others are very important.; This is the Safety Alert Symbol.
4 APPLIANCE SAFETY Your safety and the safety of others are very important. W e have provided many important safety messages in this manual and on your appliance. Always read and obey all safety messages. This is the Safety Alert Symbol. This symbol alerts you to potential hazards that can kill or i...
Page 5 - IMPORTANT SAFEGUIDES; Do not obstruct the flow of ventilation air.
5 IMPORTANT SAFEGUIDES Before the appliance is used, it must be properly positioned and installed as described in this manual, so read the manual carefully. To reduce the risk of fire, electrical shock or injury when using the appliance, follow basic precaution, including the following: • It is reco...
Page 8 - This Unit Is For Indoor Use Only
8 • Do Not Cook on Broken Cook-top – If cook-top should break, cleaning solutions and spillovers may penetrate the broken cook-top and create a risk of electric shock. Contact a qualified technician immediately. • Clean Cook-top With Caution – If a wet sponge or cloth is used to wipe spills on a hot...
Page 9 - BEFORE USING YOUR ELECTRIC COOKTOP; Remove the exterior and interior packing.; (Packed in the Styrofoam packing – DO NOT DISCARD); Please observe all local and national codes and ordinances.
9 INSTALLATION INSTRUCTIONS WARNING HAVE THIS APPLIANCE INSTALLED BY A QUALIFIED INSTALLER. Improper installation, adjustment, alteration or maintenance can cause injury or property damage. Consult a qualified installer or service agency. IMPORTANT – SAVE FOR THE LOCAL ELECTRICAL INSPECTOR’S USE. Ø ...
Page 10 - IMPORTANT PRECAUTIONS AND RECOMMENDATIONS; After use, ensure that the controls are in the
10 Ø IMPORTANT PRECAUTIONS AND RECOMMENDATIONS After having unpacked the appliance, check to ensure that it is not damaged and all accessories or items included were received. In case of doubt, do not use it and consult your supplier or a professionally qualified technician. Packing elements (i.e. p...
Page 11 - INSTALLATION OF ELECTRIC COOKTOP
11 Ø INSTALLATION OF ELECTRIC COOKTOP • The electric cooktop must be installed by a qualified technician. Make sure you have everything necessary for correct installation. It is the installer’s responsibility to comply with installation clearances specified in the manual. • Cabinet opening dimension...
Page 12 - WARNING
12 Ø ELECTRICAL CONNECTION The appliance must be properly installed and grounded by a qualified technician in accordance, with the National Electrical Code ANSI / NFPA No. 70 (Latest Edition) and local electrical code requirements. Installation should be made by a licensed electrician. The appliance...
Page 13 - OPERATING YOUR APPLIANCE; CONTROL PANEL; Push this button to turn the cooktop power on or off,; AUTOMATIC SHUT OFF TIMER
13 OPERATING YOUR APPLIANCE Ø CONTROL PANEL 1 Control Panel Lock Button 6 Rear Burner Selector Button 2 Front Burner Selector Button 7 Power ON / OFF Button 3 Reduce / Decrease ( - ) Button 8 Rear Burner Control Display 4 Timer Selector Button 9 Timer Control Display 5 Add / Increase ( + ) Button 10...
Page 14 - panel will be lock and will not allow any changes.; COOKWARE TIPS; and the indicator lights are
14 CONTROL PANEL LOCK: When the control panel lock is activated, the display will flash LO. This is a safety system that will automatically lock the controls after no activity on the control panel for approximately 1 minute. To deactivate the control panel lock, simply press and hold the button for ...
Page 15 - CARE AND MAINTENANCE; GENERAL INFORMATION; PROBLEMS WITH YOUR APPLIANCE?; PROBLEM
15 CARE AND MAINTENANCE Ø GENERAL INFORMATION • CAUTION: Before any operation of cleaning and maintenance disconnect the appliance from the electrical supply. • It is advisable to clean when the appliance is cold and especially for cleaning the glass cooktop. • Avoid leaving alkaline or acidic subst...
Page 16 - SERVICE FOR YOUR APPLIANCE; AVANTI PRODUCTS CUSTOMER SERVICES; WIRING DIAGRAM
16 SERVICE FOR YOUR APPLIANCE W e are proud of our customer service organization and the network of professional service technicians that provide service on your Avanti appliances. W ith the purchase of your Avanti appliance, you can have the confidence that if you ever need additional information o...
Page 17 - WHAT IS COVERED – LIMITED ONE-YEAR W ARRANTY; OUT OF WARRANTY PRODUCT
17 YOUR AVANTI PRODUCTS WARRANTY Staple your sales receipt here. Proof of original purchase date is needed to obtain service under warranty. WHAT IS COVERED – LIMITED ONE-YEAR W ARRANTY Avanti Products warrants that the product is free from defects in materials and/or workmanship for a period of twe...
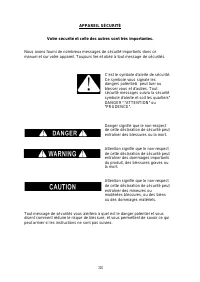
Page 18 - AVISO DE SEGURIDAD; Su seguridad y la seguridad de los demás son muy importantes.; Advertencia significa que si no se respeta
18 AVISO DE SEGURIDAD Su seguridad y la seguridad de los demás son muy importantes. Nosotros han incluido muchos mensajes importantes de seguridad en este manual y en su electrodoméstico. Siempre lea y obedezca todos los mensajes de seguridad. Éste es el símbolo de alerta de seguridad. Este símbolo ...
Page 19 - AVISO DE SEGURIDAD IMPORTANTE; No obstruya el flujo de aire de ventilación.
19 AVISO DE SEGURIDAD IMPORTANTE Antes de usar el aparato, tiene que estar bien posicionada e instalada como se describe en este manual, así que lea cuidadosamente el manual. Para reducir el riesgo de incendio, descarga eléctrica o lesiones al utilizar el aparato, siga las precauciones básicas, incl...
Page 20 - PIEZAS Y CARACTERÍSTICAS
20 PIEZAS Y CARACTERÍSTICAS 1. Botón del bloqueo del panel de control 2. Botón selector para la hornilla delantera 3. Botón para Reducir / Disminuir (-) 4. Botón selector para el reloj 5. Botón para Añadir / Aumentar (+) 6. Botón selector para la hornilla trasera 7. Botón para encender / apagar 8. S...
Page 22 - Esta unidad es para uso en interiores
22 • No cocine en un aparato defectuoso - Si el aparato se rompe, soluciones de limpieza y derrames pueden penetrar en la quebrada encimera y crear un riesgo de descarga eléctrica. Póngase en contacto con un técnico cualificado de inmediato. • Limpia el aparato con precaución - una esponja húmeda o ...
Page 23 - ANTES DE USAR LA CUBIERTA ELECTRIC; Retire la envoltura interna y externa.
23 INSTRUCCIONES DE INSTALACIÓN ADVERTENCIA ESTE APARATO REQUIERE INSTLACION POR UN INSTALADOR CALIFICADO. La instalación, ajuste, modificación o mantenimiento inadecuados pueden causar lesiones o daños materiales. Consulte a un instalador o servicio agencia calificada. IMPORTANTE - GUARDAR PARA EL ...
Page 24 - PRECAUCIONES Y RECOMENDACIONES IMPORTANTES; Después de su uso, asegúrese de que los controles estén en la; Peligro de quemaduras!; El aparato puede llegar a ser muy caliente durante el
24 Ø PRECAUCIONES Y RECOMENDACIONES IMPORTANTES Después de haber desembalado el aparato, compruebe que no está dañado y se recibieron todos los accesorios o elementos incluidos. En caso de duda, no lo use y consulte a su proveedor o un técnico cualificado profesionalmente. elementos de relleno (es d...
Page 25 - INSTALACIÓN DEL APARATO
25 Ø INSTALACIÓN DEL APARATO • El aparato debe ser instalada por un técnico cualificado. Asegúrate de que tienes todo lo necesario para una instalación correcta. Es responsabilidad del instalador cumplir con los requisitos de instalación especificadas en el manual. • Deben utilizarse dimensiones de ...
Page 26 - CONEXIÓN ELÉCTRICA; ADVERTENCIA
26 Ø CONEXIÓN ELÉCTRICA El aparato debe estar correctamente instalado y conectado a tierra por un técnico calificado de acuerdo con el Código Eléctrico Nacional ANSI / NFPA No. 70 (última edición) y los requisitos del código eléctrico local. La instalación debe hacerla un electricista autorizado. El...
Page 27 - FUNCIONAMIENTO DEL APARATO; PANEL DE CONTROL; Botón selector – hornilla trasera; Pulse este botón para encender o apagar el aparato.; Reloj
27 FUNCIONAMIENTO DEL APARATO Ø PANEL DE CONTROL 1 Botón selector del bloqueo del control de panel 6 Botón selector – hornilla trasera 2 Botón selector – hornilla delantera 7 Botón para encender / apagar 3 Botón para Reducir / Disminuir (-) 8 Pantalla indicadora para la hornilla trasera 4 Botón sele...
Page 28 - y el indicador son
28 BLOQUEO DEL PANEL DE CONTROL: Cuando el bloqueo del panel de control está activado, la pantalla mostrará LO. Este es un sistema de seguridad que bloqueará automáticamente los controles después de que no haya actividad en el panel de control durante aproximadamente 1 minuto. Para desactivar el blo...
Page 29 - CUIDADO Y MANTENIMIENTO; INFORMACIÓN GENERAL; PROBLEMAS CON SU ELECTRODOMÉSTICO?; PROBLEMA
29 CUIDADO Y MANTENIMIENTO Ø INFORMACIÓN GENERAL • PRECAUCIÓN: Antes de cualquier operación de limpieza y mantenimiento desconecte el aparato de la red eléctrica. • Es aconsejable limpiar cuando el aparato esté frío y, especialmente, para la limpieza de la cubierta de vidrio. • Evitar dejar sustanci...
Page 30 - SERVICIO PARA SU APARATO; PRODUCTOS DE CLIENTE AVANTI; DIAGRAMA DE CABLEADO
30 SERVICIO PARA SU APARATO Nosotros estamos orgullosos de nuestra organización de servicio al cliente y la red de técnicos de servicios profesionales que prestan servicio en sus electrodomésticos Avanti. Con la compra del aparato, Avanti, usted puede tener la confianza de que si alguna vez necesita...
Page 31 - COBERTURA - GARANTÍA LIMITADA DE UN AÑO
31 GARANTÍA AVANTI PRODUCTS Grapa su recibo de compra aquí. Se requiere prueba de la fecha de compra original para obtener el servicio de garantía. COBERTURA - GARANTÍA LIMITADA DE UN AÑO Avanti Products garantiza que el producto está libre de defectos en materiales y / o mano de obra durante un per...
Page 32 - Lisez attentivement ce guide.; Il est destiné à vous aider à utiliser et à; Avanti Service à la clientèle; Numéro de modèle; SI VOUS AVEZ BESOIN DE SERVICE
32 AIDEZ NOUS À VOUS AIDER ... Lisez attentivement ce guide. Il est destiné à vous aider à utiliser et à maintenir votre nouvel appareil correctement. Gardez-le à portée de main pour répondre à vos questions. Si vous ne comprenez pas quelque chose ou vous avez besoin de plus d'aide, s'il vous plaît ...
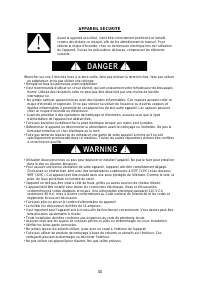
Page 34 - APPAREIL SÉCURITÉ; un adaptateur, et ne pas utiliser une rallonge
34 APPAREIL SÉCURITÉ Avant le appareil est utilisé, il doit être correctement positionné et installé comme décrit dans ce manuel, afin de lire attentivement le manuel. Pour réduire le risque d'incendie, choc ou de blessure électrique lors de l'utilisation du l’appareil, Suivez les précautions de bas...
Page 35 - PIÈCES ET CARACTÉRISTIQUES; Bouton de verrouillage du panneau de commande
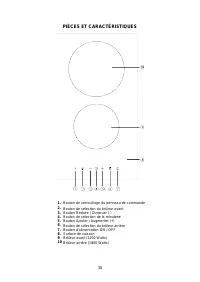
35 PIÈCES ET CARACTÉRISTIQUES 1. Bouton de verrouillage du panneau de commande 2. Bouton de sélection du brûleur avant 3. Bouton Réduire / Diminuer (-) 4. Bouton de sélection de la minuterie 5. Bouton Ajouter / Augmenter (+) 6. Bouton de sélection du brûleur arrière 7. Bouton d'alimentation ON / OFF...
Page 36 - Lisez toutes les instructions avant d'utiliser l'appareil.
36 CONSIGNES DE SÉCURITÉ IMPORTANTES ATTENTION Pour réduire les risques d'incendie, d'électrocution ou de blessure lors de l'utilisation de l'appareil, suivez ces précautions de base: • Lisez toutes les instructions avant d'utiliser l'appareil. • Installation correcte - Assurez-vous que l'appareil e...
Page 37 - Cette unité est à un usage intérieur
37 • Ne pas faire cuire sur Broken Cook-top - Si cuisson supérieure brisée, les solutions nettoyantes et les éclaboussures peuvent pénétrer dans la cuisson supérieure brisée et créer un risque de choc électrique. Contactez immédiatement un technicien qualifié. • Clean Cook-top avec prudence - Si une...
Page 38 - AVANT D'UTILISER LE COOKTOP; Retirez l'emballage extérieur et intérieur.
38 INSTRUCTIONS D'INSTALLATION ATTENTION AVOIR CET APPAREIL INSTALLÉ PAR UN INSTALLATEUR. Une mauvaise installation, le réglage, la modification ou l'entretien peuvent causer des dommages corporels ou matériels. Consulter un organisme d'installation ou d'un service qualifié. IMPORTANT - CONSERVER PO...
Page 39 - PRÉCAUTIONS IMPORTANTES ET RECOMMANDATIONS; Après utilisation, assurez-vous que les contrôles sont dans la
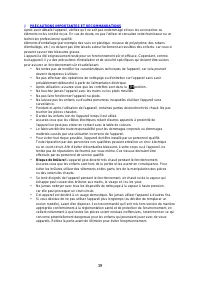
39 Ø PRÉCAUTIONS IMPORTANTES ET RECOMMANDATIONS Après avoir déballé l'appareil, vérifiez qu'il ne soit pas endommagé et tous les accessoires ou éléments inclus ont été reçus. En cas de doute, ne pas l'utiliser et consultez votre fournisseur ou un technicien professionnel qualifié. éléments d'emballa...
Page 40 - INSTALLATION DE LA TABLE DE CUISSON
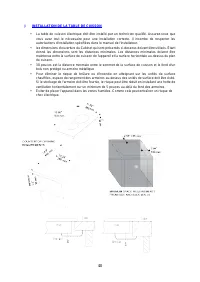
40 Ø INSTALLATION DE LA TABLE DE CUISSON • La table de cuisson électrique doit être installé par un technicien qualifié. Assurez-vous que vous avez tout le nécessaire pour une installation correcte. Il incombe de respecter les autorisations d'installation spécifiées dans le manuel de l'installateur....
Page 41 - CONNEXION ÉLECTRIQUE; ATTENTION
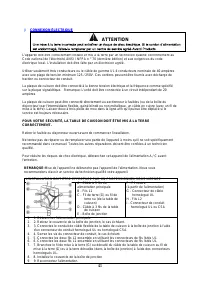
41 Ø CONNEXION ÉLECTRIQUE L'appareil doit être correctement installé et mis à la terre par un technicien qualifié conformément au Code national de l'électricité ANSI / NFPA n ° 70 (dernière édition) et aux exigences du code électrique local. L'installation doit être faite par un électricien agréé. U...
Page 42 - UTILISATION DE VOTRE APPAREIL; PANNEAU DE CONTRÔLE; Brûleur avant Bouton de sélection; MARCHE / ARRÊT BOUTON; À feu doux; MINUTERIE AUTOMATIQUE
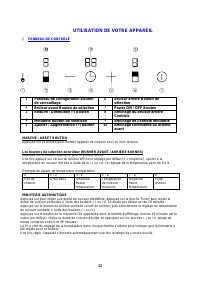
42 UTILISATION DE VOTRE APPAREIL Ø PANNEAU DE CONTRÔLE 1 Panneau de configuration Bouton de verrouillage 6 Brûleur arrière Bouton de sélection 2 Brûleur avant Bouton de sélection 7 Power ON / OFF Bouton 3 Réduire / Diminution (-) Bouton 8 Affichage du brûleur arrière Contrôle 4 Minuterie Bouton de s...
Page 43 - et les voyants sont
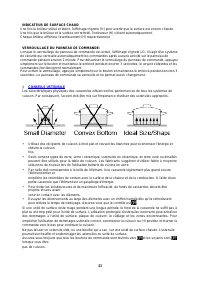
43 INDICATEUR DE SURFACE CHAUD Une fois le brûleur utilisé et éteint, l'affichage clignote (H) pour avertir que la surface est encore chaude. Une fois que le brûleur et la surface ont refroidi, l'indicateur (H) s'éteint automatiquement. Chaque brûleur affichera l'avertissement (H) respectivement VER...
Page 44 - ENTRETIEN; INFORMATIONS GÉNÉRALES; PROBLÈMES AVEC VOTRE APPAREIL?; PROBLÈME
44 ENTRETIEN Ø INFORMATIONS GÉNÉRALES • ATTENTION: Avant toute opération de nettoyage et d'entretien débrancher l'appareil de l'alimentation électrique. • Il est conseillé de nettoyer lorsque l'appareil est froid et en particulier pour le nettoyage de la table de cuisson en verre. • Évitez de laisse...
Page 45 - SERVICE DE VOTRE APPAREIL; AVANTI PRODUITS SERVICES CLIENTS; SCHEMA
45 SERVICE DE VOTRE APPAREIL nous sont fiers de notre organisation de service à la clientèle et le réseau de techniciens de services professionnels qui offrent des services sur vos appareils Avanti. Avec l'achat de votre appareil Avanti, vous pouvez avoir la certitude que si vous avez besoin d'infor...
Page 46 - CE QUI EST COUVERT - GARANTIE LIMITÉE D'UN AN
46 VOTRE GARANTIE AVANTI PRODUCTS Agrafez votre reçu de vente ici. Preuve de la date d'achat est nécessaire pour obtenir le service sous garantie. CE QUI EST COUVERT - GARANTIE LIMITÉE D'UN AN Avanti Products garantit que le produit est exempt de tout défaut de matériaux et / ou de fabrication penda...
Page 47 - Registration Information; Avanti Products LLC; Avanti Registration Card; Is This Product Used In The:
47 Registration Information Thank you for purchasing this fine Avanti product. Please fill out this form and return it to the following address within 100 days from the date of purchase and receive these important benefits: Avanti Products LLC P.O.Box 520604 – Miami, Florida 33152 Ø Protect your pro...
Page 48 - PRINTED IN CHINA