Page 3 - Avalon Water Coolers; Follow our social media accounts and stay up to
www.avalonh2o.com We’re Here to Help Let’s Connect Call Us: 1.800.256.0695 Email Us: [email protected] [email protected] Live Chat: Monday-Thursday: 9 a.m.-5:30 p.m. Friday: 9 a.m.-4:30 p.m. @avalon_h2o Avalon Water Coolers Avalonh2o Follow our social media accounts and stay up to date on the latest...
Page 4 - Use and Care Guide
Use and Care Guide MODEL: A13CT Registration Please visit the website below to register your new water cooler within the first 30 days of purchase. Registration within the first 30 days will activate your one year warranty. www.avalonh2o.com/register-my-avalon-cooler Please keep your model number, o...
Page 5 - Contents
Contents About Your Water Cooler Meet Your Avalon Product Part Names Indicator Lights Tech Specs Filter Function Introduction Getting Started Unpacking Installation (Under the Sink) Installation (Refrigerator Water Line) Flushing Filters Finishing Water Cooler Installation Activating Heating and Coo...
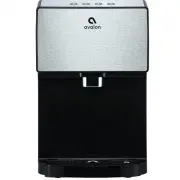
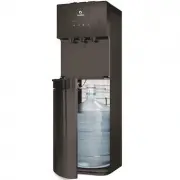
Page 6 - Meet Your Avalon Product
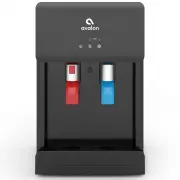
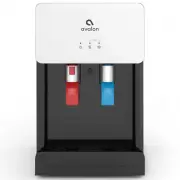
1 About Your Water Cooler Metal Adapter with Valve (3/8” compression) Meet Your Avalon Product Inside the box, you’ll find: 2 Small PE Tubing 2 Mounting Brackets Carbon Block Filter Sediment Filter 2 Filter Flushing Adapters Valve and Tube Assembly PE Tubing (20’ length, 1/4” diameter) Three Way Pla...
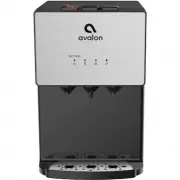
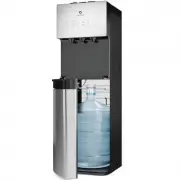
Page 8 - Part Names
3 9. Panel 11. Nightlight 10. Spout 12. Drip Tray 5. Child Safety Lock Push Button Part Names About Your Water Cooler 8. Cold Water Push Button 7. Cool Water Push Button 6. Hot Water Push Button Replace Filter Self Clean Blinking = Heating Blinking = Cooling 2. Heating Indicator Light 4. Cooling Ind...
Page 10 - Indicator Lights
5 Indicator Lights Heating Indicator Light This light will indicate when the water is heating. The light will blink while the water is heating and will turn off when it has reached the correct temperature of 185°F. Cooling Indicator Light This light will indicate when the water is cooling. The light...
Page 11 - Tech Specs
6 Tech Specs 1.8L/min / 2.2L/min / 2.0L/min 4 L/H (≥ 185°F) 1.16 Liters 2.5 L/H ( ≤ 50°F) 3.0 Liters 0.1-0.4 MPa 39 ~ 104°F humidity ≤90% Tap Water TDS ≤ 350 ppm 41 ~ 100.4°F Sediment Carbon Block 13”(L)x12”(W)x19”(H) 16”(L)x15”(W)x28”(H) 36.15 lb/46.5 lb 115V 60Hz Compressor Internal Element 420W/1...
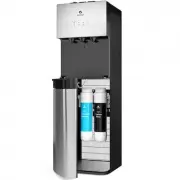
Page 12 - Filter Function Introduction
7 Filter Function Introduction Stage Stage 1 Stage 2 Sediment Filter Carbon Block Filter Filter Course filtration of raw water to remove rust, dirt and sediment Removes the water odor, residual chlorine, organic matter, and lead to improve taste Function About Your Water Cooler
Page 13 - G e t t i n g Sta r te d
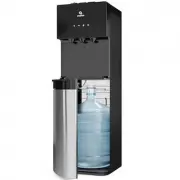
Page 14 - Unpacking Your Avalon Water Cooler
9 Unpacking Your Avalon Water Cooler Locating Dispenser • Do NOT plug in the power cord yet. • Place dispenser upright on a hard and level surface in a cool and shaded location near a grounded wall outlet. Position the dispenser so there is about 4 inches of clearance from the wall on the back and b...
Page 18 - Flushing Filters Prior to Use
13 Getting Started Flushing Filters Prior to Use Before continuing with installation, it is recommended that you flush both filters for approximately 2 minutes. 1. Twist the filter into the provided Filter Flushing Adapter by rotating it clockwise. 3. Hold the filter with the Filter Flushing Adapter...
Page 20 - Finishing the Water Cooler Installation
15 Getting Started Finishing the Water Cooler Installation Once you have flushed the filters and removed the filters and PE Tubing from the Filter Flushing Adaptor, you are ready to complete the installation process. 1. Locate the two black Mounting Brackets. Clip each bracket, one next to the other...
Page 24 - Activate Heating and Cooling
19 Activate Heating and Cooling To activate the cold water, push the cooling switch (#18) into the on (I) position by pushing the top of the switch in. If you do not wish to have cold water you can leave the switch in the off (O) positon.To activate the hot water, push the heating switch (#19) into ...
Page 25 - Installing and Removing the Drip Tray
20 Installing and Removing the Drip Tray 1. To install the drip tray, simply slide it into the area at the top of the door until it snaps into place. 2. To remove the drip tray, place your fingers in the grid of thte drip tray with one hand and hold the door of the cooler shut with the other. 3. Gen...
Page 26 - Us e r G u i d e a n d Ma i n te n a n c e
Page 28 - Replacing the Filters
23 Replacing the Filters 1. When lifetime of the filter is near its end, either by means of water flow or by means of 6 months time, the filter indicator light (#1) on the left side of the front panel will blink red as a warning. When the filter lifetime is up, the indicator light will be steady red...
Page 31 - Leak Detection
26 Leak Detection User Guide and Maintenance Our machines are equipped with a high-tech leak detector that will alert you of any potential leak. At the same time the machine will automatically shut off any intake of water to prevent a potential flood. In the event of a possible leak, the hot water p...
Page 32 - C l e a n i n g
Page 33 - Activating Self-Cleaning Function
28 Activating Self-Cleaning Function 3. Ozone will be produced and injected into the water system, it will kill bacteria and bio-films typically found in water dispensers. By the end of the cleaning cycle the ozone will convert into harmless oxygen and will be emitted into the air. 1. To activate, p...
Page 37 - Cleaning
32 To remove mineral deposits that may have built up inside the the tanks, mix 4 L of water with 200 g of citric acid crystals (not included) or cleaning solution of your choice. Cleaning 1. Unscrew the top cover and lift off the cold tank lid. 2. Put the mixture into the machine's cold tank and mak...
Page 39 - Tro u b l e s h o ot i n g
Page 42 - S a fe t y