Page 2 - Trademark Information; Copyright Warning; Data Storage and Usage
Trademark Information EVO Ⅱ ™ , EVO Ⅱ Pro ™ , EVO Ⅱ Dual ™ , Autel Explorer™ , Starpoint™ and the Autel Robotics ® logo are trademarks of Autel Robotics Co., Ltd., registered in China, the United States and other countries. All other products and company names mentioned in this User Manual are regis...
Page 3 - Safety Instructions; Battery Safety; Battery Usage
with the aircraft, flight log data (including flight telemetry) will be uploaded and maintained on Autel Robotics data servers. All telemetry and flight logs are stored on data servers located within the boundaries of the continental United States, and the data upload occurs automatically only if th...
Page 4 - Flying the Aircraft Safely & Securely; Flight Environment; Before Flying; While Flying
It should take a maximum of 90 minutes to fully charge the aircraft battery, though charging times will vary according to the remaining power level. Additional information: • Do not use a damaged battery charger. • When the charger is not in use, disconnect it from the aircraft battery and the power...
Page 5 - WARNING
• Keep the aircraft in your visual line of sight at all times. • Do not fly the aircraft close to water surfaces. • When the low battery warning appears, do not cancel the automatic go-home process. Otherwise, the aircraft may not have enough battery power to return to the home point. • If a warning...
Page 6 - Contents; Chapter 1 About This Manual; Chapter 2 Getting to Know Your Smart Drone; Chapter 3 Preflight Preparation
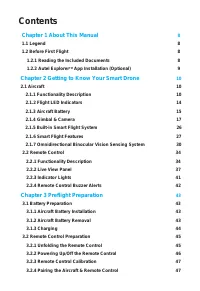
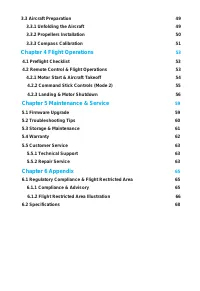
Contents Chapter 1 About This Manual 8 1.1 Legend 8 1.2 Before First Flight 8 1.2.1 Reading the Included Documents 8 1.2.2 Autel Explorer TM App Installation (Optional) 9 Chapter 2 Getting to Know Your Smart Drone 10 2.1 Aircraft 10 2.1.1 Functionality Description 10 2.1.2 Flight LED Indicators 14 2...
Page 8 - Chapter 1; About This Manual; Before Your First Flight
8 Chapter 1 About This Manual Thank you for purchasing the EVO Ⅱ series, and welcome to the Autel Robotics family. Use this manual to get a detailed look at the EVO Ⅱ ’s features and how best to make use of them when operating the aircraft and remote control. Please read it in its entirety — with th...
Page 9 - xplorerTM App Installation
9 4. Battery Quick Guide : The basics of intelligent battery 5. User Manual: A guide to the finer points of EVO Ⅱ mastery. Download it at https://www.auteldrones.com/support/downloads/ . 6. Autel Explorer TM App Manual: If you plan to use our mobile app, download the manual for it at www.auteldrones...
Page 10 - Chapter 2
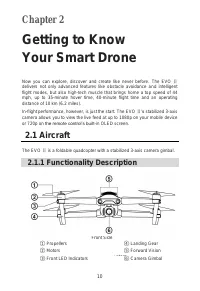
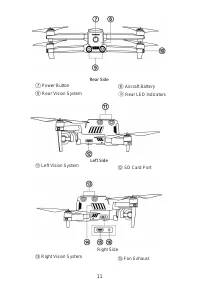
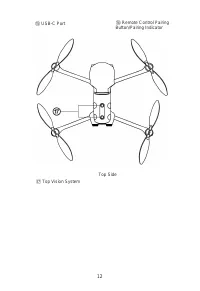
10 Chapter 2 Getting to Know Your Smart Drone 2.1 Aircraft The EVO Ⅱ is a foldable quadcopter with a stabilized 3-axis camera gimbal. 2.1.1 Functionality Description Front Side ① Propellers ④ Landing Gear ② Motors ⑤ Forward Vision ystem ③ Front LED Indicators ⑥ Camera Gimbal Now you can explore, dis...
Page 13 - NOTE
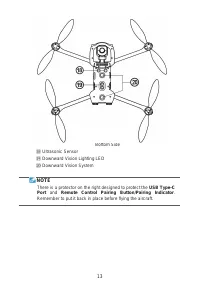
13 Bottom Side ⑱ Ultrasonic Sensor ⑲ Downward Vision Lighting LED ⑳ Downward Vision System NOTE There is a protector on the right designed to protect the USB Type-C Port and Remote Control Pairing Button/Pairing Indicator . Remember to put it back in place before flying the aircraft.
Page 14 - Definitions of Flight LED Indicator Status
14 2.1.2 Flight LED Indicators An LED indicator is located on the end of each aircraft arm. The front LEDs will light up solid red to help you identify the direction of the aircraft's nose. The rear LEDs will display the current flight status of the aircraft. The chart below shows the meaning of eac...
Page 15 - Basic Functions; Turning On the Battery; Turning Off the Battery; Checking the Battery Level
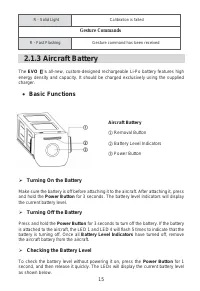
15 R - Solid Light Calibration is failed Gesture Commands R - Fast Flashing Gesture command has been received 2.1.3 Aircraft Battery The EVO Ⅱ ’s all-new, custom-designed rechargeable Li-Po battery features high energy density and capacity. It should be charged exclusively using the supplied charger...
Page 16 - Additional Functions
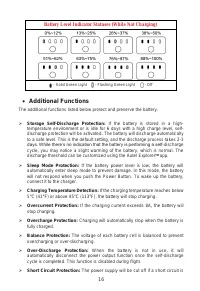
16 Battery Level Indicator Statuses (While Not Charging) - Solid Green Light - Flashing Green Light - Off Additional Functions The additional functions listed below protect and preserve the battery. Storage Self-Discharge Protection: If the battery is stored in a high- temperature environment or...
Page 17 - LED Warning Descriptions
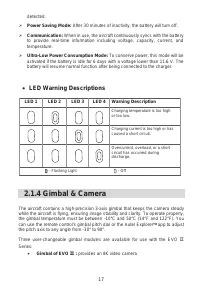
17 detected. Power Saving Mode: After 30 minutes of inactivity, the battery will turn off. Communication: When in use, the aircraft continuously syncs with the battery to provide real-time information including voltage, capacity, current, and temperature. Ultra-Low Power Consumption Mode: To c...
Page 21 - Removing the Gimbal
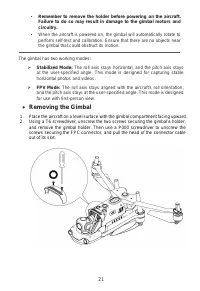
21 • Remember to remove the holder before powering on the aircraft. Failure to do so may result in damage to the gimbal motors and circuitry. • When the aircraft is powered on, the gimbal will automatically rotate to perform self-test and calibration. Ensure that there are no objects near the gimbal...
Page 22 - Replacing the Gimbal
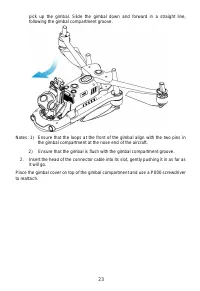
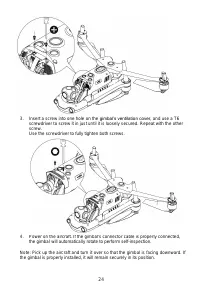
22 3. Gently grasp the two vibration absorber tails with your thumb and forefinger. Slide the gimbal back and up in a straight line, following the gimbal compartment groove. Replacing the Gimbal 1. Gently grasping the two vibration absorber tails with your thumb and forefinger,
Page 25 - Camera; Using a Micro SD Card
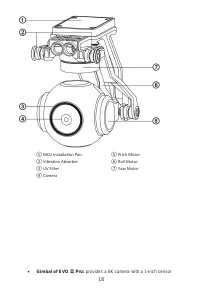
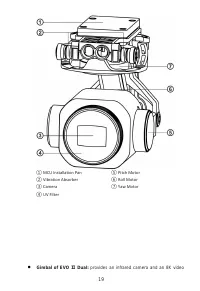
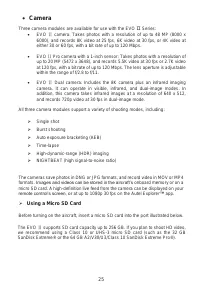
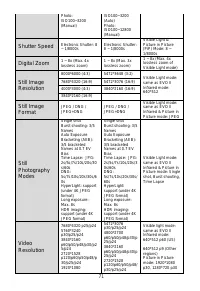
25 Camera Three camera modules are available for use with the EVO Ⅱ Series: EVO Ⅱ camera: Takes photos with a resolution of up to 48 MP (8000 x 6000), and records 8K video at 25 fps, 6K video at 30 fps, or 4K video at either 30 or 60 fps, with a bit rate of up to 120 Mbps. EVO Ⅱ Pro camera wit...
Page 26 - Smart Flight System Modules
26 WARNING To prevent file loss, always power off the aircraft before removing the micro SD card. Transferring Files to Your Computer To transfer photos and videos to your computer, connect it to the aircraft via the USB-C Port as shown below. 2.1.5 Built-in Smart Flight System The EVO Ⅱ delivers ...
Page 27 - Flight Modes; Go Home
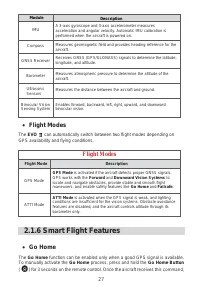
27 Module Description IMU A 3-axis gyroscope and 3-axis accelerometer measures acceleration and angular velocity. Automatic IMU calibration is performed when the aircraft is powered on. Compass Measures geomagnetic field and provides heading reference for the aircraft. GNSS Receiver Receives GNSS (G...
Page 28 - Failsafe; Communication Lost
28 it will return automatically and land at the current home point. The EVO Ⅱ can detect and avoid obstacles on its flight path using its Forward Vision System . The remote control’s function will be disabled while the aircraft is in GO HOME , but you can reactivate it by pressing the Pause Button (...
Page 29 - NOTES; Landing Features; Landing Protection
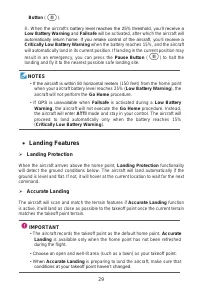
29 Button ( ). B. When the aircraft's battery level reaches the 25% threshold, you’ll receive a Low Battery Warning and Failsafe will be activated, after which the aircraft will automatically return home. If you retake control of the aircraft, you’ll receive a Critically Low Battery Warning when the...
Page 30 - Sensing System; Binocular Vision Sensing Systems
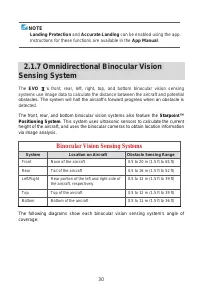
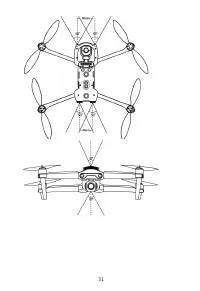
30 NOTE Landing Protection and Accurate Landing can be enabled using the app. Instructions for these functions are available in the App Manual . 2.1.7 Omnidirectional Binocular Vision Sensing System The EVO Ⅱ ’s front, rear, left, right, top, and bottom binocular vision sensing systems use image dat...
Page 32 - Prerequisites
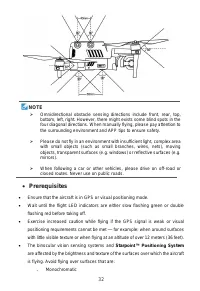
32 NOTE Omnidirectional obstacle sensing directions include front, rear, top, bottom, left, right. However, there might exists some blind spots in the four diagonal directions. When manually flying, please pay attention to the surrounding environment and APP tips to ensure safety. Please do not ...
Page 33 - Functionality Description; Dynamic Tracking
33 ˗ Highly reflective, such as water ˗ Especially dark or bright ˗ Subject to frequent lighting changes ˗ Made of closely repeating patterns, such as tiles ˗ Sound-absorbent, such as thick carpeting ˗ In motion, such as roads with heavy traffic Keep the binocular camera lenses and sensors clean. ...
Page 34 - Safe Landing
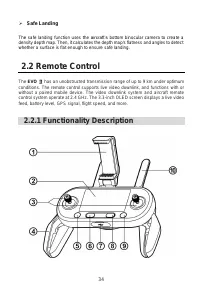
34 Safe Landing The safe landing function uses the aircraft’s bottom binocular camera to create a density depth map. Then, it calculates the depth map's flatness and angles to detect whether a surface is flat enough to ensure safe landing. 2.2 Remote Control The EVO Ⅱ has an unobstructed transmiss...
Page 37 - Flight Information Panel
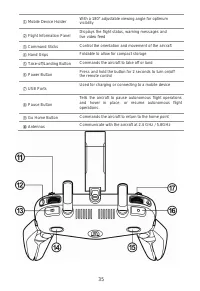
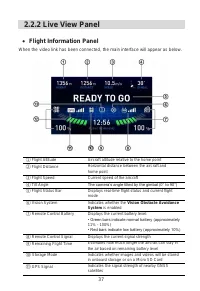
37 2.2.2 Live View Panel Flight Information Panel When the video link has been connected, the main interface will appear as below. ① Flight Altitude Aircraft altitude relative to the home point ② Flight Distance Horizontal distance between the aircraft and home point ③ Flight Speed Current speed o...
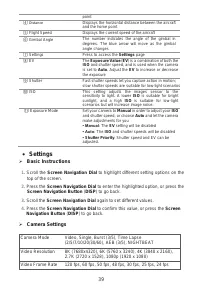
Page 38 - Image Transmission Mode; Image Transmission View
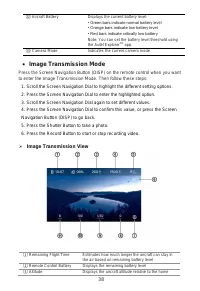
38 ⑫ Aircraft Battery Displays the current battery level: • Green bars indicate normal battery level • Orange bars indicate low battery level • Red bars indicate critically low battery Note: You can set the battery level threshold using the Autel Explorer TM app. ⑬ Camera Mode Indicates the current ...
Page 39 - Settings; Basic Instructions
39 point ④ Distance Displays the horizontal distance between the aircraft and the home point ⑤ Flight Speed Displays the current speed of the aircraft ⑥ Gimbal Angle The number indicates the angle of the gimbal in degrees. The blue arrow will move as the gimbal angle changes ⑦ Settings Press to acce...
Page 41 - Vision Settings; General Settings; Remote Control Buzzer Alerts
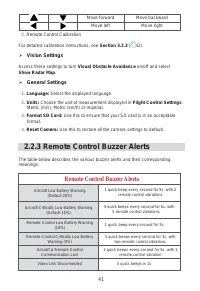
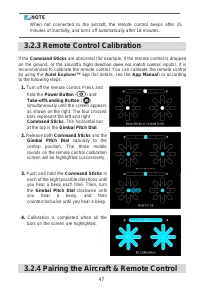
41 Move forward Move backward Move left Move right 2. Remote Control Calibration For detailed calibration instructions, see Section 3.2.3 ( 42). Vision Settings Access these settings to turn Visual Obstacle Avoidance on/off and select Show Radar Map . General Settings 1. Language: Select the dis...
Page 43 - Chapter 3; Preflight Preparation
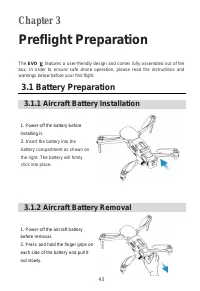
43 Chapter 3 Preflight Preparation The EVO Ⅱ features a user-friendly design and comes fully assembled out of the box. In order to ensure safe drone operation, please read the instructions and warnings below before your first flight. 3.1 Battery Preparation 3.1.1 Aircraft Battery Installation 1. Pow...
Page 44 - Charging the aircraft and remote control
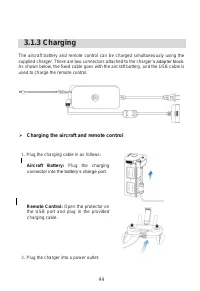
44 3.1.3 Charging The aircraft battery and remote control can be charged simultaneously using the supplied charger. There are two connectors attached to the charger ’s adapter block. As shown below, the fixed cable goes with the aircraft battery, and the USB cable is used to charge the remote contro...
Page 45 - Remote Control Preparation
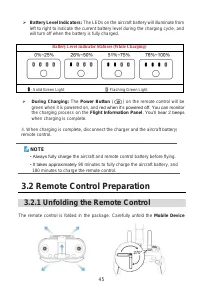
45 Battery Level Indicators: The LEDs on the aircraft battery will illuminate from left to right to indicate the current battery level during the charging cycle, and will turn off when the battery is fully charged. Battery Level Indicator Statuses (While Charging) - Solid Green Light - Flashing Gr...
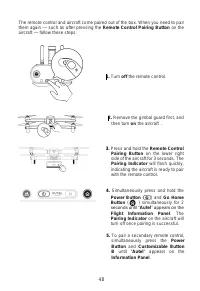
Page 46 - Positioning the Antennas; Powering Off
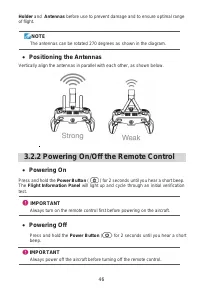
46 Holder and Antennas before use to prevent damage and to ensure optimal range of flight. NOTE The antennas can be rotated 270 degrees as shown in the diagram. Positioning the Antennas Vertically align the antennas in parallel with each other, as shown below. 3.2.2 Powering On/Off the Remote Cont...
Page 49 - Aircraft Preparation; Removing & Reinstalling the Gimbal Holder
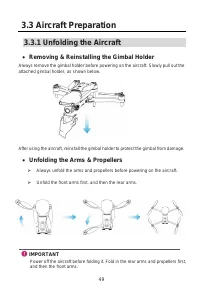
49 3.3 Aircraft Preparation 3.3.1 Unfolding the Aircraft Removing & Reinstalling the Gimbal Holder Always remove the gimbal holder before powering on the aircraft. Slowly pull out the attached gimbal holder, as shown below. After using the aircraft, reinstall the gimbal holder to protect the g...
Page 50 - Attaching the Propellers
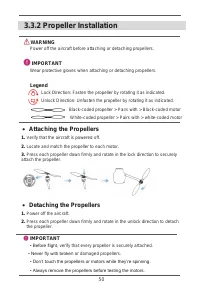
50 3.3.2 Propeller Installation WARNING Power off the aircraft before attaching or detaching propellers. IMPORTANT Wear protective gloves when attaching or detaching propellers. Legend Lock Direction: Fasten the propeller by rotating it as indicated. Unlock Direction: Unfasten the propeller by rotat...
Page 51 - Calibration Procedure
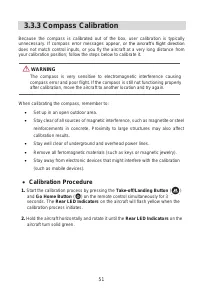
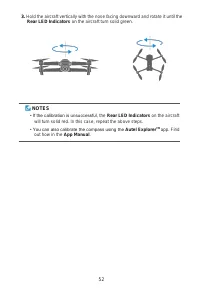
51 3.3.3 Compass Calibration Because the compass is calibrated out of the box, user calibration is typically unnecessary. If compass error messages appear , or the aircraft’s flight direction does not match control inputs, or you fly the aircraft at a very long distance from your calibration positio...
Page 53 - Chapter 4; Flight Operations; Preflight Checklist; Basic Flight
53 Chapter 4 Flight Operations 4.1 Preflight Checklist Follow these steps to carry out a full preflight checkup: • Fully charge the aircraft battery, remote control, and your mobile device. • Remove the gimbal holder. • Verify that the propellers are in proper condition and are correctly attached. •...
Page 54 - OR
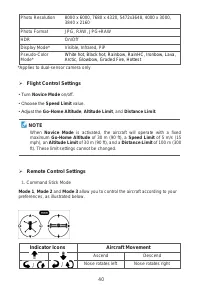
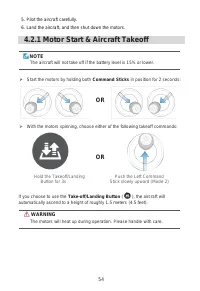
54 5. Pilot the aircraft carefully. 6. Land the aircraft, and then shut down the motors. 4.2.1 Motor Start & Aircraft Takeoff NOTE The aircraft will not take off if the battery level is 15% or lower. Start the motors by holding both Command Sticks in position for 2 seconds: OR With the motor...
Page 55 - TIPS; Left Command Stick; Rotate Left/Rotate Right; Right Command Stick
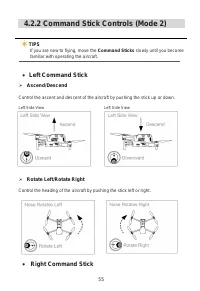
55 4.2.2 Command Stick Controls (Mode 2) TIPS If you are new to flying, move the Command Sticks slowly until you become familiar with operating the aircraft. Left Command Stick Ascend/Descend Control the ascent and descent of the aircraft by pushing the stick up or down. Left Side View Left Side...
Page 56 - Move Left/Move Right; Manual Landing; Landing the aircraft manually
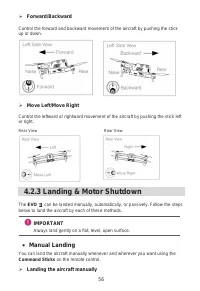
56 Forward/Backward Control the forward and backward movement of the aircraft by pushing the stick up or down. Move Left/Move Right Control the leftward or rightward movement of the aircraft by pushing the stick left or right. Rear View Rear View 4.2.3 Landing & Motor Shutdown The EVO Ⅱ can ...
Page 57 - Shutting down the motors; Automatic Landing
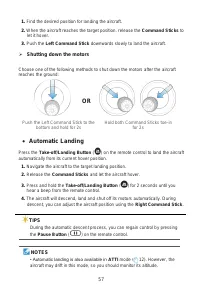
57 1. Find the desired position for landing the aircraft. 2. When the aircraft reaches the target position, release the Command Sticks to let it hover. 3. Push the Left Command Stick downwards slowly to land the aircraft. Shutting down the motors Choose one of the following methods to shut down th...
Page 58 - Passive Landing
58 • When the Low Battery Warning (25%) is displayed, the aircraft's rear LEDs will flash red and the remote control Power Button ( ) will turn solid yellow. At this point, return to a safe landing point as soon as possible. Passive Landing Whenever either of the following conditions is met, Fails...
Page 59 - Chapter 5; Maintenance & Service; Firmware Updates; Downloading & upgrading the firmware
59 Chapter 5 Maintenance & Service 5.1 Firmware Updates To optimize the performance of your EVO Ⅱ , Autel Robotics will provide firmware updates on an ongoing basis. You can download the latest firmware in one package from our official website. When a firmware update is available, you will recei...
Page 60 - Troubleshooting Tips
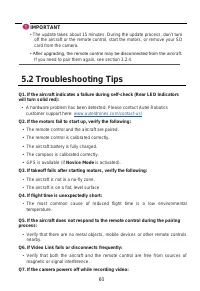
60 IMPORTANT • The update takes about 15 minutes. During the update process, don’t turn off the aircraft or the remote control, start the motors, or remove your SD card from the camera. • After upgrading, the remote control may be disconnected from the aircraft. If you need to pair them again, see s...
Page 63 - Customer Service
63 • Batteries that have been put through a full charging cycle more than 200 times under normal temperature conditions or more than 100 times in high temperatures; • Batteries that have been stored for more than 1 month at temperatures of higher than 40°C (104°F); • Products subjected to abnormal u...
Page 65 - Chapter 6; Appendix; Restricted Area; FCC Warning Message
65 Chapter 6 Appendix 6.1 Regulatory Compliance & Flight Restricted Area 6.1.1 Compliance & Advisory FCC Warning Message Any Changes or modifications not expressly approved by the party responsible for compliance could void the user’s authority to operate the equipment. This device complies ...
Page 66 - ISEDC RSS Warning; ISEDC Radiation Exposure Statement; Flight Restricted Area Illustration
66 —Reorient or relocate the receiving antenna. —Increase the separation between the equipment and receiver. —Connect the equipment into an outlet on a circuit different from that to which the receiver is connected. —Consult the dealer or an experienced radio/TV technician for help. ISEDC RSS Warnin...
Page 68 - Aircraft Specifications; Takeoff Weight
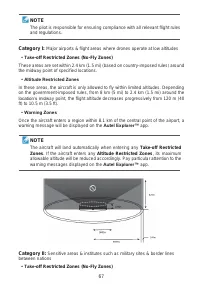
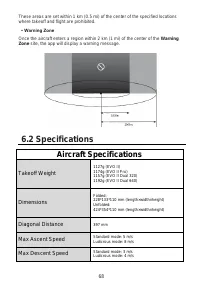
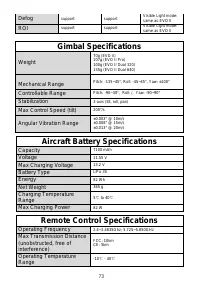
68 These areas are set within 1 km (0.5 mi) of the center of the specified locations where takeoff and flight are prohibited. • Warning Zone Once the aircraft enters a region within 2 km (1 mi) of the center of the Warning Zone site, the app will display a warning message. 6.2 Specifications Aircraf...
Page 69 - Sensing System Specifications
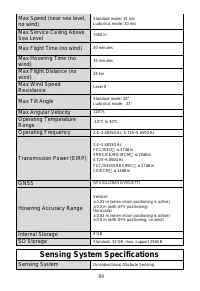
69 Max Speed (near sea level, no wind) Standard mode: 15 m/s Ludicrous mode: 20 m/s Max Service Ceiling Above Sea Level 7000 m Max Flight Time (no wind) 40 minutes Max Hovering Time (no wind) 35 minutes Max Flight Distance (no wind) 25 km Max Wind Speed Resistance Level 8 Max Tilt Angle Standard mod...
Page 70 - Camera Specifications; Model Name
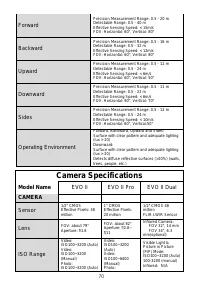
70 Forward Precision Measurement Range: 0.5 - 20 m Detectable Range: 0.5 - 40 m Effective Sensing Speed: < 15m/s FOV: Horizontal: 60°, Vertical: 80° Backward Precision Measurement Range: 0.5 - 16 m Detectable Range: 0.5 - 32 m Effective Sensing Speed: < 12m/s FOV: Horizontal: 60°, Vertical: 80...
Page 74 - Charger Specifications
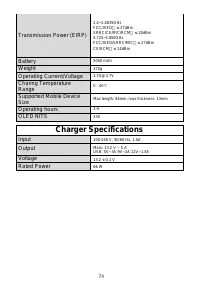
74 Transmission Power (EIRP) 2.4~2.4835GHz Battery 5000 mAh Weight 370g Operating Current/Voltage [email protected] Charing Temperature Range 0 - 40 ℃ Supported Mobile Device Size Max length: 84mm; max thickness: 13mm Operating hours 3 H OLED NITS 330 Charger Specifications Input 100-240 V, 50/60 Hz...