Page 2 - ВАЖЛИВІ ЗАХОДИ БЕЗПЕКИ
2 UA Під час використання праски необхідно дотримуватися основних заходів безпеки, які описано нижче. УВАЖНО ОЗНАЙОМТЕСЯ З УСІМА ІНСТРУКЦІЯМИ ПЕРЕД ПОЧАТКОМ ВИКОРИСТАННЯ 1. Використовуйте праску лише за призначенням. 2. Щоб уникнути ризику ураження електричним струмом, не занурюйте праску у воду або...
Page 3 - СПЕЦІАЛЬНІ ІНСТРУКЦІЇ; ЗБЕРЕЖІТЬ ЦІ ІНСТРУКЦІЇ.
3 UA гаряча вода. 9. Якщо вмикається індикатор несправності, це свідчить про проблеми з праскою. Відключіть пристрій від елек- тромережі та зверніться по допомогу до спеціаліста з технічного обслуговування. 10. Цей прилад можуть використовувати діти у віці від 8 років та особи з обмеженими фізичними...
Page 4 - SAVE THESE INSTRUCTIONS; immerse the iron, cable or plug in any liquid.; D E S C R I P T I O N O F D E V I C E
4 UA ОСОБЛИВІ ЗАС ТЕРЕЖЕННЯ НЕ дозволяйте дітям або некваліфікованим особам вико- ристовувати пристрій без нагляду. НІКОЛИ не занурюйте праску, шнур або штепсельну вилку у воду або інші рідини. НЕ залишайте гарячу праску на тканинах або легкозайми- стих поверхнях. НЕ залишайте пристрій підключеним д...
Page 5 - БУДОВА ПРИСТРОЮ
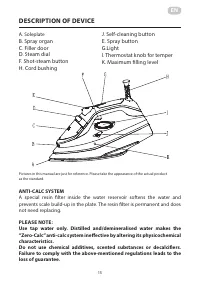
5 UA БУДОВА ПРИСТРОЮ A. ПідошваB. Випускний отвір розпилювачаC. Кришка резервуара для водиD. Регулятор париE. Кнопка розпилення водиF. Кнопка парового ударуH. Обмотка шнура живленняJ. Кнопка самоочищенняG. ІндикаторI. Ручка терморегулятораK. Позначка максимального рівня води 2 1. To avoid a circuit ...
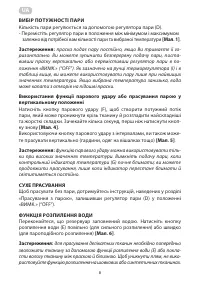
Page 8 - Натисніть кнопку парового удару (F), щоб створити потужний потік; СУХЕ ПРАСУВАННЯ; «Прасування з парою», залишивши регулятор пари (D) у положенні; ФУНКЦІЯ РОЗПИЛЕННЯ ВОДИ; Переконайтеся, що резервуар заповнений водою. Натисніть кнопку
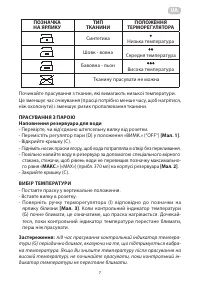
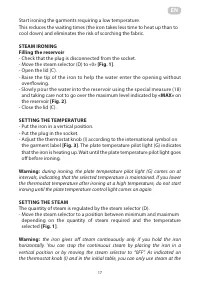
8 UA ВИБІР ПОТУЖНОСТІ ПАРИ Кількість пари регулюється за допомогою регулятора пари (D). - Перемістіть регулятор пари в положення між мінімумом і максимумом залежно від потрібної вам кількості пари та вибраної температури [Мал. 1] . Застереження: праска подає пару постійно, якщо Ви тримаєте її го- ри...
Page 9 - ОЧИЩЕННЯ; ФУНКЦІЯ САМООЧИЩЕННЯ; ЗАВЕРШЕННЯ РОБОТИ
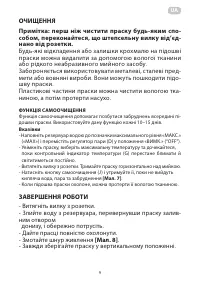
9 UA ОЧИЩЕННЯ Примітка: перш ніж чистити праску будь-яким спо- собом, переконайтеся, що штепсельну вилку від’єд- нано від розетки. Будь-які відкладення або залишки крохмалю на підошві праски можна видалити за допомогою вологої тканини або рідкого неабразивного мийного засобу. Забороняється використо...
Page 10 - НОГО ПРАСУВАННЯ
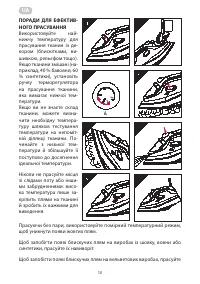
10 UA ПОРАДИ ДЛЯ ЕФЕКТИВ- НОГО ПРАСУВАННЯ Використовуйте най- нижчу температуру для прасування тканин із де- кором (блискітками, ви- шивкою, рельєфом тощо). Якщо тканини змішані (на- приклад, 40 % бавовни, 60 % синтетики), установіть ручку терморегулятора на прасування тканини, яка вимагає нижчої те...
Page 11 - УТИЛІЗАЦІЯ; їх в одному напрямку (у напрямку волокна) і не тисніть на праску.
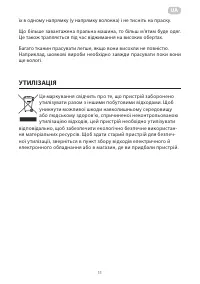
11 UA УТИЛІЗАЦІЯ Це маркування свідчить про те, що пристрій заборонено утилізувати разом з іншими побутовими відходами. Щоб уникнути можливої шкоди навколишньому середовищу або людському здоров’ю, спричиненої неконтрольованою утилізацією відходів, цей пристрій необхідно утилізувати відповідально, що...
Page 12 - READ ALL INSTRUCTIONS BEFORE USING; IMPORTANT SAFETY INSTRUCTIONS
EN 12 When using your flatiron, basic safety precautions should always be followed, including the following: READ ALL INSTRUCTIONS BEFORE USING 1. Use iron only for its intended use. 2. To protect against a risk of electric shock, do not immerse the iron in water or other liquids. 3. The iron should...
Page 13 - SPECIAL INSTRUCTIONS; SAVE THESE INSTRUCTIONS.
EN 13 use of the appliance in a safe way and understand the hazards involved. Children should not play with the device. Cleaning and user maintenance should not be performed by unsupervised children. 11. Use and store the device on a flat, stable surface. When you place the device on a stand, check ...
Page 14 - leave the iron without supervision when it is; DO NOT; fill the reservoir with water before removing the; Do not use chemical additive, scented substances or
EN 14 sun, etc. ). DO NOT leave the iron without supervision when it is connected to the power supply. DO NOT fill the reservoir with water before removing the plug from the socket. PLEASE NOTE! Do not use chemical additive, scented substances or decalcifiers. Failure to comply with the above-mentio...
Page 15 - DESCRIPTION OF DEVICE; Use tap water only. Distilled and/demineralised water makes the; I. Thermostat knob for temper
EN 15 EN DESCRIPTION OF DEVICE ANTI-CALC SYSTEM A special resin filter inside the water reservoir softens the water and prevents scale build-up in the plate. The resin filter is permanent and does not need replacing. PLEASE NOTE: Use tap water only. Distilled and/demineralised water makes the “Zero-...
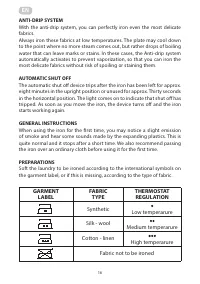
Page 16 - Synthetic
EN 16 EN ANTI-DRIP SYSTEM With the anti-drip system, you can perfectly iron even the most delicate fabrics.Always iron these fabrics at low temperatures. The plate may cool down to the point where no more steam comes out, but rather drops of boiling water that can leave marks or stains. In these cas...
Page 17 - during ironing, the plate temperature pilot light (G) comes on at; SETTING THE STEAM; the iron gives off steam continuously only if you hold the iron
EN 17 EN Start ironing the garments requiring a low temperature.This reduces the waiting times (the iron takes less time to heat up than to cool down) and eliminates the risk of scorching the fabric. STEAM IRONING Filling the reservoir - Check that the plug is disconnected from the socket. - Move th...
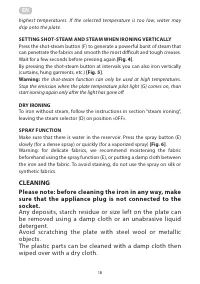
Page 18 - SETTING SHOT-STEAM AND STEAM WHEN IRONING VERTICALLY; the shot-steam function can only be used at high temperatures.; DRY IRONING; CLEANING; Please note: before cleaning the iron in any way, make; Any deposits, starch residue or size left on the plate can
EN 18 highest temperatures. If the selected temperature is too low, water may drip onto the plate. SETTING SHOT-STEAM AND STEAM WHEN IRONING VERTICALLY Press the shot-steam button (F) to generate a powerful burst of steam that can penetrate the fabrics and smooth the most difficult and tough creases...
Page 19 - AFTER THE IRONING; fibre) and do not press down on the iron.
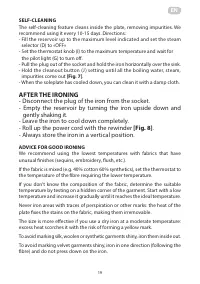
EN 19 SELF-CLEANING The self-cleaning feature cleans inside the plate, removing impurities. We recommend using it every 10-15 days. Directions: - Fill the reservoir up to the maximum level indicated and set the steam selector (D) to «OFF» - Set the thermostat knob (I) to the maximum temperature and ...
Page 20 - CORRECT DISPOSAL OF THIS PRODUCT
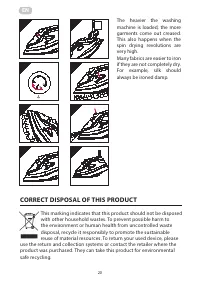
EN 20 5 - Disconnect the plug of the iron from the socket.- Empty the reservoir by turning the iron upside down and gently shaking it.- Leave the iron to cool down completely.- Roll up the power cord with the rewinder [Fig. 8] . - Always put the iron away in a vertical position. ADVICE FOR GOOD IRON...
Page 22 - ГАРАНТІЙНИЙ ТАЛОН; Шановний Покупець! Вітаємо Вас з придбанням приладу торго
ГАРАНТІЙНИЙ ТАЛОН Шановний Покупець! Вітаємо Вас з придбанням приладу торго - вельної марки ARDESTO, який був розроблений та виготовлений у відповідності до найвищих стандартів якості, та дякуємо Вам за те, що Ви обрали саме цей прилад. Просимо Вас зберігати талон протягом гарантійного періоду. При ...
Page 23 - WARRANTY CARD; Dear Buyer! Congratulations on your purchase of the ARDESTO
WARRANTY CARD Dear Buyer! Congratulations on your purchase of the ARDESTO brand appliance, which was designed and manufactured in accordance with the highest quality standards, and we thank you for choosing this particular instrument.We ask you to keep the coupon during the warranty period. When pur...
Page 24 - Warranty card/Гарантійний талон
Coupon/Талон № 1 Seller stamp/ Штамп продавця/ Date of the application/Дата звернення Date of completion/Дата виконання Cause of damage/Причина пошкодження Coupon/Талон № 2 Seller stamp/ Штамп продавця/ Date of the application/Дата звернення Date of completion/Дата виконання Cause of damage/Причина ...