Page 2 - ІНСТРУКЦІЇ З ТЕХНІКИ БЕЗПЕКИ
UA 2 ІНСТРУКЦІЇ З ТЕХНІКИ БЕЗПЕКИ Під час використання електричного приладу завжди слід дотримуватися наступних правил користування та запобіжних заходів: • Перед використанням уважно ознайомтеся з усіма інструкціями. • Перед використанням видаліть усі пакувальні ма- теріали та рекламні наклейки. • ...
Page 5 - ДЕТАЛІ; PARTS
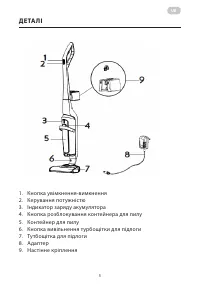
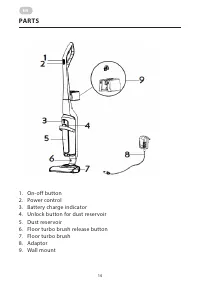
UA 5 ДЕТАЛІ 1. Кнопка увімкнення-вимкнення2. Керування потужністю3. Індикатор заряду акумулятора4. Кнопка розблокування контейнера для пилу5. Контейнер для пилу6. Кнопка вивільнення турбощітки для підлоги7. Тутбощітка для підлоги 8. Адаптер9. Настінне кріплення PARTS 1. On-off button 2. Power contro...
Page 6 - ПЕРЕД ПЕРШИМ ВИКОРИС ТАННЯМ; Connect the adaptor to the stick vacuum cleaner by the foreseen; Insert the supplied plugs into the wall.; Connect the adaptor to the stick vacuum cleaner by the foreseen; Insert the supplied plugs into the wall.; ЗАРЯДЖАННЯ
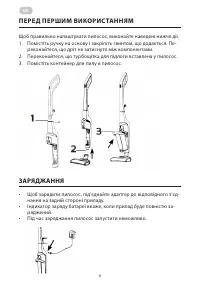
UA 6 ПЕРЕД ПЕРШИМ ВИКОРИС ТАННЯМ Щоб правильно налаштувати пилосос, виконайте наведені нижче дії.1. Помістіть ручку на основу і закріпіть гвинтом, що додається. Пе- реконайтеся, що дріт не затиснуто між компонентами. 2. Переконайтеся, що турбощітка для підлоги вставлена у пилосос.3. Помістіть контей...
Page 7 - НАСТІННЕ КРІПЛЕННЯ
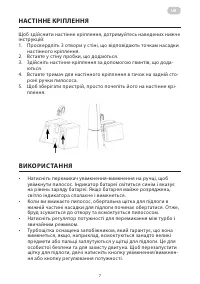
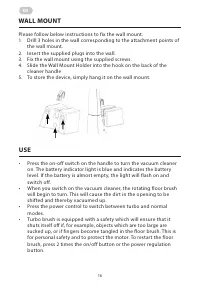
UA 7 CHARGING • Connect the adaptor to the stick vacuum cleaner by the foreseen connection on the back side of the appliance to charge the stick vacuum cleaner. • The battery charge indicator indicates when the appliance has been fully charged. • The machine cannot be started during charging. WALL M...
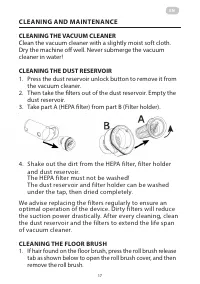
Page 8 - ОЧИЩЕННЯ ТА ОБС ЛУГОВУВАННЯ; ОЧИЩЕННЯ ПИЛОСОСА; empty, the light will flash on and off.; CLEANING AND MAINTENANCE; The HEPA filter must not be washed!
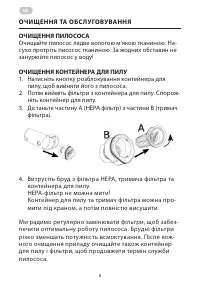
UA 8 ОЧИЩЕННЯ ТА ОБС ЛУГОВУВАННЯ ОЧИЩЕННЯ ПИЛОСОСА Очищайте пилосос ледве вологою м’якою тканиною. На- сухо протріть писосос тканиною. За жодних обставин не занурюйте пилосос у воду! ОЧИЩЕННЯ КОНТЕЙНЕРА ДЛЯ ПИЛУ 1. Натисніть кнопку розблокування контейнера для пилу, щоб вийняти його з пилососа. 2. П...
Page 9 - ЧИЩЕННЯ ЩІТКИ ДЛЯ ПІДЛОГИ; ПРОБЛЕМИ І ВИРІШЕННЯ; PROBLEM AND SOLUTION
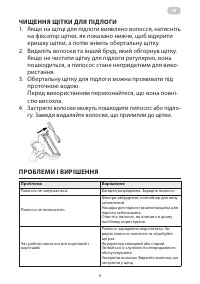
UA 9 ЧИЩЕННЯ ЩІТКИ ДЛЯ ПІДЛОГИ 1. Якщо на щітці для підлоги виявлено волосся, натисніть на фіксатор щітки, як показано нижче, щоб відкрити кришку щітки, а потім зніміть обертальну щітку. 2. Видаліть волоски та інший бруд, який обгорнув щітку. Якщо не чистити щітку для підлоги регулярно, вона пошкоди...
Page 11 - SAFETY INSTRUCTIONS
EN 11 SAFETY INSTRUCTIONS When using an electrical appliance, the following rules of use and precautions should always be followed: • Read all instructions carefully before use. • Remove all packing materials and stickers before use. • This is a vacuum cleaner for dry cleaning, do not use it to suck...
Page 13 - FOR HOUSEHOLD USE ONLY
EN 13 manufacturer or authorized service center. • This appliance is intended for use in domestic and similar environments, including: - kitchen areas for staff in shops, offices and other production environments, on agricultural farms; - customers in hotels, motels and other residential type infras...
Page 15 - BEFORE THE FIRST USE
EN 15 BEFORE THE FIRST USE To set up the vacuum cleaner properly, please follow the steps below: 1. Place the handle on the base and fix with the supplied screw. Make sure that no wiring is trapped between the components. 2. Make sure the floor turbo brush is clicked into the stick vacuum cleaner. 3...
Page 16 - USE
EN 16 CHARGING • Connect the adaptor to the stick vacuum cleaner by the foreseen connection on the back side of the appliance to charge the stick vacuum cleaner. • The battery charge indicator indicates when the appliance has been fully charged. • The machine cannot be started during charging. WALL ...
Page 17 - CLEANING THE VACUUM CLEANER
EN 17 CLEANING AND MAINTENANCE CLEANING THE VACUUM CLEANER Clean the vacuum cleaner with a slightly moist soft cloth. Dry the machine off well. Never submerge the vacuum cleaner in water! CLEANING THE DUST RESERVOIR 1. Press the dust reservoir unlock button to remove it from the vacuum cleaner. 2. T...
Page 19 - ELECTRICAL PARAMETERS; ENVIRONMENT-FRIENDLY DIPOSAL; Never dispose of the device with normal household waste.
EN 19 CLEANING THE FLOOR BRUSH 1. If hair found on the floor brush, press the roll brush release tab as shown below to open the roll brush cover, and then remove the roll brush. 2. Remove hairs and other dirt that have wrapped around the floor brush. If you do not clean the floor brush regularly, it...
Page 21 - ГАРАНТІЙНИЙ ТАЛОН
ГАРАНТІЙНИЙ ТАЛОН Шановний Покупець! Вітаємо Вас з придбанням приладу торго - вельної марки ARDESTO, який був розроблений та виготовлений у відповідності до найвищих стандартів якості, та дякуємо Вам за те, що Ви обрали саме цей прилад. Просимо Вас зберігати талон протягом гарантійного періоду. При ...
Page 22 - WARRANTY CARD
WARRANTY CARD Dear Buyer! Congratulations on your purchase of the ARDESTO brand appliance, which was designed and manufactured in accordance with the highest quality standards, and we thank you for choosing this particular instrument. We ask you to keep the coupon during the warranty period. When pu...