Page 2 - ВАЖЛИВІ ЗАХОДИ БЕЗПЕКИ
UA 2 ВАЖЛИВІ ЗАХОДИ БЕЗПЕКИ Під час використання електричного приладу завжди слід дотримуватися наступних правил користування та запо- біжних заходів: • Перед використанням уважно ознайомтеся з усіма інструкціями. • Перед використанням видаліть усі пакувальні матеріа- ли та рекламні наклейки. • Це п...
Page 4 - ЛИШЕ ДЛЯ ПОБУТОВОГО ВИКОРИСТАННЯ
UA 4 втягування кабелю живлення, штор та інших подібних предметів, які можуть обмотатися навколо щітки. • Підблок використовується лише із цим пристроєм, і цей пристрій не застосовується із жодним іншим під- блоком. • Перед першим використанням повністю зарядіть но- вий акумулятор. • Витягайте вилку...
Page 5 - ОПИС ПРИЛАДУ; DEVICE DESCRIPTION
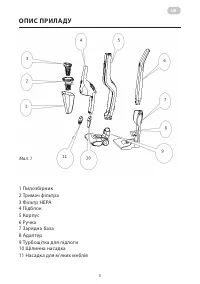
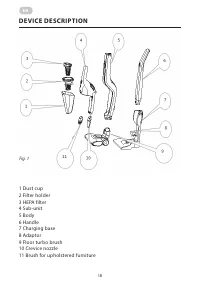
UA 5 ОПИС ПРИЛАДУ 1 Пилозбірник2 Тримач фільтра3 Фільтр HEPA4 Підблок5 Корпус6 Ручка7 Зарядна база8 Адаптер9 Турбощітка для підлоги10 Щілинна насадка11 Насадка для м’яких меблів s 2. DEVICE DESCRIPTION 3. INSTALLATION INSTRUCTION The body, floor brush, charging base, adaptor, nozzles, etc. are packe...
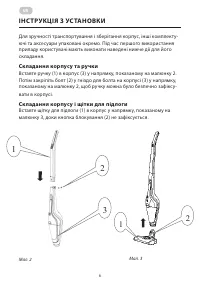
Page 6 - ІНС ТРУКЦІЯ З УС ТАНОВКИ; Складання корпусу та ручки; Assembling of Body and Handle
UA 6 ІНС ТРУКЦІЯ З УС ТАНОВКИ Для зручності транспортування і зберігання корпус, інші комплекту-ючі та аксесуари упаковані окремо. Під час першого використання приладу користувачі мають виконати наведені нижче дії для його складання. Складання корпусу та ручки Вставте ручку (1) в корпус (3) у напрям...
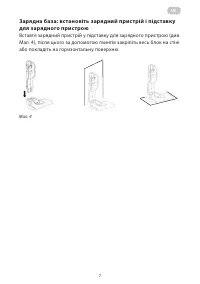
Page 7 - Charging base: install the charger and charger stand; OPERATION INSTRUCTION; Operate the whole unit
UA 7 Зарядна база: встановіть зарядний пристрій і підставку для зарядного пристрою Вставте зарядний пристрій у підставку для зарядного пристрою (див. Мал. 4), після цього за допомогою гвинтів закріпіть весь блок на стіні або покладіть на горизонтальну поверхню. s 3.3 Charging base: install the charg...
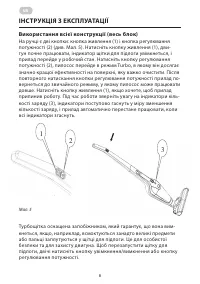
Page 8 - ІНСТРУКЦІЯ З ЕКСПЛУАТАЦІЇ; Використання всієї конструкції (весь блок); brush, press 2 times the on/off button or the speed control.
UA 8 Мал. 5 ІНСТРУКЦІЯ З ЕКСПЛУАТАЦІЇ Використання всієї конструкції (весь блок) На ручці є дві кнопки: кнопка живлення (1) і кнопка регулювання потужності (2) (див. Мал. 5). Натисніть кнопку живлення (1), дви- гун почне працювати, індикатор щітки для підлоги увімкнеться, і прилад перейде у робочий ...
Page 9 - Використання знімного ручного пилососа (підблок); CHARGING INSTRUCTION
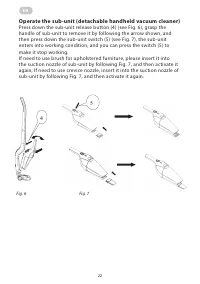
UA 9 s Fig. 4 - 1 Turbo brush is equipped with a safety which will ensure that it shuts itself off if, for example, objects which are too large are sucked up, or if fingers become tangled in the floor brush. This is for personal safety and to protect the motor. To restart the floor brush, press 2 ti...
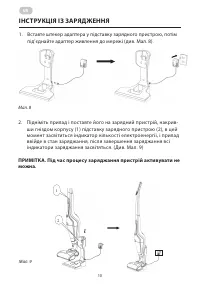
Page 10 - ІНСТРУКЦІЯ ІЗ ЗАРЯДЖЕННЯ; ПРИМІТКА. Під час процесу заряджання пристрій активувати не
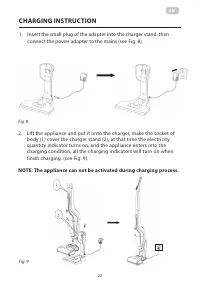
UA 10 s Fig. 4-2 Fig.4-3 Fig. 4-4 5. CHARGING INSTRUCTION 5.1 Fix the charger by following Fig.3.3, insert the small end of adaptor into the charger stand by following Fig. 5-1a. 5.2 Insert the large end of adaptor into power outlet and then connect the power source well ( see Fig. 5-1b ) Fig. 5-1a ...
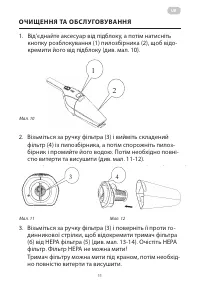
Page 11 - ОЧИЩЕННЯ ТА ОБС ЛУГОВУВАННЯ; Від’єднайте аксесуар від підблоку, а потім натисніть; бірник і промийте його водою. Потім необхідно повні-
UA 11 ОЧИЩЕННЯ ТА ОБС ЛУГОВУВАННЯ 1. Від’єднайте аксесуар від підблоку, а потім натисніть кнопку розблокування (1) пилозбірника (2), щоб відо- кремити його від підблоку (див. мал. 10). s and the appliance enters into the charging condition, all the charging indicators will turn on when finish chargi...
Page 13 - ПРОБЛЕМИ І ВИРІШЕННЯ
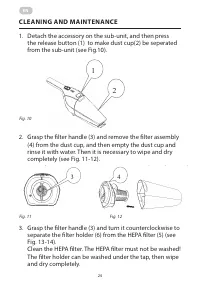
UA 13 s then empty the dust cup and rinse it with water. Then it is necessary to wipe and dry completely. Fig. 6-2a Fig. 6-2b 3) Grasp the filter handle (3) and turn it counterclockwise to separate the filter holder (6) from the HEPA filter (5). Clean the HEPA filter. The HEPA filter must not be was...
Page 14 - Ніколи не викидайте прилад у звичайні побутові відходи.
UA 14 ЕЛЕКТРИЧНІ ПАРАМЕТРИ Робоча напруга Постійний струм 14,4 В Номінальна потужність 85 Вт Вхід адаптера 100-240 В, 50/60 Гц Вихід адаптера 22 В, 500 мА Номінальна потужність електричної щітки для підлоги 10 Вт УТИЛІЗАЦІЯ ПРИЛАДУ Ніколи не викидайте прилад у звичайні побутові відходи. Утилізуйте п...
Page 15 - IMPORTANT SAFEGUARDS
EN 15 IMPORTANT SAFEGUARDS When using an electrical appliance, the following rules of use and precautions should always be followed: • Read all instructions carefully before use. • Remove all packing materials and stickers before use. • This is a vacuum cleaner for dry cleaning, do not use it to suc...
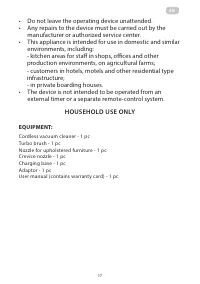
Page 17 - HOUSEHOLD USE ONLY
EN 17 • Do not leave the operating device unattended. • Any repairs to the device must be carried out by the manufacturer or authorized service center. • This appliance is intended for use in domestic and similar environments, including: - kitchen areas for staff in shops, offices and other producti...
Page 18 - DEVICE DESCRIPTION
EN 18 DEVICE DESCRIPTION 1 Dust cup2 Filter holder3 HEPA filter4 Sub-unit5 Body6 Handle7 Charging base8 Adaptor9 Floor turbo brush10 Crevice nozzle11 Brush for upholstered furniture s 2. DEVICE DESCRIPTION 3. INSTALLATION INSTRUCTION The body, floor brush, charging base, adaptor, nozzles, etc. are p...
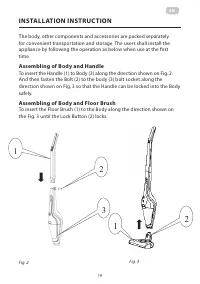
Page 19 - INSTALLATION INSTRUCTION; Assembling of Body and Handle
EN 19 INSTALLATION INSTRUCTION The body, other components and accessories are packed separately for convenient transportation and storage. The users shall install the appliance by following the operation as below when use at the first time. Assembling of Body and Handle To insert the Handle (1) to B...
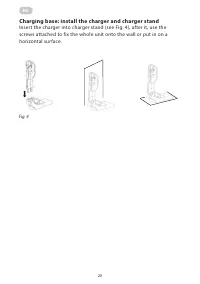
Page 20 - Charging base: install the charger and charger stand
EN 20 Charging base: install the charger and charger stand Insert the charger into charger stand (see Fig. 4), after it, use the screws attached to fix the whole unit onto the wall or put in on a horizontal surface. s 3.3 Charging base: install the charger and charger stand Insert the charger into c...
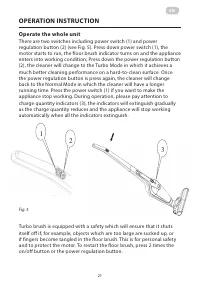
Page 21 - OPERATION INSTRUCTION; Operate the whole unit
EN 21 OPERATION INSTRUCTION Operate the whole unit There are two switches including power switch (1) and power regulation button (2) (see Fig. 5). Press down power switch (1), the motor starts to run, the floor brush indicator turns on and the appliance enters into working condition; Press down the ...
Page 23 - CHARGING INSTRUCTION
EN 23 s Fig. 4-2 Fig.4-3 Fig. 4-4 5. CHARGING INSTRUCTION 5.1 Fix the charger by following Fig.3.3, insert the small end of adaptor into the charger stand by following Fig. 5-1a. 5.2 Insert the large end of adaptor into power outlet and then connect the power source well ( see Fig. 5-1b ) Fig. 5-1a ...
Page 24 - CLEANING AND MAINTENANCE; Grasp the filter handle (3) and remove the filter assembly
EN 24 CLEANING AND MAINTENANCE 1. Detach the accessory on the sub-unit, and then press the release button (1) to make dust cup(2) be seperated from the sub-unit (see Fig.10). s and the appliance enters into the charging condition, all the charging indicators will turn on when finish charging. (see F...
Page 26 - PROBLEM AND SOLUTION
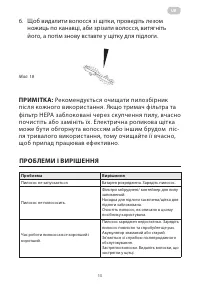
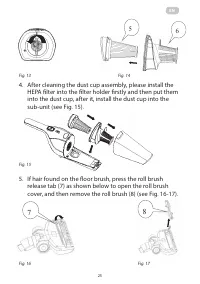
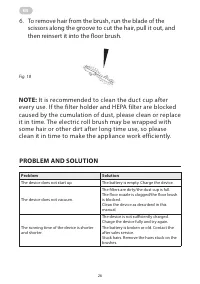
EN 26 s Fig. 6-4 5) If hair found on the floor brush, press the roll brush release tab (7) as shown below to open the roll brush cover, and then remove the roll brush (8). Fig. 6-5a Fig. 6-5b 6) To remove hair from the brush, run the blade of the scissors along the groove to cut the hair, pull it ou...
Page 27 - ELECTRICAL PARAMETERS; ENVIRONMENT-FRIENDLY DIPOSAL; Never dispose of the device with normal household waste.
EN 27 ELECTRICAL PARAMETERS Working voltage DC 14,4 V Rated power 85 W Adaptor input 100-240 V, 50/60 Hz Adaptor output 22 V, 500 mA Electric floor brush rated power 10 W ENVIRONMENT-FRIENDLY DIPOSAL Never dispose of the device with normal household waste. Dispose of the device through an authorized...
Page 29 - ГАРАНТІЙНИЙ ТАЛОН
ГАРАНТІЙНИЙ ТАЛОН Шановний Покупець! Вітаємо Вас з придбанням приладу торго - вельної марки ARDESTO, який був розроблений та виготовлений у відповідності до найвищих стандартів якості, та дякуємо Вам за те, що Ви обрали саме цей прилад. Просимо Вас зберігати талон протягом гарантійного періоду. При ...
Page 30 - WARRANTY CARD
WARRANTY CARD Dear Buyer! Congratulations on your purchase of the ARDESTO brand appliance, which was designed and manufactured in accordance with the highest quality standards, and we thank you for choosing this particular instrument. We ask you to keep the coupon during the warranty period. When pu...