Page 2 - ВАЖЛИВІ ЗАХОДИ БЕЗПЕКИ
UA 2 ВАЖЛИВІ ЗАХОДИ БЕЗПЕКИ Під час використання електричного приладу завжди слід дотримуватися наступних правил користування та запобіжних заходів: • Перед використанням уважно ознайомтеся з усіма інструкціями. • Перед використанням видаліть усі пакувальні ма- теріали та рекламні наклейки. • Це пил...
Page 4 - ЛИШЕ ДЛЯ ПОБУТОВОГО ВИКОРИСТАННЯ
UA 4 • Перед першим використанням повністю зарядіть новий акумулятор. • Витягайте вилку з розетки, коли пилосос повністю зарядиться. Не від’єднуйте прилад від розетки, по- тягнувши за шнур. • Не залишайте працюючий прилад без нагляду. • Будь-який ремонт приладу має виконуватися вироб- ником або авто...
Page 5 - ОПИС ПРИЛАДУ; Product Display
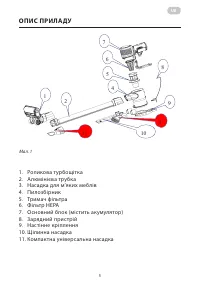
UA 5 ОПИС ПРИЛАДУ 1. Роликова турбощітка 2. Алюмінієва трубка 3. Насадка для м’яких меблів 4. Пилозбірник 5. Тримач фільтра 6. Фільтр HEPA 7. Основний блок (містить акумулятор) 8. Зарядний пристрій 9. Настінне кріплення 10. Щілинна насадка 11. Компактна універсальна насадка 2. Product Display 1 Roll...
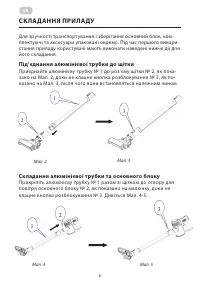
Page 6 - СК ЛАДАННЯ ПРИЛАДУ; Під’єднання алюмінієвої трубки до щітки; Aluminum tube and brush connection; Складання алюмінієвої трубки та основного блоку; Operating Instruction
UA 6 СК ЛАДАННЯ ПРИЛАДУ Для зручності транспортування і зберігання основний блок, ком- плектуючі та аксесуари упаковані окремо. Під час першого викори- стання приладу користувачі мають виконати наведені нижче дії для його складання. Під’єднання алюмінієвої трубки до щітки Приєднайте алюмінієву трубк...
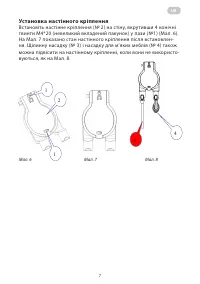
Page 7 - Установка настінного кріплення; Встановіть настінне кріплення (No 2) на стіну, вкрутивши 4 конічні
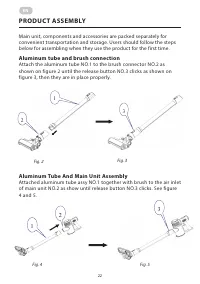
UA 7 3. Product Assembly For the convenience of transportation and storage, main unit, brush, aluminum tube assy, wall-mount, charger and nozzles packaged respectively on account of relatively large in size. Users should follow the steps below for assembling when they use the product for the first t...
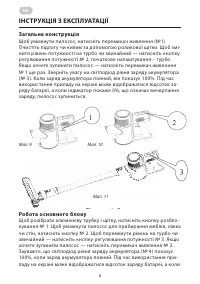
Page 8 - ІНСТРУКЦІЯ З ЕКСПЛУАТАЦІЇ; Загальна конструкція; Main Unit Operation; Робота основного блоку
UA 8 ІНСТРУКЦІЯ З ЕКСПЛУАТАЦІЇ Загальна конструкція Щоб увімкнути пилосос, натисніть перемикач живлення (№1). Очистіть підлогу чи килим за допомогою роликової щітки. Щоб змі- нити рівень потужності на турбо чи звичайний — натисніть кнопку регулювання потужності № 2; початкове налаштування – турбо. Я...
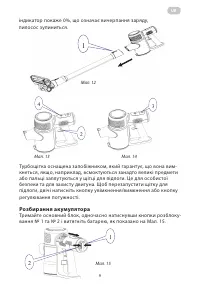
Page 9 - Розбирання акумулятора; floor brush, press 2 times the on/off button or the speed control.; Battery disassemble operation
UA 9 4.2 Main Unit Operation Figure 4-3 Figure 4-5 Figure 4-6 1 2 4 3 Figure 4-1 Figure 4-2 3 4.2 Main Unit Operation Figure 4-3 Figure 4-5 Figure 4-6 1 2 4 3 Figure 4-1 Figure 4-2 3 індикатор покаже 0%, що означає вичерпання заряду, пилосос зупиниться. Мал. 12 Мал. 13 Мал. 14 Турбощітка оснащена за...
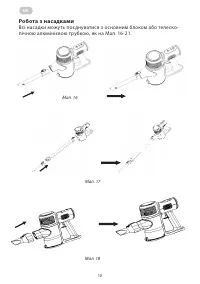
Page 10 - Робота з насадками; Всі насадки можуть поєднуватися з основним блоком або телеско-
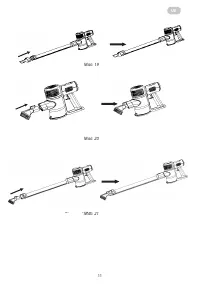
UA 10 Turbo brush is equipped with a safety which will ensure that it shuts itself off if, for example, objects which are too large are sucked up, or if fingers become tangled in the floor brush. This is for personal safety and to protect the motor. To restart the floor brush, press 2 times the on/o...
Page 11 - Battery Charging
UA 11 Turbo brush is equipped with a safety which will ensure that it shuts itself off if, for example, objects which are too large are sucked up, or if fingers become tangled in the floor brush. This is for personal safety and to protect the motor. To restart the floor brush, press 2 times the on/o...
Page 12 - ЗАРЯДЖАННЯ АКУМУЛЯТОРА
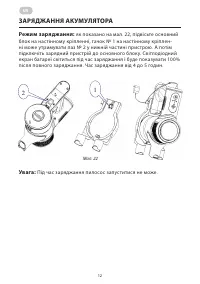
UA 12 ЗАРЯДЖАННЯ АКУМУЛЯТОРА Режим заряджання: як показано на мал. 22, підвісьте основний блок на настінному кріпленні, гачок № 1 на настінному кріплен- ні може утримувати паз № 2 у нижній частині пристрою. А потім підключіть зарядний пристрій до основного блоку. Світлодіодний екран батареї світитьс...
Page 13 - ОЧИЩЕННЯ ТА ОБС ЛУГОВУВАННЯ
UA 13 5. Battery Charging 5.1 Charging mode: as shown in fig. 5-1, hang the main unit to the wall mount, the hook NO.1 on the wall mount can hold the groove NO.2 at the bottom of the unit. And then plug the charger to the main unit. The LED screen of the battery is on during charging and it will sho...
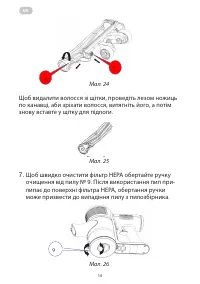
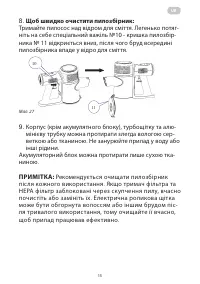
Page 15 - Щоб швидко очистити пилозбірник:
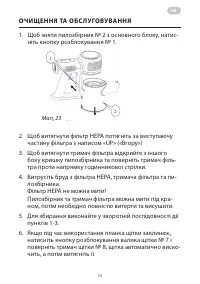
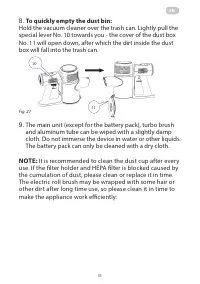
UA 15 6.8 To quickly empty the dust bin: Hold the vacuum cleaner over the trash can. Lightly pull the special lever No. 10 towards you - the cover of the dust box No. 11 will open down, after which the dirt inside the dust box will fall into the trash can. 6.9. The main unit (except for the battery ...
Page 16 - ПРОБЛЕМИ І ВИРІШЕННЯ; ЕЛЕКТРИЧНІ ПАРАМЕТРИ
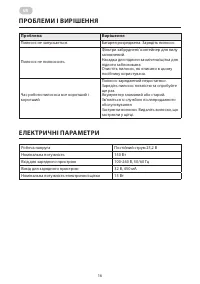
UA 16 ПРОБЛЕМИ І ВИРІШЕННЯ Проблема Вирішення Пилосос не запускається. Батарея розряджена. Зарядіть пилосос. Пилосос не пилососить. Фільтри забруднені/ контейнер для пилу заповнений. Насадка для підлоги засмічена/щітка для підлоги заблокована. Очистіть пилосос, як описано в цьому посібнику користува...
Page 17 - УТИЛІЗАЦІЯ ПРИЛАДУ; Ніколи не викидайте прилад у звичайні побутові відходи.
UA 17 УТИЛІЗАЦІЯ ПРИЛАДУ Ніколи не викидайте прилад у звичайні побутові відходи. Утилізуйте прилад через уповноважену компанію з утилі- зації або відповідну державну установу. Будь ласка, дотри- муйтеся усіх чинних правил. Якщо у вас виникли сумніви, зв’яжіться зі своїм підприємством з утилізації ві...
Page 18 - IMPORTANT SAFEGUARDS
EN 18 IMPORTANT SAFEGUARDS When using an electrical appliance, the following rules of use and precautions should always be followed: • Read all instructions carefully before use. • Remove all packing materials and stickers before use. • This is a vacuum cleaner for dry cleaning, do not use it to suc...
Page 20 - FOR HOUSEHOLD USE ONLY
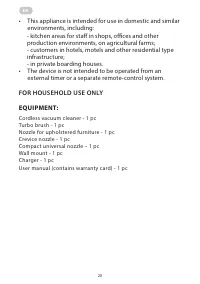
EN 20 • This appliance is intended for use in domestic and similar environments, including: - kitchen areas for staff in shops, offices and other production environments, on agricultural farms; - customers in hotels, motels and other residential type infrastructure; - in private boarding houses. • T...
Page 21 - PRODUCT DISPLAY
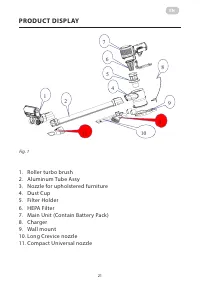
EN 21 PRODUCT DISPLAY 1. Roller turbo brush2. Aluminum Tube Assy3. Nozzle for upholstered furniture4. Dust Cup5. Filter Holder6. HEPA Filter7. Main Unit (Contain Battery Pack)8. Charger9. Wall mount10. Long Crevice nozzle11. Compact Universal nozzle 2. Product Display 1 Roller turbo brush 8 Charger ...
Page 22 - PRODUCT ASSEMBLY; Aluminum Tube And Main Unit Assembly
EN 22 PRODUCT ASSEMBLY Fig. 2 Fig. 3 3. Product Assembly For the convenience of transportation and storage, main unit, brush, aluminum tube assy, wall-mount, charger and nozzles packaged respectively on account of relatively large in size. Users should follow the steps below for assembling when they...
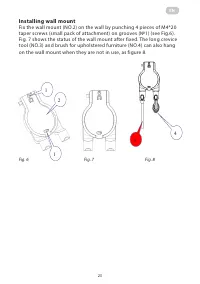
Page 23 - Installing wall mount; on the wall mount when they are not in use, as figure 8.
EN 23 3. Product Assembly For the convenience of transportation and storage, main unit, brush, aluminum tube assy, wall-mount, charger and nozzles packaged respectively on account of relatively large in size. Users should follow the steps below for assembling when they use the product for the first ...
Page 24 - OPERATING INSTRUCTION
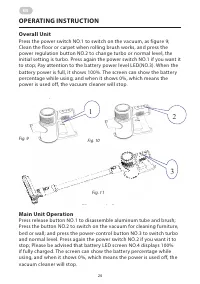
EN 24 OPERATING INSTRUCTION Overall Unit Press the power switch NO.1 to switch on the vacuum, as figure 9; Clean the floor or carpet when rolling brush works, and press the power regulation button NO.2 to change turbo or normal level, the initial setting is turbo. Press again the power switch NO.1 i...
Page 25 - on/off button or the power regulation button.; Hold the main unit, pressing the release button NO1 and NO2 at the
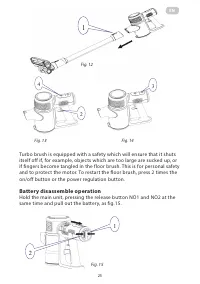
EN 25 4.2 Main Unit Operation Figure 4-3 Figure 4-5 Figure 4-6 1 2 4 3 Figure 4-1 Figure 4-2 3 4.2 Main Unit Operation Figure 4-3 Figure 4-5 Figure 4-6 1 2 4 3 Figure 4-1 Figure 4-2 3 Fig. 12 Fig. 13 Fig. 14 Turbo brush is equipped with a safety which will ensure that it shuts itself off if, for exa...
Page 26 - Nozzles
EN 26 Turbo brush is equipped with a safety which will ensure that it shuts itself off if, for example, objects which are too large are sucked up, or if fingers become tangled in the floor brush. This is for personal safety and to protect the motor. To restart the floor brush, press 2 times the on/o...
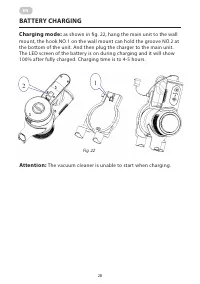
Page 28 - BATTERY CHARGING; as shown in fig. 22, hang the main unit to the wall; The vacuum cleaner is unable to start when charging.
EN 28 BATTERY CHARGING Charging mode: as shown in fig. 22, hang the main unit to the wall mount, the hook NO.1 on the wall mount can hold the groove NO.2 at the bottom of the unit. And then plug the charger to the main unit. The LED screen of the battery is on during charging and it will show 100% a...
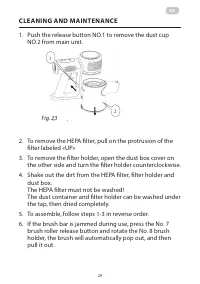
Page 29 - CLEANING AND MAINTENANCE
EN 29 5. Battery Charging 5.1 Charging mode: as shown in fig. 5-1, hang the main unit to the wall mount, the hook NO.1 on the wall mount can hold the groove NO.2 at the bottom of the unit. And then plug the charger to the main unit. The LED screen of the battery is on during charging and it will sho...
Page 31 - To quickly empty the dust bin:
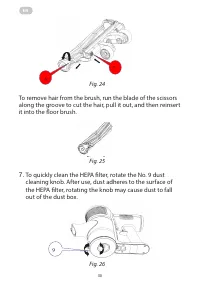
EN 31 To remove hair from the brush, run the blade of the scissors along the groove to cut the hair, pull it out, and then reinsert it into the floor brush. 6.7 To quickly clean the HEPA filter, rotate the No. 9 dust cleaning knob. After use, dust adheres to the surface of the HEPA filter, rotating ...
Page 32 - Never dispose of the device with normal household waste.; Dispose of the device through an authorized disposal; PROBLEM AND SOLUTION
EN 32 ELECTRICAL PARAMETERS Working voltage DC 25.2 V Rated power 150 W Battery Charger Input 100-240 V~ 50/60 Hz Battery Charger Output 32 V, 450 mA Electrical Brush Rated Power 15 W ENVIRONMENT-FRIENDLY DIPOSAL Never dispose of the device with normal household waste. Dispose of the device through ...
Page 34 - ГАРАНТІЙНИЙ ТАЛОН; Шановний Покупець! Вітаємо Вас з придбанням приладу торго
ГАРАНТІЙНИЙ ТАЛОН Шановний Покупець! Вітаємо Вас з придбанням приладу торго - вельної марки ARDESTO, який був розроблений та виготовлений у відповідності до найвищих стандартів якості, та дякуємо Вам за те, що Ви обрали саме цей прилад. Просимо Вас зберігати талон протягом гарантійного періоду. При ...
Page 35 - WARRANTY CARD
WARRANTY CARD Dear Buyer! Congratulations on your purchase of the ARDESTO brand appliance, which was designed and manufactured in accordance with the highest quality standards, and we thank you for choosing this particular instrument. We ask you to keep the coupon during the warranty period. When pu...