Page 2 - МІСТ
2 2 Дякуємо за придбання нашого мобільного кондиціонера. Перед використанням кондиціонера уважно прочитайте цей посібник та зберігайте його для подальшого використання. ПРОЧИТАЙТЕ І ЗБЕРІГАЙТЕ ЦЕЙ ПОСІБНИК ! З МІСТ Підготовка .............................................................................
Page 6 - АСТЕРЕЖЕННЯ; Застереження
6 6 З АСТЕРЕЖЕННЯ Застереження - Цей прилад може використовуватися дітьми у віці не менше 8 років і особами з обмеженими фізичними, сенсорними або розумовими можливостями, а також особами без достатнього досвіду та знань, за умови нагляду або надання їм вказівок щодо безпечного користування пристроє...
Page 7 - Правильний вибір місця розташування
7 6 З АСТЕРЕЖЕННЯ Застереження - Цей прилад може використовуватися дітьми у віці не менше 8 років і особами з обмеженими фізичними, сенсорними або розумовими можливостями, а також особами без достатнього досвіду та знань, за умови нагляду або надання їм вказівок щодо безпечного користування пристроє...
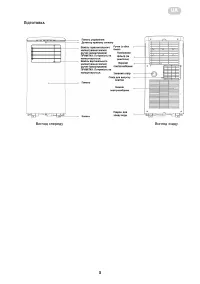
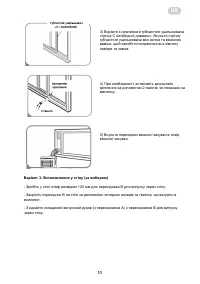
Page 8 - Приладдя; Комплект для встановлення у вікно
8 8 - Пилка ( опціонально, для скорочення віконного перехідника для вузьких вікон). Приладдя Ваш комплект призначений для встановлення у вікна розміром 67,5 - 123 см або для менших вікон. Перелік приладдя, що може постачатися разом з мобільним кондиціонером, вказано в таблиці нижче. Деталь Опис Кіль...
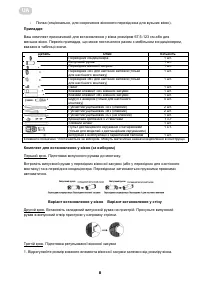
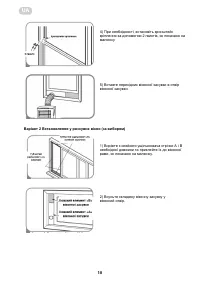
Page 9 - Варіант
9 8 - Пилка ( опціонально, для скорочення віконного перехідника для вузьких вікон). Приладдя Ваш комплект призначений для встановлення у вікна розміром 67,5 - 123 см або для менших вікон. Перелік приладдя, що може постачатися разом з мобільним кондиціонером, вказано в таблиці нижче. Деталь Опис Кіль...
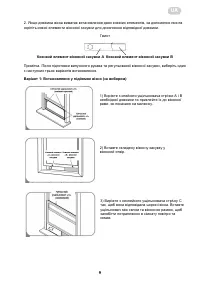
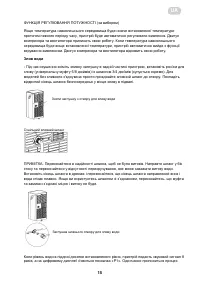
Page 10 - Варіант 2 Встановлення у розсувне вікно (за вибором
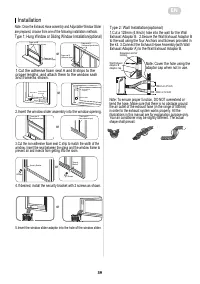
10 10 4) При необхідності, встановіть кронштейн кріплення за допомогою 2 гвинтів, як показано на малюнку 5) Вставте перехідник віконної засувки в отвір віконної засувки . Варіант 2 Встановлення у розсувне вікно (за вибором ) 1) Виріжте з клейкого ущільнювача стрічки А і В необхідної довжини та прикл...
Page 12 - або
12 12 Примітка. Якщо отвір не використовується , закрийте його кришкою перехідника . Примітка. Для забезпечення належного функціонування, НЕ витягуйте та не згинайте рукав . Для правильної роботи випускної системи перевірте, щоб навколо отвору випускного рукава ( на відстані 500 мм) не було перешкод...
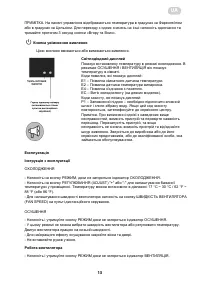
Page 14 - Інші особливості
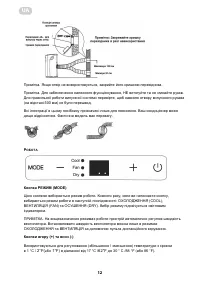
14 14 - Натисніть на кнопку ШВИДКІСТЬ ВЕНТИЛЯТОРА на пульті дистанційного керування та налаштуйте швидкість вентилятора. Температуру в цьому режимі не можна налаштувати. - Не вставляйте рукав у вікно . Інші особливості Режим СОН / ЕКО ( SLEEP / ECO) Цю функцію можна активувати лише з пульта дистанці...
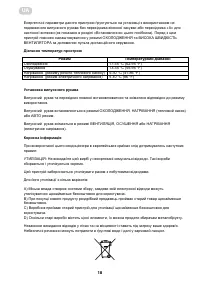
Page 16 - Чистка
16 16 кондиціювання / осушення. Однак двигун вентилятора продовжуватиме працювати (це нормально). Обережно перемістіть пристрій у місце зливу, зніміть нижню дренажну заглушку та злийте воду . Встановіть на місце заглушку нижнього отвору для зливу води та перезапустіть пристрій. Позначка « P1 » повин...
Page 17 - Проблема
17 16 кондиціювання / осушення. Однак двигун вентилятора продовжуватиме працювати (це нормально). Обережно перемістіть пристрій у місце зливу, зніміть нижню дренажну заглушку та злийте воду . Встановіть на місце заглушку нижнього отвору для зливу води та перезапустіть пристрій. Позначка « P1 » повин...
Page 19 - CONTENTS; Use the remote controller within a distance of 8; rear part and protected by a cover.; Інструкція щодо користування; Виробник залишає за собою право вносити зміни в кон-
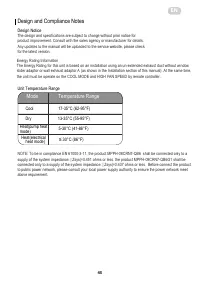
19 18 Енергетичні параметри даного пристрою ґрунтуються на установці з використанням не подовженого випускного рукава без перехідника віконної засувки або перехідника «А» для настінної витяжки (як показано в розділі «Встановлення» цього посібника). Поряд з цим пристрій повинен налаштовуватися у режи...
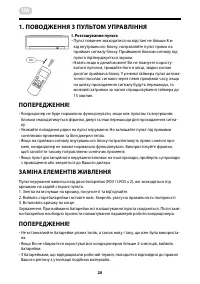
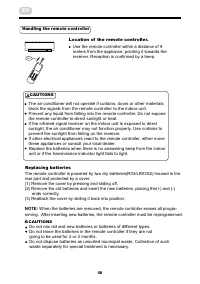
Page 20 - ПОВОДЖЕННЯ З ПУЛЬТОМ УПРАВЛІННЯ; I. Розташування пульта; ЗАМІНА ЕЛЕМЕНТІВ ЖИВЛЕННЯ
20 1. ПОВОДЖЕННЯ З ПУЛЬТОМ УПРАВЛІННЯ I. Розташування пульта • Пульт повинен знаходитися на відстані не більше 8 м від внутрішнього блоку, направляйте пульт прямо на приймач сигналу блоку. Приймання блоком сигналу від пульта підтверджується звуком. • Навіть якщо в даний момент Ви не плануєте користу...
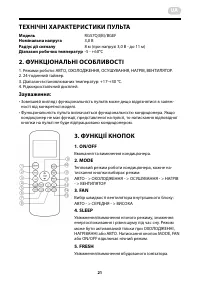
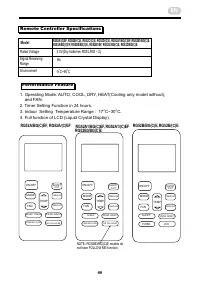
Page 21 - ТЕХНІЧНІ ХАРАКТЕРИСТИКИ ПУЛЬТА; Модель; ФУНКЦІОНАЛЬНІ ОСОБЛИВОСТІ
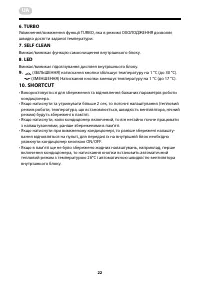
21 UA ТЕХНІЧНІ ХАРАКТЕРИСТИКИ ПУЛЬТА Модель RG57Q3(B)/BGEF Номінальна напруга 3,0 В Радіус дії сигналу 8 м (при напрузі 3,0 В - до 11 м) Діапазон робочих температур -5 - +60°С 2. ФУНКЦІОНАЛЬНІ ОСОБЛИВОСТІ 1. Режими роботи: АВТО, ОХОЛОДЖЕННЯ, ОСУШУВАННЯ, НАГРІВ, ВЕНТИЛЯТОР. 2. 24-годинний таймер. 3. ...
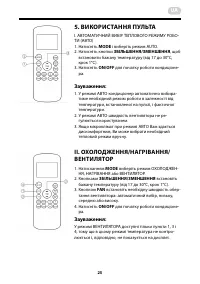
Page 25 - ВИКОРИСТАННЯ ПУЛЬТА; ВЕНТИЛЯТОР; MODE
25 UA 5. ВИКОРИСТАННЯ ПУЛЬТА I. АВТОМАТИЧНИЙ ВИБІР ТЕПЛОВОГО РЕЖИМУ РОБО- ТИ (АВТО) 1. Натисніть MODE і виберіть режим AUTO. 2. Натисніть кнопки ЗБІЛЬШЕННЯ/ЗМЕНШЕННЯ , щоб встановити бажану температуру (від 17 до 30°С, крок 1°С). 3. Натисніть ON/OFF для початку роботи кондиціоне- ра. Зауваження: 1. ...
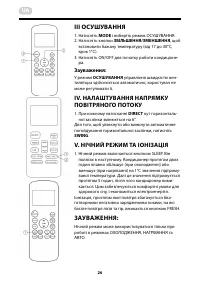
Page 26 - III ОСУШУВАННЯ; IV. НАЛАШТУВАННЯ НАПРЯМКУ; DIRECT; V. НІЧНИЙ РЕЖИМ ТА ІОНІЗАЦІЯ
26 UA III ОСУШУВАННЯ 1. Натисніть MODE і виберіть режим ОСУШУВАННЯ. 2. Натисніть кнопки ЗБІЛЬШЕННЯ/ЗМЕНШЕННЯ , щоб встановити бажану температуру (від 17 до 30°С, крок 1°С). 3. Натисніть ON/OFF для початку роботи кондиціоне- ра. Зауваження: У режимі ОСУШУВАННЯ управління швидкістю вен- тилятора здійс...
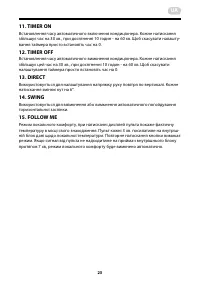
Page 27 - TIMER ON; ТАЙМЕР НА АВТОМАТИЧНЕ; TIMER OFF
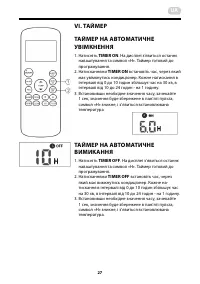
27 UA VI. ТАЙМЕР ТАЙМЕР НА АВТОМАТИЧНЕ УВІМКНЕННЯ 1. Натисніть TIMER ON . На дисплеї з’явиться останнє налаштування та символ «Н». Таймер готовий до програмування. 2. Натисканнями TIMER ON встановіть час, через який має увімкнутись кондиціонер. Кожне натискання в інтервалі від 0 до 10 годин збільшує...
Page 29 - Contents; S a f e t y P r e c a u t i o n s; ( f o r u s i n g R 2 9 0 / R 3 2 r e f r i g e r a n t o n l y )
29 Contents S a f e t y P r e c a u t i o n s C a u t i o n sW a r n i n g s ( f o r u s i n g R 2 9 0 / R 3 2 r e f r i g e r a n t o n l y ) P r e p a r a t i o n sI n s t a l l a t i o nO p e r a t i o n M a i n t e n a n c eF a u l t s D i a g n o s i sD e s i g n a n d C o m p l i a n c e N o t...
Page 30 - Safety Precautions; cause fire or electrical shock.
30 Safety Precautions -Installation must be performed according to the installation instructions. Improper installation can cause water leakage, electrical shock, or fire. -Use only the included accessories and parts, and specified tools for the installation. Using non-standard parts can cause water l...
Page 31 - C autions
31 Safety Precautions -Installation must be performed according to the installation instructions. Improper installation can cause water leakage, electrical shock, or fire. -Use only the included accessories and parts, and specified tools for the installation. Using non-standard parts can cause water l...
Page 32 - manual or installation manual.
32 4 -Do not use means to accelerate the defrosting process or to clean, other than those recommended by the manufacturer. -The appliance shall be stored in a room without continuously operating ignition sources (for example: open flames, an operating gas appliance or an operating electric heater). ...
Page 33 - a dry powder or CO2 fire extinguisher adjacent to the
33 4 -Do not use means to accelerate the defrosting process or to clean, other than those recommended by the manufacturer. -The appliance shall be stored in a room without continuously operating ignition sources (for example: open flames, an operating gas appliance or an operating electric heater). ...
Page 34 - Check that cabling will not be subject to wear, corrosion,
34 exposed while charging, recovering or purging the system; That there is continuity of earth bonding. 7.Repairs to sealed components 1)During repairs to sealed components, all electrical supplies shall be disconnected from the equipment being worked upon prior to any removal of sealed covers, etc....
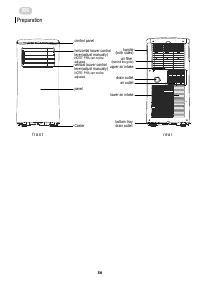
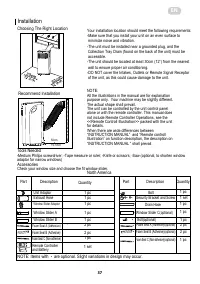
Page 36 - Preparation; r e a r
36 Preparation 8 control panel handle (both sides) horizontal louver control lever(adjust manually) vertical louver control lever(adjust manually) panel Caster bottom tray drain outlet air filter (behind the grille) upper air intake air outlet lower air intake drain outlet NOTE: PHA can not be adjus...
Page 37 - Installation
37 Preparation 8 control panel handle (both sides) horizontal louver control lever(adjust manually) vertical louver control lever(adjust manually) panel Caster bottom tray drain outlet air filter (behind the grille) upper air intake air outlet lower air intake drain outlet NOTE: PHA can not be adjus...
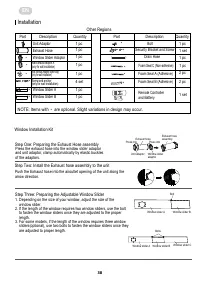
Page 38 - Window Installation Kit; Depending on the size of your window, adjust the size of the; Other Regions; Wall Exhaust Adaptor A
38 Installation 10 Window Installation Kit Press the exhaust hose into the window slider adaptor and unit adaptor, clamp automatically by elastic buckles of the adaptors. Step One: Preparing the Exhaust Hose assembly Step Two: Install the Exhaust hose assembly to the unit Press into Press into Step ...
Page 39 - Note: Once the Exhaust Hose assembly and Adjustable Window Slider; or
39 Installation 10 Window Installation Kit Press the exhaust hose into the window slider adaptor and unit adaptor, clamp automatically by elastic buckles of the adaptors. Step One: Preparing the Exhaust Hose assembly Step Two: Install the Exhaust hose assembly to the unit Press into Press into Step ...
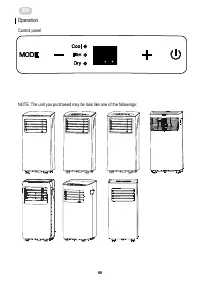
Page 40 - Operation; NOTE: The unit you purchased may be look like one of the followings:
40 Operation 12 NOTE: The unit you purchased may be look like one of the followings: Control panel EN
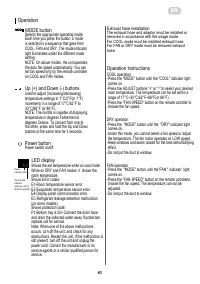
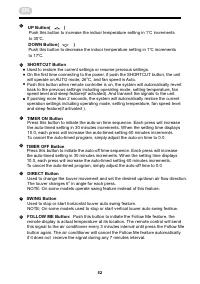
Page 41 - MODE button; LED display; -Under this mode, you cannot select a fan speed or adjust; The exhaust hose and adaptor must be installed or
41 Operation 12 NOTE: The unit you purchased may be look like one of the followings: Control panel Operation 13 MODE button Selects the appropriate operating mode. Each time you press the button, a mode is selected in a sequence that goes from COOL, FAN and DRY .The mode indicator light illuminates ...
Page 42 - Adjust the air flow direction manually:
42 Operation Other features FOLLOW ME/TEMP SENSING feature(optional) NOTE:This feature can be activated from the remote control ONLY. The remote control serves as a remote thermostat allowing for the precise temperature control at its location. To activate the Follow Me/Temp Sensing feature, point t...
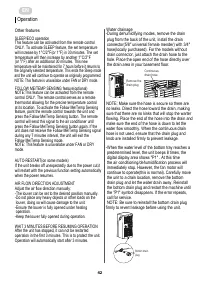
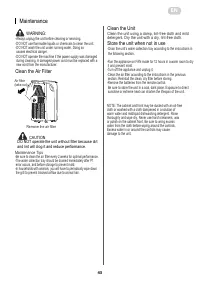
Page 43 - Maintenance; -DO NOT use flammable liquids or chemicals to clean the unit.; Clean the Air Filter; the grill to prevent blocked airflow due to animal hair.; Remove the air filter
43 Operation Other features FOLLOW ME/TEMP SENSING feature(optional) NOTE:This feature can be activated from the remote control ONLY. The remote control serves as a remote thermostat allowing for the precise temperature control at its location. To activate the Follow Me/Temp Sensing feature, point t...
Page 44 - Faults Diagnosis; Problem
44 16 Please check the machine according to the following form before asking for maintenance: Faults Diagnosis Problem Possible Cause P1 Error Code In COOL mode: room temperature is lower than the set temperature The air filter is blocked with dust or animal hair The unit is low on refrigerant Temper...
Page 45 - Design and Compliance Notes; Design Notice; Mode
45 16 Please check the machine according to the following form before asking for maintenance: Faults Diagnosis Problem Possible Cause P1 Error Code In COOL mode: room temperature is lower than the set temperature The air filter is blocked with dust or animal hair The unit is low on refrigerant Temper...
Page 46 - Sociable Remark; separately for special treatment is necessary.
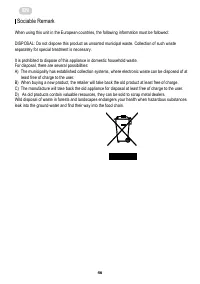
46 Sociable Remark When using this unit in the European countries, the following information must be followed: DISPOSAL: Do not dispose this product as unsorted municipal waste. Collection of such waste separately for special treatment is necessary. It is prohibited to dispose of this appliance in d...
Page 47 - AIR CONDITIONER
47 Sociable Remark When using this unit in the European countries, the following information must be followed: DISPOSAL: Do not dispose this product as unsorted municipal waste. Collection of such waste separately for special treatment is necessary. It is prohibited to dispose of this appliance in d...
Page 49 - Model; Remote Controller Specifications; RG52B1/EF; not have FOLLOW ME function.
49 Model Rated Voltage 8m o o -5 C~60 C 3.0V(Dry batteries R03/LR03 × 2) Remote Controller Specifications 1. Operating Mode: AUTO, COOL, DRY, HEAT(Cooling only model without), and FAN.2. Timer Setting Function in 24 hours. O O 3. Indoor Setting Temperature Range : 17 C~30 C.4. Full function of LCD (...
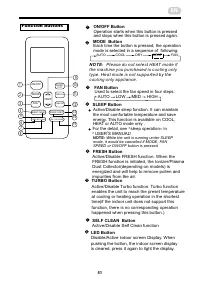
Page 51 - Function buttons; While the unit is running under SLEEP; NOTE
51 5 6 Function buttons 1 2 Each time the button is pressed, the operation mode is selected in a sequence of following: 3 MODE Button 4 5 ON/OFF Button Operation starts when this button is pressed and stops when this button is pressed again. AUTO COOL DRY HEAT FAN SHORTCUT Button TIMER ON Button TIM...
Page 53 - Indicators on LCD; How to use the buttons
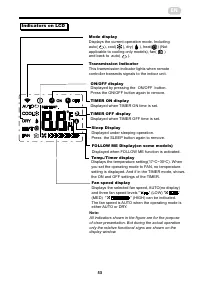
53 7 8 Indicators on LCD Transmission Indicator Temp./Timer display Fan speed display Sleep Display Mode display ON/OFF display This transmission indicator lights when remote controller transmits signals to the indoor unit. Displays the current operation mode. Including auto( ), cool( ), dry( ), hea...
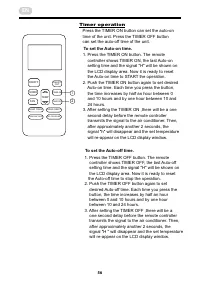
Page 55 - Dehumidifying operation; In the Dehumidifying mode, you can not switch the; Timer operation
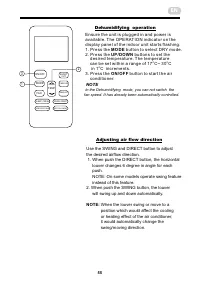
55 9 10 Dehumidifying operation Ensure the unit is plugged in and power is available. The OPERATION indicator on the display panel of the indoor unit starts flashing. 1. Press the MODE button to select DRY mode. 2. Press the UP/DOWN buttons to set the desired temperature. The temperature O O can be ...
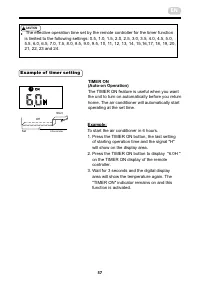
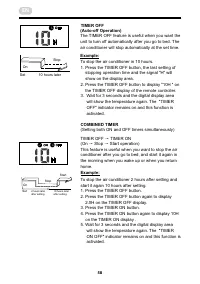
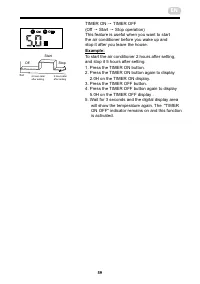
Page 57 - Example of timer setting; COMBINED TIMER
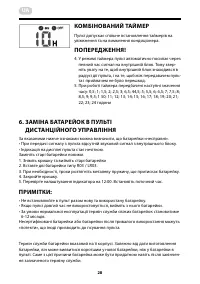
57 11 12 The effective operation time set by the remote controller for the timer function is limited to the following settings: 0.5, 1.0, 1.5, 2.0, 2.5, 3.0, 3.5, 4.0, 4.5, 5.0, 5.5, 6.0, 6.5, 7.0, 7.5, 8.0, 8.5, 9.0, 9.5, 10, 11, 12, 13, 14, 15,16,17, 18, 19, 20, 21, 22, 23 and 24. CAUTION ! Exampl...
Page 62 - ГАРАНТІЙНИЙ ТАЛОН; Шановний Покупець! Вітаємо Вас з придбанням приладу торго-; Комплектність виробу перевірено. Із умовами гарантійного
ГАРАНТІЙНИЙ ТАЛОН Шановний Покупець! Вітаємо Вас з придбанням приладу торго- вельної марки ARDESTO, який був розроблений та виготовлений у відповідності до найвищих стандартів якості, та дякуємо Вам за те, що Ви обрали саме цей прилад. Просимо Вас зберігати талон протягом гарантійного періоду. При к...
Page 63 - Талони на гарантійне обслуговування
ГАРАНТІЙНИЙ ТАЛОН Шановний Покупець! Вітаємо Вас з придбанням приладу торго- вельної марки ARDESTO, який був розроблений та виготовлений у відповідності до найвищих стандартів якості, та дякуємо Вам за те, що Ви обрали саме цей прилад. Просимо Вас зберігати талон протягом гарантійного періоду. При к...