Page 2 - TABLE OF CONTENTS; assembling and using this appliance.; Leave these instructions with the consumer .
2 TABLE OF CONTENTS Safety Information ...................................................................................................................... 3 Package Contents ...................................................................................................................... 5 Ha...
Page 3 - CALIFORNIA PROPOSITION 65; DANGER; SAFETY INFORMATION; CAUTION; • Do not use gasoline, kerosene or alcohol for li
3 mbustion of such fuels contain chemicals, including Benzene, known to the State of California to cause cancer, birth defects or other reproductive harm. This product contains chemicals, including lead and lead compounds, known to the State of California to cause cancer, birth defects or other repr...
Page 4 - WARNING
4 SAFETY INFORMATION • Do not place the grill under overhead combustible construction or awnings. Minimum clearance from sides and back of unit to combustible construction, 36 inches (915.0mm) from sides and back. NOTE: The installation must conform with local codes or, in the absence of local codes...
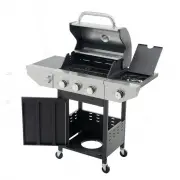
Page 5 - Front view of the product
1 2 3 28 29 20 18 17 19 23 5 9 12 11 15 27 26 21 6 24 25 4 7 8 14 13 22 16 10 30 PACKAGE CONTENTS (Endark Gas Grill-1) Front view of the product 5
Page 8 - 0 minutes with 2 people.; THIS UNIT IS HEAVY. Two people required for safe assembly.; use and care instructions before attempting to assemble and use.
PREPARATION Before beginning assembly of product, make sure all parts are present. Compare parts with package contents list on previous page and hardware contents above. If any part is missing or damaged, do not attempt to assemble the product. Contact customer service for replacement parts. Estimat...
Page 14 - Left
5 21 A Right Left 13.A M6×12 ( ×6 ) 14.A M6×12 ( ×14 ) A A A A Left Right Assembly steps: 14
Page 15 - Step 1. Take out side burner gas valve from bottom of control panel
24 E 25 15.E M4×8 ( ×2 ) 16. Assembly steps: Step 2. Step 3. Step 4. Correct Incorrect Incorrect 15 Step 1. Take out side burner gas valve from bottom of control panel Step 5. Connect the ignition wire
Page 16 - Tank Screw
2 3 10 4 17. 1 29 18. Assembly steps: 16 Tank Screw
Page 27 - Connect the ignition wire
15. 2 3 4 16. Assembly steps: 27 Connect the ignition wire
Page 29 - ASSEMBLY INSTRUCTIONS
Open the left door assembly and the right door assembly , insert the hose/regulator assembly into the cart assembly through the clearance above the cart right side panel assembly . Place LP gas cylinder (sold separately) into the nesting hole located in the cart bottom shelf . Rotate the LP gas cyli...
Page 30 - ALL INSTRUCTIONS AND SAFEGUARDS ON THIS PAGE MUST BE FOLLOWED TO; Only use the regulator and hose assembly provided!
30 OPERATION INSTRUCTIONS CHECKING FOR LEAKS gs on the LP gas tank valve, gas hose and regulator for leaks with a water and soap solution. • Always perform leak test prior to lighting the grill. • Do not smoke while testing for a leak. • Always perform leak tests outdoors in a well-ventilated area. ...
Page 31 - Goods and Commission, as applicable and provided with a liste; a. Do not store a spare LP-gas cylinder under or near this appliance.
31 OPERATION INSTRUCTIONS CONNECTING GAS CYLINDER The propane gas supply cylinder to be used must be constructed and marked in accordance with the Standard of Canada, CAN/CSA-B339, Cylinders, Spheres and Tubes for Transportation of Dangerous Goods; and Commission, as applicable; and provided with a ...
Page 32 - OPERATION INSTRUCTIONS; CONNECTING THE LP TANK
32 OPERATION INSTRUCTIONS NOTE: Other cylinders may be acceptable for use with this appliance If they are compatible with the app- -liance nesting hole and retention means. Refer to Page11 of the Assembly Instructions for corr- ect cylinder to cylinder holder connection. WARNING ALL INSTRUCTIONS AND...
Page 33 - and odor from the manufacturing process.; ion, immediately TURN OFF the; Check that the control knobs are in the OFF position.
33 OPERATION INSTRUCTIONS Lighting The Grill Remove all hangings or plastic straps, if present. Before you cook on your new gas grill, it is important to clean your grill with heat. To do this, operate the grill for approximately 15 minutes with the lid closed and the control knob in the highest pos...
Page 34 - burners that have been lit.
34 OPERATION INSTRUCTIONS SHUTDOWN INSTRUCTIONS 1. Turn control knobs clockwise to the OFF position. 2. Close valve at tank fully by turning clockwise. 3. Close lid. Turn off LP supply at cylinder when appliance is not in use. CAUTION Make sure all burners controls are off except for the burner bein...
Page 38 - CARE AND MAINTENANCE; TROUBLESHOOTING; If you have any questions regarding the product,
38 CARE AND MAINTENANCE The electronic ignition requires 1 “AA” alkaline battery, which is included. WARNING DO NOT mix old and new batteries. DO NOT mix alkaline, standard (Carbon-Zinc), or rechargeable (Nickel-Cadmium) batteries. TROUBLESHOOTING PROBLEM POSSIBLE CAUSE CORRECTIVE ACTION Low Heat. E...
Page 39 - Side Burner rated BTU:
39 TROUBLESHOOTING PROBLEM POSSIBLE CAUSE CORRECTIVE ACTION T h e b u rn er w ill n o tlig h t w ith a m atch . NOTICE: Some states do not allow the exclusion or limitation of incidental or consequential damages or limitations on how long an implied warranty lasts, so the above limitations or exclus...