Page 2 - PRECAUTIONS AND NOTICES; Important Information; FCC Compliance Statement; Please Read Carefully Before Using This Product.
2 PRECAUTIONS AND NOTICES ■ Important Information This product is intended to provide turn by turninstructions to get you to a desired destination.Please make certain that all persons using thisnavigation system carefully read these precautionsand the following instructions fully. 1) This product is...
Page 3 - WARNINGS; PRECAUTIONS; WARNING; Points to Observe for Safe Usage
3 WARNINGS Read this manual carefully before using this system.It contains instructions on how to use this product ina safe and effective manner. Alpine cannot beresponsible for problems resulting from failure toobserve the instructions in this manual. This manual uses various pictorial displays to ...
Page 4 - USER AGREEMENT
4 USER AGREEMENT In using this Removable Navigation Drive, NVE-P1 (hereinafter referred to as “System”), which includes AlpineElectronics, Inc. (“Alpine”) Specifications, Space Machine, Inc. ("Space Machine") Software and NAVTEQNorth America, LLC. (“NAVTEQ”) Database, you are bound by the te...
Page 5 - TABLE OF CONTENTS
5 TABLE OF CONTENTS PRECAUTIONS AND NOTICES . . . . . . . . . . . . . . . 2 WARNINGS . . . . . . . . . . . . . . . . . . . . . . . . . . . 3 USER AGREEMENT . . . . . . . . . . . . . . . . . . . . . 4 TABLE OF CONTENTS . . . . . . . . . . . . . . . . . . . . 5 SYSTEM FEATURES . . . . . . . . . . . . ...
Page 6 - SYSTEM FEATURES
6 SYSTEM FEATURES Mini USB Connector External GPSAntenna Connector Reset Button Power Indicator Software Update Switch System Interface Connector Removable Navigation Drive, NVE-P1 Congratulations and thank you for purchasing the Alpine Removable NavigationDrive, NVE-P1. We hope you enjoy using this...
Page 7 - IN THE BOX; Optional Accessories
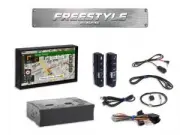
7 IN THE BOX ■ Optional Accessories ■ Accessories USB Cable NVE-P1 Q uick Reference G uide Remov a ble N a vig a tion Drive Quick Reference Guide External GPS Antenna External Microphone R Customer Care Registration For easy on-line registration, go to “www.alpine-usa.com/registration” Thank you for...
Page 8 - COMPATIBLE MMS (MOBILE MULTIMEDIA STATION); List; Connection Chart
PMD-B200 PMD-DOK2 NVE-P1 2DIN MMS (DOCK N’ ROLL) IVA-W505 IVA-W203 IVA-W205 IVA-Dxxx DIRECT DOCK-IN with DOK2 with DOK2 DIRECT DOCK-IN DIRECT DOCK-IN DIRECT DOCK-IN DIRECT DOCK-IN NO DOCKABLE PMD-DOK2 DOCKING STATION 1DIN MMS PRODUCT NAME or w/DOK2 or w/DOK2 or w/DOK2 or w/DOK2 or w/DOK2 or w/DOK2 8...
Page 9 - INSTALLATION; How to Reset MMS
9 INSTALLATION ■ How to Reset NVE-P1 In the event the system requires a reset, pull over in a safe and legal manner beforedoing so. Press the reset button on the NVE-P1 for at least 1 second. ■ How to Reset MMS If you change NVE-P1 to PMD-B200 (or PMD-B200 to NVE-P1), both IVA-W203 andIVA-W505 need ...
Page 10 - BASIC OPERATION; Set a Destination and Go!
Disclaimer screen appears.Read carefully. Touch I Accept to display map. The last-known currentlocation is indicated onthe map. To Power Off Press and hold Power (Source)button of MMS for 2 seconds. To Power On 1 3 4 10 Select an input method. (In this example, Places is selected.) 2 Select a search...
Page 11 - Select; OK to Proceed; to; By POI; Type name of a place.; ATTRACTIONS
11 Map is displayed.Follow the navigation. 9 Select OK to Proceed to set the destination. 8 For Map Function, see page 12.To Go Home, see page 22.To Find other routes, see page 23. Select the search method. (In this example, By POI Name is selected.) 5 Type name of a place. If more than one place wi...
Page 12 - Setting the Map Orientation; Repeating the Announcement; Accessing the MMS; MAP FUNCTION
12 Click this icon to switch betweenEstimated Time Remaining andEstimated Time of Arrival. Note: The time estimates are based on the average speed. Theestimate time will vary dependingon vehicle speed. The arrow alwayspoints toward the destination. In north up view, north is always atthe top of the ...
Page 13 - Set as Destination; Touch; on the; Setting a Destination Directly from Map Display; Switching Map Display; Arrow Mode
13 Touch anywhere on map screen. The current location arrow changes to CrosshairCursor on the screen. Move the cursor to the new desiredstreet.Note: Use Map Scale Bar to zoom out the map if the destination is far from the current location. Touch Select. Select Set as Destination . Touch OK to Procee...
Page 14 - MAIN MENU; DESTINATION; Setting a Destination by Address
14 MAIN MENU Get back home fromanywhere. ➔ Page 22 Set and saveDestinations. ➔ Page 14 Access your Bluetoothpaired mobile phone. ➔ Page 26 Edit Home andAddress Book. ➔ Page 24 Customize thenavigation system. ➔ Page 28 Modify or choosealternate routes to adestination. ➔ Page 23 Select Input City Name...
Page 15 - Destination by POI Name; Go to; Setting a Destination by POI
15 You can select from approximately 1.3 Million Point-of-Interest (POI) locations storedinside your Removable Navigation Drive, NVE-P1. These destinations are sorted by POIName or by POI Category and are listed in order of distance from your current location. Destination by POI Name Go to Main Menu...
Page 16 - Destination by POI Category
16 Go to Main Menu ➔ Destination ➔ Places Select By POI Category . Select a desired POI Category. There are 37 POI categories to choose fromincluding ATMs, Banks, Gas Stations, GroceryStores, Hotels, Parking Lots, Restaurants and more. Select Search Method. 4 3 2 1 DESTINATION Destination by POI Cat...
Page 17 - Setting a Destination from the Address Book; Setting a Destination by Recently Entered Destination
17 Go to Main Menu ➔ Destination ➔ Address Book Select the desired destination. Confirmation screen appears. Touch OK to Proceed to set the destination and start guidance. To save an address in the address book, see page 20. 3 2 1 ■ Setting a Destination from the Address Book Go to Main Menu ➔ Desti...
Page 18 - Input the second street name.; Setting a Destination by Intersection
18 Go to Main Menu ➔ Destination ➔ Intersection 1 Select Input City Name . Note: You can skip typing the city name by selecting Recent Cities . It displays a list of recent city names previouslyentered. Type the city name, then select the cityfrom the list. Type the first street name. Touch OK . The...
Page 19 - Call; Changing State; Map; Confirm Destination Screen; Change Method
19 DESTINATION Call (Only available on POIs and address book) If the phone number is available, youcan call the selected location usingyour Bluetooth enable mobile phone. Changing State If you want to choose a differentstate from the one shown on thescreen, touch Change to switch to a different stat...
Page 20 - Saving a Destination into the Address Book; OPTIONS; Find Local Places; How to Find Local POIs Directly from the Map
■ Saving a Destination into the Address Book OPTIONS ■ Find Local Places T ouch anywhere on map screen. The current location arrow changes to cross hair cursor on the screen. Touch Select . Select Find Local POIs and the desired category. Select the desired place. Confirmation screen appears. Touch ...
Page 21 - Setting Waypoints; How to Set a Waypoint from the Destination Menu; How to Set a Waypoint from the Address Book
21 OPTIONS ■ Setting Waypoints T ouch anywhere on map screen. The current location arrow changes to cross hair cursor on the screen. Move the cursor to the desired waypoint. Touch Select . Select Set as Waypoint then select Recalculate . When the route search is complete, the current location is dis...
Page 22 - Main Menu; Confirmation screen appears. Touch; to set the destination; HOME; Set Destination as Home; Set the destination using any desired; Set as Home Location; Going Home
22 Go to Main Menu ➔ Home Confirmation screen appears. Touch OK to Proceed to set the destination and start guidance. See page 19 fordetail. To edit the Home Address, see page 24. 2 1 HOME ■ Set Destination as Home You can get home from anywhere once the home address is set from DestinationMenu. Set...
Page 23 - ROUTE; Recalling the Maneuver List during Guidance; Waypoints; Finding Alternate Route
23 ROUTE ■ Recalling the Maneuver List during Guidance Go to Main Menu ➔ Route Touch Maneuver List . List of upcoming streets and turns appears on the screen. To preview a specific point, select a street name/maneuver on the list. 3 2 1 ■ Deleting Route Go to Main Menu ➔ Route ➔ Delete ➔ Yes Note: A...
Page 24 - Editing Address Book; EDIT; Editing Home
24 Go to Main Menu ➔ Edit Touch Edit Address Book The list of addresses appears. Select the destination you need to modify. “Edit Address Item” screen appears. See page 25 for details. Note: Select DELETE ALL to delete all addresses saved in the address book. 4 3 2 1 ■ Editing Address Book ■ Deletin...
Page 25 - Name; Tel
25 Edit Telephone Screen Delete Screen Change Icon Screen Name Touch Name to change the display name of the storedlocation. Note: For the details of selecting letters, see page 19. Tel Touch Tel to change the telephone number of the storedlocation. Map Touch Map to preview the location on the map. T...
Page 26 - MOBILE PHONE; Placing Calls; Using the 12 key Dial Pad
26 MOBILE PHONE Most Bluetooth enabled mobile phones can be synchronized to interface with NVE-P1.Once you have paired and synchronized your mobile phone with NVE-P1 (see Setupon page 30) you can place and receive calls in addition to many other convenientfunctions. Some Bluetooth enabled phones may...
Page 27 - Using Dialed, Missed, or Received Calls from your call history; Receiving Calls; Call Option Menu; Mute
27 MOBILE PHONE Using Dialed, Missed, or Received Calls from your call history Call History will be available after downloading has been completed. Touch Main Menu Touch Phone Touch Dialed Calls , Missed Calls , or Received Calls . A list of your call history will appear. Select the desired contact ...
Page 28 - SETUP; Customizing Display; Setting the Map Color
28 Go to Main Menu Select Setup Setup screen appears. 3 2 1 SETUP ■ Customizing Display Setting the Map Color Day - a bright tone screenNight - a dark tone screenAuto - switches automatically between Day and Night modes dependingupon ambience brightness Map Style 1 - Geographic features displayed in...
Page 29 - Customizing Guidance; Turning Voice On and Off; Setting up the Clock; Reset All Settings
29 ■ Customizing Guidance Turning Voice On and Off This allows you to turn ON or OFF guidance voice prompts. Changing Navi Mix Volume This allows you to vary the volume of the voice prompts with respect to the music. Setting Estimate Time Display Estimated Time of Arrival (ETA) or Estimated Time Rem...
Page 30 - Bluetooth Setup; Change
30 ■ Bluetooth Setup Bluetooth enabled mobile phones can be paired to interface with NVE-P1. You cancustomize this interface using the Bluetooth Setup controls. Go to Main Menu Select Setup Select Bluetooth . The Bluetooth Setup menu appears and displays the setup options. Use the largearrow button ...
Page 31 - Pairing Your Mobile Phone with NVE-P1; Go to Bluetooth Setup and turn on Bluetooth.
31 Changing Device Passkey The passkey used to pair NVE-P1 with your mobilephone can be changed here. Default Passkey is '0000'. Bluetooth Indicator The following icons indicate the Bluetooth status: No Icon When Bluetooth is OFF, the icon does not appear. When Bluetooth is on, but not paired, the g...
Page 32 - Viewing Information; Simulating Navigation
32 ■ Viewing Information Simulating Navigation You can watch a demonstration of the navigation system’s voice and screen guidance.Note: Set your destination first before using this function. To Start a Demonstration To Stop a Demonstration Follow 2 through 4 of "To Start aDemonstration". Sel...
Page 33 - Viewing GPS Status
33 Go to Main Menu Go to Setup Select Information . Select GPS Status . 4 3 2 1 You can view the dynamic location informationreceived from satellite such as signal strength,compass (direction information), latitude/longitude,approximate altitude, and speed. This featureallows you to view GPS satelli...
Page 34 - How to Update the New Software and Map Database; IN CASE OF DIFFICULTY
34 If you encounter a problem, please review the items in the following checklist. This guidewill help you isolate the problem if the unit is at fault. Otherwise make sure the rest of yoursystem is properly connected, batteries are completely charged and contact yourauthorized Alpine dealer or Alpin...
Page 35 - SPECIFICATIONS
35 SPECIFICATIONS Main Unit Size 6.1” x 2.9” x 1.0” (145mm x 73mm x 26mm) Main Unit Weight 4.4 oz (120 g) CPU Centrality Atlas III ARM9 CPU GPS Embedded 16 channel GPS, Built-In Main Unit Antenna with Optional External AntennaConnection Storage Media Built-In memory with Pre-Loaded Maps of US* and C...
Page 36 - INDEX
36 INDEX A Accessories 7 Address book 20 Announcement 12 B Background Color 28 Basic Operation 10 Bluetooth 26, 30 Setup 30 C Call 26, 27 Ending 27 Muting 27 Placing 26 Receiving 27 Clock 29 Confirm Destination Screen 19 Coordinates 17 Customizing Display 28 Guidance 29 D Deleting Route 23 Saved Des...
Page 37 - LIMITED WARRANTY
● PRODUCTS COVERED: This Warranty covers Car Audio, Navigation Products andRelated Accessories ("the product"). Products purchased in theCanada are covered only in the Canada. Products purchased inthe U.S.A. are covered only in the U.S.A. ● LENGTH OF WARRANTY: This Warranty is in effect for ...


 Alpine X800D-U
Manual
Alpine X800D-U
Manual
 Alpine INE-W987D
Manual
Alpine INE-W987D
Manual
 Alpine IVA-D511R
Manual
Alpine IVA-D511R
Manual
 Alpine X902D-F
Manual
Alpine X902D-F
Manual
 Alpine X702D-F
Manual
Alpine X702D-F
Manual
 Alpine CDE-203BT
Manual
Alpine CDE-203BT
Manual
 Alpine CDE-201R
Manual
Alpine CDE-201R
Manual
 Alpine UTE-200BT
Manual
Alpine UTE-200BT
Manual
 Alpine CDE-100E
Manual
Alpine CDE-100E
Manual
 Alpine CDA-7839
Manual
Alpine CDA-7839
Manual
 Alpine CDA-105
Manual
Alpine CDA-105
Manual
 Alpine PKG-RSE3DVD
Manual
Alpine PKG-RSE3DVD
Manual
 Alpine TME-M790
Manual
Alpine TME-M790
Manual
 Alpine PMD-B100
Manual
Alpine PMD-B100
Manual
 Alpine CDM-7871
Manual
Alpine CDM-7871
Manual
 Alpine MRP-T130
Manual
Alpine MRP-T130
Manual
 Alpine TDA-7547E
Manual
Alpine TDA-7547E
Manual
 Alpine iDA-305
Manual
Alpine iDA-305
Manual
 Alpine MDA-7755
Manual
Alpine MDA-7755
Manual
 Alpine MRV-F307
Manual
Alpine MRV-F307
Manual