Page 3 - Important Safety Notice; • DO NOT; To reduce the risk of fire, electric shock, or injury to persons:; DO NOT; To reduce the risk of a stove top grease fire:
Important Safety Notice Read all Instructions before Installing and operating this appliance • The installation in this manual is intended for qualified installers, service technicians or persons with similar qualified background. Installation and electrical wiring must be done by qualified professi...
Page 4 - WARNING; what can happen if the instructions are not followed.; To reduce the risk of injury to persons in the event of a gas leaks:
All safety messages will follow the safety alert symbol and the word “WARNING”. The manufacturer and/or distributor/reseller declines all responsibility in the event of failure to ob- serve the instructions given here for installation, maintenance and suitable use of the product. The manufacturer an...
Page 5 - Table of Contents; INSTALLATION; Charcoal filter Installation
Page 3 Tools needed: Level Flat-blade and Phillips screw - drivers Powered screwdriver or drill Measuring tape Utility knife Marker or pencil Table of Contents INSTALLATION Mount heights & clearance...........................5-6 Installation....................................................10 ...
Page 7 - Venting Requirements; For the most efficient and quiet opera
Page 5 Venting Requirements • Vent system must terminate to the outside (roof or side wall). • Do not terminate the vent system in an attic or other enclosed area. • Do not use 4” (10.2 cm) laundry-type wall caps. • Use metal/aluminum vent only. Rigid metal/ aluminum vent is recommended. • Do not us...
Page 8 - Duct Run Calculation:; Calculating vent system length
IMPORTANT: • A minimum of 6” round (standard for this range hood) must be used to maintain maximum airflow efficien - cy. • Always use rigid type metal/aluminum ducts if available to maximize airflow when connecting to provided duct. • Please use Duct Run Calculation below to compute total available...
Page 9 - Venting Methods
Page 7 Venting Methods • This power pack range hood insert is factory set for venting through the roof or wall. • NEVER exhaust air or terminate duct work into spaces between walls, crawl spaces, ceiling, attics or • Vent work can terminate either through the roof or wall. To vent through a wall, a ...
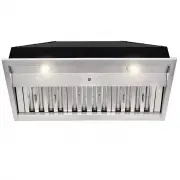
Page 10 - Filter Installation
Venting Methods (Continued) Charcoal Filter Installation Round Duct Wall Cap Roof Cap Round Elbow Power Pack Range Hood Insert 24” to 30” Above Cooking Surface average of 1 to 2 hours of daily cooking time). Available at your local resellers.Re-install grease filters. NOTE: 1.Remove grease filters f...
Page 11 - Electrical Requirements
Electrical Requirements IMPORTANT: Observe all governing codes and ordinances. (Please consult with a qualified electrician for 220-Volt 50 Hz voltage)It is the customer’s responsibility: To contact a qualified electrical installer. To assure that the electrical installation is adequate and in confo...
Page 12 - Installation; Excessive Weight; INSTALL THE HOOD
Installation Excessive Weight Require two or more person to move and install this range hood. Spinal or other bodi- ly injuries could occur if it is not followed. INSTALL THE HOOD Due to excessive weight, two or more person is recommended for this step. NOTE: DO NOT INSTALL THIS POWER PACK RANGE HOO...
Page 13 - Range Hood Operations; Speed Electronic Touch Control
This range hood is designed to remove smoke, cooking vapors and odors from the cook top area. For best results, start the range hood before cooking and allow it to operate several minutes after the cooking is completed to clear all smoke and odors from the kitchen. Button functions: • Power: Power O...
Page 14 - CAUTION: DO NOT touch the lights until switched OFF and cooled.; Speed Electronic Touch Control
Controls: • Adjusting the timer function: • While the blower (motor) is not running, press and hold • Decrease Value button over 3 seconds to enter timer mode. Adjust to desired period of delay off timer by pressing Increase Value or Decrease Value button (minimum 1 minute to maximum 9 minutes). Thi...
Page 16 - Troubleshooting
Troubleshooting 1. If the range hood does not operate after installa - tion: • Check if the range hood has been plugged in, make sure that all power has been turned back on and all electrical wiring are properly connected. 2. The range hood vibrates when the blower is on: • The range hood might not ...
Page 17 - Use and Care Information; Specifications
Use and Care Information WARNING — TO REDUCE THE RISK OF FIRE, ELEC - TRIC SHOCK, OR INJURY TO PERSONS, OBSERVE THE FOLLOWING: Use this unit only in the manner in - tended by the manufacturer. If you have questions, contact the manufacturer. Before servicing or cleaning unit, switch power off at ser...
Page 18 - Maintenance
WARNING Hazard of Burns! Light bulb become extremely hot when turned on. DO NOT touch bulb until switched off and cooled. Touching hot bulbs could cause serious burns. Maintenance SAFETY WARNING: Never put your hand into area housing the fan while the fan is operating! For optimal operation, clean r...
Page 20 - Disclaimer; Contact Us
Carefully inspect all items for damages before accepting delivery. note any damages on the freight bill or express receipt. request name and signature of the carrier’s agent and keep copy to support your claim. Upon acceptance of items, owner assumes responsibility for its safe arrival. Report damag...