Page 2 - CUSTOMER CARE AND SERVICE
CONTENTS 1. SAFETY INFORMATION...........................................................................................3 2. SAFETY INSTRUCTIONS.......................................................................................... 5 3. PRODUCT DESCRIPTION...........................................
Page 5 - SAFETY INSTRUCTIONS; Installation
• Items such as foam rubber (latex foam), shower caps, waterproof textiles, rubber backed articles and clothes or pillows fitted with foam rubber pads should not be dried in the tumble dryer. • Fabric softeners, or similar products, should be used as specified by the fabric softener instructions. • ...
Page 7 - PRODUCT DESCRIPTION
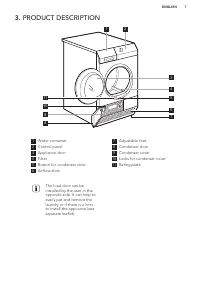
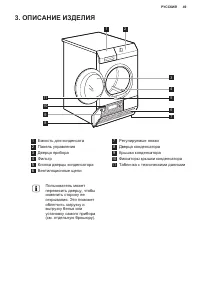
3. PRODUCT DESCRIPTION 2 1 4 3 8 9 10 11 5 6 7 1 Water container 2 Control panel 3 Appliance door 4 Filter 5 Button for condenser door 6 Airflow slots 7 Adjustable feet 8 Condenser door 9 Condenser cover 10 Locks for condenser cover 11 Rating plate The load door can be installed by the user in the o...
Page 8 - ACCESSORIES; Stacking kit
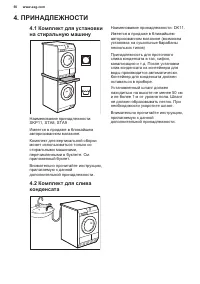
4. ACCESSORIES 4.1 Stacking kit Accessory name: SKP11, STA8, STA9Available from your authorized vendor.Stacking kit can be used only with the washing machines specified in the leaflet. See the leaflet attached.Read carefully the instructions supplied with the accessory. 4.2 Draining kit Accessory na...
Page 9 - CONTROL PANEL; PROGRAMME TABLE
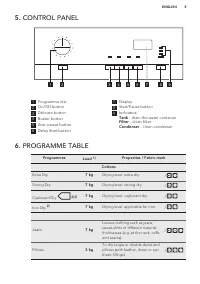
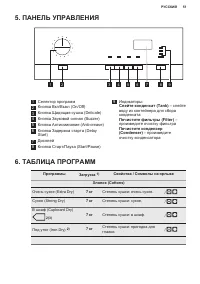
5. CONTROL PANEL 1 2 3 4 5 6 7 8 9 1 Programme dial 2 On/Off button 3 Delicate button 4 Buzzer button 5 Anti-crease button 6 Delay Start button 7 Display 8 Start/Pause button 9 Indicators: Tank - drain the water container Filter - clean filter Condenser - clean condenser 6. PROGRAMME TABLE Programme...
Page 10 - Programmes and options selection
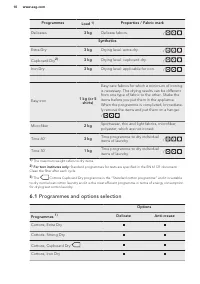
Programmes Load 1) Properties / Fabric mark Delicates 3 kg Delicate fabrics. / Synthetics Extra Dry 3 kg Drying level: extra dry. / Cupboard Dry 2) 3 kg Drying level: cupboard dry. / Iron Dry 3 kg Drying level: applicable for iron. / Easy Iron 1 kg (or 5 shirts) Easy care fabrics for which a minimum...
Page 11 - Consumption Data
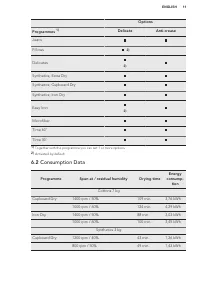
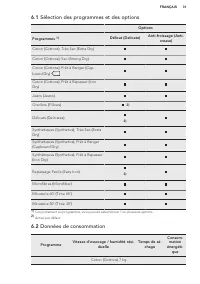
Options Programmes 1) Delicate Anti-crease Jeans Pillows 2) Delicates 2) Synthetics; Extra Dry Synthetics; Cupboard Dry Synthetics; Iron Dry Easy Iron 2) Microfiber Time 60’ Time 30’ 1) Together with the programme you can set 1 or more options. 2) Activated by default. 6.2 Consumption Data Programme...
Page 12 - OPTIONS; Delicate; BEFORE FIRST USE; Preparing the laundry
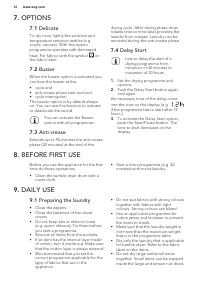
7. OPTIONS 7.1 Delicate To dry more lightly the sensitive and temperature sensitive textiles (e.g. acrylic, viscose). With this option programme operates with decreasedheat. For fabrics with the symbol on the fabric label. 7.2 Buzzer When the buzzer option is activated you can hear the buzzer at the...
Page 13 - Loading the laundry
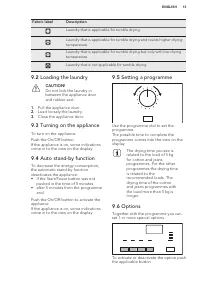
Fabric label Description Laundry that is applicable for tumble drying. Laundry that is applicable for tumble drying and resists higher dryingtemperature. Laundry that is applicable for tumble drying but only with low dryingtemperature. Laundry that is not applicable for tumble drying. 9.2 Loading th...
Page 14 - HINTS AND TIPS
When the option is activated the LED above the button or symbol on the display comes into the view. 9.7 Child lock option The child lock can be set to prevent the children to play with the appliance. The child lock option locks all push buttons and the programme dial (this option does not lock On/Of...
Page 15 - CARE AND CLEANING
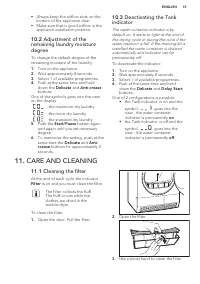
• Always keep the airflow slots on the bottom of the appliance clear. • Make sure that is good airflow in the appliance installation position. 10.2 Adjustment of the remaining laundry moisture degree To change the default degree of the remaining moisture of the laundry: 1. Turn on the appliance. 2. ...
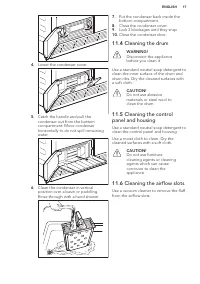
Page 16 - Cleaning the condenser
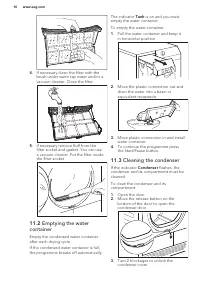
4. If necessary clean the filter with the brush under warm tap water and/or a vacuum cleaner. Close the filter. 5. If necessary remove fluff from the filter socket and gasket. You can use a vacuum cleaner. Put the filter inside the filter socket. 11.2 Emptying the water container Empty the condensed...
Page 18 - TROUBLESHOOTING
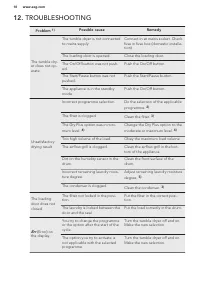
12. TROUBLESHOOTING Problem 1) Possible cause Remedy The tumble dry-er does not op-erate. The tumble dryer is not connectedto mains supply. Connect in at mains socket. Checkfuse in fuse box (domestic installa-tion). The loading door is opened. Close the loading door. The On/Off button was not push-e...
Page 19 - TECHNICAL DATA
Problem 1) Possible cause Remedy Abnormallyelapsing time onthe display. The time to end is calculated onthe basis of the volume and damp-ness of the laundry. The automatic procedure — this isnot the appliance malfunction. Programme in-active. The water container is full. Drain the water container, p...
Page 20 - INSTALLATION; Unpacking
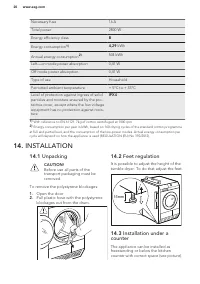
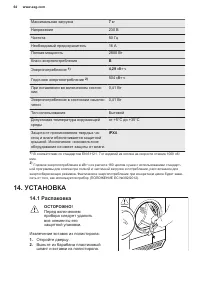
Necessary fuse 16 A Total power 2800 W Energy efficiency class B Energy consumption 1) 4,29 kWh Annual energy consumption 2) 504 kWh Left—on mode power absorption 0,41 W Off mode power absorption 0,41 W Type of use Household Permitted ambient temperature + 5°C to + 35°C Level of protection against i...
Page 21 - ENVIRONMENT CONCERNS
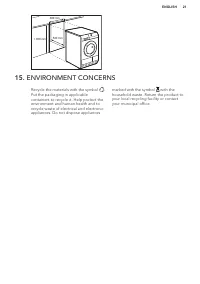
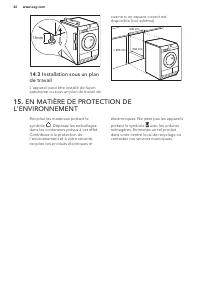
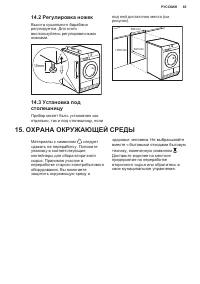
> 850 mm 600 mm 540 mm 15. ENVIRONMENT CONCERNS Recycle the materials with the symbol . Put the packaging in applicable containers to recycle it. Help protect the environment and human health and to recycle waste of electrical and electronic appliances. Do not dispose appliances marked with the s...
Page 25 - INSTRUCTIONS DE SÉCURITÉ; Instructions d’installation
• N'introduisez dans le sèche-linge que du linge propre. • Il convient que les articles qui ont été salis avec des substances telles que l'huile de cuisson, l'acétone, l'alcool, l'essence, le kérosène, les détachants, la térébenthine, la cire et les substances pour retirer la cire soient lavés dans ...
Page 27 - DESCRIPTION DE L'APPAREIL
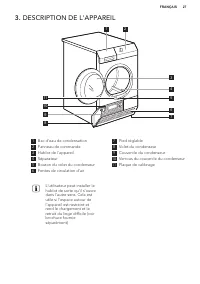
3. DESCRIPTION DE L'APPAREIL 2 1 4 3 8 9 10 11 5 6 7 1 Bac d'eau de condensation 2 Panneau de commande 3 Hublot de l'appareil 4 Séparateur 5 Bouton du volet du condenseur 6 Fentes de circulation d'air 7 Pied réglable 8 Volet du condenseur 9 Couvercle du condenseur 10 Verrous du couvercle du condense...
Page 28 - ACCESSOIRES; Kit de superposition
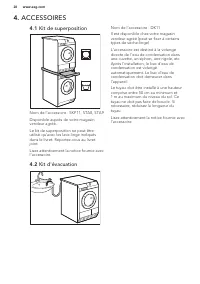
4. ACCESSOIRES 4.1 Kit de superposition Nom de l'accessoire : SKP11, STA8, STA9Disponible auprès de votre magasin vendeur agréé.Le kit de superposition ne peut être utilisé qu'avec les lave-linge indiqués dans le livret. Reportez-vous au livret joint.Lisez attentivement la notice fournie avec l'acce...
Page 29 - PANNEAU DE COMMANDE; TABLEAU DES PROGRAMMES
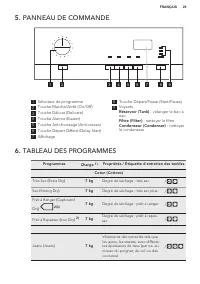
5. PANNEAU DE COMMANDE 1 2 3 4 5 6 7 8 9 1 Sélecteur de programme 2 Touche Marche/Arrêt (On/Off) 3 Touche Délicat (Delicate) 4 Touche Alarme (Buzzer) 5 Touche Anti-froissage (Anti-crease) 6 Touche Départ Différé (Delay Start) 7 Affichage 8 Touche Départ/Pause (Start/Pause) 9 Voyants : Réservoir (Tan...
Page 32 - Départ Différé (Delay
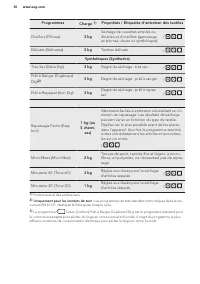
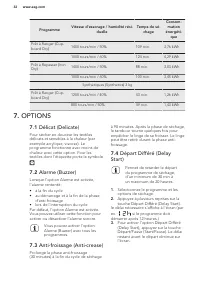
Programme Vitesse d'essorage / humidité rési- duelle Temps de sé- chage Consom- mation énergéti- que Prêt à Ranger (Cup-board Dry) 1400 tours/min / 50% 109 min. 3,76 kWh 1000 tours/min / 60% 124 min. 4,29 kWh Prêt à Repasser (IronDry) 1400 tours/min / 50% 88 min. 3,03 kWh 1000 tours/min / 60% 100 mi...
Page 33 - Préparation du linge; Chargement du linge
8. AVANT LA PREMIÈRE UTILISATION Avant d'utiliser l'appareil pour la première fois, effectuez les opérations suivantes :• Nettoyez le tambour du sèche-linge avec un chiffon humide. • Démarrez un programme court (par exemple 30 minutes) avec du linge humide. 9. UTILISATION QUOTIDIENNE 9.1 Préparation...
Page 35 - CONSEILS
9.8 Départ d'un programme Pour lancer le programme : Appuyez sur la touche Départ/Pause (Start/Pause) . L'appareil démarre et le voyant au- dessus de la touche reste fixe. 9.9 Changement de programme Pour changer de programme : 1. Tournez le sélecteur de programme sur la position Stop . 2. Sélection...
Page 36 - Désactivation du voyant; ENTRETIEN ET NETTOYAGE; Nettoyage du filtre
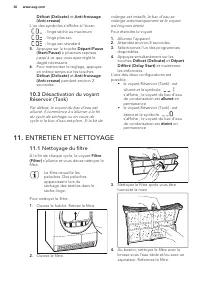
Délicat (Delicate) et Anti-froissage (Anti-crease) . L'un des symboles s'affiche à l'écran : - linge séché au maximum - linge plus sec - linge sec standard 5. Appuyez sur la touche Départ/Pause (Start/Pause) à plusieurs reprises jusqu'à ce que vous ayez réglé le degré nécessaire. 6. Pour mémoriser l...
Page 37 - Nettoyage du
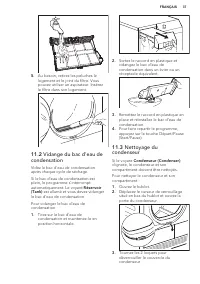
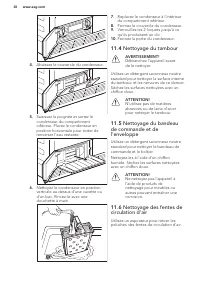
5. Au besoin, retirez les peluches le logement et le joint du filtre. Vous pouvez utiliser un aspirateur. Insérez le filtre dans son logement. 11.2 Vidange du bac d'eau de condensation Videz le bac d'eau de condensation après chaque cycle de séchage.Si le bac d'eau de condensation est plein, le prog...
Page 39 - DÉPANNAGE
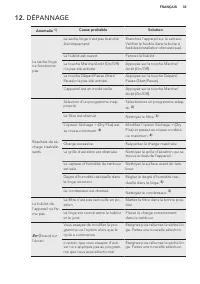
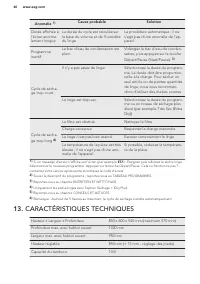
12. DÉPANNAGE Anomalie 1) Cause probable Solution Le sèche-lingene fonctionnepas. Le sèche-linge n'est pas branchéélectriquement. Branchez l'appareil sur le secteur.Vérifiez le fusible dans la boîte àfusibles (installation domestique). Le hublot est ouvert. Fermez le hublot. La touche Marche/Arrêt (...
Page 40 - CARACTÉRISTIQUES TECHNIQUES
Anomalie 1) Cause probable Solution Durée affichée àl'écran anorma-lement longue. La durée du cycle est calculée surla base du volume et de l'humiditédu linge. La procédure automatique ; il nes'agit pas d'une anomalie de l'ap-pareil. Programmeinactif. Le bac d'eau de condensation estplein. Vidangez ...
Page 41 - Déballage
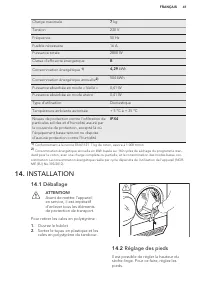
Charge maximale 7 kg Tension 230 V Fréquence 50 Hz Fusible nécessaire 16 A Puissance totale 2800 W Classe d'efficacité énergétique B Consommation énergétique 1) 4,29 kWh Consommation énergétique annuelle 2) 504 kWh Puissance absorbée en mode « Veille » 0,41 W Puissance absorbée en mode éteint 0,41 W...
Page 42 - EN MATIÈRE DE PROTECTION DE
15mm 14.3 Installation sous un plan de travail L'appareil peut être installé de façon autonome ou sous un plan de travail de cuisine si un espace correct est disponible (voir schéma). > 850 mm 600 mm 540 mm 15. EN MATIÈRE DE PROTECTION DE L'ENVIRONNEMENT Recyclez les matériaux portant lesymbole ....
Page 43 - ПОДДЕРЖКА ПОТРЕБИТЕЛЕЙ И СЕРВИСНОЕ
СОДЕРЖАНИЕ 1. СВЕДЕНИЯ ПО ТЕХНИКЕ БЕЗОПАСНОСТИ...............................................44 2. УКАЗАНИЯ ПО БЕЗОПАСНОСТИ................................................................. 47 3. ОПИСАНИЕ ИЗДЕЛИЯ................................................................................... 49 4....
Page 45 - Общие правила техники безопасности
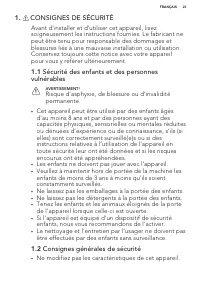
• Если прибор оснащен устройством защиты от детей, рекомендуем Вам включить это устройство. • Очистка и доступное пользователю техническое обслуживание не должно производиться детьми без присмотра. 1.2 Общие правила техники безопасности • Не изменяйте параметры данного прибора. • Если сушильный бара...
Page 47 - УКАЗАНИЯ ПО БЕЗОПАСНОСТИ; электросети
• Заключительный этап цикла сушки в сушильном барабане выполняется без нагрева (этап охлаждения) для того, чтобы конечная температура белья позволила обеспечить его сохранность. • Перед выполнением операций по чистке и уходу выключите прибор и извлеките вилку сетевого шнура из розетки. 2. УКАЗАНИЯ П...
Page 53 - Выбор программ и режимов; Данные по потреблению энергии
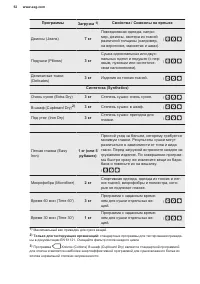
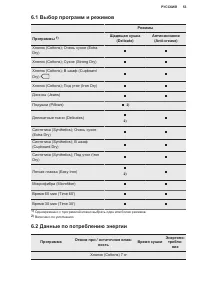
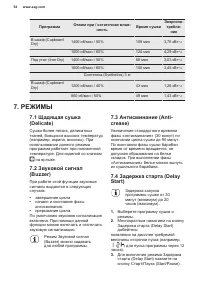
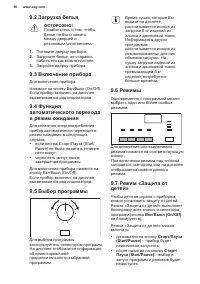
6.1 Выбор программ и режимов Режимы Программы 1) Щадящая сушка (Delicate) Антисминание (Anti-crease) Хлопок (Cottons); Очень сухое (Extra Dry) Хлопок (Cottons); Cухое (Strong Dry) Хлопок (Cottons); В шкаф (CupboardDry) Хлопок (Cottons); Под утюг (Iron Dry) Джинсы (Jeans) Подушки (Pillows) 2) Деликат...
Page 57 - Установка режима «Защита; Окончание программы
Установка режима «Защита от детей»: 1. Включите сушильный барабан. 2. Подождите приблизительно 8 секунд. 3. Выберите одну из доступных программ. 4. Одновременно нажмите и удерживайте кнопки Антисминание (Anti-crease) и Задержка старта (Delay Start). На дисплее появится значок . 5. Для выключения фун...
Page 59 - контейнера для сбора
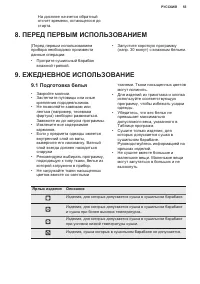
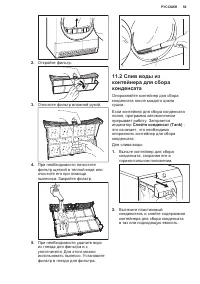
2. Откройте фильтр. 3. Очистите фильтр влажной рукой. 4. При необходимости почистите фильтр щеткой в теплой воде или очистите его при помощи пылесоса. Закройте фильтр. 5. При необходимости удалите ворс из гнезда для фильтра и с уплотнителя. Для этого можно использовать пылесос. Установите фильтр в г...
Page 60 - Очистка конденсатора
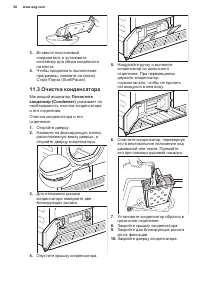
3. Вставьте пластиковый соединитель и установите контейнер для сбора конденсата на место. 4. Чтобы продолжить выполнение программы, нажмите на кнопку Старт/Пауза (Start/Pause). 11.3 Очистка конденсатора Мигающий индикатор Почистите конденсер (Condenser) указывает на необходимость очистки конденсатор...
Page 61 - ПОИСК И УСТРАНЕНИЕ НЕИСПРАВНОСТЕЙ
11.4 Чистка барабана ВНИМАНИЕ! Перед очисткой отключите прибор от электросети. Для мытья внутренней поверхности барабана и его ребер используйте нейтральное моющее средство. Протрите вымытые поверхности мягкой тряпкой. ОСТОРОЖНО! Не используйте для чистки барабана абразивные материалы или металличес...
Page 63 - ТЕХНИЧЕСКИЕ ДАННЫЕ
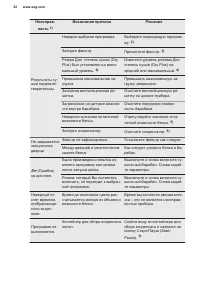
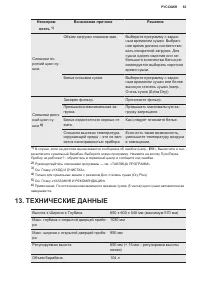
Неисправ‐ ность 1) Возможная причина Решение Слишком ко‐ роткий цикл су‐ шки. Объем загрузки слишком мал. Выберите программу с задан‐ ным временем сушки. Выбран‐ ное время должно соответство‐ вать конкретной загрузке. Для сушки одного изделия или не‐ большого количества белья ре‐ комендуется выбират...
Page 65 - ОХРАНА ОКРУЖАЮЩЕЙ СРЕДЫ
14.2 Регулировка ножек Высота сушильного барабана регулируется. Для этого воспользуйтесь регулировочными ножками. 15mm 14.3 Установка под столешницу Прибор может быть установлен как отдельно, так и под столешницу, если под ней достаточно места (см. рисунок). > 850 mm 600 mm 540 mm 15. ОХРАНА ОКРУ...