Page 2 - Visitate il nostro sito web per:; SERVIZIO CLIENTI E MANUTENZIONE
INDICE 1. ISTRUZIONI DI SICUREZZA . . . . . . . . . . . . . . . . . . . . . . . . . . . . . . . . . . . . . . . . . . . . . . . . . . . . 3 2. DESCRIZIONE DEL PRODOTTO . . . . . . . . . . . . . . . . . . . . . . . . . . . . . . . . . . . . . . . . . . . . . . . 6 3. USO DELL'APPARECCHIO . . . . . . ...
Page 3 - ISTRUZIONI DI SICUREZZA; Sicurezza dei bambini e
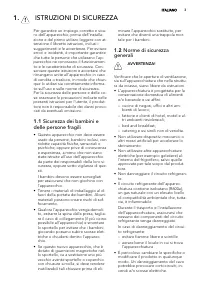
1. ISTRUZIONI DI SICUREZZA Per garantire un impiego corretto e sicu-ro dell'apparecchio, prima dell'installa-zione e del primo utilizzo leggere con at-tenzione il libretto istruzioni, inclusi isuggerimenti e le avvertenze. Per evitareerrori e incidenti, è importante garantireche tutte le persone che...
Page 6 - DESCRIZIONE DEL PRODOTTO; Accensione
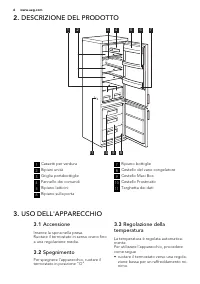
2. DESCRIZIONE DEL PRODOTTO 3 5 6 7 4 1 8 9 10 11 2 1 Cassetti per verdura 2 Ripiani unità 3 Griglia portabottiglie 4 Pannello dei comandi 5 Ripiano latticini 6 Ripiano sulla porta 7 Ripiano bottiglie 8 Cestello del vano congelatore 9 Cestello Maxi Box 10 Cestello Frostmatic 11 Targhetta dei dati 3....
Page 7 - UTILIZZO QUOTIDIANO
• ruotare il termostato verso una regola- zione alta per un raffreddamento mas-simo. Una regolazione media è in ge-nere la più adatta. Tuttavia la regolazione esatta dovrebbeessere scelta tenendo a mente che latemperatura all'interno dell'apparecchiodipende da:• temperatura ambiente• frequenza di ap...
Page 8 - CONSIGLI E SUGGERIMENTI UTILI
4.5 Griglia portabottiglie Disporre le bottiglie (con l'apertura inavanti) sull'apposito ripiano. Se il ripiano è posizionato orizzontal-mente, utilizzarlo solo per le bottigliechiuse.Il ripiano può essere inclinato per con-sentire l'appoggio di bottiglie aperte. Aquesto scopo, tirare verso l'alto i...
Page 10 - PULIZIA E CURA; ATTENZIONE; Pulizia periodica
5.6 Consigli per la conservazione dei surgelati I cestelli del congelatore consentono diindividuare rapidamente e facilmente laconfezione di alimenti desiderata. Se oc-corre conservare grandi quantità di cibo,si consiglia di rimuovere tutti i cassettiad eccezione del cestello inferiore, la cuipresen...
Page 12 - RISOLUZIONE DEI PROBLEMI; Problema
7. RISOLUZIONE DEI PROBLEMI ATTENZIONE Prima della ricerca guasti, estrar-re la spina dalla presa.Le operazioni di ricerca guastinon descritte nel presente ma-nuale devono essere eseguiteesclusivamente da elettricistiqualificati o da personale com-petente. Durante l'uso, alcuni rumori difunzionament...
Page 13 - La lampada è difettosa.; Sostituzione della
Problema Possibile causa Soluzione Il regolatore di tempera-tura non è impostato cor-rettamente. Impostare una temperatu-ra superiore. La temperatura al-l'interno dell'appa-recchio è troppobassa. Il regolatore di tempera-tura non è impostato cor-rettamente. Impostare una temperatu-ra superiore. La t...
Page 14 - Chiusura della porta; INSTALLAZIONE; Posizionamento; Temperatura ambiente; SN; Ubicazione
2. Esercitare pressione sulla parte mo-bile per sganciare il coprilampada(1). 3. Rimuovere il coprilampada (2). 4. Se necessario sostituire la lampadinacon una dalle caratteristiche e po-tenza simili. E' consigliabile l'uso diOsram PARATHOM SPECIAL T26 0,8Watt. 5. Installare il coprilampada. 6. Coll...
Page 15 - Livellamento
A B 100 mm min 20 mm AVVERTENZA! L'apparecchiatura deve poter es-sere scollegabile dalla presa dicorrente; pertanto, al terminedell'installazione, la spina deveessere facilmente accessibile. 8.3 Collegamento elettrico Prima di inserire la spina, verificare che latensione e la frequenza riportate sul...
Page 17 - DATI TECNICI; CONSIDERAZIONI AMBIENTALI
2 1 • Rimuovere le coperture (B). Rimuovere i tappini di copertura (A). • Svitare le maniglie (C) e fissarle sul lato opposto. • Reinserire i tappini di copertura (A) sul lato opposto. Eseguire un controllo finale per accertar-si che:• Tutte le viti siano serrate.• La guarnizione magnetica aderisca ...
Page 19 - Visit our website for:; CUSTOMER CARE AND SERVICE
CONTENTS 1. SAFETY INSTRUCTIONS . . . . . . . . . . . . . . . . . . . . . . . . . . . . . . . . . . . . . . . . . . . . . . . . . . . . . 20 2. PRODUCT DESCRIPTION . . . . . . . . . . . . . . . . . . . . . . . . . . . . . . . . . . . . . . . . . . . . . . . . . . . . 23 3. OPERATION . . . . . . . . ...
Page 20 - SAFETY INSTRUCTIONS; Children and vulnerable
1. SAFETY INSTRUCTIONS In the interest of your safety and to en-sure the correct use, before installingand first using the appliance, read thisuser manual carefully, including its hintsand warnings. To avoid unnecessary mis-takes and accidents, it is important toensure that all people using the appl...
Page 23 - Switching on
2. PRODUCT DESCRIPTION 3 5 6 7 4 1 8 9 10 11 2 1 Vegetable drawers 2 Cabinet shelves 3 Bottle rack 4 Control panel 5 Dairy shelf 6 Door shelf 7 Bottle shelf 8 Freezer basket 9 Maxibox basket 10 Frostmatic basket 11 Rating plate 3. OPERATION 3.1 Switching on Insert the plug into the wall socket.Turn ...
Page 24 - DAILY USE; Freezing fresh food
• turn the Temperature regulator to- ward higher settings to obtain themaximum coldness. A medium setting is generallythe most suitable. However, the exact setting should bechosen keeping in mind that the temper-ature inside the appliance depends on:• room temperature• how often the door is opened• ...
Page 26 - HELPFUL HINTS AND TIPS
5. HELPFUL HINTS AND TIPS 5.1 Normal Operating Sounds • You may hear a faint gurgling and a bubbling sound when the refrigerantis pumped through the coils or tubing.This is correct. • When the compressor is on, the refrig- erant is being pumped around andyou will hear a whirring sound and apulsating...
Page 27 - CARE AND CLEANING; Cleaning the interior
partment, can possibly cause the skinto be freeze burnt; • it is advisable to show the freezing in date on each individual pack to enableyou to keep tab of the storage time. 5.6 Hints for storage of frozen food The freezer baskets ensure that it isquick and easy to find the food packageyou want. If ...
Page 28 - Defrosting the freezer
partment every time the motor compres-sor stops, during normal use. The de-frost water drains out through a drainhole into a special container at the backof the appliance, over the motor com-pressor, where it evaporates.It is important to periodically clean thedefrost water drain hole in the middle ...
Page 29 - TROUBLESHOOTING; Problem; Set a warmer temperature.
7. TROUBLESHOOTING CAUTION! Before troubleshooting, discon-nect the power supply.Only a qualified electrician orcompetent person must do thetroubleshooting that is not in thismanual. There are some sounds duringnormal use (compressor, refriger-ant circulation). Problem Possible cause Solution The ap...
Page 30 - Set a higher temperature.; Replacing the lamp
Problem Possible cause Solution The temperature inthe appliance is toolow. The Temperature regula-tor may be set incorrectly. Set a higher temperature. The temperature inthe appliance is toohigh. The Temperature regula-tor may be set incorrectly. Set a lower temperature. The door is not closedcorrec...
Page 31 - Closing the door; INSTALLATION; Positioning; Ambient temperature; Location
1 2 7.2 Closing the door 1. Clean the door gaskets. 2. If necessary, adjust the door. Referto "Installation". 3. If necessary, replace the defectivedoor gaskets. Contact the ServiceCenter. 8. INSTALLATION WARNING! Read the "Safety Information"carefully for your safety and cor-rect op...
Page 32 - Rear spacers; Levelling
This appliance complies with the E.E.C.Directives. 8.4 Rear spacers You can find the two spacers in the bagwith documentation.Do these steps to install the spacers: 1. Release the screw. 2. Engage the spacer below the screw. 3. Turn the spacer to the right position. 4. Tighten again the screws. 2 4 ...
Page 34 - TECHNICAL DATA; Service Centres; Servicestellen; Garantie
9. TECHNICAL DATA Dimension Height 1850 mm Width 595 mm Depth 658 mm Rising Time 20 h Voltage 230-240 V Frequency 50 Hz The technical information are situated inthe rating plate on the internal left sideof the appliance and in the energy label. 10. CH GARANTIE, GARANZIA, GUARANTEE 10.1 Kundendienst,...
Page 35 - Garanzia; Warranty; ENVIRONMENT CONCERNS
Garantie Nous octroyons sur chaque produit 2 ans de garantie à partir de ladate de livraison ou de la mise en serv-ice au consommateur (documenté aumoyen d’une facture, d’un bon de ga-rantie ou d’un justificatif d’achat). Notregarantie couvre les frais de mains d’œu-vres et de déplacement, ainsi que...