Page 2 - CUSTOMER CARE AND SERVICE
CONTENTS 1. SAFETY INFORMATION...........................................................................................3 2. SAFETY INSTRUCTIONS.......................................................................................... 4 3. OPERATION.....................................................
Page 4 - SAFETY INSTRUCTIONS; Installation
• Do not use water spray and steam to clean the appliance. • Clean the appliance with a moist soft cloth. Only use neutral detergents. Do not use abrasive products, abrasive cleaning pads, solvents or metal objects. • Do not store explosive substances such as aerosol cans with a flammable propellant...
Page 5 - OPERATION; Switching on
• Do not change the specification of this appliance. • Do not put electrical appliances (e.g. ice cream makers) in the appliance unless they are stated applicable by the manufacturer. • Be careful not to cause damage to the refrigerant circuit. It contains isobutane (R600a), a natural gas with a hig...
Page 6 - Temperature regulation; FIRST USE; Cleaning the interior; DAILY USE; Freezing fresh food
3.3 Temperature regulation The temperature is automatically regulated.To operate the appliance, proceed as follows: • turn the Temperature regulator towards lower settings to obtain the minimum coldness. • turn the Temperature regulator towards higher settings to obtain the maximum coldness. A mediu...
Page 7 - HINTS AND TIPS; Normal operating sounds
In the event of accidental defrosting, for example due to a power failure, if the power has been off for longer than the value shown in the technical characteristics chart under "rising time", the defrosted food must be consumed quickly or cooked immediately and then re- frozen (after coolin...
Page 9 - CARE AND CLEANING; General warnings
7. CARE AND CLEANING WARNING! Refer to Safety chapters. 7.1 General warnings CAUTION! Unplug the appliance before carrying out any maintenance operation. This appliance contains hydrocarbons in its cooling unit; maintenance and recharging must therefore only be carried out by authorized technicians....
Page 10 - Periods of non-operation; TROUBLESHOOTING
A certain amount of frost will always form on the freezer shelves and around the top compartment.Defrost the freezer when the frost layer reaches a thickness of about 3-5 mm. 1. Switch off the appliance, or pull out electrical plug from the wall socket. 2. Remove any stored food, wrap it in several ...
Page 11 - Replacing the lamp
Problem Possible cause Solution The compressor operatescontinually. Temperature is set incorrect-ly. Refer to "Operation" chap-ter. Many food products to befrozen were put in at thesame time. Wait some hours and thencheck the temperatureagain. The room temperature is toohigh. Refer to climat...
Page 12 - Closing the door; INSTALLATION; Positioning; Levelling
appliances (the maximum power is shown on the lamp cover). 4. Install the lamp cover. 5. Tighten the screw to the lamp cover. 6. Connect the plug to the mains socket. 7. Open the door. Make sure that the light comes on. 8.3 Closing the door 1. Clean the door gaskets. 2. If necessary, adjust the door...
Page 13 - Door reversibility
100 mm 15 mm 15 mm 9.4 Door reversibility WARNING! Before carrying out any operations, remove the plug from the power socket. CAUTION! To carry out the following operations, we suggest that this be made with another person that will keep a firm hold on the doors of the appliance during the operation...
Page 15 - NOISES
9.5 Reversibility of the freezer door 180˚ 9.6 Electrical connection • Before plugging in, ensure that the voltage and frequency shown on the rating plate correspond to your domestic power supply. • The appliance must be earthed. The power supply cable plug is provided with a contact for this purpos...
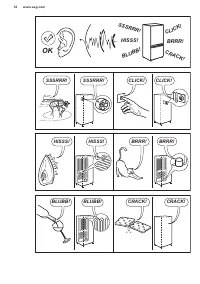
Page 16 - OK
BRRR ! HISSS! CL IC K! BL UB B! CR AC K! SSSR R R! OK CLICK! CLICK! SSSRRR! SSSRRR! BRRR! BRRR! HISSS! HISSS! BLUBB! BLUBB! CRACK! CRACK! www.aeg.com 16
Page 17 - TECHNICAL INFORMATION; Technical data; ENVIRONMENT CONCERNS
11. TECHNICAL INFORMATION 11.1 Technical data Height mm 850 Width mm 550 Depth mm 612 Rising time Hours 11 Voltage Volts 230-240 Frequency Hz 50 The technical information are situated in the rating plate on the external right side of the appliance and in the energy label. 12. ENVIRONMENT CONCERNS Re...
Page 20 - INSTRUCTIONS DE SÉCURITÉ
• N'endommagez pas le circuit frigorifique. • N'utilisez pas d'appareils électriques à l'intérieur des compartiments de conservation des aliments de l'appareil, sauf s'ils sont du type recommandé par le fabricant. • Ne pulvérisez pas d'eau ni de vapeur pour nettoyer l'appareil. • Nettoyez l'appareil...
Page 22 - FONCTIONNEMENT; Mise en marche; PREMIÈRE UTILISATION; Nettoyage de l'intérieur; UTILISATION QUOTIDIENNE; Congélation d'aliments
• Le circuit frigorifique et les matériaux d'isolation de cet appareil préservent la couche d'ozone. • La mousse isolante contient un gaz inflammable. Contactez votre service municipal pour obtenir des informations sur la marche à suivre pour mettre l'appareil au rebut. • N'endommagez pas la partie ...
Page 24 - CONSEILS
6. CONSEILS 6.1 Bruits normaux de fonctionnement Les bruits suivants sont normaux lorsque l'appareil est en cours de fonctionnement :• Un léger gargouillis lorsque le liquide réfrigérant est pompé. • Un ronronnement et un bruit de pulsation provenant du compresseur lorsque le liquide réfrigérant est...
Page 25 - ENTRETIEN ET NETTOYAGE; Avertissements généraux
• préparez la nourriture en petits paquets pour une congélation rapide et uniforme, adaptés à l'importance de la consommation ; • enveloppez les aliments dans des feuilles d'aluminium ou des sachets en plastique et assurez-vous que les emballages sont étanches ; • ne laissez pas des aliments frais, ...
Page 27 - EN CAS D'ANOMALIE DE FONCTIONNEMENT; En cas d'anomalie de fonctionnement
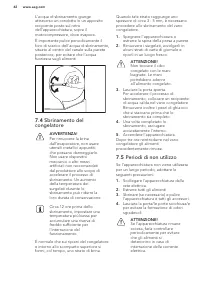
détachent, avant que le processus de dégivrage ne soit terminé. 4. Une fois le dégivrage terminé, séchez bien l'intérieur. 5. Mettez l'appareil en marche. Au bout de 3 heures, replacez les produits congelés dans le compartiment congélateur. 7.5 En cas de non-utilisation prolongée Si l'appareil n'est...
Page 29 - Mise de niveau
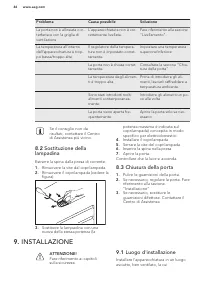
Si ces conseils n'apportent pas de solution à votre problème, veuillez consulter le service après-vente le plus proche. 8.2 Remplacement de l'éclairage Débranchez la fiche de l'appareil de la prise secteur. 1. Retirez la vis du diffuseur. 2. Retirez le diffuseur (voir l'illustration). 3. Remplacez l...
Page 33 - Branchement électrique; BRUITS; BRRR
180˚ 9.6 Branchement électrique • Avant de brancher l'appareil, assurez- vous que la tension et la fréquence indiquées sur la plaque signalétique correspondent à celles de votre réseau électrique domestique. • L'appareil doit être relié à la terre. La fiche du cordon d'alimentation est fournie avec ...
Page 34 - CARACTÉRISTIQUES TECHNIQUES; Caractéristiques techniques
CLICK! CLICK! SSSRRR! SSSRRR! BRRR! BRRR! HISSS! HISSS! BLUBB! BLUBB! CRACK! CRACK! 11. CARACTÉRISTIQUES TECHNIQUES 11.1 Caractéristiques techniques Hauteur mm 850 Largeur mm 550 Profondeur mm 612 Autonomie de fonctionnement Heures 11 www.aeg.com 34
Page 35 - EN MATIÈRE DE PROTECTION DE
Tension Volts 230-240 Fréquence Hz 50 Les caractéristiques techniques figurent sur la plaque signalétique située sur le côté droit à l'extérieur de l'appareil et sur l'étiquette énergétique. 12. EN MATIÈRE DE PROTECTION DE L'ENVIRONNEMENT Recyclez les matériaux portant lesymbole . Déposez les emball...
Page 36 - REPARATUR- UND KUNDENDIENST
INHALTSVERZEICHNIS 1. SICHERHEITSINFORMATIONEN.......................................................................... 37 2. SICHERHEITSANWEISUNGEN.............................................................................. 38 3. BETRIEB..............................................................
Page 38 - SICHERHEITSANWEISUNGEN; Montage
• Betreiben Sie in den Lebensmittelfächern des Geräts keine anderen als die vom Hersteller empfohlenen Elektrogeräte. • Reinigen Sie das Gerät nicht mit einem Wasser- oder Dampfstrahl. • Reinigen Sie das Gerät mit einem weichen, feuchten Tuch. Verwenden Sie ausschließlich Neutralreiniger. Benutzen S...
Page 40 - BETRIEB; Einschalten des Geräts; ERSTE INBETRIEBNAHME; Reinigen des Innenraums
• Entfernen Sie die Tür, um zu verhindern, dass sich Kinder oder Haustiere in dem Gerät einschließen. • Der Kältekreislauf und die Isolierungsmaterialien dieses Gerätes sind ozonfreundlich. • Die Isolierung enthält entzündliches Gas. Für Informationen zur korrekten Entsorgung des Gerätes wenden Sie ...
Page 41 - TÄGLICHER GEBRAUCH
5. TÄGLICHER GEBRAUCH WARNUNG! Siehe Kapitel Sicherheitshinweise. 5.1 Einfrieren frischer Lebensmittel Der Gefrierraum eignet sich zum Einfrieren von frischen Lebensmitteln und zum längerfristigen Lagern von bereits gefrorenen und tiefgefrorenen Lebensmitteln.Für das Einfrieren frischer Lebensmittel...
Page 42 - TIPPS UND HINWEISE
5.5 Positionierung der Türablagen Die Türablagen können in verschiedener Höhe positioniert werden; damit ermöglichen sie das Lagern verschieden großer Lebensmittelpackungen. 1. Ziehen Sie die Ablage langsam in Pfeilrichtung, bis sie sich lösen lässt. 2. Setzen Sie die Ablage in der gewünschten Höhe ...
Page 43 - REINIGUNG UND PFLEGE; Allgemeine Warnhinweise
wie möglich in der Verpackung zu haben. • Flaschen: Bitte bewahren Sie Flaschen stets mit Deckel im in der Türablage auf. • Bananen, Kartoffeln, Zwiebeln und Knoblauch sollten im Kühlschrank nicht unverpackt aufbewahrt werden. 6.5 Hinweise zum Einfrieren Im Folgenden finden Sie einige wertvolle Tipp...
Page 45 - Stillstandszeiten; FEHLERSUCHE
Schichten Zeitungspapier und lagern Sie es an einem kühlen Ort. WARNUNG! Fassen Sie gefrorene Lebensmittel nicht mit nassen Händen an. Ihre Hände könnten an den Lebensmitteln festfrieren. 3. Lassen Sie die Tür offen. Stellen Sie eine Schale mit warmem Wasser in das Gefrierfach, um den Abtauprozess z...
Page 47 - Austauschen der Lampe; MONTAGE; Standort
Problem Mögliche Ursache Abhilfe Es wurden zu viele Leben-smittel gleichzeitig einge-legt. Legen Sie weniger Leben-smittel gleichzeitig ein. Die Tür wurde zu häufiggeöffnet. Öffnen Sie die Tür nur, wennes notwendig ist. Bitte rufen Sie den nächsten Kundendienst an, wenn alle genannten Abhilfemaßnahm...
Page 51 - Elektrischer Anschluss; GERÄUSCHE
180˚ 9.6 Elektrischer Anschluss • Kontrollieren Sie vor der ersten Benutzung des Geräts, ob die Netzspannung und -frequenz Ihres Hausanschlusses mit den auf dem Typenschild angegebenen Anschlusswerten übereinstimmen. • Das Gerät muss geerdet sein. Zu diesem Zweck ist der Netzstecker mit einem Schutz...
Page 52 - TECHNISCHE DATEN; Technische Daten
CLICK! CLICK! SSSRRR! SSSRRR! BRRR! BRRR! HISSS! HISSS! BLUBB! BLUBB! CRACK! CRACK! 11. TECHNISCHE DATEN 11.1 Technische Daten Höhe mm 850 Breite mm 550 Tiefe mm 612 Lagerzeit bei Störung Stunden 11 www.aeg.com 52
Page 53 - UMWELTTIPPS
Spannung Volt 230-240 Frequenz Hz 50 Die technischen Daten befinden sich auf dem Typenschild auf der rechten Außenseite des Geräts sowie auf der Energieplakette. 12. UMWELTTIPPS Recyceln Sie Materialien mit dem Symbol . Entsorgen Sie die Verpackung in den entsprechenden Recyclingbehältern. Recyceln ...
Page 54 - SERVIZIO CLIENTI E MANUTENZIONE
INDICE 1. INFORMAZIONI PER LA SICUREZZA.................................................................... 55 2. ISTRUZIONI DI SICUREZZA.................................................................................... 56 3. USO DELL'APPARECCHIO.......................................................
Page 56 - ISTRUZIONI DI SICUREZZA; Installazione
• Non danneggiare il circuito refrigerante. • Non utilizzare apparecchiature elettriche all'interno dei comparti di conservazione degli alimenti, ad eccezione di quelli consigliati dal costruttore. • Non nebulizzare acqua né utilizzare vapore per pulire l'apparecchiatura. • Pulire l'apparecchiatura ...
Page 58 - PRIMO UTILIZZO
rimangano chiusi all’interno dell’apparecchiatura. • Il circuito refrigerante e i materiali di isolamento di questa apparecchiatura rispettano l'ozono. • La schiuma isolante contiene gas infiammabili. Contattare le autorità locali per ricevere informazioni su come smaltire correttamente l'apparecchi...
Page 59 - UTILIZZO QUOTIDIANO
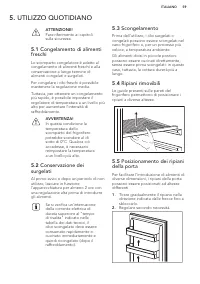
5. UTILIZZO QUOTIDIANO ATTENZIONE! Fare riferimento ai capitoli sulla sicurezza. 5.1 Congelamento di alimenti freschi Lo scomparto congelatore è adatto al congelamento di alimenti freschi e alla conservazione a lungo termine di alimenti congelati e surgelati.Per congelare i cibi freschi è possibile ...
Page 60 - CONSIGLI E SUGGERIMENTI UTILI
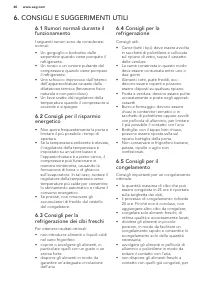
6. CONSIGLI E SUGGERIMENTI UTILI 6.1 Rumori normali durante il funzionamento I seguenti rumori sono da considerarsi normali:• Un gorgoglio o borbottio dalle serpentine quando viene pompato il refrigerante. • Un ronzio o un rumore pulsante dal compressore quando viene pompato il refrigerante. • Uno s...
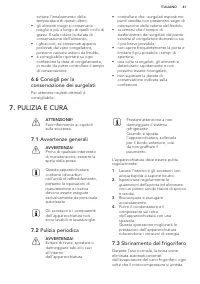
Page 61 - PULIZIA E CURA; Avvertenze generali
evitare l'innalzamento della temperatura di questi ultimi; • gli alimenti magri si conservano meglio e più a lungo di quelli ricchi di grassi. Il sale riduce la durata di conservazione dell'alimento; • i ghiaccioli, se consumati appena prelevati dal vano congelatore, possono causare ustioni da fredd...
Page 63 - RISOLUZIONE DEI PROBLEMI
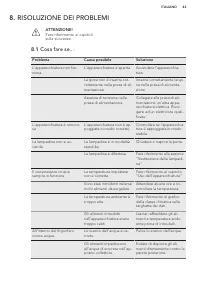
8. RISOLUZIONE DEI PROBLEMI ATTENZIONE! Fare riferimento ai capitoli sulla sicurezza. 8.1 Cosa fare se... Problema Causa possibile Soluzione L'apparecchiatura non fun-ziona. L'apparecchiatura è spenta. Accendere l’apparecchia-tura. La spina non è inserita cor-rettamente nella presa di ali-mentazione...
Page 64 - Sostituzione della; INSTALLAZIONE; Luogo d'installazione
Problema Causa possibile Soluzione La porta non è allineata o in-terferisce con la griglia diventilazione. L'apparecchiatura non è cor-rettamente livellata. Fare riferimento alla sezione"Livellamento". La temperatura all'internodell'apparecchiatura è trop-po bassa/troppo alta. Il regolatore ...
Page 65 - Livellamento
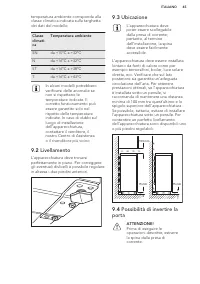
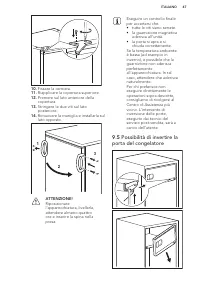
temperatura ambiente corrisponda alla classe climatica indicata sulla targhetta dei dati del modello: Classeclimati-ca Temperatura ambiente SN da +10°C a +32°C N da +16°C a +32°C ST da +16°C a +38°C T da +16°C a +43°C In alcuni modelli potrebbero verificarsi delle anomalie se non si rispettano le te...
Page 68 - Collegamento elettrico; RUMORI
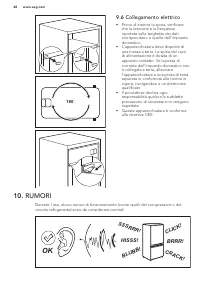
180˚ 9.6 Collegamento elettrico • Prima di inserire la spina, verificare che la tensione e la frequenza riportate sulla targhetta dei dati corrispondano a quelle dell'impianto domestico. • L'apparecchiatura deve disporre di una messa a terra. La spina del cavo di alimentazione è dotata di un apposit...
Page 69 - DATI TECNICI; Dati tecnici
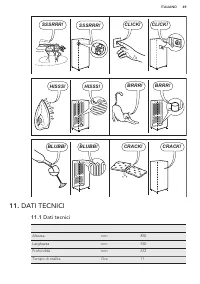
CLICK! CLICK! SSSRRR! SSSRRR! BRRR! BRRR! HISSS! HISSS! BLUBB! BLUBB! CRACK! CRACK! 11. DATI TECNICI 11.1 Dati tecnici Altezza mm 850 Larghezza mm 550 Profondità mm 612 Tempo di risalita Ore 11 ITALIANO 69
Page 70 - CONSIDERAZIONI SULL'AMBIENTE
Tensione Volt 230-240 Frequenza Hz 50 I dati tecnici sono riportati sulla targhetta dei dati applicata sul lato interno destro dell'apparecchiatura e sull'etichetta dei valori energetici. 12. CONSIDERAZIONI SULL'AMBIENTE Riciclare i materiali con il simbolo . Buttare l'imballaggio negli appositi con...


 AEG AREH30LF
User Manual
AEG AREH30LF
User Manual
 AEG AREI20XLF
User Manual
AEG AREI20XLF
User Manual
 AEG FFB72746PM
User Manual
AEG FFB72746PM
User Manual
 AEG PS254DB
User Manual
AEG PS254DB
User Manual
 AEG NIK85M00AZ
User Manual
AEG NIK85M00AZ
User Manual
 AEG DGE5662HB
User Manual
AEG DGE5662HB
User Manual
 AEG DGE5962HB
User Manual
AEG DGE5962HB
User Manual
 AEG HVB95450IB
User Manual
AEG HVB95450IB
User Manual
 AEG PL700
User Manual
AEG PL700
User Manual
 AEG W14120
User Manual
AEG W14120
User Manual
 AEG DC240
User Manual
AEG DC240
User Manual
 AEG T738A4OBC
User Manual
AEG T738A4OBC
User Manual
 AEG T858M6OBC
User Manual
AEG T858M6OBC
User Manual
 AEG T859M6OBC
User Manual
AEG T859M6OBC
User Manual
 AEG T959M6ORS
User Manual
AEG T959M6ORS
User Manual
 AEG IKE95771FB
User Manual
AEG IKE95771FB
User Manual
 AEG AREI9XLF
User Manual
AEG AREI9XLF
User Manual
 AEG A18SPC3
User Manual
AEG A18SPC3
User Manual
 AEG LF7384O4C
User Manual
AEG LF7384O4C
User Manual