Page 2 - CUSTOMER CARE AND SERVICE; SAFETY INFORMATION
CONTENTS 1. SAFETY INFORMATION............................................................................................. 2 2. SAFETY INSTRUCTIONS.............................................................................................4 3. OPERATION................................................
Page 4 - SAFETY INSTRUCTIONS; Installation
• If the supply cord is damaged, it must be replaced by the manufacturer, its Authorised Service Centre or similarly qualified persons in order to avoid a hazard. 2. SAFETY INSTRUCTIONS 2.1 Installation WARNING! Only a qualified person must install this appliance. • Remove all the packaging and the ...
Page 5 - OPERATION; Control panel
• Do not store flammable gas and liquid in the appliance. • Do not put flammable products or items that are wet with flammable products in, near or on the appliance. • Do not touch the compressor or the condenser. They are hot. • Do not remove or touch items from the freezer compartment if your hand...
Page 6 - Temperature regulation
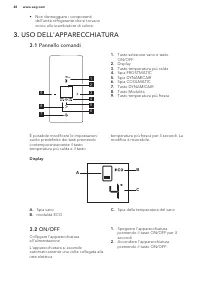
It is possible to change predefined sound of buttons by pressing together temperature warmer key and temperature colder key for 3 seconds. Change is reversible. Display B A C A. Compartment indicator B. ECO mode C. Temperature compartment indicator 3.2 ON/OFF Plug the appliance into electrical mains...
Page 7 - DAILY USE
2. To switch on the COOLMATIC and FROSTMATIC together press mode key twice. The COOLMATIC and FROSTMATIC indicators appear. 3. To switch on the FROSTMATIC press mode key three times. The FROSTMATIC indicator appears. 4. To deactivate the functions press mode key until the FROSTMATIC and/or COOLMATIC...
Page 9 - DYNAMICAIR; CARE AND CLEANING; Cleaning the interior
4.6 DYNAMICAIR The refrigerator compartment is equipped with a device that allows rapid cooling of food and keeps a more uniform temperature in the compartment.This device activates automatically when needed, for example for a quick temperature recovery after door opening or when the ambient tempera...
Page 10 - Periods of non-operation; TROUBLESHOOTING
is in operation, neither on the internal walls nor on the foods. The absence of frost is due to the continuous circulation of cold air inside the compartment, driven by an automatically controlled fan. The defrost water drains out through a trough into a special container at the back of the applianc...
Page 12 - Replacing the lamp; INSTALLATION
Problem Possible cause Solution The temperature in the ap-pliance is too low/too high. The temperature regulatoris not set correctly. Set a higher/lower tempera-ture. The food products temper-ature is too high. Let the food products temper-ature decrease to room tem-perature before storage. Many foo...
Page 13 - TECHNICAL DATA
7.1 Positioning This appliance can be installed in a dry, well ventilated indoor where the ambient temperature corresponds to the climate class indicated on the rating plate of the appliance: Climateclass Ambient temperature SN +10°C to + 32°C N +16°C to + 32°C ST +16°C to + 38°C T +16°C to + 43°C 7...
Page 14 - ENVIRONMENTAL CONCERNS
internal side of the appliance and in the energy label. 9. ENVIRONMENTAL CONCERNS Recycle materials with the symbol . Put the packaging in relevant containers to recycle it. Help protect the environment and human health by recycling waste of electrical and electronic appliances. Do not dispose of ap...
Page 15 - INFORMATIONS DE SÉCURITÉ; soigneusement les instructions fournies. Le fabricant ne
TABLE DES MATIÈRES 1. INFORMATIONS DE SÉCURITÉ............................................................................... 15 2. CONSIGNES DE SÉCURITÉ......................................................................................17 3. FONCTIONNEMENT............................................
Page 17 - CONSIGNES DE SÉCURITÉ
• Ne pulvérisez pas d'eau ni de vapeur pour nettoyer l'appareil. • Nettoyez l'appareil avec un chiffon doux humide. Utilisez uniquement des produits de nettoyage neutres. N'utilisez pas de produits abrasifs, de tampons à récurer, de solvants ni d'objets métalliques. • Ne conservez aucune substance e...
Page 19 - FONCTIONNEMENT; Bandeau de commande; Réglage de la température
3. FONCTIONNEMENT 3.1 Bandeau de commande 1 2 3 9 4 7 5 6 8 1. Touche de sélection du compartiment et touche ON/OFF 2. Affichage 3. Touche d'augmentation de la température 4. Voyant FROSTMATIC 5. Voyant DYNAMICAIR 6. Voyant COOLMATIC 7. Touche DYNAMICAIR 8. Touche Mode 9. Touche de diminution de la ...
Page 21 - UTILISATION QUOTIDIENNE
2. Pour désactiver la fonction, appuyez sur la touche DYNAMICAIR jusqu'à ce que le voyant DYNAMICAIR s'éteigne. 3.8 Mode DEMO Le mode DEMO vous permet de faire fonctionner le bandeau de commande sans allumer l'appareil.• Pour activer ce mode, appuyez 9 fois sur la touche touche de mode, jusqu'à ce q...
Page 23 - ENTRETIEN ET NETTOYAGE; Nettoyage de l'intérieur
5. ENTRETIEN ET NETTOYAGE AVERTISSEMENT! Reportez-vous aux chapitres concernant la sécurité. 5.1 Nettoyage de l'intérieur Avant d'utiliser l'appareil pour la première fois, nettoyez l'intérieur et tous les accessoires avec de l'eau tiède savonneuse (pour supprimer toute odeur de neuf), puis séchez-l...
Page 24 - EN CAS D'ANOMALIE DE FONCTIONNEMENT; En cas d'anomalie de fonctionnement
5.4 En cas de non-utilisation prolongée Si l'appareil n'est pas utilisé pendant de longues périodes, prenez les précautions suivantes : 1. Débranchez l'appareil de l'alimentation électrique. 2. Retirez tous les aliments. 3. Nettoyez l'appareil et tous les accessoires. 4. Laissez la porte/les portes ...
Page 26 - Remplacement de
Problème Cause probable Solution La température à l'intérieurde l'appareil est trop basse/élevée. Le thermostat n'est pas ré-glé correctement. Augmentez/réduisez la tem-pérature. La température des pro-duits est trop élevée. Laissez les aliments refroidir àtempérature ambiante avantde les placer dan...
Page 27 - DONNÉES TECHNIQUES
7. INSTALLATION AVERTISSEMENT! Reportez-vous aux chapitres concernant la sécurité. 7.1 Installation Cet appareil peut être installé dans un pièce intérieure sèche et bien ventilée où la température ambiante correspond à la classe climatique indiquée sur la plaque signalétique de l'appareil : Classec...
Page 28 - EN MATIÈRE DE PROTECTION DE
Fréquence 50 Hz Les caractéristiques techniques figurent sur la plaque signalétique située sur le côté intérieur ou extérieur de l'appareil et sur l'étiquette énergétique. 9. EN MATIÈRE DE PROTECTION DE L'ENVIRONNEMENT Recyclez les matériaux portant lesymbole . Déposez les emballages dans les conten...
Page 29 - REPARATUR- UND KUNDENDIENST; SICHERHEITSHINWEISE; Lesen Sie vor der Montage und dem Gebrauch des
INHALTSVERZEICHNIS 1. SICHERHEITSHINWEISE........................................................................................... 29 2. SICHERHEITSANWEISUNGEN.................................................................................31 3. BETRIEB................................................
Page 31 - SICHERHEITSANWEISUNGEN; Montage
• Reinigen Sie das Gerät nicht mit einem Wasser- oder Dampfstrahl. • Reinigen Sie das Gerät mit einem weichen, feuchten Tuch. Verwenden Sie ausschließlich Neutralreiniger. Benutzen Sie keine Scheuermittel, scheuernde Reinigungsschwämmchen, Lösungsmittel oder Metallgegenstände. • Bewahren Sie in dem ...
Page 33 - BETRIEB; Bedienfeld
• Der Kältekreislauf und die Isolierungsmaterialien dieses Gerätes sind ozonfreundlich. • Die Isolierung enthält entzündliches Gas. Für Informationen zur korrekten Entsorgung des Gerätes wenden Sie sich an Ihre kommunale Behörde. • Achten Sie darauf, dass die Kühleinheit in der Nähe des Wärmetausche...
Page 35 - TÄGLICHER GEBRAUCH
3.7 Funktion DYNAMICAIR Durch das Einschalten der Funktion DYNAMICAIR erhöht sich der Energieverbrauch (siehe „Täglicher Gebrauch“). Die DYNAMICAIR-Funktion kann automatisch eingeschaltet werden. 1. Drücken Sie zum manuellen Einschalten der Funktion die Taste DYNAMICAIR so lange, bis das entsprechen...
Page 37 - REINIGUNG UND PFLEGE; Reinigen des Innenraums
VORSICHT! Bevor Sie das FreshBox- Modul aus dem Gerät nehmen oder wieder einsetzen, nehmen Sie die MaxiBox-Schublade und die Glasplatte heraus. Das FreshBox-Modul besitzt Führungsschienen. Um das Modul aus dem Kühlraum zu entnehmen, ziehen Sie das Modul zu sich und kippen Sie den Korb mit der Vorder...
Page 38 - FEHLERSUCHE
Das gesamte Gerät muss regelmäßig gereinigt werden: 1. Reinigen Sie die Innenseiten und die Zubehörteile mit lauwarmem Wasser und etwas Neutralseife. 2. Prüfen und säubern Sie die Türdichtungen in regelmäßigen Abständen, um zu gewährleisten, dass diese sauber und frei von Fremdkörpern sind. 3. Spüle...
Page 41 - Austauschen der Lampe; MONTAGE; Aufstellung; Elektrischer Anschluss
Störung Mögliche Ursache Abhilfe An der Rückwand des Kühl-schranks befindet sich zuviel Kondenswasser. Die Tür wurde zu oft geöff-net. Öffnen Sie die Tür nur, wennes notwendig ist. Die Tür wurde nicht voll-ständig geschlossen. Vergewissern Sie sich, dass dieTür vollständig geschlossenist. Die eingel...
Page 42 - TECHNISCHE DATEN
Falls die Steckdose Ihres Hausanschlusses nicht geerdet sein sollte, lassen Sie das Gerät gemäß den geltenden Vorschriften von einem qualifizierten Elektriker erden. • Der Hersteller übernimmt keinerlei Haftung bei Missachtung der vorstehenden Sicherheitshinweise. • Das Gerät entspricht den EWG- Ric...
Page 44 - SERVIZIO CLIENTI E MANUTENZIONE; INFORMAZIONI DI SICUREZZA; Leggere attentamente le istruzioni fornite prima di
INDICE 1. INFORMAZIONI DI SICUREZZA............................................................................... 44 2. ISTRUZIONI DI SICUREZZA...................................................................................... 46 3. USO DELL'APPARECCHIATURA..........................................
Page 46 - ISTRUZIONI DI SICUREZZA; Installazione
• Non nebulizzare acqua né utilizzare vapore per pulire l'apparecchiatura. • Pulire l'apparecchiatura con un panno inumidito e morbido. Utilizzare solo detergenti neutri. Non usare prodotti abrasivi, spugnette abrasive, solventi od oggetti metallici. • Non conservare in questa apparecchiatura sostan...
Page 48 - USO DELL'APPARECCHIATURA; Pannello comandi
• Non danneggiare i componenti dell'unità refrigerante che si trovano vicino allo scambiatore di calore. 3. USO DELL'APPARECCHIATURA 3.1 Pannello comandi 1 2 3 9 4 7 5 6 8 1. Tasto selezione vano e tasto ON/OFF 2. Display 3. Tasto temperatura più calda 4. Spia FROSTMATIC 5. Spia DYNAMICAIR 6. Spia C...
Page 50 - UTILIZZO QUOTIDIANO
La funzione DYNAMICAIR può essere attivata automaticamente 1. Per attivare la funzione manualmente premere il tasto DYNAMICAIR finché non si illumina la spia corrispondente. Appare la spia DYNAMICAIR. 2. Per disattivare la funzione premere il tasto DYNAMICAIR finché la spia DYNAMICAIR non si spegne....
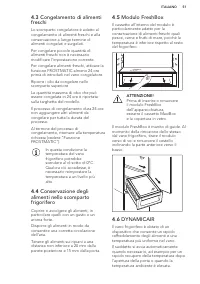
Page 52 - PULIZIA E CURA; Pulizia periodica
Il dispositivo può essere acceso manualmente se necessario (fare riferimento alla "funzione DYNAMICAIR"). 5. PULIZIA E CURA AVVERTENZA! Fare riferimento ai capitoli sulla sicurezza. 5.1 Pulizia dell'interno Prima di utilizzare l'apparecchiatura per la prima volta, lavare l'interno e gli acce...
Page 53 - Periodi di non utilizzo; RISOLUZIONE DEI PROBLEMI
5.4 Periodi di non utilizzo Se l'apparecchiatura non viene utilizzata per un lungo periodo, adottare le seguenti precauzioni: 1. Scollegare l'apparecchiatura dalla rete elettrica. 2. Estrarre tutti gli alimenti. 3. Pulire l'apparecchiatura e tutti gli accessori. 4. Lasciare la porta/le porte socchiu...
Page 55 - Sostituzione della
Problema Causa possibile Soluzione La temperatura degli ali-menti è troppo alta. Prima di introdurre gli alimen-ti, lasciarli raffreddare a tem-peratura ambiente. Sono stati introdotti moltialimenti contemporanea-mente. Introdurre gli alimenti un pocoalla volta. La funzione FROSTMATIC èattiva. Fare ...
Page 56 - INSTALLAZIONE; DATI TECNICI
7. INSTALLAZIONE AVVERTENZA! Fare riferimento ai capitoli sulla sicurezza. 7.1 Luogo d'installazione Installare l'apparecchiatura in un luogo asciutto, ben ventilato, la cui temperatura ambiente corrisponda alla classe climatica indicata sulla targhetta dei dati del modello: Classeclimati-ca Tempera...
Page 57 - CONSIDERAZIONI SULL'AMBIENTE
Profondità 647 mm Tempo di risalita 20 ore Tensione 230 - 240 V Frequenza 50 Hz I dati tecnici sono riportati sulla targhetta dei dati applicata sul lato esterno o interno dell'apparecchiatura e sull'etichetta dei valori energetici. 9. CONSIDERAZIONI SULL'AMBIENTE Riciclare i materiali con il simbol...
Page 58 - ATENCIÓN Y SERVICIO AL CLIENTE; INFORMACIÓN SOBRE SEGURIDAD; Antes de instalar y utilizar el aparato, lea atentamente
CONTENIDO 1. INFORMACIÓN SOBRE SEGURIDAD..................................................................... 58 2. INSTRUCCIONES DE SEGURIDAD..........................................................................60 3. FUNCIONAMIENTO...................................................................
Page 60 - INSTRUCCIONES DE SEGURIDAD; Instalación
• Limpie el aparato con un paño suave humedecido. Utilice solo detergentes neutros. No utilice productos abrasivos, estropajos duros, disolventes ni objetos metálicos. • No almacene sustancias explosivas tales como latas de aerosol con un propulsor inflamable en este aparato. • Si el cable eléctrico...
Page 62 - FUNCIONAMIENTO; Panel de control; Regulación de la
3. FUNCIONAMIENTO 3.1 Panel de control 1 2 3 9 4 7 5 6 8 1. Tecla de selección de compartimento y tecla ON/OFF 2. Affichage 3. Tecla de temperatura más cálida 4. Indicador FROSTMATIC 5. Indicador DYNAMICAIR 6. Indicador COOLMATIC 7. Tecla DYNAMICAIR 8. Tecla de modo 9. Tecla de temperatura más fría ...
Page 64 - USO DIARIO
3.8 Modo DEMO El modo DEMO permite utilizar el panel sin encender el aparato.• Para activar el modo, pulse tecla de modo 9 veces, hasta que en la pantalla aparezca dE . • Para desactivar el modo, pulse tecla de modo durante aproximadamente 10 segundos. El aparato vuelve al modo normal. 3.9 Alarma de...
Page 66 - MANTENIMIENTO Y LIMPIEZA; Limpieza del interior
5. MANTENIMIENTO Y LIMPIEZA ADVERTENCIA! Consulte los capítulos sobre seguridad. 5.1 Limpieza del interior Antes de utilizar el aparato por primera vez, lave su interior y todos los accesorios internos con agua templada y jabón neutro para eliminar el típico olor de los productos nuevos. A continuac...
Page 67 - Periodos de inactividad; SOLUCIÓN DE PROBLEMAS
5.4 Periodos de inactividad Si el aparato no se utiliza durante un tiempo prolongado, tome las siguientes precauciones: 1. Desconecte el aparato de la red eléctrica. 2. Extraiga todos los alimentos. 3. Limpie el aparato y todos los accesorios. 4. Deje la puerta o puertas abiertas para que no se prod...
Page 69 - Cambio de la bombilla; INSTALACIÓN; Colocación
Problema Posible causa Solución La función FROSTMATICestá activada. Consulte la sección “FunciónFROSTMATIC”. La función COOLMATIC es-tá activada. Consulte la sección “FunciónCOOLMATIC”. Los paneles laterales delaparato están calientes. Es un estado normal causa-do por el funcionamientodel intercambi...
Page 70 - DATOS TÉCNICOS
7.2 Conexión eléctrica • Antes de conectar el aparato, compruebe que el voltaje y la frecuencia indicados en la placa de datos técnicos se corresponden con el suministro de la vivienda. • El aparato debe conectarse a tierra. El enchufe del cable de alimentación se suministra con un contacto para tal...


 AEG AREH30LF
User Manual
AEG AREH30LF
User Manual
 AEG AREI20XLF
User Manual
AEG AREI20XLF
User Manual
 AEG FFB72746PM
User Manual
AEG FFB72746PM
User Manual
 AEG PS254DB
User Manual
AEG PS254DB
User Manual
 AEG NIK85M00AZ
User Manual
AEG NIK85M00AZ
User Manual
 AEG DGE5662HB
User Manual
AEG DGE5662HB
User Manual
 AEG DGE5962HB
User Manual
AEG DGE5962HB
User Manual
 AEG HVB95450IB
User Manual
AEG HVB95450IB
User Manual
 AEG PL700
User Manual
AEG PL700
User Manual
 AEG W14120
User Manual
AEG W14120
User Manual
 AEG DC240
User Manual
AEG DC240
User Manual
 AEG T738A4OBC
User Manual
AEG T738A4OBC
User Manual
 AEG T858M6OBC
User Manual
AEG T858M6OBC
User Manual
 AEG T859M6OBC
User Manual
AEG T859M6OBC
User Manual
 AEG T959M6ORS
User Manual
AEG T959M6ORS
User Manual
 AEG IKE95771FB
User Manual
AEG IKE95771FB
User Manual
 AEG AREI9XLF
User Manual
AEG AREI9XLF
User Manual
 AEG A18SPC3
User Manual
AEG A18SPC3
User Manual
 AEG LF7384O4C
User Manual
AEG LF7384O4C
User Manual