Page 2 - spend a few minutes reading to get the very best from it.; CUSTOMER CARE AND SERVICE; Always use original spare parts.
CONTENTS 1. SAFETY INFORMATION...........................................................................................3 2. SAFETY INSTRUCTIONS.......................................................................................... 4 3. PRODUCT DESCRIPTION...........................................
Page 4 - SAFETY INSTRUCTIONS; Installation
• NEVER try to extinguish a fire with water, but switch off the appliance and then cover flame e.g. with a lid or a fire blanket. • CAUTION: The cooking process has to be supervised. A short term cooking process has to be supervised continuously. • WARNING: Danger of fire: Do not store items on the ...
Page 7 - PRODUCT DESCRIPTION; Cooking surface layout; Control panel layout
3. PRODUCT DESCRIPTION 3.1 Cooking surface layout 300 mm 145 mm 1 1 2 1 1 1 Induction cooking zone 2 Control panel 3.2 Control panel layout 7 8 5 2 4 3 9 1 12 10 11 6 Use the sensor fields to operate the appliance. The displays, indicators and sounds tell which functions operate. Sensorfield Functio...
Page 8 - Heat setting displays; OptiHeat Control (3 step
Sensorfield Function Comment 8 Hob²Hood To activate and deactivate the manualmode of the function. 9 - To select the cooking zone. 10 / - To increase or decrease the time. 11 Power function To activate and deactivate the function. 12 - Control bar To set a heat setting. 3.3 Heat setting displays Dis...
Page 9 - DAILY USE
4. DAILY USE WARNING! Refer to Safety chapters. 4.1 Activating and deactivating Touch for 1 second to activate or deactivate the hob. 4.2 Automatic Switch Off The function deactivates the hob automatically if: • all cooking zones are deactivated, • you do not set the heat setting after you activate ...
Page 12 - Hob2Hood
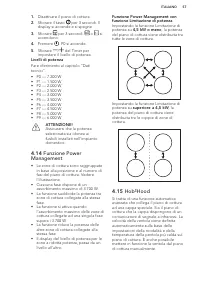
• P6 — 4000 W • P7 — 4500 W • P8 — 5000 W • P9 — 6000 W CAUTION! Make sure that the selected power fits to the house installation fuses. 4.14 Power management function • Cooking zones are grouped according to the location and number of the phases in the hob. See the illustration. • Each phase has a ...
Page 13 - HINTS AND TIPS; Cookware
Auto-maticlight Boiling 1) Frying 2) Mode H3 On Off Fanspeed 1 Mode H4 On Fanspeed 1 Fanspeed 1 Mode H5 On Fanspeed 1 Fanspeed 2 Mode H6 On Fanspeed 2 Fanspeed 3 1) The hob detects the boiling process and acti- vates fan speed in accordance with automaticmode. 2) The hob detects the frying process a...
Page 14 - The noises during; Examples of cooking
Cookware is correct for an induction hob if: • some water boils very quickly on a zone set to the highest heat setting. • a magnet pulls on to the bottom of the cookware. The bottom of the cookware must be as thick and flat as possible. Cookware dimensions Induction cooking zones adapt to the dimens...
Page 15 - Hints and Tips for
Heat setting Use to: Time(min) Hints 7 - 9 Steam potatoes. 20 - 60 Use max. ¼ l water for 750 g ofpotatoes. 7 - 9 Cook larger quantities of food,stews and soups. 60 - 150 Up to 3 l liquid plus ingredi- ents. 9 - 12 Gentle fry: escalope, veal cor-don bleu, cutlets, rissoles,sausages, liver, roux, egg...
Page 16 - CARE AND CLEANING; General information; TROUBLESHOOTING
6. CARE AND CLEANING WARNING! Refer to Safety chapters. 6.1 General information • Clean the hob after each use. • Always use cookware with clean bottom. • Scratches or dark stains on the surface have no effect on how the hob operates. • Use a special cleaner applicable for the surface of the hob. • ...
Page 18 - If you cannot find a; INSTALLATION; Before the installation
Problem Possible cause Remedy and a number come on. There is an error in the hob. Disconnect the hob from theelectrical supply for sometime. Disconnect the fusefrom the electrical system ofthe house. Connect it again.If comes on again, speak to an Authorised ServiceCentre. comes on. There is an erro...
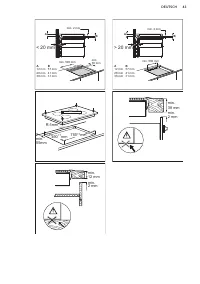
Page 19 - Assembly
CAUTION! Do not drill or solder the wire ends. This is strictly forbidden! CAUTION! Do not connect the cable without cable end sleeve. Two-phase connection 1. Remove the cable end sleeve from black and brown wires. 2. Remove an insulation of the brown and black cable ends. 3. Apply a new wire end sl...
Page 21 - Protection box; TECHNICAL DATA; Rating plate
8.5 Protection box If you use a protection box (an additional accessory), the front airflow space of 2 mm and the protective floor directly below the hob are not necessary. The protection box accessory may not be available in some countries. Please contact your local supplier. You can not use the pr...
Page 22 - ENERGY EFFICIENCY; Product information according to EU 66/2014; Energy saving; ENVIRONMENT CONCERNS
10. ENERGY EFFICIENCY 10.1 Product information according to EU 66/2014 Model identification HKL85416XB Type of hob Built-In Hob Number of cooking zones 4 Heating technology Induction Diameter of circular cook-ing zones (Ø) Left frontLeft rearMiddle frontRight rear 21.0 cm21.0 cm14.5 cm30.0 cm Energy...
Page 23 - REPARATUR- UND KUNDENDIENST; Diese Informationen finden Sie auf dem Typenschild.
INHALTSVERZEICHNIS 1. SICHERHEITSHINWEISE.........................................................................................24 2. SICHERHEITSANWEISUNGEN.............................................................................. 26 3. GERÄTEBESCHREIBUNG..........................................
Page 26 - SICHERHEITSANWEISUNGEN; Montage
2. SICHERHEITSANWEISUNGEN 2.1 Montage WARNUNG! Nur eine qualifizierte Fachkraft darf die Montage des Geräts vornehmen. • Entfernen Sie das gesamte Verpackungsmaterial. • Montieren Sie ein beschädigtes Gerät nicht und benutzen Sie es nicht. • Halten Sie sich an die mitgelieferte Montageanleitung. • D...
Page 27 - Gebrauch
werden, dass sie nicht ohne Werkzeug entfernt werden können. • Stecken Sie den Netzstecker erst nach Abschluss der Montage in die Steckdose. Stellen Sie sicher, dass der Netzstecker nach der Montage noch zugänglich ist. • Falls die Steckdose lose ist, schließen Sie den Netzstecker nicht an. • Ziehen...
Page 28 - GERÄTEBESCHREIBUNG; Kochfeldanordnung
• Legen Sie keine Alufolie auf das Gerät. • Kochgeschirr aus Gusseisen, Aluminium oder mit beschädigten Böden kann die Glas- bzw. Glaskeramikoberfläche verkratzen. Heben Sie das Kochgeschirr stets an, wenn Sie es auf dem Kochfeld umsetzen möchten. • Dieses Gerät ist nur zum Kochen bestimmt. Jeder an...
Page 29 - Bedienfeldanordnung; Anzeigen der Kochstufen
3.2 Bedienfeldanordnung 7 8 5 2 4 3 9 1 12 10 11 6 Bedienen Sie das Gerät über die Sensorfelder. Die Anzeigen, Kontrolllampen und akustischen Signale informieren Sie über die aktiven Funktionen. Sen-sorfeld Funktion Kommentar 1 EIN/AUS Ein- und Ausschalten des Kochfeldes. 2 Verriegeln / Kindersicher...
Page 30 - OptiHeat Control; TÄGLICHER GEBRAUCH; Abschaltautomatik
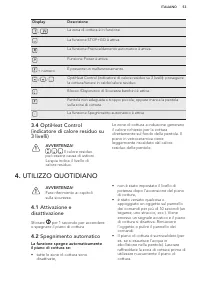
Display Beschreibung - Die Kochzone ist eingeschaltet. Die Funktion STOP+GO ist in Betrieb. Die Funktion Ankochautomatik ist in Betrieb. Power-Funktion ist eingeschaltet. + Zahl Eine Störung ist aufgetreten. / / OptiHeat Control (Restwärmeanzeige, 3-stufig): Weitergaren/Warm-halten/Restwärme. Die Fu...
Page 31 - Kochstufe; Ankochautomatik
Weile leuchtet auf und das Kochfeld schaltet sich aus. Verhältnis zwischen der Kochstufe und der Zeit, nach der das Kochfeld ausgeschaltet wird: Kochstufe Das Kochfeld wirdausgeschaltet nach , 1 - 3 6 Stunden 4 - 7 5 Stunden 8 - 9 4 Stunden 10 - 14 1,5 Stunden 4.3 Kochstufe Einstellen oder Ändern de...
Page 32 - Timer
Siehe Kapitel „Technische Daten“. Einschalten der Funktion für eineKochzone: Berühren Sie . leuchtet auf. Ausschalten der Funktion: Ändern Sie die Kochstufe. 4.8 Timer Kurzzeitmesser Mit dieser Funktion stellen Sie ein, wie lange eine Kochzone für einen einzelnen Kochvorgang eingeschaltet bleiben so...
Page 34 - Management
• P0 – 7200 W • P1 – 1500 W • P2 – 2000 W • P3 – 2500 W • P4 – 3000 W • P5 – 3500 W • P6 – 4000 W • P7 – 4500 W • P8 – 5000 W • P9 – 6000 W VORSICHT! Achten Sie darauf, dass die gewählte Leistungsstufe für die Sicherungen in der Hausinstallation geeignet ist. 4.14 Funktion Power- Management • Die Ko...
Page 36 - TIPPS UND HINWEISE; Kochgeschirr
einschaltet, wenn Sie das Kochfeld bedienen. Stellen Sie hierzu den Automatikmodus auf H1 – H6. Die Beleuchtung der Dunstabzugshaube schaltet sich 2 Minuten nach Ausschalten des Kochfelds aus. 5. TIPPS UND HINWEISE WARNUNG! Siehe Kapitel "Sicherheitshinweise". 5.1 Kochgeschirr Das Kochgeschi...
Page 37 - Tipps und Hinweise für die
Bei den Angaben in der folgenden Tabelle handelt es sich um Richtwerte. Kochstufe Verwendung: Dauer(Min.) Hinweise - 1 Warmhalten von gegartenSpeisen. NachBedarf Legen Sie einen Deckel aufdas Kochgeschirr. 1 - 3 Sauce Hollandaise, Schmelzenvon: Butter, Schokolade, Gelat-ine. 5 - 25 Gelegentlich umrü...
Page 38 - REINIGUNG UND PFLEGE; Allgemeine Informationen; FEHLERSUCHE
Abbildung. Die abgebildete Dunstabzugshaube ist nur beispielhaft. Andere Geräte mit Fernbedienung können das Signal beeinträchtigen. Um dies zu vermeiden, die Fernbedienung des Gerätes und des Kochfelds nicht gleichzeitig verwenden. Dunstabzugshauben mit der Funktion Hob²Hood Die komplette Palette v...
Page 41 - Wenn Sie das Problem; MONTAGE; Vor der Montage
Störung Mögliche Ursache Abhilfe leuchtet auf. Im Kochfeld ist ein Fehleraufgetreten, da ein Kochge-schirr leer gekocht ist. DieAbschaltautomatik und derÜberhitzungsschutz für dieZonen sind aktiviert. Schalten Sie das Kochfeldaus. Entfernen Sie das heißeKochgeschirr. Schalten Siedie Kochzone nach et...
Page 44 - Schutzboden; TECHNISCHE DATEN; Typenschild
8.5 Schutzboden Falls Sie einen Schutzboden (optionales Zubehör) verwenden, ist die Einhaltung des vorderen Belüftungsabstands von 2 mm und die Schutzmatte direkt unter dem Gerät nicht nötig. Der Schutzboden ist möglicherweise in einigen Ländern nicht erhältlich. Wenden Sie sich an Ihren Händler vor...
Page 45 - ENERGIEEFFIZIENZ; Energie sparen; UMWELTTIPPS
10. ENERGIEEFFIZIENZ 10.1 Produktinformationen gemäß EU 66/2014 Modellidentifikation HKL85416XB Kochfeldtyp Einbau-Kochfeld Anzahl der Kochzonen 4 Heiztechnologie Induktion Durchmesser der kreisför-migen Kochzonen (Ø) Vorne linksHinten linksVorne MitteHinten rechts 21,0 cm21,0 cm14,5 cm30,0 cm Energ...
Page 46 - SERVIZIO CLIENTI E MANUTENZIONE; Consigliamo sempre l’impiego di ricambi originali.
INDICE 1. INFORMAZIONI PER LA SICUREZZA.................................................................... 47 2. ISTRUZIONI DI SICUREZZA.................................................................................... 49 3. DESCRIZIONE DEL PRODOTTO...................................................
Page 49 - protezioni può causare incidenti.; ISTRUZIONI DI SICUREZZA; Installazione
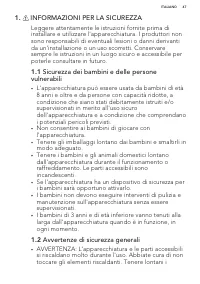
nell'apparecchiatura. L'uso inadeguato delle protezioni può causare incidenti. 2. ISTRUZIONI DI SICUREZZA 2.1 Installazione AVVERTENZA! L’installazione dell'apparecchiatura deve essere eseguita da personale qualificato. • Rimuovere tutti i materiali di imballaggio. • Non installare o utilizzare l'ap...
Page 50 - Utilizzo
• Inserire la spina di alimentazione nella presa solo al termine dell'installazione. Verificare che la spina di alimentazione rimanga accessibile dopo l'installazione. • Nel caso in cui la spina di corrente sia allentata, non collegarla alla presa. • Non tirare il cavo di alimentazione per scollegar...
Page 51 - DESCRIZIONE DEL PRODOTTO; Disposizione della superficie di cottura
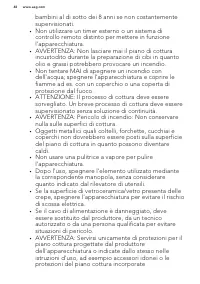
graffiare il vetro o la vetroceramica. Per spostare questi oggetti sollevarli sempre dalla superficie di cottura. • L'apparecchiatura è destinata solo alla cottura. Non deve essere utilizzata per altri scopi, come per esempio il riscaldamento di un ambiente. 2.4 Pulizia e cura • Pulire regolarmente ...
Page 52 - Disposizione del pannello dei comandi; Display del livello di potenza
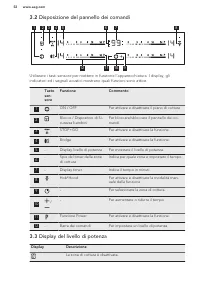
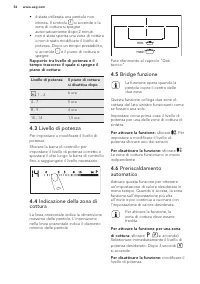
3.2 Disposizione del pannello dei comandi 7 8 5 2 4 3 9 1 12 10 11 6 Utilizzare i tasti sensore per mettere in funzione l'apparecchiatura. I display, gli indicatori ed i segnali acustici mostrano quali funzioni sono attive. Tastosen-sore Funzione Commento 1 ON / OFF Per attivare e disattivare il pia...
Page 53 - UTILIZZO QUOTIDIANO; Attivazione e
Display Descrizione - La zona di cottura è in funzione. La funzione STOP+GO è attiva. La funzione Preriscaldamento automatico è attiva. Funzione Power è attiva. + numero È presente un malfunzionamento. / / OptiHeat Control (indicatore di calore residuo su 3 livelli): proseguirela cottura/tenere in c...
Page 57 - Funzione Power
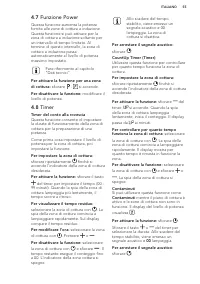
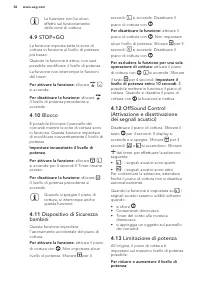
1. Disattivare il piano di cottura. 2. Sfiorare il tasto per 3 secondi. Il display si accende e si spegne. 3. Sfiorare per 3 secondi. o si accendono. 4. Premere . P0 si accende. 5. Sfiorare / del Timer per impostare il livello di potenza. Livelli di potenza Fare riferimento al capitolo "Dati tec...
Page 59 - CONSIGLI E SUGGERIMENTI UTILI; Pentole
Attivazione della luce È anche possibile impostare il piano di cottura per attivare automaticamente la luce ogni volta che si accende il piano di cottura. Per farlo impostare la modalità automatica da H1 a H6. La luce sulla cappa si disattiva 2 minuti dopo la disattivazione del piano di cottura. 5. ...
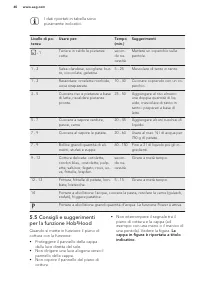
Page 60 - Consigli e suggerimenti
I dati riportati in tabella sono puramente indicativi. Livello di po-tenza Usare per: Tempo(min.) Suggerimenti - 1 Tenere in caldo le pietanzecotte. secon-do ne-cessità Mettere un coperchio sullapentola. 1 - 3 Salsa olandese, sciogliere: bur-ro, cioccolata, gelatina. 5 - 25 Mescolare di tanto in tan...
Page 61 - PULIZIA E CURA; Informazioni generali
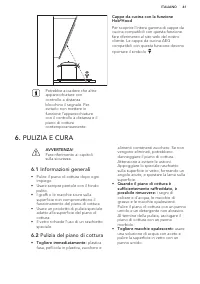
Potrebbe accadere che altre apparecchiature con controllo a distanza blocchino il segnale. Per evitarlo non mettere in funzione l'apparecchiature con il controllo a distanza e il piano di cottura contemporaneamente. Cappe da cucina con la funzione Hob²Hood Per scoprire l'intera gamma di cappe da cuc...
Page 62 - RISOLUZIONE DEI PROBLEMI
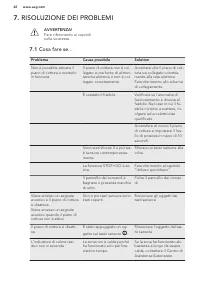
7. RISOLUZIONE DEI PROBLEMI AVVERTENZA! Fare riferimento ai capitoli sulla sicurezza. 7.1 Cosa fare se... Problema Causa possibile Solution Non è possibile attivare ilpiano di cottura o metterloin funzione. Il piano di cottura non è col-legato a una fonte di alimen-tazione elettrica o non è col-lega...
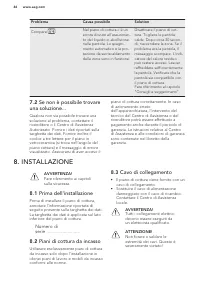
Page 64 - Se non è possibile trovare; INSTALLAZIONE; Prima dell'installazione
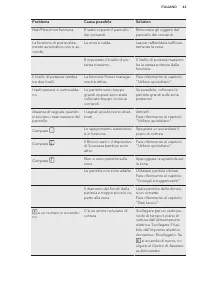
Problema Causa possibile Solution Compare . Nel piano di cottura c'è unerrore dovuto all'esaurimen-to del liquido in ebollizionenella pentola. Lo spegni-mento automatico e la pro-tezione da surriscaldamentodelle zone sono in funzione. Disattivare il piano di cot-tura. Togliere le pentolecalde. Dopo ...
Page 65 - Montaggio
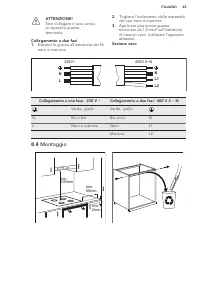
ATTENZIONE! Non collegare il cavo senza la rispettiva guaina terminale. Collegamento a due fasi 1. Estrarre la guaina all'estremità dei fili nero e marrone. 2. Togliere l'isolamento delle estremità dei cavi nero e marrone. 3. Applicare una nuova guaina terminale da 1,5 mm² sull'estremità di ciascun ...
Page 67 - DATI TECNICI; Targhetta dei dati; Caratteristiche tecniche zone di cottura
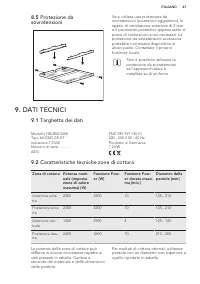
8.5 Protezione da sovratensioni Se si utilizza una protezione da sovratensioni (accessorio aggiuntivo), lo spazio di ventilazione anteriore di 2 mm e il pavimento protettivo appena sotto al piano di cottura non sono necessari. La protezione da sovratensioni accessoria potrebbe non essere disponibile...
Page 68 - EFFICIENZA ENERGETICA; Informazioni prodotto conformi alla norma UE 66/2014; Risparmio energetico; CONSIDERAZIONI SULL'AMBIENTE
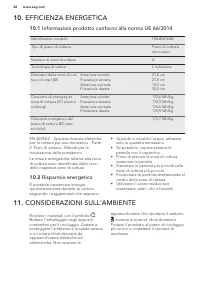
10. EFFICIENZA ENERGETICA 10.1 Informazioni prodotto conformi alla norma UE 66/2014 Identificativo modello HKL85416XB Tipo di piano di cottura Piano di cotturada incasso Numero di zone di cottura 4 Tecnologia di calore L'induzione Diametro delle zone di cot-tura circolari (Ø) Anteriore sinistraPoste...


 AEG AREH30LF
User Manual
AEG AREH30LF
User Manual
 AEG AREI20XLF
User Manual
AEG AREI20XLF
User Manual
 AEG FFB72746PM
User Manual
AEG FFB72746PM
User Manual
 AEG PS254DB
User Manual
AEG PS254DB
User Manual
 AEG NIK85M00AZ
User Manual
AEG NIK85M00AZ
User Manual
 AEG DGE5662HB
User Manual
AEG DGE5662HB
User Manual
 AEG DGE5962HB
User Manual
AEG DGE5962HB
User Manual
 AEG HVB95450IB
User Manual
AEG HVB95450IB
User Manual
 AEG PL700
User Manual
AEG PL700
User Manual
 AEG W14120
User Manual
AEG W14120
User Manual
 AEG DC240
User Manual
AEG DC240
User Manual
 AEG T738A4OBC
User Manual
AEG T738A4OBC
User Manual
 AEG T858M6OBC
User Manual
AEG T858M6OBC
User Manual
 AEG T859M6OBC
User Manual
AEG T859M6OBC
User Manual
 AEG T959M6ORS
User Manual
AEG T959M6ORS
User Manual
 AEG IKE95771FB
User Manual
AEG IKE95771FB
User Manual
 AEG AREI9XLF
User Manual
AEG AREI9XLF
User Manual
 AEG A18SPC3
User Manual
AEG A18SPC3
User Manual
 AEG LF7384O4C
User Manual
AEG LF7384O4C
User Manual