Page 2 - KUNDENDIENST UND -BETREUUNG
INHALT 1. SICHERHEITSHINWEISE . . . . . . . . . . . . . . . . . . . . . . . . . . . . . . . . . . . . . . . . . . . . . . . . . . . . . . 3 2. BETRIEB . . . . . . . . . . . . . . . . . . . . . . . . . . . . . . . . . . . . . . . . . . . . . . . . . . . . . . . . . . . . . . . . . . . 5 3. TÄGLICHER ...
Page 3 - SICHERHEITSHINWEISE; Sicherheit von Kindern und
1. SICHERHEITSHINWEISE Lesen Sie zu Ihrer Sicherheit und für eineoptimale Nutzung des Geräts vor derMontage und dem ersten Gebrauch dasvorliegende Benutzerhandbuch ein-schließlich der Ratschläge und Warnun-gen aufmerksam durch. Es ist wichtig,dass zur Vermeidung von Fehlern undUnfällen alle Personen...
Page 5 - BETRIEB; Einschalten des Geräts
• Kontrollieren Sie nach dem Auspacken das Gerät auf eventuelle Beschädigun-gen. Nehmen Sie das Gerät nicht inBetrieb, wenn es beschädigt ist. Mel-den Sie die Schäden umgehend demHändler, bei dem Sie es erworben ha-ben. Bewahren Sie in diesem Fall dieVerpackung auf. • Lassen Sie das Gerät mindestens...
Page 6 - TÄGLICHER GEBRAUCH
eine mittlere Einstellung ist imAllgemeinen am besten geeig-net. Allerdings muss für eine exakte Einstel-lung berücksichtigt werden, dass dieTemperatur im Innern des Gerätes vonverschiedenen Faktoren abhängt:• von der Raumtemperatur• von der Häufigkeit der Türöffnung• von der Menge der eingelagerten...
Page 7 - PRAKTISCHE TIPPS UND HINWEISE
3.5 Eiswürfelbereitung Dieses Gerät ist mit einer oder mehrerenSchalen für die Herstellung von Eiswür-feln ausgestattet. Füllen Sie die Schalenmit Wasser und stellen Sie diese in dasGefrierfach. Bitte verwenden Sie zum Heraus-holen der Schalen aus dem Ge-frierschrank keine Utensilien ausMetall. 3.6 ...
Page 9 - REINIGUNG UND PFLEGE; Regelmäßige Reinigung
• Aufgetaute Lebensmittel verderben sehr schnell und eignen sich nicht fürein erneutes Einfrieren. • Das Haltbarkeitsdatum auf der Tief- kühlkostverpackung darf nicht über-schritten werden. 5. REINIGUNG UND PFLEGE VORSICHT! Ziehen Sie bitte vor jeder Reini-gungsarbeit immer den Netzste-cker aus der ...
Page 10 - Stillstandzeiten
5.2 Abtauen des Kühlschranks Bei normalem Betrieb wird Reif bei je-dem Anhalten des Kompressors automa-tisch vom Verdampfer des Kühlschranksentfernt. Das Tauwasser läuft durch eineAbflussöffnung in einen speziellen Be-hälter an der Rückseite des Geräts überdem Motorkompressor, wo es ver-dampft.Reini...
Page 12 - Austauschen der Lampe
Problem Mögliche Ursache Abhilfe Wasser fließt an derRückwand des Kühl-schranks herunter. Beim automatischen Ab-tauen fließt das Tauwas-ser an der Rückwand desGeräts herunter. Das ist normal. Wasser fließt in denKühlschrank. Der Wasserablauf ist ver-stopft. Reinigen Sie den Wasser-ablauf. Die eingel...
Page 13 - Schließen der Tür; MONTAGE; Aufstellung; Umgebungstemperatur; Elektrischer Anschluss
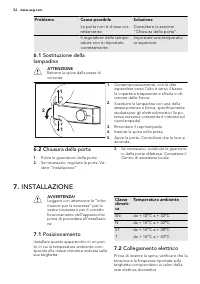
1 1 2 1. Schieben Sie die transparente Abde-ckung mit den Fingern nach oben undunten und nehmen Sie sie in Pfeilrich-tung ab. 2. Ersetzen Sie die defekte Lampe durcheine Lampe mit der gleichen Leistungund Form, die speziell für Haushaltsge-räte vorgesehen ist. (Die maximal er-laubte Leistung finden ...
Page 19 - GERÄUSCHE
Ha K 8 mm Nehmen Sie die Halterungen wiederab. Markieren Sie 8 mm ab der Türau-ßenkante die Stelle, an der der Nagel(K) eingesetzt werden muss. Hb Setzen Sie das Führungsstück erneutauf die Führungsschiene und schrau-ben Sie es mit den mitgeliefertenSchrauben fest.Richten Sie die Tür des Einbaumöbel...
Page 20 - BRRR; SSSRR; OK
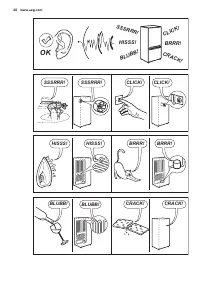
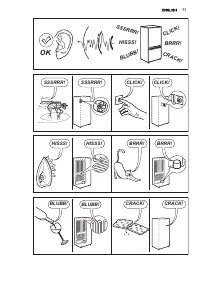
BRRR ! HISSS! CLICK! BLUBB! CRACK! SSSRR R! OK CLICK! CLICK! SSSRRR! SSSRRR! BRRR! BRRR! HISSS! HISSS! BLUBB! BLUBB! CRACK! CRACK! 20 www.aeg.com
Page 21 - TECHNISCHE DATEN; UMWELTTIPPS
9. TECHNISCHE DATEN Abmessung der Ausspa-rung Höhe 1780 mm Breite 560 mm Tiefe 550 mm Ausfalldauer 22 h Spannung 230-240 V Frequenz 50 Hz Die technischen Informationen befindensich auf dem Typenschild innen links imGerät sowie auf der Energieplakette. 10. UMWELTTIPPS Recyceln Sie Materialien mit dem...
Page 23 - INSTRUCTIONS DE SÉCURITÉ; Sécurité des enfants et
1. INSTRUCTIONS DE SÉCURITÉ Pour votre sécurité et garantir une utili-sation correcte de l'appareil, lisez atten-tivement cette notice, y compris les con-seils et avertissements, avant d'installeret d'utiliser l'appareil pour la premièrefois. Pour éviter toute erreur ou accident,veillez à ce que tou...
Page 24 - Utilisation quotidienne
Si le circuit frigorifique est endomma-gé :– évitez les flammes vives et toute au- tre source d'allumage – aérez soigneusement la pièce où se trouve l'appareil • Ne modifiez pas les spécifications de l'appareil. Si le câble d'alimentationest endommagé, il peut causer uncourt circuit, un incendie et/...
Page 25 - FONCTIONNEMENT; Mise en fonctionnement
• Déballez l'appareil et vérifiez qu'il n'est pas endommagé. Ne branchezpas l'appareil s'il est endommagé. Si-gnalez immédiatement au revendeurde l'appareil les dommages constatés.Dans ce cas, gardez l'emballage. • Il est conseillé d'attendre au moins quatre heures avant de brancher l'ap-pareil pour...
Page 26 - UTILISATION QUOTIDIENNE
Toutefois, le réglage doit être choisi entenant compte du fait que la températu-re à l'intérieur de l'appareil dépend deplusieurs facteurs :• la température ambiante• la fréquence d'ouverture de la porte• la quantité de denrées stockées• l'emplacement de l'appareil. Si le thermostat est réglé sur la...
Page 27 - CONSEILS UTILES
3.5 Fabrication de glaçons Cet appareil est équipé d'un ou de plu-sieurs bacs à glaçons. Remplissez d'eauces bacs et mettez-les dans le comparti-ment congélateur. N'utilisez pas d'instruments mé-talliques pour décoller les bacsdu congélateur. 3.6 Clayettes amovibles Les parois du réfrigérateur sont ...
Page 29 - ENTRETIEN ET NETTOYAGE; Nettoyage périodique
• une fois décongelés, les aliments se détériorent rapidement et ne peuventpas être recongelés ; • ne dépassez pas la durée de conserva- tion indiquée par le fabricant. 5. ENTRETIEN ET NETTOYAGE ATTENTION débrancher l'appareil avant touteopération d'entretien. Cet appareil contient des hydro-carbure...
Page 31 - EN CAS D'ANOMALIE DE FONCTIONNEMENT; Problème
• débranchez l'appareil • retirez tous les aliments• dégivrez si nécessaire et nettoyez l'ap- pareil ainsi que tous les accessoires • laissez la porte/les portes entrouver- te(s) pour prévenir la formationd'odeurs désagréables. Si, toutefois, vous n'avez pas la possibili-té de débrancher et vider l'...
Page 32 - Remplacement de
Problème Cause possible Solution La température du pro-duit est trop élevée. Laissez le produit revenir àtempérature ambianteavant de le placer dansl'appareil. La température ambianteest trop élevée. Diminuez la températureambiante. De l'eau s'écoule surla plaque arrière duréfrigérateur. Pendant le ...
Page 33 - Fermeture de la porte; INSTALLATION; Emplacement; Température ambiante; Branchement électrique
1 1 2 1. Dans le même temps, placez vosdoigts en haut et en bas du diffuseurtransparent et glissez-le dans le sensindiqué par les flèches pour le déta-cher. 2. Remplacez l'ampoule par une ampoulede puissance et de forme identiques,spécifiquement conçue pour les appa-reils électroménagers. (La puissa...
Page 39 - BRUITS
Ha K 8 mm Retirez les supports et repérez une dis-tance de 8 mm à partir de l'arête exté-rieure de la porte où le clou doit êtreposé (K). Hb Placez de nouveau le petit carré sur leguide et fixez-le à l'aide des vis four-nies.Alignez la porte du meuble de cuisineet celle de l'appareil en réglant la p...
Page 41 - CARACTÉRISTIQUES TECHNIQUES; EN MATIÈRE DE PROTECTION DE L'ENVIRONNEMENT
9. CARACTÉRISTIQUES TECHNIQUES Dimensions de la niched'encastrement Hauteur 1780 mm Largeur 560 mm Profondeur 550 mm Temps de levée 22 h Tension 230-240 V Fréquence 50 Hz Les caractéristiques techniques figurentsur la plaque signalétique située sur le côté gauche à l'intérieur de l'appareil etsur l'...
Page 42 - SERVIZIO CLIENTI E MANUTENZIONE
INDICE 1. ISTRUZIONI DI SICUREZZA . . . . . . . . . . . . . . . . . . . . . . . . . . . . . . . . . . . . . . . . . . . . . . . . . . . 43 2. USO DELL'APPARECCHIO . . . . . . . . . . . . . . . . . . . . . . . . . . . . . . . . . . . . . . . . . . . . . . . . . . . 45 3. UTILIZZO QUOTIDIANO . . . . ....
Page 43 - ISTRUZIONI DI SICUREZZA; Sicurezza dei bambini e
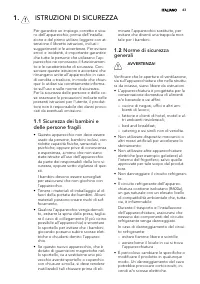
1. ISTRUZIONI DI SICUREZZA Per garantire un impiego corretto e sicu-ro dell'apparecchio, prima dell'installa-zione e del primo utilizzo leggere con at-tenzione il libretto istruzioni, inclusi isuggerimenti e le avvertenze. Per evitareerrori e incidenti, è importante garantireche tutte le persone che...
Page 46 - UTILIZZO QUOTIDIANO
3. UTILIZZO QUOTIDIANO 3.1 Pulizia dell'interno Prima di utilizzare l'apparecchiatura perla prima volta, lavare l'interno e gli ac-cessori con acqua tiepida e sapone neu-tro per eliminare il tipico odore dei pro-dotti nuovi, quindi asciugare accurata-mente. Non usare detergenti corrosivi opolveri ab...
Page 47 - CONSIGLI E SUGGERIMENTI UTILI
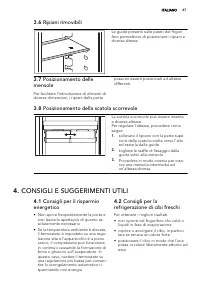
3.6 Ripiani rimovibili Le guide presenti sulle pareti del frigori-fero permettono di posizionare i ripiani adiverse altezze. 3.7 Posizionamento delle mensole Per facilitare l'introduzione di alimenti didiverse dimensioni, i ripiani della porta possono essere posizionati ad altezzedifferenti. 3.8 Pos...
Page 48 - PULIZIA E CURA
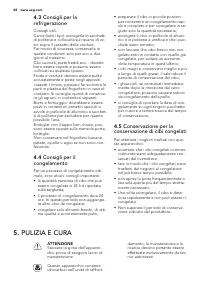
4.3 Consigli per la refrigerazione Consigli utili:Carne (tutti i tipi): avvolgerla in sacchettidi politene e collocarla sul ripiano di ve-tro sopra il cassetto delle verdure.Per motivi di sicurezza, conservarla inqueste condizioni solo per uno o duegiorni al massimo.Cibi cucinati, piatti freddi ecc....
Page 49 - Pulizia periodica; Sbrinamento del vano frigorifero
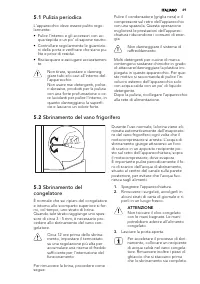
5.1 Pulizia periodica L'apparecchio deve essere pulito rego-larmente:• Pulire l'interno e gli accessori con ac- qua tiepida e un po' di sapone neutro. • Controllare regolarmente le guarnizio- ni della porta e verificare che siano pu-lite e prive di residui. • Risciacquare e asciugare accuratamen- te...
Page 50 - Periodi di inutilizzo; COSA FARE SE...; Problema
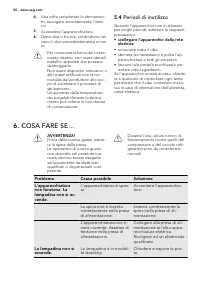
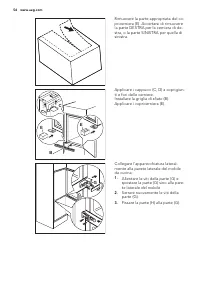
4. Una volta completato lo sbrinamen-to, asciugare accuratamente l'inter-no. 5. Accendere l’apparecchiatura. 6. Dopo due o tre ore, reintrodurre nelvano il cibo precedentemente rimos-so Per rimuovere la brina dal rivesti-mento interno, non usare utensilimetallici appuntiti che possanodanneggiarlo.No...
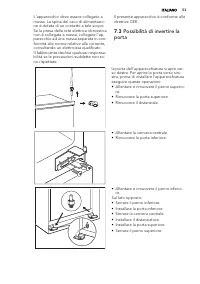
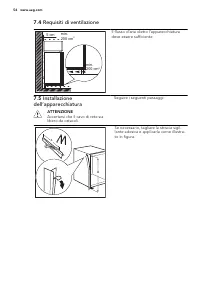
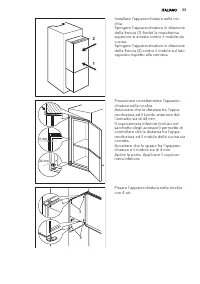
Page 52 - Sostituzione della; Chiusura della porta; INSTALLAZIONE; Posizionamento; Temperatura ambiente; Collegamento elettrico
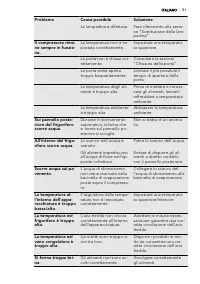
Problema Causa possibile Soluzione La porta non è chiusa cor-rettamente. Consultare la sezione"Chiusura della porta". Il regolatore della tempe-ratura non è impostatocorrettamente. Impostare una temperatu-ra superiore. 6.1 Sostituzione della lampadina ATTENZIONE Estrarre la spina dalla presa...
Page 58 - RUMORI
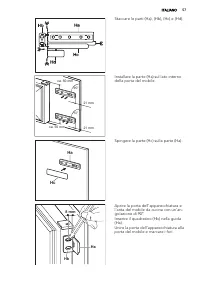
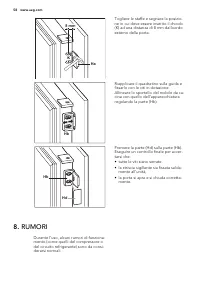
Ha K 8 mm Togliere le staffe e segnare la posizio-ne in cui deve essere inserito il chiodo(K) ad una distanza di 8 mm dal bordoesterno della porta. Hb Riapplicare il quadratino sulla guida efissarlo con le viti in dotazione.Allineare lo sportello del mobile da cu-cina con quello dell'apparecchiatura...
Page 60 - DATI TECNICI; CONSIDERAZIONI AMBIENTALI
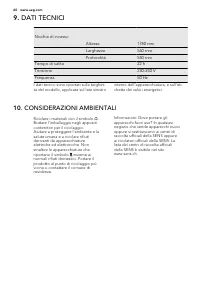
9. DATI TECNICI Nicchia di incasso Altezza 1780 mm Larghezza 560 mm Profondità 550 mm Tempo di salita 22 h Tensione 230-240 V Frequenza 50 Hz I dati tecnici sono riportati sulla targhet-ta del modello, applicata sul lato sinistro interno dell'apparecchiatura, e sull'eti-chetta dei valori energetici....
Page 61 - CUSTOMER CARE AND SERVICE
CONTENTS 1. SAFETY INSTRUCTIONS . . . . . . . . . . . . . . . . . . . . . . . . . . . . . . . . . . . . . . . . . . . . . . . . . . . . . 62 2. OPERATION . . . . . . . . . . . . . . . . . . . . . . . . . . . . . . . . . . . . . . . . . . . . . . . . . . . . . . . . . . . . . . . 64 3. DAILY USE . . ...
Page 62 - SAFETY INSTRUCTIONS; Children and vulnerable
1. SAFETY INSTRUCTIONS In the interest of your safety and to en-sure the correct use, before installingand first using the appliance, read thisuser manual carefully, including its hintsand warnings. To avoid unnecessary mis-takes and accidents, it is important toensure that all people using the appl...
Page 64 - OPERATION; Switching on
• The appliance must not be located close to radiators or cookers. • Make sure that the mains plug is ac- cessible after the installation of the ap-pliance. • Connect to potable water supply only (If a water connection is foreseen). 1.6 Service • Any electrical work required to do the servicing of t...
Page 65 - DAILY USE; Cleaning the interior
3. DAILY USE 3.1 Cleaning the interior Before using the appliance for the firsttime, wash the interior and all internalaccessories with lukewarm water andsome neutral soap so as to remove thetypical smell of a brand-new product,then dry thoroughly. Do not use detergents or abra-sive powders, as thes...
Page 66 - HELPFUL HINTS AND TIPS
3.7 Positioning the door shelves To permit storage of food packages ofvarious sizes, the door shelves can beplaced at different heights. 3.8 Positioning the sliding box The sliding box can be placed at differ-ent heights.Do make these adjustments proceed asfollow: 1. lift the shelf with the sliding ...
Page 67 - CARE AND CLEANING; Periodic cleaning
4.4 Hints for freezing To help you make the most of the freez-ing process, here are some importanthints:• the maximum quantity of food which can be frozen in 24 hrs. is shown onthe rating plate; • the freezing process takes 24 hours. No further food to be frozen shouldbe added during this period; • ...
Page 68 - Periods of non-operation
that the outer casing of this appliance isonly cleaned with warm water with a littlewashing-up liquid added. After cleaning, reconnect the equipmentto the mains supply. 5.2 Defrosting the refrigerator Frost is automatically eliminated fromthe evaporator of the refrigerator com-partment every time th...
Page 69 - WHAT TO DO IF...; Problem
6. WHAT TO DO IF… WARNING! Before troubleshooting, discon-nect the mains plug from themains socket.Only a qualified electrician orcompetent person must do thetroubleshooting that is not in thismanual. There are some sounds duringnormal use (compressor, refriger-ant circulation). Problem Possible cau...
Page 70 - Replacing the lamp; Closing the door
Problem Possible cause Solution Products prevent that wa-ter flows into the watercollector. Make sure that productsdo not touch the rearplate. Water flows on theground. The melting water outletdoes not flow in the evap-orative tray above thecompressor. Attach the melting wateroutlet to the evaporati...
Page 71 - Positioning; Ambient temperature; Electrical connection
7. INSTALLATION WARNING! Read the "Safety Information"carefully for your safety and cor-rect operation of the appliancebefore installing the appliance. 7.1 Positioning Install this appliance at a location wherethe ambient temperature corresponds tothe climate class indicated on the ratingpla...
Page 76 - NOISES
Ha K 8 mm Remove the brackets and mark a dis-tance of 8 mm from the outer edge ofthe door where the nail must be fitted(K). Hb Place the small square on the guideagain and fix it with the screws sup-plied.Align the kitchen furniture door andthe appliance door by adjusting thepart (Hb). Hb Hd Press t...
Page 78 - TECHNICAL DATA; Service Centres; Servicestellen
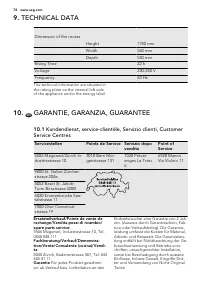
9. TECHNICAL DATA Dimension of the recess Height 1780 mm Width 560 mm Depth 550 mm Rising Time 22 h Voltage 230-240 V Frequency 50 Hz The technical information are situated inthe rating plate on the internal left sideof the appliance and in the energy label. 10. CH GARANTIE, GARANZIA, GUARANTEE 10.1...
Page 79 - ENVIRONMENT CONCERNS
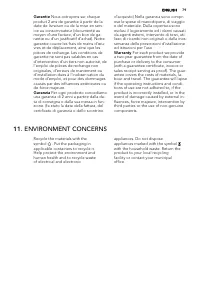
Garantie Nous octroyons sur chaque produit 2 ans de garantie à partir de ladate de livraison ou de la mise en serv-ice au consommateur (documenté aumoyen d’une facture, d’un bon de ga-rantie ou d’un justificatif d’achat). Notregarantie couvre les frais de mains d’œu-vres et de déplacement, ainsi que...


 AEG AREH30LF
User Manual
AEG AREH30LF
User Manual
 AEG AREI20XLF
User Manual
AEG AREI20XLF
User Manual
 AEG FFB72746PM
User Manual
AEG FFB72746PM
User Manual
 AEG PS254DB
User Manual
AEG PS254DB
User Manual
 AEG NIK85M00AZ
User Manual
AEG NIK85M00AZ
User Manual
 AEG DGE5662HB
User Manual
AEG DGE5662HB
User Manual
 AEG DGE5962HB
User Manual
AEG DGE5962HB
User Manual
 AEG HVB95450IB
User Manual
AEG HVB95450IB
User Manual
 AEG PL700
User Manual
AEG PL700
User Manual
 AEG W14120
User Manual
AEG W14120
User Manual
 AEG DC240
User Manual
AEG DC240
User Manual
 AEG T738A4OBC
User Manual
AEG T738A4OBC
User Manual
 AEG T858M6OBC
User Manual
AEG T858M6OBC
User Manual
 AEG T859M6OBC
User Manual
AEG T859M6OBC
User Manual
 AEG T959M6ORS
User Manual
AEG T959M6ORS
User Manual
 AEG IKE95771FB
User Manual
AEG IKE95771FB
User Manual
 AEG AREI9XLF
User Manual
AEG AREI9XLF
User Manual
 AEG A18SPC3
User Manual
AEG A18SPC3
User Manual
 AEG LF7384O4C
User Manual
AEG LF7384O4C
User Manual