Page 2 - KUNDENDIENST UND -BETREUUNG
INHALT 1. SICHERHEITSHINWEISE . . . . . . . . . . . . . . . . . . . . . . . . . . . . . . . . . . . . . . . . . . . . . . . . . . . . . . 3 2. GERÄTEBESCHREIBUNG . . . . . . . . . . . . . . . . . . . . . . . . . . . . . . . . . . . . . . . . . . . . . . . . . . . . . 6 3. BEDIENFELD . . . . . . . . ...
Page 3 - SICHERHEITSHINWEISE; Sicherheit von Kindern und
1. SICHERHEITSHINWEISE Lesen Sie zu Ihrer Sicherheit und für eineoptimale Nutzung des Geräts vor derMontage und dem ersten Gebrauch dasvorliegende Benutzerhandbuch ein-schließlich der Ratschläge und Warnun-gen aufmerksam durch. Es ist wichtig,dass zur Vermeidung von Fehlern undUnfällen alle Personen...
Page 6 - Display; Einschalten des Geräts
2. GERÄTEBESCHREIBUNG 2 3 4 5 6 7 8 10 9 1 1 Ablagen 2 Bedienfeld 3 Gefrierfach 4 Innenbeleuchtung 5 Butter- und Käsefach mit Deckel 6 Türablage 7 Variables Lagerfach 8 Flaschenhalter 9 Obst- und Gemüsefach 10 Typenschild (an der Innenseite) 3. BEDIENFELD 1 2 3 4 5 6 1 ON/OFF -Taste 2 Mode-Taste 3 O...
Page 7 - Ausschalten; Temperaturregelung; Funktion Kindersicherung
1. Stecken Sie den Netzstecker in dieNetzsteckdose. 2. Drücken Sie die Taste ON/OFF,wenn das Display ausgeschaltet ist. 3. Wenn auf dem Display „dEMo“ an-gezeigt wird, befindet sich das Gerätim Demo-Modus. Weitere Informati-onen finden Sie im Abschnitt „Wastun, wenn...“. 4. Die Temperaturanzeigen ze...
Page 8 - Funktion COOLMATIC; Alarm „Tür offen“; ERSTE INBETRIEBNAHME; Reinigung des Innenraums
3. Die Anzeige „Kindersicherung“ er-lischt. 3.7 Funktion COOLMATIC Wenn Sie zum Beispiel nach einem Ein-kauf größere Mengen warmer Lebens-mittel einlegen möchten, empfehlen wirdie Aktivierung der Funktion COOLMA-TIC, um die Produkte schneller zu kühlenund zu vermeiden, dass die bereits imKühlschrank...
Page 9 - TÄGLICHER GEBRAUCH
5. TÄGLICHER GEBRAUCH 5.1 Einfrieren frischer Lebensmittel Das Gefrierfach eignet sich zum Einfrie-ren von frischen Lebensmitteln und zumLagern von gefrorenen und tiefgefrore-nen Lebensmitteln für einen längerenZeitraum.Für das Einfrieren frischer Lebensmittelist eine Änderung der mittleren Einstel-...
Page 10 - PRAKTISCHE TIPPS UND HINWEISE
5.5 Positionierung der Türeinsätze Die Türablagen können in unterschiedli-cher Höhe positioniert werden, wodurchdas Lagern verschieden großer Lebens-mittelpackungen ermöglicht wird.Gehen Sie dazu wie folgt vor:Ziehen Sie die Ablage langsam in Pfeil-richtung, bis sie sich herausheben lässt,und setzen...
Page 12 - REINIGUNG UND PFLEGE; Regelmäßige Reinigung; Abtauen des Kühlschranks
7. REINIGUNG UND PFLEGE VORSICHT! Ziehen Sie bitte vor jeder Reini-gungsarbeit immer den Netzste-cker aus der Steckdose. Der Kältekreis des Gerätes ent-hält Kohlenwasserstoffe; War-tungsarbeiten und Nachfüllenvon Kältemittel dürfen daher nurdurch vom Hersteller autorisier-tes Fachpersonal ausgeführt...
Page 13 - Stillstandzeiten; Problem
5. Schalten Sie das Gerät ein. 6. Drehen Sie den Temperaturreglerauf eine höhere Einstellung, um diemaximal mögliche Kühlung zu errei-chen, und lassen Sie das Gerät zweibis drei Stunden mit dieser Einstel-lung laufen. 7. Legen Sie die ausgelagerten Le-bensmittel wieder in das Fach hi-nein. Verwenden...
Page 15 - Warnanzeige
Problem Mögliche Ursache Abhilfe Die Temperatur der Le-bensmittel ist zu hoch. Lassen Sie die Lebensmit-tel auf Raumtemperaturabkühlen, bevor Sie sie indas Gerät legen. Es wurden zu viele Le-bensmittel auf einmal ein-gelegt. Legen Sie weniger Lebens-mittel auf einmal ein. Die Temperatur imKühlschran...
Page 16 - Austauschen der Lampe; Schließen der Tür; MONTAGE; Aufstellung; Umgebungstemperatur; Elektrischer Anschluss
8.2 Austauschen der Lampe 1 2 1. Schalten Sie das Gerät aus. 2. Drücken Sie das bewegliche Teil, umdie Lampenabdeckung auszuhängen(1). 3. Nehmen Sie die Lampenabdeckungab (2). 4. Ersetzen Sie die Lampe durch eine mitder gleichen Leistung, die für Haus-haltsgeräte geeignet sein muss. 5. Bringen Sie d...
Page 17 - GERÄUSCH; BRRR; SSSRR; OK
durch Missachtung der oben genanntenSicherheitshinweise entstehen. Das Gerät entspricht den EU- Richtlinien. 10. GERÄUSCH Während das Gerät in Betrieb ist, entste-hen bestimmte Geräusche (Kompressorund Kühlkreislauf). BRRR ! HISSS! CLICK! BLUBB! CRACK! SSSRR R! OK CLICK! CLICK! SSSRRR! SSSRRR! BRRR!...
Page 18 - TECHNISCHE DATEN; UMWELTTIPPS
BLUBB! BLUBB! CRACK! CRACK! 11. TECHNISCHE DATEN Abmessungen der Ein-baunische Höhe 880 mm Breite 560 mm Tiefe 550 mm Spannung 230 V Frequenz 50 Hz Die technischen Daten befinden sich aufdem Typenschild innen links im Gerätsowie auf der Energieplakette. 12. UMWELTTIPPS Recyceln Sie Materialien mit d...
Page 20 - INSTRUCTIONS DE SÉCURITÉ; Sécurité des enfants et
1. INSTRUCTIONS DE SÉCURITÉ Pour votre sécurité et garantir une utili-sation correcte de l'appareil, lisez atten-tivement cette notice, y compris les con-seils et avertissements, avant d'installeret d'utiliser l'appareil pour la premièrefois. Pour éviter toute erreur ou accident,veillez à ce que tou...
Page 21 - Utilisation quotidienne
Si le circuit frigorifique est endomma-gé :– évitez les flammes vives et toute au- tre source d'allumage – aérez soigneusement la pièce où se trouve l'appareil • Ne modifiez pas les spécifications de l'appareil. Si le câble d'alimentationest endommagé, il peut causer uncourt circuit, un incendie et/...
Page 23 - Affichage; Mise en fonctionnement
2. DESCRIPTION DE L'APPAREIL 2 3 4 5 6 7 8 10 9 1 1 Clayettes 2 Bandeau de commande 3 Compartiment congélateur 4 Éclairage intérieur 5 Compartiment beurre et fromagesavec couvercle 6 Balconnet de porte 7 Bac de rangement variable 8 Compartiment à bouteilles 9 Bac à fruits et légumes 10 Plaque signal...
Page 25 - PREMIÈRE UTILISATION; Nettoyage intérieur
1. Appuyez sur la touche Mode jusqu'àce que le voyant Sécurité enfants cli-gnote. 2. Appuyez sur la touche OK pour con-firmation. 3. Le voyant Sécurité enfants s'éteint. 3.7 Fonction COOLMATIC Si vous devez ranger une grande quanti-té d'aliments dans votre réfrigérateur,par exemple après avoir fait ...
Page 26 - UTILISATION QUOTIDIENNE
N'utilisez pas de produits abra-sifs, poudre à récurer, épongemétallique pour ne pas abîmer lafinition. 5. UTILISATION QUOTIDIENNE 5.1 Congélation d'aliments frais Le compartiment congélateur est idéalpour congeler des denrées fraîches etconserver les aliments surgelés ou con-gelés pendant longtemps...
Page 27 - Emplacement des balconnets de la porte; CONSEILS UTILES; Bruits de fonctionnement
5.5 Emplacement des balconnets de la porte Selon la taille des emballages des ali-ments conservés, les balconnets de laporte peuvent être positionnés à diffé-rentes hauteurs.Pour les ajuster, procédez comme suit :tirez progressivement le balconnet dansle sens des flèches pour le dégager, puisreposit...
Page 29 - ENTRETIEN ET NETTOYAGE; Nettoyage périodique; Dégivrage du réfrigérateur
7. ENTRETIEN ET NETTOYAGE ATTENTION débrancher l'appareil avant touteopération d'entretien. Cet appareil contient des hydro-carbures dans son circuit réfrigé-rant : l'entretien et la recharge nedoivent donc être effectués quepar du personnel autorisé. 7.1 Nettoyage périodique Cet appareil doit être ...
Page 30 - EN CAS D'ANOMALIE DE FONCTIONNEMENT; Problème
5. Mettez l'appareil en fonctionne-ment. 6. Réglez le thermostat pour obtenirplus de froid et faites fonctionnerl'appareil pendant deux ou troisheures en utilisant ce réglage. 7. Replacez les produits surgelés oucongelés dans le compartiment. N'utilisez en aucun cas de cou-teau ou tout autre objet t...
Page 32 - Signal d'avertissement
Problème Cause probable Solution La température àl'intérieur de l'appa-reil est trop élevée. Le thermostat n'est pascorrectement réglé. Modifiez le dispositif deréglage de températurepour obtenir une tempéra-ture pour obtenir plus detrop. La porte n'est pas correc-tement fermée. Reportez-vous au cha...
Page 33 - Remplacement de l'ampoule; INSTALLATION; Emplacement; Température ambiante; Branchement électrique
Une erreur de fonctionnement de l'ap-pareil s'est produite. Dans le cas où lesystème électronique de l'appareil nepeut pas identifier la températureréelle, un signal apparaît sur l'afficha-ge de température. • L'appareil continuera de fonctionner avec l'aide d'un programme de se-cours jusqu'à ce que...
Page 34 - BRUITS
de terre conformément aux normes envigueur, en demandant conseil à unélectricien qualifié.Le fabricant décline toute responsabilitéen cas d'incident suite au non-respect des consignes de sécurité sus-mention-nées.Cet appareil est conforme aux directivescommunautaires. 10. BRUITS L'appareil émet cert...
Page 35 - CARACTÉRISTIQUES TECHNIQUES; EN MATIÈRE DE PROTECTION DE L'ENVIRONNEMENT
BLUBB! BLUBB! CRACK! CRACK! 11. CARACTÉRISTIQUES TECHNIQUES Dimensions de la niched'encastrement Hauteur 880 mm Largeur 560 mm Profondeur 550 mm Tension 230 V Fréquence 50 Hz Les caractéristiques techniques figurentsur la plaque signalétique située sur le côté gauche à l'intérieur de l'appareil etsu...
Page 36 - SERVIZIO CLIENTI E MANUTENZIONE
INDICE 1. ISTRUZIONI DI SICUREZZA . . . . . . . . . . . . . . . . . . . . . . . . . . . . . . . . . . . . . . . . . . . . . . . . . . . 37 2. DESCRIZIONE DEL PRODOTTO . . . . . . . . . . . . . . . . . . . . . . . . . . . . . . . . . . . . . . . . . . . . . . 39 3. PANNELLO DEI COMANDI . . . . . . . ...
Page 37 - ISTRUZIONI DI SICUREZZA; Sicurezza dei bambini e
1. ISTRUZIONI DI SICUREZZA Per garantire un impiego corretto e sicu-ro dell'apparecchio, prima dell'installa-zione e del primo utilizzo leggere con at-tenzione il libretto istruzioni, inclusi isuggerimenti e le avvertenze. Per evitareerrori e incidenti, è importante garantireche tutte le persone che...
Page 39 - DESCRIZIONE DEL PRODOTTO
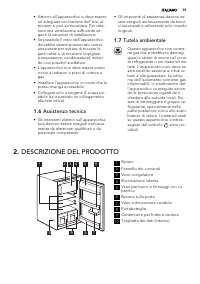
• Attorno all'apparecchio vi deve essere un'adeguata circolazione dell'aria, al-trimenti si può surriscaldare. Per otte-nere una ventilazione sufficiente se-guire le istruzioni di installazione. • Se possibile il retro dell'apparecchio dovrebbe essere posizionato controuna parete per evitare di tocc...
Page 40 - PANNELLO DEI COMANDI
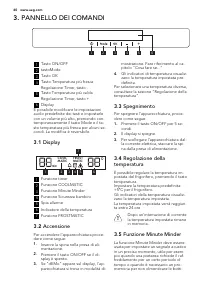
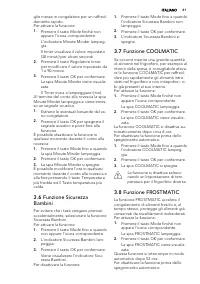
3. PANNELLO DEI COMANDI 1 2 3 4 5 6 1 Tasto ON/OFF 2 tastoMode 3 Tasto OK 4 Tasto Temperatura più frescaRegolazione Timer, tasto - 5 Tasto Temperatura più caldaRegolazione Timer, tasto + 6 Display È possibile modificare le impostazioniaudio predefinite dei tasti e impostarlecon un volume più alto, p...
Page 42 - PRIMO UTILIZZO
1. Premere il tasto Mode fino a quandola spia FROSTMATIC lampeggia. 2. Premere il tasto OK per confermare. 3. L'indicatore FROSTMATIC si spe-gne. La funzione si disattiva selezio-nando un'impostazione di tem-peratura per il congelatore diver-sa. 3.9 Allarme porta aperta Se la porta è lasciata aperta...
Page 43 - CONSIGLI E SUGGERIMENTI UTILI; Rumori normali durante il
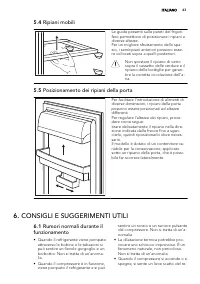
5.4 Ripiani mobili Le guide presenti sulle pareti del frigori-fero permettono di posizionare i ripiani adiverse altezze.Per un migliore sfruttamento dello spa-zio, i semiripiani anteriori possono esse-re collocati sopra a quelli posteriori. Non spostare il ripiano di vetrosopra il cassetto delle ver...
Page 45 - PULIZIA E CURA; Pulizia periodica
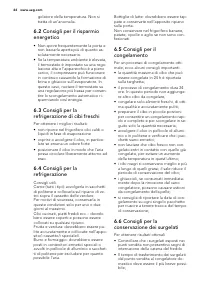
• Non aprire frequentemente la porta e limitare il più possibile i tempi di aper-tura; • Una volta scongelati, gli alimenti si de- teriorano rapidamente e non possonoessere ricongelati; • Non superare la durata di conservazio- ne indicata sulla confezione. 7. PULIZIA E CURA ATTENZIONE Staccare la sp...
Page 46 - Periodi di inutilizzo; COSA FARE SE...; Problema
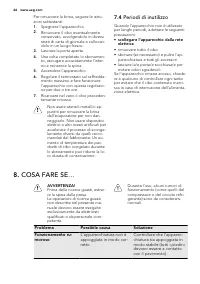
Per rimuovere la brina, seguire le istru-zioni sottostanti: 1. Spegnere l'apparecchio. 2. Rimuovere il cibo eventualmenteconservato, avvolgendolo in diversistrati di carta di giornale e collocan-dolo in un luogo fresco. 3. Lasciare la porta aperta. 4. Una volta completato lo sbrinamen-to, asciugare ...
Page 48 - Segnale di allarme
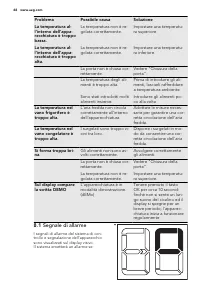
Problema Possibile causa Soluzione La temperatura al-l'interno dell'appa-recchiatura è troppobassa. La temperatura non è re-golata correttamente. Impostare una temperatu-ra superiore. La temperatura al-l'interno dell'appa-recchiatura è troppoalta. La temperatura non è re-golata correttamente. Impost...
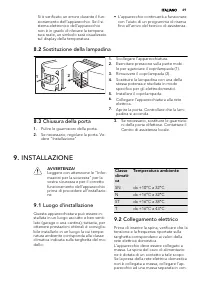
Page 49 - Sostituzione della lampadina; Chiusura della porta; INSTALLAZIONE; Luogo d'installazione; Temperatura ambiente; Collegamento elettrico
Si è verificato un errore durante il fun-zionamento dell'apparecchio. Se il si-stema elettronico dell'apparecchionon è in grado di rilevare la tempera-tura reale, un simbolo sarà visualizzatosul display della temperatura. • L'apparecchio continuerà a funzionare con l'aiuto di un programma di riserva...
Page 50 - RUMOROSITÀ
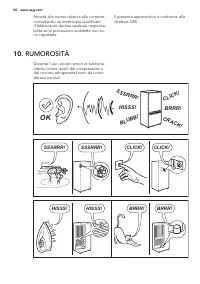
formità alle norme relative alla corrente,consultando un elettricista qualificato.Il fabbricante declina qualsiasi responsa-bilità se le precauzioni suddette non so-no rispettate. Il presente apparecchio è conforme alledirettive CEE. 10. RUMOROSITÀ Durante l'uso, alcuni rumori di funziona-mento (com...
Page 51 - DATI TECNICI; CONSIDERAZIONI AMBIENTALI
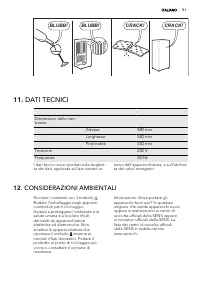
BLUBB! BLUBB! CRACK! CRACK! 11. DATI TECNICI Dimensioni della rien-tranza Altezza 880 mm Larghezza 560 mm Profondità 550 mm Tensione 230 V Frequenza 50 Hz I dati tecnici sono riportati sulla targhet-ta dei dati, applicata sul lato sinistro in- terno dell'apparecchiatura, e sull'etichet-ta dei valori...
Page 52 - CUSTOMER CARE AND SERVICE
CONTENTS 1. SAFETY INSTRUCTIONS . . . . . . . . . . . . . . . . . . . . . . . . . . . . . . . . . . . . . . . . . . . . . . . . . . . . . 53 2. PRODUCT DESCRIPTION . . . . . . . . . . . . . . . . . . . . . . . . . . . . . . . . . . . . . . . . . . . . . . . . . . . . 55 3. CONTROL PANEL . . . . . . ...
Page 53 - SAFETY INSTRUCTIONS; Children and vulnerable
1. SAFETY INSTRUCTIONS In the interest of your safety and to en-sure the correct use, before installingand first using the appliance, read thisuser manual carefully, including its hintsand warnings. To avoid unnecessary mis-takes and accidents, it is important toensure that all people using the appl...
Page 55 - PRODUCT DESCRIPTION
• The appliance must not be located close to radiators or cookers. • Make sure that the mains plug is ac- cessible after the installation of the ap-pliance. • Connect to potable water supply only (If a water connection is foreseen). 1.6 Service • Any electrical work required to do the servicing of t...
Page 56 - CONTROL PANEL; Switching on
3. CONTROL PANEL 1 2 3 4 5 6 1 ON/OFF button 2 Mode button 3 OK button 4 Temperature colder buttonTimer regulator, - button 5 Temperature warmer buttonTimer regulator, + button 6 Display It is possible to change predefinedsound of buttons to a loudly one bypressing together Mode button andTemperatur...
Page 58 - FIRST USE; Cleaning the interior; DAILY USE; Freezing fresh food
When normal conditions are restored(door closed), the alarm will stop.During the alarm, the buzzer can beswitched off by pressing any button. The lamp will turn off after 7 mi-nutes with door open. 4. FIRST USE 4.1 Cleaning the interior Before using the appliance for the firsttime, wash the interior...
Page 59 - HELPFUL HINTS AND TIPS; Normal Operating Sounds
5.4 Movable shelves The walls of the refrigerator are equip-ped with a series of runners so that theshelves can be positioned as desired.For better use of space, the front half-shelves can lie over the rear ones. Do not move the glass shelfabove the vegetable drawer andthe bottle shelf to ensure cor...
Page 61 - CARE AND CLEANING; Periodic cleaning; Defrosting of the
7. CARE AND CLEANING CAUTION! Unplug the appliance before car-rying out any maintenance oper-ation. This appliance contains hydrocar-bons in its cooling unit; mainte-nance and recharging musttherefore only be carried out byauthorized technicians. 7.1 Periodic cleaning The equipment has to be cleaned...
Page 62 - Periods of non-operation; WHAT TO DO IF...
the appliance for two or three hoursusing this setting. 7. Reload the previously removed foodinto the compartment. Never use sharp metal tools toscrape off frost from the evapo-rator as you could damage it. Donot use a mechanical device orany artificial means to speed upthe thawing process other tha...
Page 64 - Warning signal
Problem Possible cause Solution The temperature inthe refrigerator istoo high. There is no cold air circu-lation in the appliance. Make sure that there iscold air circulation in theappliance. The temperature inthe freezer is toohigh. Products are too near toeach other. Store products so thatthere is...
Page 65 - Replacing the lamp; Closing the door; Positioning; Ambient temperature; Electrical connection
8.2 Replacing the lamp 1 2 1. Disconnect the appliance. 2. Push the movable part to unhook thelamp cover (1). 3. Remove the lamp cover (2). 4. Replace the lamp with one of thesame power and specifically designedfor domestic appliances only. 5. Install the lamp cover. 6. Connect the appliance. 7. Ope...
Page 66 - NOISE
10. NOISE There are some sounds during normalrunning (compressor, refrigerant circula-tion). BRRR ! HISSS! CLICK! BLUBB! CRACK! SSSRR R! OK CLICK! CLICK! SSSRRR! SSSRRR! BRRR! BRRR! HISSS! HISSS! 66 www.aeg.com
Page 67 - TECHNICAL DATA; ENVIRONMENT CONCERNS
BLUBB! BLUBB! CRACK! CRACK! 11. TECHNICAL DATA Dimension of the recess Height 880 mm Width 560 mm Depth 550 mm Voltage 230 V Frequency 50 Hz The technical information are situated inthe rating plate on the internal left sideof the appliance and in the energy label. 12. ENVIRONMENT CONCERNS Recycle t...


 AEG AREH30LF
User Manual
AEG AREH30LF
User Manual
 AEG AREI20XLF
User Manual
AEG AREI20XLF
User Manual
 AEG FFB72746PM
User Manual
AEG FFB72746PM
User Manual
 AEG PS254DB
User Manual
AEG PS254DB
User Manual
 AEG NIK85M00AZ
User Manual
AEG NIK85M00AZ
User Manual
 AEG DGE5662HB
User Manual
AEG DGE5662HB
User Manual
 AEG DGE5962HB
User Manual
AEG DGE5962HB
User Manual
 AEG HVB95450IB
User Manual
AEG HVB95450IB
User Manual
 AEG PL700
User Manual
AEG PL700
User Manual
 AEG W14120
User Manual
AEG W14120
User Manual
 AEG DC240
User Manual
AEG DC240
User Manual
 AEG T738A4OBC
User Manual
AEG T738A4OBC
User Manual
 AEG T858M6OBC
User Manual
AEG T858M6OBC
User Manual
 AEG T859M6OBC
User Manual
AEG T859M6OBC
User Manual
 AEG T959M6ORS
User Manual
AEG T959M6ORS
User Manual
 AEG IKE95771FB
User Manual
AEG IKE95771FB
User Manual
 AEG AREI9XLF
User Manual
AEG AREI9XLF
User Manual
 AEG A18SPC3
User Manual
AEG A18SPC3
User Manual
 AEG LF7384O4C
User Manual
AEG LF7384O4C
User Manual