Page 2 - KUNDENDIENST UND -BETREUUNG
INHALT 1. SICHERHEITSHINWEISE . . . . . . . . . . . . . . . . . . . . . . . . . . . . . . . . . . . . . . . . . . . . . . . . . . . . . . 3 2. BEDIENFELD . . . . . . . . . . . . . . . . . . . . . . . . . . . . . . . . . . . . . . . . . . . . . . . . . . . . . . . . . . . . . . . 5 3. ERSTE INBETRIEB...
Page 3 - SICHERHEITSHINWEISE; Sicherheit von Kindern und
1. SICHERHEITSHINWEISE Lesen Sie zu Ihrer Sicherheit und für dieoptimale Geräteanwendung vor der In-stallation und dem Gebrauch des Gerä-tes die vorliegende Benutzerinformationaufmerksam durch, einschließlich derRatschläge und Warnungen. Es ist wich-tig, dass zur Vermeidung von Fehlernund Unfällen a...
Page 5 - BEDIENFELD; Display
densator) möglichst mit der Rückseitegegen eine Wand aufgestellt werden. • Das Gerät darf nicht in der Nähe von Heizkörpern oder Kochern installiertwerden. • Vergewissern Sie sich, dass der Netz- stecker des Gerätes nach der Installati-on frei zugänglich ist. • Wenn ein Wasseranschluss vorgese- hen ...
Page 6 - Temperaturregelung; Funktion Minute Minder
2.2 Einschalten des Geräts Gehen Sie wie folgt vor, um das Geräteinzuschalten: 1. Stecken Sie den Netzstecker in dieNetzsteckdose. 2. Drücken Sie die Taste ON/OFF,wenn das Display ausgeschaltet ist. 3. Nach ein paar Sekunden ertöntmöglicherweise ein akustischesAlarmsignal.Wie Sie den Alarm ausschalt...
Page 7 - ERSTE INBETRIEBNAHME; Reinigen des Innenraums
2. Schalten Sie den Alarmton und dieFunktion mit der Taste OK aus. Diese Funktion kann während desCountdowns jederzeit ausgeschaltetwerden: 1. Drücken Sie die Taste Mode bis dieAnzeige Minute Minder blinkt. 2. Drücken Sie zur Bestätigung die Tas-te OK. 3. Die Anzeige Minute Minder erlischt. Die Zeit...
Page 8 - TÄGLICHER GEBRAUCH; Einfrieren frischer Lebensmittel; Lagerung gefrorener
4. TÄGLICHER GEBRAUCH 4.1 Einfrieren frischer Lebensmittel Der Gefrierraum eignet sich zum Einfrie-ren von frischen Lebensmitteln und zumlängerfristigen Lagern von bereits gefro-renen und tiefgefrorenen Lebensmitteln.Um frische Lebensmittel einzufrieren,schalten Sie die FROSTMATIC-Funktionmindestens...
Page 9 - HILFREICHE HINWEISE UND TIPPS; Hinweise zum Einfrieren; REINIGUNG UND PFLEGE; Regelmäßige Reinigung
5. HILFREICHE HINWEISE UND TIPPS 5.1 Hinweise zum Einfrieren Im Folgenden finden Sie einige wertvol-le Tipps für einen optimalen Gefriervor-gang:• die maximale Menge an Lebensmit- teln, die innerhalb von 24 Stunden ein-gefroren werden kann. ist auf demTypschild angegeben; • der Gefriervorgang dauert...
Page 10 - Abtauen des
• Spülen und trocknen Sie diese sorgfäl- tig ab. Ziehen Sie nicht an Leitungenund/oder Kabeln im Innern desKühlschranks und achten Sie da-rauf, diese nicht zu verschiebenoder zu beschädigen.Benutzen Sie zur Reinigung desInnenraums keinesfalls Putzmit-tel, Scheuerpulver, stark parfü-mierte Reinigungs...
Page 12 - Stillstandzeiten; Problem
6.3 Stillstandzeiten Bei längerem Stillstand des Gerätesmüssen Sie folgendermaßen vorgehen:• trennen Sie das Gerät von der Netz-versorgung • entnehmen Sie alle Lebensmittel• Tauen Sie das Gerät ab (sofern vorge- sehen). Reinigen Sie den Innenraumund das gesamte Zubehör. • lassen Sie die Türen offen/...
Page 14 - Schließen der Tür; MONTAGE
Problem Mögliche Ursache Abhilfe Das Display zeigtdEMoan. Das Gerät befindet sichim Demo-Modus (dEMo). Halten Sie die OK-Tasteca. 10 Sekunden gedrückt,bis ein langer Signalton er-tönt und das Display für ei-ne kurze Zeit ausgeschaltetwird. Das Gerät arbeitetwieder normal. 7.1 Schließen der Tür 1. Re...
Page 15 - Umgebungstemperatur; Elektrischer Anschluss
8.1 Standort 10mm 10mm 100mm Das Gerät sollte in ausreichendem Ab-stand von Wärmequellen wie Heizungen,Boilern, direkter Sonneneinstrahlung etc.aufgestellt werden. Vergewissern Siesich, dass Luft an der Rückseite des Geh-äuses frei zirkulieren kann. Um einwand-freien Betrieb sicherzustellen, sollte ...
Page 18 - GERÄUSCHE; BRRR; SSSRR; OK
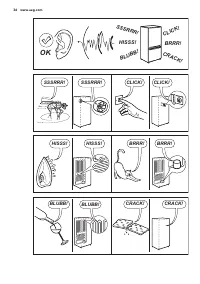
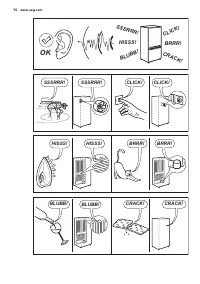
ab, bis sich die Dichtung allmählich an-passt. 9. GERÄUSCHE Während das Gerät in Betrieb ist, entste-hen bestimmte Geräusche (Kompressorund Kühlkreislauf). BRRR ! HISSS! CLICK! BLUBB! CRACK! SSSRR R! OK CLICK! CLICK! SSSRRR! SSSRRR! BRRR! BRRR! HISSS! HISSS! 18 www.aeg.com
Page 19 - TECHNISCHE DATEN; UMWELTTIPPS
BLUBB! BLUBB! CRACK! CRACK! 10. TECHNISCHE DATEN Abmessung der Ausspa-rung Höhe 1600 mm Breite 600 mm Tiefe 630 mm Ausfalldauer 35 h Spannung 230-240 V Frequenz 50 Hz Die technischen Informationen befindensich auf dem Typenschild innen links imGerät sowie auf der Energieplakette. 11. UMWELTTIPPS Rec...
Page 21 - CONSIGNES DE SÉCURITÉ; Sécurité des enfants et
1. CONSIGNES DE SÉCURITÉ Pour votre sécurité et garantir une utili-sation correcte de l'appareil, lisez atten-tivement cette notice, y compris les con-seils et avertissements, avant d'installeret d'utiliser l'appareil pour la premièrefois. Pour éviter toute erreur ou accident,veillez à ce que toute ...
Page 22 - Utilisation quotidienne
AVERTISSEMENT Les éventuelles réparations ouinterventions sur votre appareil,ainsi que le remplacement du câ-ble d'alimentation, ne doiventêtre effectuées que par un pro-fessionnel qualifié. 1. Ne branchez pas le cordon d'ali-mentation à une rallonge. 2. Assurez-vous que la prise n'estpas écrasée ou...
Page 23 - BANDEAU DE COMMANDE; Afficheur
• Placez l'appareil dos au mur pour évi- ter tout contact avec le compresseuret le condenseur (risque de brûlure). • Placez de préférence votre appareil loin d'une source de chaleur (chauffa-ge, cuisson ou rayons solaires trop in-tenses). • Assurez-vous que la prise murale reste accessible après l'i...
Page 24 - Fonction FROSTMATIC; Fonction Minute Minder
2.2 Mise en fonctionnement Pour mettre en fonctionnement l'appa-reil, procédez comme suit : 1. Branchez électriquement l'appareil. 2. Appuyez sur la touche ON/OFF sil'affichage est éteint. 3. L'alarme sonore peut se déclencherau bout de quelques secondes.Pour réinitialiser l'alarme, reportez-vous au...
Page 25 - Fonction Sécurité enfants; Alarme haute température; Alarme porte ouverte; PREMIÈRE UTILISATION
2. Appuyez sur la touche OK pour arrê-ter le signal sonore et désactiver lafonction. Il est possible de désactiver cette fonc-tion à tout moment pendant le décomp-te : 1. Appuyez sur la touche Mode jusqu'àce que le voyant Minute Minder cli-gnote. 2. Appuyez sur la touche OK pour con-firmer. 3. Le vo...
Page 26 - UTILISATION QUOTIDIENNE; Congélation d'aliments frais; Conservation des aliments
4. UTILISATION QUOTIDIENNE 4.1 Congélation d'aliments frais Le compartiment congélateur est idéalpour congeler des aliments frais et con-server longtemps des aliments congelésou surgelés.Activez la fonction FROSTMATIC aumoins 24 heures avant d'introduire desaliments frais à congeler dans le compar-t...
Page 27 - CONSEILS; Conseils pour la; ENTRETIEN ET NETTOYAGE; Nettoyage périodique
5. CONSEILS 5.1 Conseils pour la congélation Pour obtenir les meilleurs résultats, voiciquelques conseils importants :• la quantité maximale de denrées que vous pouvez congeler par 24 heuresest indiquée sur la plaque signaléti-que. • le temps de congélation est de 24 heures. Aucune autre denrée à co...
Page 28 - Dégivrage du congélateur
Ne pas tirer, déplacer ou endom-mager les tuyaux et/ou câblesqui se trouvent à l'intérieur del'appareil.Ne JAMAIS utiliser de produitsabrasifs ou caustiques ni d'épon-ges avec grattoir pour nettoyerl'intérieur de façon à ne pas l'abî-mer et laisser de fortes odeurs. Nettoyer le condenseur (grille no...
Page 30 - EN CAS D'ANOMALIE DE FONCTIONNEMENT; Anomalie
6.3 En cas d'absence prolongée ou de non-utilisation Prenez les précautions suivantes :• débranchez l'appareil • retirez tous les aliments• dégivrez si nécessaire et nettoyez l'ap- pareil ainsi que tous les accessoires • laissez la porte/les portes entrouver- te(s) pour prévenir la formationd'odeurs...
Page 32 - Fermeture de la porte; INSTALLATION
Anomalie Cause possible Solution dEMo s’affiche sur lebandeau. L'appareil est en modedémonstration (dEMo). Maintenez la touche OKenfoncée pendant environ10 secondes, jusqu'à cequ'un long signal sonoreretentisse et que l'afficha-ge s'éteigne un court ins-tant : l'appareil commenceà fonctionner de faç...
Page 33 - Emplacement; Température ambiante; Branchement électrique
8.1 Emplacement 10mm 10mm 100mm L'appareil ne doit pas être installé prèsd'une source de chaleur telle qu'un ra-diateur, une chaudière, la lumière direc-te du soleil, etc. Assurez-vous que l'aircircule librement à l'arrière de l'appareil.Pour garantir un rendement optimal sil'appareil est installé s...
Page 35 - BRUITS
G Retirez la porte de la goupille (G). Dévis-sez la goupille (G) et montez-la sur le cô-té opposé.Dévissez le gond (Z) de la charnière (E)et la vis arrière (Y) avec une clé de10 mm et enlevez le dispositif de ferme-ture (M). Prenez le dispositif de fermetu-re inférieur fourni dans le sachet d’acces-...
Page 37 - CARACTÉRISTIQUES TECHNIQUES; EN MATIÈRE DE PROTECTION DE L'ENVIRONNEMENT
10. CARACTÉRISTIQUES TECHNIQUES Dimensions de la niched'encastrement Hauteur 1600 mm Largeur 600 mm Profondeur 630 mm Temps de levée 35 h Tension 230-240 V Fréquence 50 Hz Les caractéristiques techniques figurentsur la plaque signalétique située sur le côté gauche à l'intérieur de l'appareil etsur l...
Page 38 - SERVIZIO CLIENTI E MANUTENZIONE
INDICE 1. INFORMAZIONI PER LA SICUREZZA . . . . . . . . . . . . . . . . . . . . . . . . . . . . . . . . . . . . . . . . . . . 39 2. PANNELLO DEI COMANDI . . . . . . . . . . . . . . . . . . . . . . . . . . . . . . . . . . . . . . . . . . . . . . . . . . 41 3. PRIMO UTILIZZO . . . . . . . . . . . . . ...
Page 39 - INFORMAZIONI PER LA SICUREZZA; Sicurezza dei bambini e
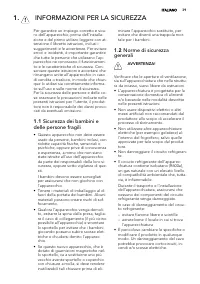
1. INFORMAZIONI PER LA SICUREZZA Per garantire un impiego corretto e sicu-ro dell'apparecchio, prima dell'installa-zione e del primo utilizzo leggere con at-tenzione il libretto istruzioni, inclusi isuggerimenti e le avvertenze. Per evitareerrori e incidenti, è importante garantireche tutte le perso...
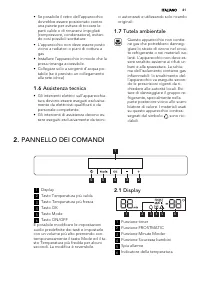
Page 41 - PANNELLO DEI COMANDI
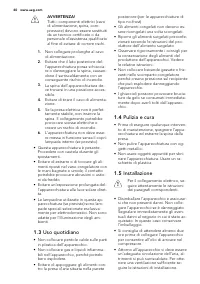
• Se possibile il retro dell'apparecchio dovrebbe essere posizionato controuna parete per evitare di toccare leparti calde o di rimanervi impigliati(compressore, condensatore), evitan-do così possibili scottature. • L'apparecchio non deve essere posto vicino a radiatori o piani di cottura agas. • In...
Page 43 - PRIMO UTILIZZO
È possibile disattivare la funzione inqualsiasi momento durante il conto allarovescia: 1. Premere il tasto Mode fino a quandola spia Minute Minder lampeggia. 2. Premere il tasto OK per confermare. 3. La spia Minute Minder si spegne. È possibile modificare l'ora in qualsiasimomento durante il conto a...
Page 44 - UTILIZZO QUOTIDIANO; Congelazione dei cibi freschi; Conservazione dei
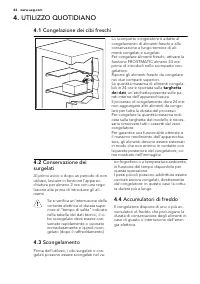
4. UTILIZZO QUOTIDIANO 4.1 Congelazione dei cibi freschi Lo scomparto congelatore è adatto alcongelamento di alimenti freschi e allaconservazione a lungo termine di ali-menti congelati e surgelati.Per congelare alimenti freschi, attivare lafunzione FROSTMATIC almeno 24 oreprima di introdurli nello s...
Page 45 - SUGGERIMENTI E CONSIGLI UTILI; Consigli per il; PULIZIA E CURA; Pulizia periodica
5. SUGGERIMENTI E CONSIGLI UTILI 5.1 Consigli per il congelamento Per un processo di congelamento otti-male, ecco alcuni consigli importanti:• la quantità massima di cibo che può essere congelata in 24 h è riportatasulla targhetta; • il processo di congelamento dura 24 ore. In questo periodo non agg...
Page 47 - Periodi di inutilizzo
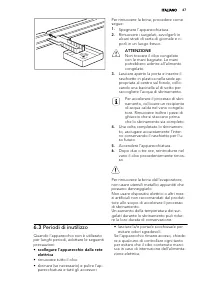
Per rimuovere la brina, procedere comesegue: 1. Spegnere l'apparecchiatura. 2. Rimuovere i surgelati, avvolgerli inalcuni strati di carta di giornale e ri-porli in un luogo fresco. ATTENZIONE Non toccare il cibo congelatocon le mani bagnate. Le manipotrebbero aderire all'alimentocongelato. 3. Lascia...
Page 48 - COSA FARE SE...; Problema
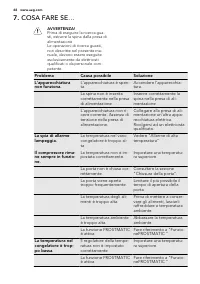
7. COSA FARE SE… AVVERTENZA! Prima di eseguire la ricerca gua-sti, estrarre la spina dalla presa dialimentazione.Le operazioni di ricerca guasti,non descritte nel presente ma-nuale, devono essere eseguiteesclusivamente da elettricistiqualificati o da personale com-petente. Problema Causa possibile S...
Page 49 - Chiusura della porta
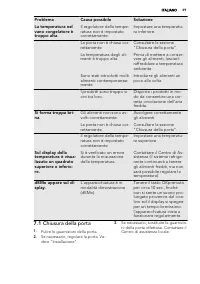
Problema Causa possibile Soluzione La temperatura nelvano congelatore ètroppo alta. Il regolatore della tempe-ratura non è impostatocorrettamente. Impostare una temperatu-ra inferiore. La porta non è chiusa cor-rettamente. Consultare la sezione"Chiusura della porta". La temperatura degli ali...
Page 50 - INSTALLAZIONE; Posizione; Temperatura ambiente
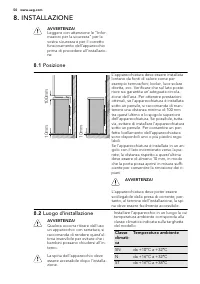
8. INSTALLAZIONE AVVERTENZA! Leggere con attenzione le "Infor-mazioni per la sicurezza" per lavostra sicurezza e per il correttofunzionamento dell'apparecchioprima di procedere all'installazio-ne. 8.1 Posizione 10mm 10mm 100mm L'apparecchiatura deve essere installatalontano da fonti di calor...
Page 51 - Collegamento elettrico
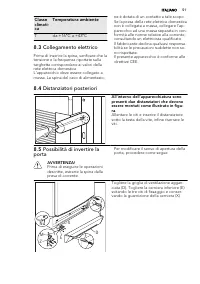
Classeclimati-ca Temperatura ambiente T da +16°C a +43°C 8.3 Collegamento elettrico Prima di inserire la spina, verificare che latensione e la frequenza riportate sullatarghetta corrispondano ai valori dellarete elettrica domestica.L'apparecchio deve essere collegato amassa. La spina del cavo di ali...
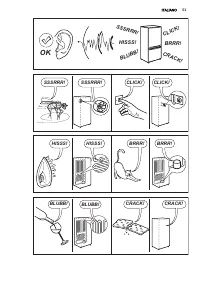
Page 52 - RUMORI
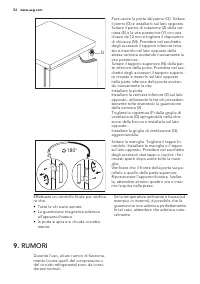
G Fare uscire la porta dal perno (G). Svitareil perno (G) e installarlo sul lato opposto.Svitare il perno di rotazione (Z) della cer-niera (E) e la vite posteriore (Y) con unachiave da 10 mm e togliere il dispositivodi chiusura (M). Prendere nel sacchettodegli accessori il tappino inferiore rima-sto...
Page 54 - DATI TECNICI; CONSIDERAZIONI AMBIENTALI
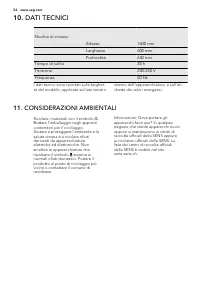
10. DATI TECNICI Nicchia di incasso Altezza 1600 mm Larghezza 600 mm Profondità 630 mm Tempo di salita 35 h Tensione 230-240 V Frequenza 50 Hz I dati tecnici sono riportati sulla targhet-ta del modello, applicata sul lato sinistro interno dell'apparecchiatura, e sull'eti-chetta dei valori energetici...
Page 55 - CUSTOMER CARE AND SERVICE
CONTENTS 1. SAFETY INFORMATION . . . . . . . . . . . . . . . . . . . . . . . . . . . . . . . . . . . . . . . . . . . . . . . . . . . . . 56 2. CONTROL PANEL . . . . . . . . . . . . . . . . . . . . . . . . . . . . . . . . . . . . . . . . . . . . . . . . . . . . . . . . . . 58 3. FIRST USE . . . . . ....
Page 56 - SAFETY INFORMATION; Children and vulnerable
1. SAFETY INFORMATION In the interest of your safety and to en-sure the correct use, before installingand first using the appliance, read thisuser manual carefully, including its hintsand warnings. To avoid unnecessary mis-takes and accidents, it is important toensure that all people using the appli...
Page 58 - Environment Protection; CONTROL PANEL
• This product must be serviced by an authorized Service Centre, and onlygenuine spare parts must be used. 1.7 Environment Protection This appliance does not containgasses which could damage theozone layer, in either its refriger-ant circuit or insulation materials.The appliance shall not be dis-car...
Page 60 - Door open alarm; FIRST USE; Cleaning the interior
• sounding of buzzer.To reset the alarm: 1. Press any button. 2. The buzzer switches off. 3. The freezer temperature indicatorshows the highest temperaturereached for a few seconds. Thenshow again the set temperature. 4. The alarm indicator continue to flashuntil the normal conditions are re-stored....
Page 61 - DAILY USE; Freezing fresh food; Storage of frozen food
4. DAILY USE 4.1 Freezing fresh food The freezer compartment is suitable forfreezing fresh food and storing frozenand deep-frozen food for a long time.To freeze fresh food activate the FROST-MATIC function at least 24 hours beforeplacing the food to be frozen in thefreezer compartment.Place the fres...
Page 62 - HELPFUL HINTS AND TIPS; Hints for freezing; CARE AND CLEANING; Periodic cleaning
5. HELPFUL HINTS AND TIPS 5.1 Hints for freezing To help you make the most of the freez-ing process, here are some importanthints:• the maximum quantity of food which can be frozen in 24 hrs. is shown onthe rating plate; • the freezing process takes 24 hours. No further food to be frozen shouldbe ad...
Page 63 - Defrosting the freezer
Take care of not to damage thecooling system. Many proprietary kitchen surface clean-ers contain chemicals that can attack/damage the plastics used in this appli-ance. For this reason it is recommendedthat the outer casing of this appliance isonly cleaned with warm water with a littlewashing-up liqu...
Page 64 - Periods of non-operation
To remove the frost, follow the instruc-tions below: 1. Switch off the appliance. 2. Remove any stored food, wrap it inseveral layers of newspaper and putit in a cool place. CAUTION! Do not touch frozen goods withwet hands. Hands can freeze tothe goods. 3. Leave the door open and insert theplastic s...
Page 65 - WHAT TO DO IF...
7. WHAT TO DO IF… WARNING! Before troubleshooting, discon-nect the mains plug from themains socket.Only a qualified electrician orcompetent person must do thetroubleshooting that is not in thismanual. Problem Possible cause Solution The appliance doesnot operate. The appliance is switchedoff. Switch...
Page 66 - Closing the door
Problem Possible cause Solution The door is not closedcorrectly. Refer to "Closing thedoor". The product temperatureis too high. Let the product tempera-ture decrease to roomtemperature before stor-age. Many products are storedat the same time. Store less products at thesame time. Products a...
Page 67 - Ambient temperature; Electrical connection
8.1 Location 10mm 10mm 100mm The appliance should be installed wellaway from sources of heat such as radia-tors, boilers, direct sunlight etc. Ensurethat air can circulate freely around theback of the cabinet. To ensure best per-formance, if the appliance is positionedbelow an overhanging wall unit,...
Page 69 - NOISES
G Slide the door off the pin (G). Unscrewthe pin (G) and install it on the oppositeside.Unscrew the pivot pin (Z) of the hinge (E)and the rear screw (Y) with a spanner of10 mm and remove the closing device(M). Take from the accessory bag thelower closing device left and install it onthe opposite sid...
Page 71 - TECHNICAL DATA; ENVIRONMENT CONCERNS
10. TECHNICAL DATA Dimension of the recess Height 1600 mm Width 600 mm Depth 630 mm Rising Time 35 h Voltage 230-240 V Frequency 50 Hz The technical information are situated inthe rating plate on the internal left sideof the appliance and in the energy label. 11. ENVIRONMENT CONCERNS Recycle the mat...


 AEG AREH30LF
User Manual
AEG AREH30LF
User Manual
 AEG AREI20XLF
User Manual
AEG AREI20XLF
User Manual
 AEG FFB72746PM
User Manual
AEG FFB72746PM
User Manual
 AEG PS254DB
User Manual
AEG PS254DB
User Manual
 AEG NIK85M00AZ
User Manual
AEG NIK85M00AZ
User Manual
 AEG DGE5662HB
User Manual
AEG DGE5662HB
User Manual
 AEG DGE5962HB
User Manual
AEG DGE5962HB
User Manual
 AEG HVB95450IB
User Manual
AEG HVB95450IB
User Manual
 AEG PL700
User Manual
AEG PL700
User Manual
 AEG W14120
User Manual
AEG W14120
User Manual
 AEG DC240
User Manual
AEG DC240
User Manual
 AEG T738A4OBC
User Manual
AEG T738A4OBC
User Manual
 AEG T858M6OBC
User Manual
AEG T858M6OBC
User Manual
 AEG T859M6OBC
User Manual
AEG T859M6OBC
User Manual
 AEG T959M6ORS
User Manual
AEG T959M6ORS
User Manual
 AEG IKE95771FB
User Manual
AEG IKE95771FB
User Manual
 AEG AREI9XLF
User Manual
AEG AREI9XLF
User Manual
 AEG A18SPC3
User Manual
AEG A18SPC3
User Manual
 AEG LF7384O4C
User Manual
AEG LF7384O4C
User Manual