Page 2 - KUNDENDIENST UND -BETREUUNG
INHALT 1. SICHERHEITSHINWEISE . . . . . . . . . . . . . . . . . . . . . . . . . . . . . . . . . . . . . . . . . . . . . . . . . . . . . . 3 2. GERÄTEBESCHREIBUNG . . . . . . . . . . . . . . . . . . . . . . . . . . . . . . . . . . . . . . . . . . . . . . . . . . . . . 6 3. BEDIENFELD . . . . . . . . ...
Page 3 - SICHERHEITSHINWEISE; Sicherheit von Kindern und
1. SICHERHEITSHINWEISE Lesen Sie zu Ihrer Sicherheit und für eineoptimale Nutzung des Geräts vor derMontage und dem ersten Gebrauch dasvorliegende Benutzerhandbuch ein-schließlich der Ratschläge und Warnun-gen aufmerksam durch. Es ist wichtig,dass zur Vermeidung von Fehlern undUnfällen alle Personen...
Page 6 - Einschalten
2. GERÄTEBESCHREIBUNG 1 4 2 5 3 1 Bedienfeld 2 Klappe 3 Gefrierkörbe 4 Typenschild 5 Maxibox Körbe 3. BEDIENFELD 1 2 4 3 5 1 Alarmleuchte 2 Superfrost-Anzeige 3 Superfrost-Taste (Schnellgefrieren) 4 Kontrolllampe 5 Temperaturregler 3.1 Einschalten Stecken Sie den Stecker in die Netz-steckdose.Drehen...
Page 7 - TÄGLICHER GEBRAUCH
Die Betriebsanzeige und die Alarmanzei-ge leuchten. 3.2 Ausschalten des Geräts Drehen Sie den Temperaturregler zumAusschalten des Geräts in die Position “0”. 3.3 Funktion Fast Freeze Drücken Sie zum Einschalten der Funkti-on Fast Freeze die Taste Fast Freeze.Die Kontrolllampe Fast Freeze leuchtetauf...
Page 8 - PRAKTISCHE TIPPS UND HINWEISE
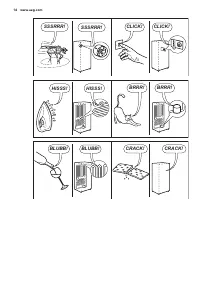
5. PRAKTISCHE TIPPS UND HINWEISE 5.1 Normale Betriebsgeräusche • Unter Umständen ist ein leichtes Gur- geln und Blubbern zu hören, wenn dasKältemittel durch die Leitungen ge-pumpt wird. Das ist normal. • Bei eingeschaltetem Kompressor wird das Kältemittel umgewälzt und Sie hö-ren ein Surren und ein ...
Page 9 - REINIGUNG UND PFLEGE; Reinigung des Innenraums; Abtauen des Gefriergeräts
• Öffnen Sie die Tür nicht zu häufig, und lassen Sie die Tür nicht länger offenals notwendig. • Aufgetaute Lebensmittel verderben sehr schnell und eignen sich nicht fürein erneutes Einfrieren. • Das Haltbarkeitsdatum auf der Tief- kühlkostverpackung darf nicht über-schritten werden. 6. REINIGUNG UND...
Page 12 - Schließen der Tür; MONTAGE; Aufstellung; Umgebungstemperatur
Problem Mögliche Ursache Abhilfe Die Fast Freeze -Funktionist eingeschaltet. Siehe hierzu „Fast Freeze -Funktion“. Die Temperatur imGefrierraum ist zuhoch. Der Temperaturregler istnicht richtig eingestellt. Stellen Sie eine niedrigereTemperatur ein. Es wurden zu viele Pro-dukte auf einmal einge-legt...
Page 15 - GERÄUSCHE; BRRR; SSSRR; OK
A B • Schrauben Sie den Bolzen (A) ab und an der gegenüberliegenden Seite wie-der an. • Nehmen Sie die Kappe (B) ab und bringen Sie sie auf der gegenüberlie-genden Seite an. • Schrauben Sie die unteren Scharniere an. • Bringen Sie die Sockelblende wieder an. • Stellen Sie das Gerät wieder in auf- re...
Page 17 - TECHNISCHE DATEN; UMWELTTIPPS
10. TECHNISCHE DATEN Abmessungen Höhe 1540 mm Breite 595 mm Tiefe 658 mm Lagerzeit bei Störung 30 Std. Spannung 230 - 240 V Frequenz 50 Hz Die technischen Daten befinden sich aufdem Typenschild im Innern des Gerätes auf der linken Seite sowie auf der Ener-gieplakette. 11. UMWELTTIPPS Recyceln Sie Ma...
Page 19 - INSTRUCTIONS DE SÉCURITÉ; Sécurité des enfants et
1. INSTRUCTIONS DE SÉCURITÉ Pour votre sécurité et garantir une utili-sation correcte de l'appareil, lisez atten-tivement cette notice, y compris les con-seils et avertissements, avant d'installeret d'utiliser l'appareil pour la premièrefois. Pour éviter toute erreur ou accident,veillez à ce que tou...
Page 20 - Utilisation quotidienne
Si le circuit frigorifique est endomma-gé :– évitez les flammes vives et toute au- tre source d'allumage – aérez soigneusement la pièce où se trouve l'appareil • Ne modifiez pas les spécifications de l'appareil. Si le câble d'alimentationest endommagé, il peut causer uncourt circuit, un incendie et/...
Page 22 - Mise en marche
2. DESCRIPTION DE L'APPAREIL 1 4 2 5 3 1 Bandeau de commande 2 Volet 3 Paniers de congélation 4 Plaque signalétique 5 Bacs Maxibox 3. BANDEAU DE COMMANDE 1 2 4 3 5 1 Voyant d'alarme 2 Voyant Congélation rapide 3 Touche Congélation rapide 4 Voyant lumineux 5 Thermostat 3.1 Mise en marche Branchez l'a...
Page 23 - UTILISATION QUOTIDIENNE
3.2 Mise à l'arrêt Pour éteindre l'appareil, tournez le ther-mostat sur la position « “0” ». 3.3 Fonction Fast Freeze Pour activer la fonction Fast Freeze, ap-puyez sur l'interrupteur Fast Freeze.Le voyant Fast Freeze s'allume. 3.4 Réglage de la température La température est réglée automatique-ment...
Page 24 - CONSEILS UTILES
5. CONSEILS UTILES 5.1 Bruits de fonctionnement normaux • Le liquide de refroidissement qui pas- se dans le circuit d'évaporation peutproduire un bruit de gargouillis ou debouillonnement. Ce phénomène estnormal. • Le compresseur peut produire un ron- ronnement aigu ou un bruit de pulsa-tion. Ce phén...
Page 25 - ENTRETIEN ET NETTOYAGE; Nettoyage intérieur; Nettoyage périodique
• évitez d'ouvrir trop souvent la porte du congélateur et ne la laissez ouverteque le temps nécessaire ; • une fois décongelés, les aliments se détériorent rapidement et ne peuventpas être recongelés ; • ne dépassez pas la durée de conserva- tion indiquée par le fabricant. 6. ENTRETIEN ET NETTOYAGE ...
Page 26 - EN CAS D'ANOMALIE DE FONCTIONNEMENT; Anomalie
tière en l'insérant dans l'emplacementprévu à cet effet. Placez au-dessousun récipient dans lequel s'écouleral'eau de dégivrage • retirez soigneusement la glace quand elle commence à fondre (utilisez unespatule en bois ou en plastique) • une fois la glace fondue, épongez et séchez soigneusement l'in...
Page 27 - Fermeture de la porte
Anomalie Cause possible Solution Le courant n'arrive pas àl'appareil. La prise decourant n'est pas alimen-tée. Branchez un autre appareilélectrique sur la prise decourant.Faites appel à un électri-cien qualifié. Le voyant de fonc-tionnement clignote. L'appareil ne fonctionnepas correctement. Faites ...
Page 28 - INSTALLATION; Température ambiante; Emplacement; Branchement électrique
3. Si nécessaire, remplacez les jointsdéfectueux. Pour cela, contactez vo-tre service après-vente. 8. INSTALLATION AVERTISSEMENT Pour votre sécurité et le bonfonctionnement de l'appareil,veuillez lire attentivement les"Consignes de sécurité" avantd'installer l'appareil. 8.1 Emplacement Insta...
Page 30 - BRUITS
2 1 • Dévissez le pivot supérieur et vissez-le sur le côté opposé. • Remettez en place la porte.• Vérifiez que le bord de la porte est pa- rallèle au bord de la paroi supérieure. A B • Dévissez le pivot (A) et placez-le sur le côté opposé. • Démontez le cache (B) et placez-le sur le côté opposé. • V...
Page 32 - CARACTÉRISTIQUES TECHNIQUES; EN MATIÈRE DE PROTECTION DE L'ENVIRONNEMENT
10. CARACTÉRISTIQUES TECHNIQUES Dimension Hauteur 1540 mm Largeur 595 mm Profondeur 658 mm Autonomie de fonction-nement 30 h Tension 230 - 240 V Fréquence 50 Hz Les caractéristiques techniques figurentsur la plaque signalétique située sur le côté gauche à l'intérieur de l'appareil etsur l'étiquette ...
Page 33 - SERVIZIO CLIENTI E MANUTENZIONE
INDICE 1. ISTRUZIONI DI SICUREZZA . . . . . . . . . . . . . . . . . . . . . . . . . . . . . . . . . . . . . . . . . . . . . . . . . . . 34 2. DESCRIZIONE DEL PRODOTTO . . . . . . . . . . . . . . . . . . . . . . . . . . . . . . . . . . . . . . . . . . . . . . 37 3. PANNELLO DEI COMANDI . . . . . . . ...
Page 34 - ISTRUZIONI DI SICUREZZA; Sicurezza dei bambini e
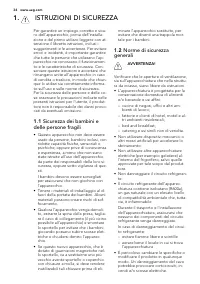
1. ISTRUZIONI DI SICUREZZA Per garantire un impiego corretto e sicu-ro dell'apparecchio, prima dell'installa-zione e del primo utilizzo leggere con at-tenzione il libretto istruzioni, inclusi isuggerimenti e le avvertenze. Per evitareerrori e incidenti, è importante garantireche tutte le persone che...
Page 37 - Accensione
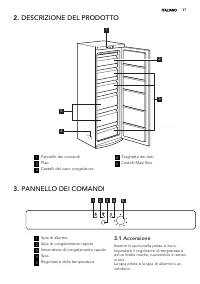
2. DESCRIZIONE DEL PRODOTTO 1 4 2 5 3 1 Pannello dei comandi 2 Flap 3 Cestelli del vano congelatore 4 Targhetta dei dati 5 Cestelli Maxi Box 3. PANNELLO DEI COMANDI 1 2 4 3 5 1 Spia di allarme 2 Spia di congelamento rapido 3 Interruttore di congelamento rapido 4 Spia 5 Regolatore della temperatura 3...
Page 38 - UTILIZZO QUOTIDIANO
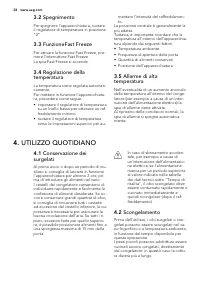
3.2 Spegnimento Per spegnere l'apparecchiatura, ruotareil regolatore di temperatura in posizione“0”. 3.3 FunzioneFast Freeze Per attivare la funzione Fast Freeze, pre-mere l'interruttore Fast Freeze.La spia Fast Freeze si accende. 3.4 Regolazione della temperatura La temperatura viene regolata autom...
Page 39 - CONSIGLI E SUGGERIMENTI UTILI
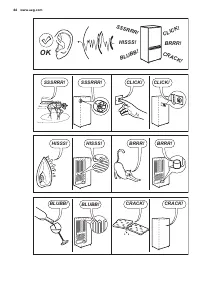
5. CONSIGLI E SUGGERIMENTI UTILI 5.1 Rumori normali durante il funzionamento • Quando il refrigerante viene pompato attraverso le bobine o le tubazioni sipuò sentire un fievole gorgoglio e unborbottio. Non si tratta di un'anoma-lia. • Quando il compressore è in funzione, viene pompato il refrigerant...
Page 40 - PULIZIA E CURA; Pulizia periodica
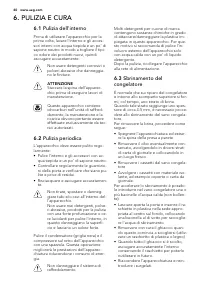
6. PULIZIA E CURA 6.1 Pulizia dell'interno Prima di utilizzare l'apparecchio per laprima volta, lavare l'interno e gli acces-sori interni con acqua tiepida e un po' disapone neutro in modo a togliere il tipi-co odore dei prodotti nuovi, quindiasciugare accuratamente. Non usare detergenti corrosivi o...
Page 41 - COSA FARE SE...; Problema
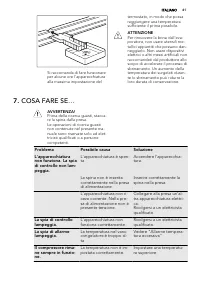
Si raccomanda di fare funzionareper alcune ore l'apparecchiaturaalla massima impostazione del termostato, in modo che possaraggiungere una temperaturasufficiente il prima possibile. ATTENZIONE Per rimuovere la brina dall'eva-poratore, non usare utensili me-tallici appuntiti che possano dan-neggiarlo...
Page 42 - Chiusura della porta
Problema Possibile causa Soluzione Lo sportello non è chiusocorrettamente. Fare riferimento alla sezio-ne "Chiusura dello sportel-lo". Lo sportello viene apertotroppo frequentemente. Limitare il più possibile iltempo di apertura dellosportello. La temperatura degli ali-menti è troppo alta. P...
Page 43 - INSTALLAZIONE; Posizionamento; Temperatura ambiente; Posizione
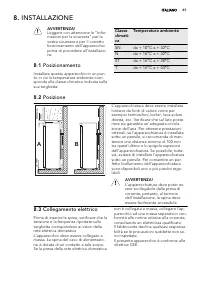
8. INSTALLAZIONE AVVERTENZA! Leggere con attenzione le "Infor-mazioni per la sicurezza" per lavostra sicurezza e per il correttofunzionamento dell'apparecchioprima di procedere all'installazio-ne. 8.1 Posizionamento Installare questo apparecchio in un pun-to in cui la temperatura ambiente co...
Page 44 - Distanziatori posteriori; Livellamento
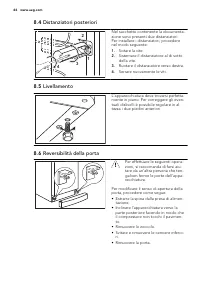
8.4 Distanziatori posteriori 2 4 3 1 Nel sacchetto contenente la documenta-zione sono presenti due distanziatori.Per installare i distanziatori, procederenel modo seguente: 1. Svitare la vite. 2. Sistemare il distanziatore al di sottodella vite. 3. Ruotare il distanziatore verso destra. 4. Serrare n...
Page 45 - RUMORI
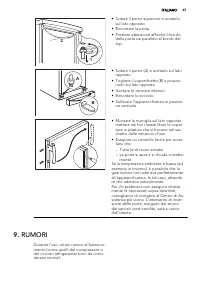
2 1 • Svitare il perno superiore e avvitarlo sul lato opposto. • Rimontare la porta.• Prestare attenzione affinché il bordo della porta sia parallelo al bordo deltop. A B • Svitare il perno (A) e avvitarlo sul lato opposto. • Togliere il coperchietto (B) e posizio- narlo sul lato opposto. • Avvitare...
Page 47 - DATI TECNICI; CONSIDERAZIONI AMBIENTALI
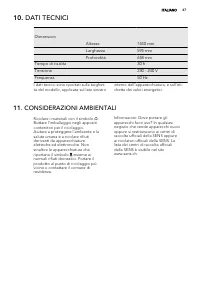
10. DATI TECNICI Dimensioni Altezza 1540 mm Larghezza 595 mm Profondità 658 mm Tempo di risalita 30 h Tensione 230 - 240 V Frequenza 50 Hz I dati tecnici sono riportati sulla targhet-ta del modello, applicata sul lato sinistro interno dell'apparecchiatura, e sull'eti-chetta dei valori energetici. 11...
Page 48 - CUSTOMER CARE AND SERVICE
CONTENTS 1. SAFETY INSTRUCTIONS . . . . . . . . . . . . . . . . . . . . . . . . . . . . . . . . . . . . . . . . . . . . . . . . . . . . . 49 2. PRODUCT DESCRIPTION . . . . . . . . . . . . . . . . . . . . . . . . . . . . . . . . . . . . . . . . . . . . . . . . . . . . 51 3. CONTROL PANEL . . . . . . ...
Page 49 - SAFETY INSTRUCTIONS; Children and vulnerable
1. SAFETY INSTRUCTIONS In the interest of your safety and to en-sure the correct use, before installingand first using the appliance, read thisuser manual carefully, including its hintsand warnings. To avoid unnecessary mis-takes and accidents, it is important toensure that all people using the appl...
Page 51 - PRODUCT DESCRIPTION
• The appliance must not be located close to radiators or cookers. • Make sure that the mains plug is ac- cessible after the installation of the ap-pliance. • Connect to potable water supply only (If a water connection is foreseen). 1.6 Service • Any electrical work required to do the servicing of t...
Page 52 - CONTROL PANEL; Switching on
1 Control panel 2 Flap 3 Freezer baskets 4 Rating plate 5 Maxibox baskets 3. CONTROL PANEL 1 2 4 3 5 1 Alarm Light 2 Fast Freeze Indicator 3 Fast Freeze Switch 4 Pilot Light 5 Temperature Regulator 3.1 Switching on Insert the plug into the wall socket.Turn the Temperature regulator clock-wise to a m...
Page 53 - DAILY USE; Storage of frozen food; HELPFUL HINTS AND TIPS; Normal Operating Sounds; Hints for energy saving; Hints for freezing
4. DAILY USE 4.1 Storage of frozen food When first starting-up or after a periodout of use, before putting the productsin the compartment let the appliance runat least 2 hours.The freezer baskets ensure that it isquick and easy to find the food packageyou want. If large quantities of food areto be s...
Page 54 - CARE AND CLEANING; Cleaning the interior
• the maximum quantity of food which can be frozen in 24 hrs. is shown onthe rating plate; • the freezing process takes 24 hours. No further food to be frozen shouldbe added during this period; • only freeze top quality, fresh and thor- oughly cleaned, foodstuffs; • prepare food in small portions to...
Page 55 - Defrosting the freezer
Do not pull, move or damageany pipes and/or cables insidethe cabinet.Never use detergents, abrasivepowders, highly perfumed clean-ing products or wax polishes toclean the interior as this will dam-age the surface and leave astrong odour. Clean the condenser (black grill) and thecompressor at the bac...
Page 56 - WHAT TO DO IF...; Problem
7. WHAT TO DO IF… WARNING! Before troubleshooting, discon-nect the mains plug from themains socket.Only a qualified electrician orcompetent person must do thetroubleshooting that is not in thismanual. Problem Possible cause Solution The appliance doesnot operate. The Pi-lot light does notflash. The ...
Page 57 - Closing the door; Positioning; Ambient temperature
Problem Possible cause Solution The temperature inthe freezer is toohigh. The temperature regula-tor is not set correctly. Set a lower temperature. Many products are storedat the same time. Store less products at thesame time. Products are too near toeach other. Store products so thatthere is cold a...
Page 60 - NOISES
A B • Unscrew the pin (A) and screw it on the opposite side. • Remove the cap (B) and position it on the opposite side. • Screw the lower hinges.• Refit the plinth.• Stand the appliance upright. • Fit the handle on the opposite side and put the plastic caps (contained inthe instructions bag) in the ...
Page 62 - TECHNICAL DATA; Service Centres; Servicestellen
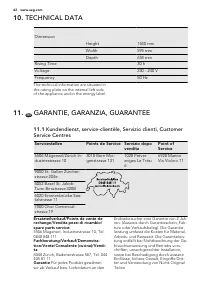
10. TECHNICAL DATA Dimension Height 1540 mm Width 595 mm Depth 658 mm Rising Time 30 h Voltage 230 - 240 V Frequency 50 Hz The technical information are situated inthe rating plate on the internal left sideof the appliance and in the energy label. 11. CH GARANTIE, GARANZIA, GUARANTEE 11.1 Kundendien...
Page 63 - ENVIRONMENT CONCERNS
Garantie Nous octroyons sur chaque produit 2 ans de garantie à partir de ladate de livraison ou de la mise en serv-ice au consommateur (documenté aumoyen d’une facture, d’un bon de ga-rantie ou d’un justificatif d’achat). Notregarantie couvre les frais de mains d’œu-vres et de déplacement, ainsi que...


 AEG AREH30LF
User Manual
AEG AREH30LF
User Manual
 AEG AREI20XLF
User Manual
AEG AREI20XLF
User Manual
 AEG FFB72746PM
User Manual
AEG FFB72746PM
User Manual
 AEG PS254DB
User Manual
AEG PS254DB
User Manual
 AEG NIK85M00AZ
User Manual
AEG NIK85M00AZ
User Manual
 AEG DGE5662HB
User Manual
AEG DGE5662HB
User Manual
 AEG DGE5962HB
User Manual
AEG DGE5962HB
User Manual
 AEG HVB95450IB
User Manual
AEG HVB95450IB
User Manual
 AEG PL700
User Manual
AEG PL700
User Manual
 AEG W14120
User Manual
AEG W14120
User Manual
 AEG DC240
User Manual
AEG DC240
User Manual
 AEG T738A4OBC
User Manual
AEG T738A4OBC
User Manual
 AEG T858M6OBC
User Manual
AEG T858M6OBC
User Manual
 AEG T859M6OBC
User Manual
AEG T859M6OBC
User Manual
 AEG T959M6ORS
User Manual
AEG T959M6ORS
User Manual
 AEG IKE95771FB
User Manual
AEG IKE95771FB
User Manual
 AEG AREI9XLF
User Manual
AEG AREI9XLF
User Manual
 AEG A18SPC3
User Manual
AEG A18SPC3
User Manual
 AEG LF7384O4C
User Manual
AEG LF7384O4C
User Manual