Page 2 - KUNDENDIENST UND -BETREUUNG
INHALT 1. SICHERHEITSHINWEISE . . . . . . . . . . . . . . . . . . . . . . . . . . . . . . . . . . . . . . . . . . . . . . . . . . . . . . 3 2. BEDIENFELD . . . . . . . . . . . . . . . . . . . . . . . . . . . . . . . . . . . . . . . . . . . . . . . . . . . . . . . . . . . . . . . 5 3. ERSTE INBETRIEB...
Page 3 - SICHERHEITSHINWEISE; Sicherheit von Kindern und
1. SICHERHEITSHINWEISE Lesen Sie zu Ihrer Sicherheit und für eineoptimale Nutzung des Geräts vor derMontage und dem ersten Gebrauch dasvorliegende Benutzerhandbuch ein-schließlich der Ratschläge und Warnun-gen aufmerksam durch. Es ist wichtig,dass zur Vermeidung von Fehlern undUnfällen alle Personen...
Page 5 - BEDIENFELD
Hitze kann die Plastikteile im Innen-raum beschädigen und Feuchtigkeitkann in das elektrische System eindrin-gen, so dass die Teile unter Spannungstehen. 1.5 Montage Halten Sie sich für den elektri-schen Anschluss strikt an die An-weisungen der betreffenden Ab-schnitte. • Kontrollieren Sie nach dem ...
Page 6 - Einschalten; Rote Alarm-Kontrolllampe
1 Grüne Ein/Aus-Kontrolllampe 2 Temperaturregler und Ein-/Aus-Schalter 3 Gelbe Superfrost-Kontrolllampe 4 Schalter zum Abschalten des Alarm-signals und für die Superfrost-Funkti-on 5 Rote Alarm-Kontrolllampe 2.1 Einschalten 1. Lassen Sie das Gerät nach dem Auf-stellen 4 Stunden stehen. 2. Stecken Si...
Page 7 - ERSTE INBETRIEBNAHME; Reinigung des Innenraums; TÄGLICHER GEBRAUCH; Einfrieren frischer
2.5 Superfrost-Funktion (Schnellgefrieren) Wenn mehr als 3-4 kg Lebensmittel ein-gefroren werden sollen: 1. Aktivieren Sie die Superfrost-Funkti-on 6-24 Stunden, bevor Sie frischeLebensmittel in das Gefriergerät le-gen. Halten Sie dafür die Superfrost-Taste 2-3 Sekunden gedrückt. Diegelbe Kontrollla...
Page 8 - PRAKTISCHE TIPPS UND HINWEISE
4.2 Lagerung gefrorener Produkte Lassen Sie das Gerät vor der ersten In-betriebnahme oder nach einer Zeit, inder das Gerät nicht benutzt wurde, min-destens zwei Stunden lang auf den hö-heren Einstellungen laufen, bevor Sie Le-bensmittel in das Gefrierfach hinein le-gen. Kam es zum Beispiel durch ein...
Page 9 - REINIGUNG UND PFLEGE; Regelmäßige Reinigung
• werden Gefrierwürfel direkt nach der Entnahme aus dem Gefrierfach ver-wendet, können Sie zu Frostbrand aufder Haut führen; • es empfiehlt sich, das Einfrierdatum auf jeder einzelnen Packung zu notie-ren, um einen genauen Überblick überdie Lagerzeit zu haben. 5.3 Hinweise zur Lagerung gefrorener Pr...
Page 13 - Schließen der Tür; TECHNISCHE DATEN; Aufstellung; Umgebungstemperatur
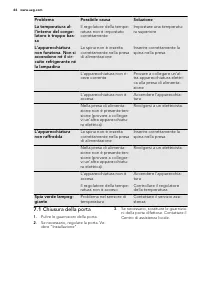
Problem Mögliche Ursache Abhilfe Der Temperaturregler istnicht eingestellt. Überprüfen Sie den Tem-peraturregler. Die grüne Kontroll-lampe blinkt. Temperatursensor - Stö-rung Rufen Sie den Kunden-dienst. 7.1 Schließen der Tür 1. Reinigen Sie die Türdichtungen. 2. Stellen Sie die Tür nach Bedarf ein....
Page 15 - Wechsel des Türanschlags
9.4 Wechsel des Türanschlags Die nachfolgend beschriebenenSchritte sollten von mindestenszwei Personen durchgeführt wer-den, um ein Herunterfallen derTüren zu vermeiden. Zum Wechseln des Türanschlags musswie folgt vorgegangen werden:• Ziehen Sie den Netzstecker aus der Steckdose. • Neigen Sie das Ge...
Page 16 - Elektrischer Anschluss; GERÄUSCH; BRRR; SSSRR; OK
Bei niedrigen Umgebungstemperaturen(z. B. im Winter) kann es vorkommen,dass die Türdichtung nicht richtig amGerät anliegt. Warten Sie in diesem Fallab, bis sich die Dichtung allmählich an-passt.Wenden Sie sich an den Kundendienst,wenn Sie bei den oben beschriebenenSchritten Unterstützung benötigen. ...
Page 17 - UMWELTTIPPS
BRRR! BRRR! HISSS! HISSS! BLUBB! BLUBB! CRACK! CRACK! 11. UMWELTTIPPS Recyceln Sie Materialien mit demSymbol . Entsorgen Sie dieVerpackung in den entsprechendenRecyclingbehältern.Recyceln Sie zum Umwelt- undGesundheitsschutz elektrische undelektronische Geräte. Entsorgen SieGeräte mit diesem Symbol ...
Page 19 - INSTRUCTIONS DE SÉCURITÉ; Sécurité des enfants et
1. INSTRUCTIONS DE SÉCURITÉ Pour votre sécurité et garantir une utili-sation correcte de l'appareil, lisez atten-tivement cette notice, y compris les con-seils et avertissements, avant d'installeret d'utiliser l'appareil pour la premièrefois. Pour éviter toute erreur ou accident,veillez à ce que tou...
Page 20 - Utilisation quotidienne
Si le circuit frigorifique est endomma-gé :– évitez les flammes vives et toute au- tre source d'allumage – aérez soigneusement la pièce où se trouve l'appareil • Ne modifiez pas les spécifications de l'appareil. Si le câble d'alimentationest endommagé, il peut causer uncourt circuit, un incendie et/...
Page 21 - BANDEAU DE COMMANDE
l'appareil. La chaleur excessive pour-rait endommager le revêtement plasti-que interne et l'humidité pourrait s'in-troduire dans le système électrique. 1.5 Installation Avant de procéder au branche-ment électrique, respectez scru-puleusement les instructionsfournies dans cette notice. • Déballez l'a...
Page 22 - Mise en fonctionnement; Voyant Alarme rouge
3 Voyant Congélation rapide jaune 4 Touche Arrêt du signal sonore etCongélation rapide 5 Voyant Alarme rouge 2.1 Mise en fonctionnement 1. Après l'installation, attendez quatreheures avant de brancher votre ap-pareil. 2. Branchez l'appareil à une prise mu-rale. 3. Tournez le thermostat dans le sensd...
Page 23 - PREMIÈRE UTILISATION; Nettoyage intérieur; UTILISATION QUOTIDIENNE; Congélation d'aliments; Conservation d'aliments
tion rapide pendant 2 ou 3 secon-des. 3. Placez les aliments dans le comparti-ment de congélation (compartimentsupérieur). Pour une performance decongélation optimale, retirez le tiroir(si présent) et rangez les aliments di-rectement sur l'évaporateur. Vousn'avez pas besoin d'enlever le tiroirsi vou...
Page 24 - CONSEILS UTILES
4.3 La décongélation Les aliments surgelés ou congelés peu-vent être décongelés à température am-biante. Les petites pièces peuvent même êtrecuites sans décongélation préalable :dans ce cas, la cuisson est plus longue. 5. CONSEILS UTILES 5.1 Bruits de fonctionnement normaux • Le liquide de refroidis...
Page 25 - ENTRETIEN ET NETTOYAGE; Nettoyage périodique; Dégivrage du congélateur
6. ENTRETIEN ET NETTOYAGE ATTENTION débrancher l'appareil avant touteopération d'entretien. Cet appareil contient des hydro-carbures dans son circuit réfrigé-rant : l'entretien et la recharge nedoivent donc être effectués quepar du personnel autorisé. 6.1 Nettoyage périodique Cet appareil doit être ...
Page 26 - EN CAS D'ANOMALIE DE FONCTIONNEMENT
Le dégivrage peut être accéléréen plaçant dans le compartimentcongélateur un récipient d'eauchaude. Retirez également lesmorceaux de glace au fur et àmesure que ceux-ci se déta-chent, avant que le processus dedégivrage ne soit terminé. 4. Une fois le dégivrage terminé, épon-gez et séchez bien l'inté...
Page 28 - Fermeture de la porte
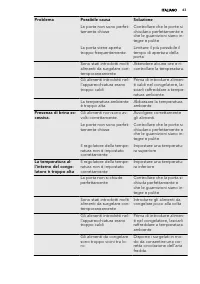
Anomalie Cause possible Solution Les produits à congelersont placés trop près lesuns des autres. Placez les produits de fa-çon à ce que l'air puissecirculer entre eux. La température àl'intérieur du congé-lateur est trop bas-se. Le thermostat n'est pasréglé correctement. Modifiez la position dutherm...
Page 29 - Emplacement; Température ambiante; Mise à niveau
8. CARACTÉRISTIQUES TECHNIQUES Dimension Hauteur 850 mm Largeur 595 mm Profondeur 635 mm Autonomie de fonction-nement 12 h Tension 230-240 V Fréquence 50 Hz Les caractéristiques techniques figurentsur la plaque signalétique située sur le côté gauche à l'intérieur de l'appareil etsur l'étiquette éner...
Page 30 - Réversibilité de la porte
9.3 Emplacement 100 mm 15 mm 15 mm L'appareil doit être installé à bonne distan-ce des sources de chaleur telles que les ra-diateurs, les chaudières, les rayons directsdu soleil, etc. Assurez-vous que l'air circulelibrement à l'arrière de l'appareil. Pour as-surer des performances optimales, si l'ap...
Page 31 - Branchement électrique
2 1 • Retirez la porte de l'appareil en la ti- rant légèrement vers le bas. • Dévissez la goupille de la charnière de porte supérieure de l'appareil puis re-vissez-la de l'autre côté. • Installez la porte de l'appareil sur la goupille de la charnière de porte su-périeure. • Retirez la charnière infé...
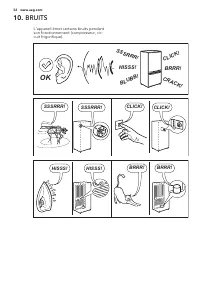
Page 32 - BRUITS
10. BRUITS L'appareil émet certains bruits pendantson fonctionnement (compresseur, cir-cuit frigorifique). BRRR ! HISSS! CLICK! BLUBB! CRACK! SSSRR R! OK CLICK! CLICK! SSSRRR! SSSRRR! BRRR! BRRR! HISSS! HISSS! 32 www.aeg.com
Page 33 - EN MATIÈRE DE PROTECTION DE L'ENVIRONNEMENT
BLUBB! BLUBB! CRACK! CRACK! 11. EN MATIÈRE DE PROTECTION DE L'ENVIRONNEMENT Recyclez les matériaux portant lesymbole . Déposez les emballagesdans les conteneurs prévus à ceteffet.Contribuez à la protection del'environnement et à votre sécurité,recyclez vos produits électriques etélectroniques. Ne je...
Page 34 - SERVIZIO CLIENTI E MANUTENZIONE
INDICE 1. ISTRUZIONI DI SICUREZZA . . . . . . . . . . . . . . . . . . . . . . . . . . . . . . . . . . . . . . . . . . . . . . . . . . . 35 2. PANNELLO DEI COMANDI . . . . . . . . . . . . . . . . . . . . . . . . . . . . . . . . . . . . . . . . . . . . . . . . . . 37 3. PRIMO UTILIZZO . . . . . . . . ...
Page 35 - ISTRUZIONI DI SICUREZZA; Sicurezza dei bambini e
1. ISTRUZIONI DI SICUREZZA Per garantire un impiego corretto e sicu-ro dell'apparecchio, prima dell'installa-zione e del primo utilizzo leggere con at-tenzione il libretto istruzioni, inclusi isuggerimenti e le avvertenze. Per evitareerrori e incidenti, è importante garantireche tutte le persone che...
Page 37 - PANNELLO DEI COMANDI
• Disimballare l'apparecchio e assicurar- si che non presenti danni. Non colle-gare l'apparecchio se è danneggiato.Segnalare immediatamente gli even-tuali danni al negozio in cui è stato ac-quistato. In questo caso conservarel'imballaggio. • Si consiglia di attendere almeno due ore prima di collegar...
Page 39 - Congelazione di alimenti; Conservazione dei
3. Sistemare gli alimenti nei vani delcongelatore (il contenitore in alto);per ottenere la massima prestazionetogliere il vassoio (se previsto dalmodello) e collocare direttamente icibi da congelare sull'evaporatore.Per congelare piccole quantità di ci-bo non occorre rimuovere il cestello. 4. Quando...
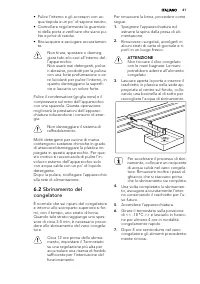
Page 41 - Sbrinamento del
• Pulire l'interno e gli accessori con ac- qua tiepida e un po' di sapone neutro. • Controllare regolarmente le guarnizio- ni della porta e verificare che siano pu-lite e prive di residui. • Risciacquare e asciugare accuratamen- te. Non tirare, spostare o danneg-giare tubi e/o cavi all'interno del-l...
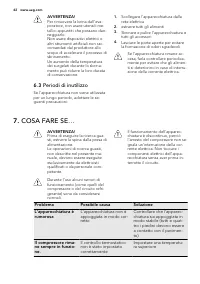
Page 42 - Periodi di inutilizzo; COSA FARE SE...; Problema
AVVERTENZA! Per rimuovere la brina dall'eva-poratore, non usare utensili me-tallici appuntiti che possano dan-neggiarlo.Non usare dispositivi elettrici oaltri strumenti artificiali non rac-comandati dal produttore alloscopo di accelerare il processo disbrinamento.Un aumento della temperaturadei surg...
Page 44 - Chiusura della porta
Problema Possibile causa Soluzione La temperatura al-l'interno del conge-latore è troppo bas-sa Il regolatore della tempe-ratura non è impostatocorrettamente Impostare una temperatu-ra superiore L'apparecchiaturanon funziona. Non siaccendono né il cir-cuito refrigerante néla lampadina La spina non è...
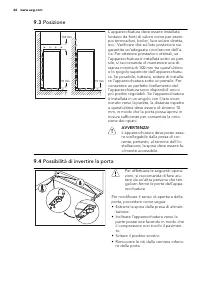
Page 45 - Luogo d'installazione; Temperatura ambiente; Livellamento
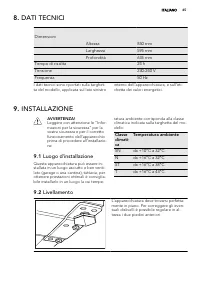
8. DATI TECNICI Dimensioni Altezza 850 mm Larghezza 595 mm Profondità 635 mm Tempo di risalita 24 h Tensione 230-240 V Frequenza 50 Hz I dati tecnici sono riportati sulla targhet-ta del modello, applicata sul lato sinistro interno dell'apparecchiatura, e sull'eti-chetta dei valori energetici. 9. INS...
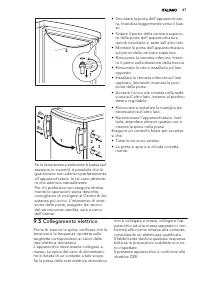
Page 47 - Collegamento elettrico
2 1 • Smontare la porta dell'apparecchiatu- ra, tirandola leggermente verso il bas-so. • Svitare il perno della cerniera superio- re della porta dell'apparecchiatura,quindi riavvitarlo in sede sull'altro lato. • Montare la porta dell'apparecchiatura sul perno della cerniera superiore. • Rimuovere la...
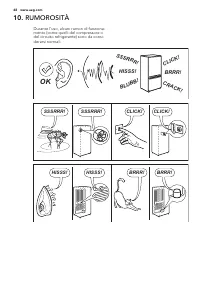
Page 48 - RUMOROSITÀ
10. RUMOROSITÀ Durante l'uso, alcuni rumori di funziona-mento (come quelli del compressore odel circuito refrigerante) sono da consi-derarsi normali. BRRR ! HISSS! CLICK! BLUBB! CRACK! SSSRR R! OK CLICK! CLICK! SSSRRR! SSSRRR! BRRR! BRRR! HISSS! HISSS! 48 www.aeg.com
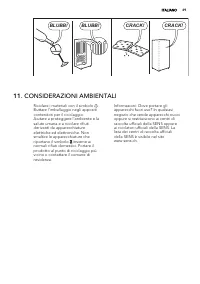
Page 49 - CONSIDERAZIONI AMBIENTALI
BLUBB! BLUBB! CRACK! CRACK! 11. CONSIDERAZIONI AMBIENTALI Riciclare i materiali con il simbolo .Buttare l'imballaggio negli appositicontenitori per il riciclaggio.Aiutare a proteggere l’ambiente e lasalute umana e a riciclare rifiutiderivanti da apparecchiatureelettriche ed elettroniche. Nonsmaltire...
Page 50 - CUSTOMER CARE AND SERVICE
CONTENTS 1. SAFETY INSTRUCTIONS . . . . . . . . . . . . . . . . . . . . . . . . . . . . . . . . . . . . . . . . . . . . . . . . . . . . . 51 2. CONTROL PANEL . . . . . . . . . . . . . . . . . . . . . . . . . . . . . . . . . . . . . . . . . . . . . . . . . . . . . . . . . . 53 3. FIRST USE . . . . . ...
Page 51 - SAFETY INSTRUCTIONS; Children and vulnerable
1. SAFETY INSTRUCTIONS In the interest of your safety and to en-sure the correct use, before installingand first using the appliance, read thisuser manual carefully, including its hintsand warnings. To avoid unnecessary mis-takes and accidents, it is important toensure that all people using the appl...
Page 53 - CONTROL PANEL; Switching on
cient ventilation follow the instructionsrelevant to installation. • Wherever possible the back of the product should be against a wall toavoid touching or catching warm parts(compressor, condenser) to preventpossible burn. • The appliance must not be located close to radiators or cookers. • Make su...
Page 54 - Red Alarm Indicator Light
temperature has reached a level re-quired for the safe conservation offrozen food. 2.2 Switching off 1. To turn off the appliance, turn theTemperature Regulator to the "O"position. 2. To disconnect the appliance fromthe power disconnect the mainsplug from the wall socket. 2.3 Temperature reg...
Page 55 - HELPFUL HINTS AND TIPS
3. FIRST USE 3.1 Cleaning the interior Before using the appliance for the firsttime, wash the interior and all internalaccessories with lukewarm water andsome neutral soap so as to remove the typical smell of a brand-new product,then dry thoroughly. Do not use detergents or abra-sive powders, as the...
Page 56 - CARE AND CLEANING; Periodic cleaning
• the freezing process takes 24 hours. No further food to be frozen shouldbe added during this period; • only freeze top quality, fresh and thor- oughly cleaned, foodstuffs; • prepare food in small portions to ena- ble it to be rapidly and completely fro-zen and to make it possible subse-quently to ...
Page 57 - Defrosting the freezer; Periods of non-operation
After cleaning, reconnect the equipmentto the mains supply. 6.2 Defrosting the freezer A certain amount of frost will always formon the freezer shelves and around thetop compartment.Defrost the freezer when the frost layerreaches a thickness of about 3-5 mm. About 12 hours prior to defrost-ing, set ...
Page 58 - WHAT TO DO IF...; Problem
7. WHAT TO DO IF… WARNING! Before troubleshooting, discon-nect the mains plug from themains socket.Only a qualified electrician orcompetent person must do thetroubleshooting that is not in thismanual. There are some sounds duringnormal use (compressor, refriger-ant circulation). The appliance operat...
Page 59 - Closing the door
Problem Possible cause Solution Large quantities of foodto be frozen were put inat the same time Insert smaller quantities offood to be frozen at anyone time. Food placed in the appli-ance was too warm Allow food to cool to roomtemperature before stor-ing. Products to be frozen areplaced too closely...
Page 60 - Positioning; Ambient temperature; Levelling
8. TECHNICAL DATA Dimension Height 850 mm Width 595 mm Depth 635 mm Rising Time 24 h Voltage 230-240 V Frequency 50 Hz The technical information are situated inthe rating plate on the internal left sideof the appliance and in the energy label. 9. INSTALLATION WARNING! Read the "Safety Informatio...
Page 62 - Electrical connection
2 1 • Take off the appliance door by pulling it slightly downwards. • Unscrew the top door hinge pin of the appliance then screw it back on theother side. • Fit the appliance door on the upper door hinge pin. • Remove the lower hinge. Put over the pin in the direction of the arrow. • Unscrew and ins...
Page 63 - NOISE
10. NOISE There are some sounds during normalrunning (compressor, refrigerant circula-tion). BRRR ! HISSS! CLICK! BLUBB! CRACK! SSSRR R! OK CLICK! CLICK! SSSRRR! SSSRRR! BRRR! BRRR! HISSS! HISSS! ENGLISH 63
Page 64 - ENVIRONMENT CONCERNS
BLUBB! BLUBB! CRACK! CRACK! 11. ENVIRONMENT CONCERNS Recycle the materials with thesymbol . Put the packaging inapplicable containers to recycle it.Help protect the environment andhuman health and to recycle wasteof electrical and electronic appliances. Do not disposeappliances marked with the symbo...


 AEG AREH30LF
User Manual
AEG AREH30LF
User Manual
 AEG AREI20XLF
User Manual
AEG AREI20XLF
User Manual
 AEG FFB72746PM
User Manual
AEG FFB72746PM
User Manual
 AEG PS254DB
User Manual
AEG PS254DB
User Manual
 AEG NIK85M00AZ
User Manual
AEG NIK85M00AZ
User Manual
 AEG DGE5662HB
User Manual
AEG DGE5662HB
User Manual
 AEG DGE5962HB
User Manual
AEG DGE5962HB
User Manual
 AEG HVB95450IB
User Manual
AEG HVB95450IB
User Manual
 AEG PL700
User Manual
AEG PL700
User Manual
 AEG W14120
User Manual
AEG W14120
User Manual
 AEG DC240
User Manual
AEG DC240
User Manual
 AEG T738A4OBC
User Manual
AEG T738A4OBC
User Manual
 AEG T858M6OBC
User Manual
AEG T858M6OBC
User Manual
 AEG T859M6OBC
User Manual
AEG T859M6OBC
User Manual
 AEG T959M6ORS
User Manual
AEG T959M6ORS
User Manual
 AEG IKE95771FB
User Manual
AEG IKE95771FB
User Manual
 AEG AREI9XLF
User Manual
AEG AREI9XLF
User Manual
 AEG A18SPC3
User Manual
AEG A18SPC3
User Manual
 AEG LF7384O4C
User Manual
AEG LF7384O4C
User Manual