Page 2 - KUNDENDIENST UND -BETREUUNG
INHALT 1. SICHERHEITSHINWEISE . . . . . . . . . . . . . . . . . . . . . . . . . . . . . . . . . . . . . . . . . . . . . . . . . . . . . . 3 2. BEDIENFELD . . . . . . . . . . . . . . . . . . . . . . . . . . . . . . . . . . . . . . . . . . . . . . . . . . . . . . . . . . . . . . . 5 3. ERSTE INBETRIEB...
Page 3 - SICHERHEITSHINWEISE; Sicherheit von Kindern und
1. SICHERHEITSHINWEISE Lesen Sie zu Ihrer Sicherheit und für eineoptimale Nutzung des Geräts vor derMontage und dem ersten Gebrauch dasvorliegende Benutzerhandbuch ein-schließlich der Ratschläge und Warnun-gen aufmerksam durch. Es ist wichtig,dass zur Vermeidung von Fehlern undUnfällen alle Personen...
Page 5 - BEDIENFELD
Hitze kann die Plastikteile im Innen-raum beschädigen und Feuchtigkeitkann in das elektrische System eindrin-gen, so dass die Teile unter Spannungstehen. 1.5 Montage Halten Sie sich für den elektri-schen Anschluss strikt an die An-weisungen der betreffenden Ab-schnitte. • Kontrollieren Sie nach dem ...
Page 7 - Schnellgefrierfunktion; ERSTE INBETRIEBNAHME; Reinigung des Innenraums; TÄGLICHER GEBRAUCH; Einfrieren frischer
Die rote Kontrolllampe ALARMblinkt weiterhin, bis die Innen-temperatur auf einen Wert abge-sunken ist, der für die sichere La-gerung des Gefrierguts erforder-lich ist. 2.5 FROSTMATIC- Schnellgefrierfunktion Wenn mehr als 3-4 kg Lebensmittel ein-gefroren werden sollen: 1. Halten Sie die SUPER-Schnell...
Page 8 - PRAKTISCHE TIPPS UND HINWEISE
4.2 Lagerung gefrorener Produkte Lassen Sie das Gerät vor der ersten In-betriebnahme oder nach einer Zeit, inder das Gerät nicht benutzt wurde, min-destens zwei Stunden lang auf den hö-heren Einstellungen laufen, bevor Sie Le-bensmittel in das Gefrierfach hinein le-gen. Kam es zum Beispiel durch ein...
Page 9 - REINIGUNG UND PFLEGE; Regelmäßige Reinigung
• werden Gefrierwürfel direkt nach der Entnahme aus dem Gefrierfach ver-wendet, können Sie zu Frostbrand aufder Haut führen; • es empfiehlt sich, das Einfrierdatum auf jeder einzelnen Packung zu notie-ren, um einen genauen Überblick überdie Lagerzeit zu haben. 5.3 Hinweise zur Lagerung gefrorener Pr...
Page 10 - Problem
6.2 Abtauen des Gefrierschranks Das Gefrierfach dieses Modells ist vomTyp "No Frost". Dies bedeutet, dass eswährend des Betriebs weder an den In-nenwänden noch auf den Lebensmittelnzu Frostbildung kommt.Die Bildung von Frost wird durch dieständig zirkulierende Kaltluft in diesemFach verhinde...
Page 12 - Schließen der Tür
Problem Mögliche Ursache Abhilfe Es ist zu kalt im Ge-friergerät. Der Temperaturreglerkann falsch eingestelltsein. Stellen Sie eine höhereTemperatur ein. Das Gerät funktio-niert überhauptnicht. Weder dieKühlung noch dieBeleuchtung funktio-nieren. Der Stecker ist nicht rich-tig in die Steckdose ge-st...
Page 13 - Aufstellung; Umgebungstemperatur; Ausrichten
8. TECHNISCHE DATEN Abmessungen Höhe 850 mm Breite 595 mm Tiefe 635 mm Lagerzeit bei Störung 13 Std. Spannung 230 V Frequenz 50 Hz Die technischen Daten befinden sich aufdem Typenschild im Innern des Gerätes auf der linken Seite sowie auf der Ener-gieplakette. 9. MONTAGE WARNUNG! Lesen Sie bitte die...
Page 15 - Elektrischer Anschluss
2 1 • Nehmen Sie die Gerätetür ab, indem Sie sie vorsichtig nach unten ziehen. • Schrauben Sie den Stift des oberen Türscharniers ab und schrauben Sieihn an der gegenüberliegenden Seitewieder an. • Hängen Sie die Gerätetür in den Stift des oberen Scharniers ein. • Entfernen Sie das untere Scharnier....
Page 16 - GERÄUSCH; BRRR; SSSRR; OK
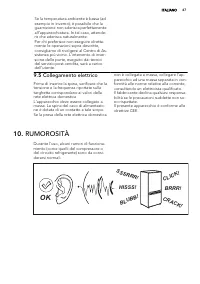
durch Missachtung der oben genanntenSicherheitshinweise entstehen. Das Gerät entspricht den EU- Richtlinien. 10. GERÄUSCH Während das Gerät in Betrieb ist, entste-hen bestimmte Geräusche (Kompressorund Kühlkreislauf). BRRR ! HISSS! CLICK! BLUBB! CRACK! SSSRR R! OK CLICK! CLICK! SSSRRR! SSSRRR! BRRR!...
Page 17 - UMWELTTIPPS
BLUBB! BLUBB! CRACK! CRACK! 11. UMWELTTIPPS Recyceln Sie Materialien mit demSymbol . Entsorgen Sie dieVerpackung in den entsprechendenRecyclingbehältern.Recyceln Sie zum Umwelt- undGesundheitsschutz elektrische undelektronische Geräte. Entsorgen SieGeräte mit diesem Symbol nichtmit dem Hausmüll. Bri...
Page 19 - INSTRUCTIONS DE SÉCURITÉ; Sécurité des enfants et
1. INSTRUCTIONS DE SÉCURITÉ Pour votre sécurité et garantir une utili-sation correcte de l'appareil, lisez atten-tivement cette notice, y compris les con-seils et avertissements, avant d'installeret d'utiliser l'appareil pour la premièrefois. Pour éviter toute erreur ou accident,veillez à ce que tou...
Page 20 - Utilisation quotidienne
Si le circuit frigorifique est endomma-gé :– évitez les flammes vives et toute au- tre source d'allumage – aérez soigneusement la pièce où se trouve l'appareil • Ne modifiez pas les spécifications de l'appareil. Si le câble d'alimentationest endommagé, il peut causer uncourt circuit, un incendie et/...
Page 21 - BANDEAU DE COMMANDE
l'appareil. La chaleur excessive pour-rait endommager le revêtement plasti-que interne et l'humidité pourrait s'in-troduire dans le système électrique. 1.5 Installation Avant de procéder au branche-ment électrique, respectez scru-puleusement les instructionsfournies dans cette notice. • Déballez l'a...
Page 24 - CONSEILS UTILES
En cas de décongélation acci-dentelle, due par exemple à unecoupure de courant, si la coupu-re a duré plus de temps qu'indi-qué au paragraphe « Autonomiede fonctionnement » du chapitre« Caractéristiques techniques »,consommez rapidement les ali-ments décongelés ou cuisez-lesimmédiatement avant de le...
Page 25 - ENTRETIEN ET NETTOYAGE; Nettoyage périodique
• prévoyez un temps réduit au minimum pour le transport des denrées du ma-gasin d'alimentation à votre domicile ; • évitez d'ouvrir trop souvent la porte du congélateur et ne la laissez ouverteque le temps nécessaire ; • une fois décongelés, les aliments se détériorent rapidement et ne peuventpas êt...
Page 26 - EN CAS D'ANOMALIE DE FONCTIONNEMENT; Problème
6.4 En cas d'absence prolongée ou de non-utilisation Prenez les précautions suivantes : 1. débranchez l'appareil 2. retirez tous les aliments 3. nettoyez l'appareil et tous les acces-soires 4. maintenez le couvercle ouvert pen-dant toute la durée de non-utilisa- tion pour éviter la formationd'odeurs...
Page 28 - Fermeture de la porte; CARACTÉRISTIQUES TECHNIQUES
Problème Cause possible Solution L'appareil n'est pas enfonctionnement. Mettez l'appareil en fonc-tionnement. La prise de courant n'estpas alimentée (essayez debrancher un autre appa-reil dans la prise). Faites appel à un électri-cien qualifié. L'appareil ne refroi-dit pas du tout. L'appareil n'est ...
Page 29 - INSTALLATION; Emplacement; Température ambiante; Mise à niveau
9. INSTALLATION AVERTISSEMENT Pour votre sécurité et le bonfonctionnement de l'appareil,veuillez lire attentivement les"Consignes de sécurité" avantd'installer l'appareil. 9.1 Emplacement Pour le bon fonctionnement de l'appa-reil, il est impératif de respecter les tem-pératures ambiantes du ...
Page 30 - Réversibilité de la porte
9.3 Emplacement 100 mm 15 mm 15 mm L'appareil doit être installé à bonne distan-ce des sources de chaleur telles que les ra-diateurs, les chaudières, les rayons directsdu soleil, etc. Assurez-vous que l'air circulelibrement à l'arrière de l'appareil. Pour as-surer des performances optimales, si l'ap...
Page 31 - Branchement électrique
2 1 • Retirez la porte de l'appareil en la ti- rant légèrement vers le bas. • Dévissez la goupille de la charnière de porte supérieure de l'appareil puis re-vissez-la de l'autre côté. • Installez la porte de l'appareil sur la goupille de la charnière de porte su-périeure. • Retirez la charnière infé...
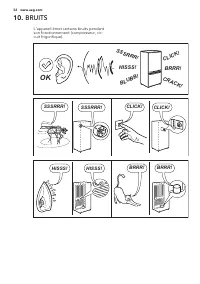
Page 32 - BRUITS
10. BRUITS L'appareil émet certains bruits pendantson fonctionnement (compresseur, cir-cuit frigorifique). BRRR ! HISSS! CLICK! BLUBB! CRACK! SSSRR R! OK CLICK! CLICK! SSSRRR! SSSRRR! BRRR! BRRR! HISSS! HISSS! 32 www.aeg.com
Page 33 - EN MATIÈRE DE PROTECTION DE L'ENVIRONNEMENT
BLUBB! BLUBB! CRACK! CRACK! 11. EN MATIÈRE DE PROTECTION DE L'ENVIRONNEMENT Recyclez les matériaux portant lesymbole . Déposez les emballagesdans les conteneurs prévus à ceteffet.Contribuez à la protection del'environnement et à votre sécurité,recyclez vos produits électriques etélectroniques. Ne je...
Page 34 - SERVIZIO CLIENTI E MANUTENZIONE
INDICE 1. ISTRUZIONI DI SICUREZZA . . . . . . . . . . . . . . . . . . . . . . . . . . . . . . . . . . . . . . . . . . . . . . . . . . . 35 2. PANNELLO DEI COMANDI . . . . . . . . . . . . . . . . . . . . . . . . . . . . . . . . . . . . . . . . . . . . . . . . . . 37 3. PRIMO UTILIZZO . . . . . . . . ...
Page 35 - ISTRUZIONI DI SICUREZZA; Sicurezza dei bambini e
1. ISTRUZIONI DI SICUREZZA Per garantire un impiego corretto e sicu-ro dell'apparecchio, prima dell'installa-zione e del primo utilizzo leggere con at-tenzione il libretto istruzioni, inclusi isuggerimenti e le avvertenze. Per evitareerrori e incidenti, è importante garantireche tutte le persone che...
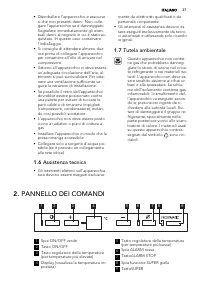
Page 37 - PANNELLO DEI COMANDI
• Disimballare l'apparecchio e assicurar- si che non presenti danni. Non colle-gare l'apparecchio se è danneggiato.Segnalare immediatamente gli even-tuali danni al negozio in cui è stato ac-quistato. In questo caso conservarel'imballaggio. • Si consiglia di attendere almeno due ore prima di collegar...
Page 39 - Congelazione di alimenti; Conservazione dei
2. È possibile disattivare la funzione inqualsiasi momento premendo il ta-sto di congelamento rapido SUPER. 3. Disporre il cibo nei vani del congela-tore (indicati con grafica) e lasciareattiva la funzione FROSTMATIC peraltre 24 ore. 4. Successivamente, premere di nuovoil tasto di congelamento rapid...
Page 41 - Sbrinamento del vano
• Pulire l'interno e gli accessori con ac- qua tiepida e un po' di sapone neutro. • Controllare regolarmente le guarnizio- ni della porta e verificare che siano pu-lite e prive di residui. • Risciacquare e asciugare accuratamen- te. Non tirare, spostare o danneg-giare tubi e/o cavi all'interno del-l...
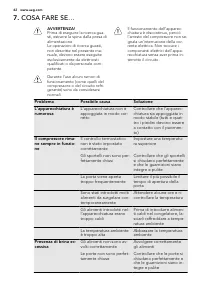
Page 42 - COSA FARE SE...; Problema
7. COSA FARE SE… AVVERTENZA! Prima di eseguire la ricerca gua-sti, estrarre la spina dalla presa dialimentazione.Le operazioni di ricerca guasti,non descritte nel presente ma-nuale, devono essere eseguiteesclusivamente da elettricistiqualificati o da personale com-petente. Durante l'uso alcuni rumor...
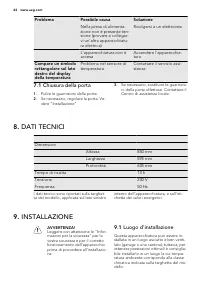
Page 44 - Chiusura della porta; DATI TECNICI; Luogo d'installazione
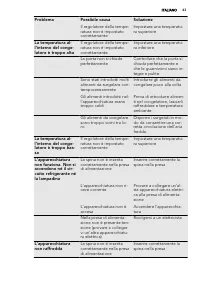
Problema Possibile causa Soluzione Nella presa di alimenta-zione non è presente ten-sione (provare a collegar-vi un'altra apparecchiatu-ra elettrica) Rivolgersi a un elettricista L'apparecchiatura non èaccesa Accendere l'apparecchia-tura Compare un simbolorettangolare sul latodestro del displaydella...
Page 45 - Temperatura ambiente; Livellamento
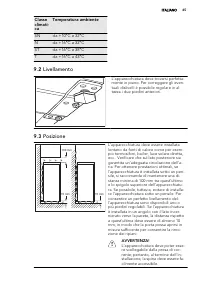
Classeclimati-ca Temperatura ambiente SN da +10°C a 32°C N da +16°C a 32°C ST da +16°C a 38°C T da +16°C a 43°C 9.2 Livellamento L'apparecchiatura deve trovarsi perfetta-mente in piano. Per correggere gli even-tuali dislivelli è possibile regolare in al-tezza i due piedini anteriori. 9.3 Posizione 1...
Page 46 - Possibilità di invertire la porta
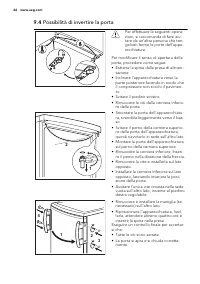
9.4 Possibilità di invertire la porta Per effettuare le seguenti opera-zioni, si raccomanda di farsi aiu-tare da un'altra persona che ten-ga ben ferme le porte dell'appa-recchiatura. Per modificare il senso di apertura dellaporta, procedere come segue:• Estrarre la spina dalla presa di alimen- tazio...
Page 47 - Collegamento elettrico; RUMOROSITÀ
Se la temperatura ambiente è bassa (adesempio in inverno), è possibile che laguarnizione non aderisca perfettamenteall'apparecchiatura. In tal caso, attende-re che aderisca naturalmente.Per chi preferisce non eseguire diretta-mente le operazioni sopra descritte,consigliamo di rivolgersi al Centro di...
Page 48 - CONSIDERAZIONI AMBIENTALI
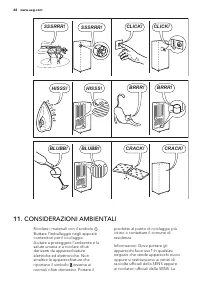
CLICK! CLICK! SSSRRR! SSSRRR! BRRR! BRRR! HISSS! HISSS! BLUBB! BLUBB! CRACK! CRACK! 11. CONSIDERAZIONI AMBIENTALI Riciclare i materiali con il simbolo .Buttare l'imballaggio negli appositicontenitori per il riciclaggio.Aiutare a proteggere l’ambiente e lasalute umana e a riciclare rifiutiderivanti d...
Page 50 - CUSTOMER CARE AND SERVICE
CONTENTS 1. SAFETY INSTRUCTIONS . . . . . . . . . . . . . . . . . . . . . . . . . . . . . . . . . . . . . . . . . . . . . . . . . . . . . 51 2. CONTROL PANEL . . . . . . . . . . . . . . . . . . . . . . . . . . . . . . . . . . . . . . . . . . . . . . . . . . . . . . . . . . 53 3. FIRST USE . . . . . ...
Page 51 - SAFETY INSTRUCTIONS; Children and vulnerable
1. SAFETY INSTRUCTIONS In the interest of your safety and to en-sure the correct use, before installingand first using the appliance, read thisuser manual carefully, including its hintsand warnings. To avoid unnecessary mis-takes and accidents, it is important toensure that all people using the appl...
Page 53 - CONTROL PANEL; Switching on
cient ventilation follow the instructionsrelevant to installation. • Wherever possible the back of the product should be against a wall toavoid touching or catching warm parts(compressor, condenser) to preventpossible burn. • The appliance must not be located close to radiators or cookers. • Make su...
Page 55 - HELPFUL HINTS AND TIPS
3. FIRST USE 3.1 Cleaning the interior Before using the appliance for the firsttime, wash the interior and all internalaccessories with lukewarm water andsome neutral soap so as to remove the typical smell of a brand-new product,then dry thoroughly. Do not use detergents or abra-sive powders, as the...
Page 56 - CARE AND CLEANING; Periodic cleaning
• the freezing process takes 24 hours. No further food to be frozen shouldbe added during this period; • only freeze top quality, fresh and thor- oughly cleaned, foodstuffs; • prepare food in small portions to ena- ble it to be rapidly and completely fro-zen and to make it possible subse-quently to ...
Page 57 - WHAT TO DO IF...
After cleaning, reconnect the equipmentto the mains supply. 6.2 Defrosting of the freezer The freezer compartment of this model,on the other hand, is a "no frost" type.This means that there is no buildup offrost when it is in operation, neither onthe internal walls nor on the foods.The absen...
Page 59 - Closing the door; TECHNICAL DATA
Problem Possible cause Solution There is no voltage in themains socket (try to con-nect another applianceinto it) Call an electrician The appliance doesnot cool at all Plug is not connected tothe mains socket properly Connect the mains plugproperly There is no voltage in themains socket (try to con-...
Page 60 - Positioning; Ambient temperature; Levelling
9. INSTALLATION WARNING! Read the "Safety Information"carefully for your safety and cor-rect operation of the appliancebefore installing the appliance. 9.1 Positioning This appliance can be installed in a dry,well ventilated indoor (garage or cellar)also, but for optimum performance in-stall...
Page 62 - Electrical connection
2 1 • Take off the appliance door by pulling it slightly downwards. • Unscrew the top door hinge pin of the appliance then screw it back on theother side. • Fit the appliance door on the upper door hinge pin. • Remove the lower hinge. Put over the pin in the direction of the arrow. • Unscrew and ins...
Page 63 - NOISE
10. NOISE There are some sounds during normalrunning (compressor, refrigerant circula-tion). BRRR ! HISSS! CLICK! BLUBB! CRACK! SSSRR R! OK CLICK! CLICK! SSSRRR! SSSRRR! BRRR! BRRR! HISSS! HISSS! ENGLISH 63
Page 64 - ENVIRONMENT CONCERNS
BLUBB! BLUBB! CRACK! CRACK! 11. ENVIRONMENT CONCERNS Recycle the materials with thesymbol . Put the packaging inapplicable containers to recycle it.Help protect the environment andhuman health and to recycle wasteof electrical and electronic appliances. Do not disposeappliances marked with the symbo...


 AEG AREH30LF
User Manual
AEG AREH30LF
User Manual
 AEG AREI20XLF
User Manual
AEG AREI20XLF
User Manual
 AEG FFB72746PM
User Manual
AEG FFB72746PM
User Manual
 AEG PS254DB
User Manual
AEG PS254DB
User Manual
 AEG NIK85M00AZ
User Manual
AEG NIK85M00AZ
User Manual
 AEG DGE5662HB
User Manual
AEG DGE5662HB
User Manual
 AEG DGE5962HB
User Manual
AEG DGE5962HB
User Manual
 AEG HVB95450IB
User Manual
AEG HVB95450IB
User Manual
 AEG PL700
User Manual
AEG PL700
User Manual
 AEG W14120
User Manual
AEG W14120
User Manual
 AEG DC240
User Manual
AEG DC240
User Manual
 AEG T738A4OBC
User Manual
AEG T738A4OBC
User Manual
 AEG T858M6OBC
User Manual
AEG T858M6OBC
User Manual
 AEG T859M6OBC
User Manual
AEG T859M6OBC
User Manual
 AEG T959M6ORS
User Manual
AEG T959M6ORS
User Manual
 AEG IKE95771FB
User Manual
AEG IKE95771FB
User Manual
 AEG AREI9XLF
User Manual
AEG AREI9XLF
User Manual
 AEG A18SPC3
User Manual
AEG A18SPC3
User Manual
 AEG LF7384O4C
User Manual
AEG LF7384O4C
User Manual