Page 3 - Inhalt
3 Inhalt Sicherheit . . . . . . . . . . . . . . . . . . . . . . . . . . . . . . . . . . . . . . . . . . . . . . 4 Entsorgung . . . . . . . . . . . . . . . . . . . . . . . . . . . . . . . . . . . . . . . . . . . . . 6 Information zur Geräteverpackung . . . . . . . . . . . . . . . . . . . . . . . . . ...
Page 4 - Sicherheit; Bestimmungsgemäße Verwendung; Vor der ersten Inbetriebnahme; Sicherheit von Kindern
4 Sicherheit Die Sicherheit unserer Kältegeräte entspricht den anerkannten Regeln derTechnik und dem Gerätesicherheitsgesetz. Dennoch sehen wir unsveranlaßt, Sie mit folgenden Sicherheitshinweisen vertraut zu machen: Bestimmungsgemäße Verwendung • Das Kältegerät ist für die Verwendung im Haushalt be...
Page 5 - Im Alltagsbetrieb; Im Störungsfall
5 • Das Gerät darf von Kindern und Personen, deren physische, sensorische oder geistige Fähigkeiten sowie Mangel an Erfahrung und Kenntnisseneinen sicheren Gebrauch des Gerätes ausschließen, nur unter Aufsichtoder nach entsprechender Einweisung durch eine Person benutzt werden,die sicherstellt, dass...
Page 6 - Entsorgung; Information zur Geräteverpackung
6 Entsorgung Information zur Geräteverpackung Alle verwendeten Werkstoffe sind umweltverträglich! Sie können gefahrlosdeponiert oder in der Müllverbrennungsanlage verbrannt werden!Zu den Werkstoffen: Die Kunststoffe können auch wiederverwertet werdenund sind folgendermaßen gekennzeichnet:>PE< ...
Page 7 - Aufstellen; Aufstellort; Transportschutz entfernen
7 Aufstellen Aufstellort Das Gerät soll in einem gut belüfteten und trockenen Raum stehen.Die Umgebungstemperatur wirkt sich auf den Stromverbrauch und dieeinwandfreie Funktion des Gerätes aus. Daher sollte das Gerät – nicht direkter Sonneneinstrahlung ausgesetzt sein; – nicht an Heizkörpern, neben ...
Page 8 - Hintere Abstandstücke
8 Ihr Gerät braucht Luft Aus Gründen der Sicherheit mußeine Mindestbelüftunggewährleistet sein, wie aus derAbb. hervorgeht: Achtung:Die Lüftungs-Öffnungenmüssen immer saubergehaltenwerden. Damit die Luftzirkulieren kann, dieLüftungsöffnungen niemalsabdecken oder verstellen. Türanschlag wechseln Der ...
Page 11 - Bedienungs- und Kontrolleinrichtung; Tasten zur Temperatureinstellung
11 Bedienungs- und Kontrolleinrichtung B C E G A F H D A. ON/OFF Taste B. Taste zur Temperatureinstellung (+) C. Temperaturanzeige D. Taste zur Temperatureinstellung (-) E Anzeige für eingeschaltete FROSTMATIC Funktion (gelb) F. FROSTMATIC Taste G. Warnanzeige (rot) H. Taste ALARM OFF Tasten zur Tem...
Page 12 - „Gefrieren“ oder „Kühlen“ wählen; Temperatur einstellen
12 erreicht ist. Ein Warnton ist zu hören. 3. Auf eine der Tasten B oder D drücken. Die Temperatur-Anzeige schaltet umund zeigt blinkend die momentan eingestellte SOLL-Temperatur an. 4. Gewünschte Temperatur durch Drücken der Tasten C und E einstellen (sieheAbschnitt "Tasten zur Temperatureinste...
Page 13 - Getränke Kühlen
13 2. Zum Verstellen auf wärmere Temperaturen die Taste „+“ (WÄRMER)drücken. Zum Verstellen auf kältere Temperaturen die Taste „-“ (KÄLTER)drücken. Die Temperaturanzeige zeigt sofort die geänderte Einstellung an.Mit jedem Tastendruck wird die Temperatur um 1 °C weitergestellt.Folgende SOLL-Temperatu...
Page 14 - Gerät abschalten; Eiswürfel bereiten; Kälteakkus
14 Achtung: Bei Erwärmung im Gefrierraum muß der Zustand des Gefriergutes überprüft werden. Gerät abschalten 1. Zum Abschalten die Taste ON/OFF ca. 5 Sekunden gedrückt halten. In derTemperaturanzeige erfolgt ein sogenannter “Count down”, dabei wirdrückwärts von “3” nach “1” gezählt. Mit Erreichen de...
Page 15 - Einfrieren und Tiefkühllagern
15 Einfrieren und Tiefkühllagern Im Gefrierschrank können Sie Tiefkühlkost lagern und frische Lebens-mitteleinfrieren. Achtung! • Vor dem Einfrieren von Lebensmitteln muß die Temperatur im Gefrierraum -18 °C oder kälter sein. • Bitte das auf dem Typschild angegebene Gefriervermögen beachten. Das Gef...
Page 17 - Abtauen; Reinigen und Pflege; Gefrierkalender
17 Abtauen Das Abtauen des Gefrierraumes erfolgt automatisch. Reinigen und Pflege Aus hygienischen Gründen sollte das Geräteinnere, einschließlichInnenausstattung, regelmäßig gereinigt werden. Warnung! • Das Gerät darf während der Reinigung nicht am Stromnetz angeschlossensein. Stromschlaggefahr! Vo...
Page 19 - Abhilfe bei Störungen
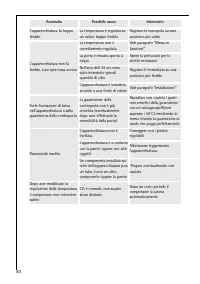
19 Was tun, wenn ... Abhilfe bei Störungen Möglicherweise handelt es sich bei einer Störung nur um einen kleinenFehler, den Sie anhand nachfolgender Hinweise selbst beheben können.Führen Sie keine weiteren Arbeiten selbst aus, wenn nachstehendeInformationen im konkreten Fall nicht weiterhelfen. Warn...
Page 22 - Indice
22 Indice Sicurezza. . . . . . . . . . . . . . . . . . . . . . . . . . . . . . . . . . . . . . . . . . . . . . .23 Smaltimento . . . . . . . . . . . . . . . . . . . . . . . . . . . . . . . . . . . . . . . . . . . .25 Informazione sull’imballaggio dell’apparecchio . . . . . . . . . . . . . . . . . . ...
Page 23 - Sicurezza; Impiego conforme alla scopo previsto
23 Sicurezza La sicurezza dei nostri apparecchi é conforme ai regolamenti approvati dellatecnica ed alla legge di sicurezza degli apparecchi. Nonostante ciò, riteniamodi doverVi facilitare la presa di confidenza con le seguenti avvertenze: Impiego conforme alla scopo previsto • L’apparecchio é stato...
Page 24 - Nel servizio quotidiano; Nel caso di una anomalia
24 bloccaggio. Mediante ciò si evita che si possano chiudere dentro deibambini che giocano (pericolo di soffocamento!) oppure che possanotrovarsi in altre situazioni pericolose per la vita. • Questo apparecchio non deve essere utilizzato da persone (e bambini) con ridotte capacità fisiche, sensorial...
Page 25 - Smaltimento; Informazione sull’imballaggio dell’apparecchio; Avvertenze sullo smaltimento :
25 Smaltimento Informazione sull’imballaggio dell’apparecchio Tutti i materiali di produzione impiegati sono tollerabili per l’ambiente!Questi possono essere depositati senza pericoli oppure smaltiti nell’impiantobruciatore di rifiuti urbani!Riguardo i materiali di produzione: I materiali sintetici ...
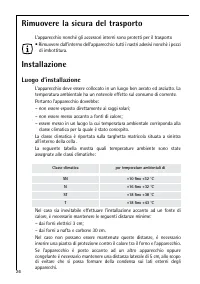
Page 26 - Installazione; Luogo d’installazione; Rimuovere la sicura del trasporto
26 Installazione Luogo d’installazione L’apparecchio deve essere collocato in un luogo ben aerato ed asciutto. Latemperatura ambientale ha un notevole effetto sul consumo di corrente.Pertanto l’apparecchio dovrebbe: – non essere esposto direttamente ai raggi solari; – non essere messo accanto a font...
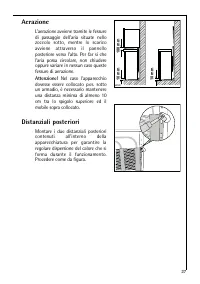
Page 27 - Aerazione; Distanziali posteriori
27 Aerazione L’aerazione avviene tramite le fessuredi passaggio dell’aria situate nellozoccolo sotto, mentre lo scaricoavviene attraverso il pannelloposteriore verso l’alto. Per far si chel’aria possa circolare, non chiudereoppure variare in nessun caso questefessure di aerazione. Attenzione! Nel ca...
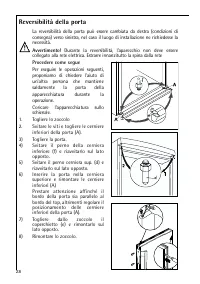
Page 28 - Reversibilità della porta
28 Reversibilità della porta La reversibilità della porta può essere cambiata da destra (condizioni diconsegna) verso sinistra, nel caso il luogo di installazione ne richiedesse lanecessità. Avvertimento! Durante la reversibilità, l’aparecchio non deve essere collegato alla rete elettrica. Estrarre ...
Page 29 - Prima della messa in servizio; Collegamento elettrico; Attenzione
29 Prima della messa in servizio • Pulire l’interno dell’apparecchio e tutti gli accessori prima di effettuare la messa in servizio (vedi capitolo “Pulizia e cura”). Collegamento elettrico Per effettuare il collegamento elettrico é necessario impiegare la spina concontatto di protezione installata c...
Page 30 - Pannello di controllo
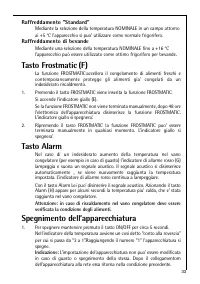
30 Pannello di controllo B C E G A F H D A. Tasto “ON/OFF” B. Tasto per la regolazione della temperatura (+) C. Indicatore della temperatura D. Tasto per la regolazione della temperatura (-) E. Indicatore per la funzione FROSTMATIC (giallo) F. Tasto FROSTMATIC G. Indicatore di allarme (rosso) H. Tas...
Page 32 - Regolazione della temperatura
32 • Al momento di commutare da “Raffreddamento” a “Congelamento” nell'indicatore di temperatura comparira’ “CF” (Cooling-Freezing),un segnale acustico confermera’ la commutazione e l'indicatore ditemperatura mostrera’ cifre lampeggianti (temperatura di set inmodo congelamento -18 °C). Con i tasti p...
Page 33 - Raffreddamento di bevande; Tasto Alarm
33 Raffreddamento "Standard" Mediante la selezione della temperatura NOMINALE in un campo attornoai +5 °C l’apparecchio si puo’ utilizzare come normale frigorifero. Raffreddamento di bevande Mediante una selezione della temperatura NOMINALE fino a +16 °Cl’apparecchio può essere utilizzato co...
Page 34 - Congelazione e conservazione
34 Congelazione e conservazione Il vostro congelatore é adatto sia per la conservazione dei surgelati che perla congelazione di cibi freschi. Attenzione • La temperatura nello scomparto congelatore dev’essere di -18°C o inferiore prima di introdurre i cibi per la congelazione. • Attenersi per la con...
Page 35 - Calendario di congelamento
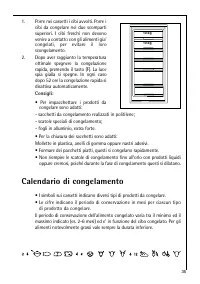
35 1. Porre nei cassetti i cibi avvolti. Porre icibi da congelare nei due scompartisuperiori. I cibi freschi non devonovenire a contatto con gli alimenti gia’congelati, per evitare il loroscongelamento. 2. Dopo aver raggiunto la temperaturaottimale spegnere la congelazionerapida, premendo il tasto (...
Page 36 - Vano congelatore; Massa eutettica
36 Cubetti di ghiaccio 1. Riempire a 3/4 la bacinella ghiaccio con acqua fredda e riporla nel cassettocongelatore. 2. Per togliere i cubetti é sufficiente torcere la bacinella o metterla brevementesotto l’acqua corrente. Sbrinamento Vano congelatore Lo sbrinamento del vano congelatore avviene automa...
Page 37 - Pulizia
37 Pulizia Avvertimento! • Durante la pulizia, l’apparecchio non deve essere collegato alla rete elettrica. Pericolo di scosse elettriche! Prima di eseguire i lavori di pulizia,é necessario disinserire l’apparecchio, estrarre la spina oppure disinserirerispett. svitare il fusibile. • Non pulire mai ...
Page 38 - Consigli per il risparmio energetico; Spegnimento dell’apparecchio
38 Consigli per il risparmio energetico • Non installare l’apparecchiatura vicino a forni o altre fonti di calore. Con temperature ambientali elevate il compressore entra in funzione piùspesso e più a lungo. • Garantire una sufficiente aerazione in entrata e uscita. Non coprire mai le aperture d’aer...
Page 39 - Interventi in caso di anomalie
39 Luce spia verde non siaccende, l’apparecchiaturafunziona. Luce verde difettata Chiamare l’assistenza tecnica Luce spia gialla non siaccende con l’accensionedella congelazione rapida. Luce gialla difettata Chiamare l’assistenza tecnica Che cosa fare, se ... Interventi in caso di anomalie Probabilm...
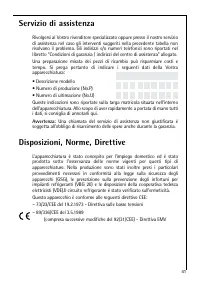
Page 41 - Servizio di assistenza
41 Servizio di assistenza Rivolgersi al Vostro rivenditore specializzato oppure presso il nostro serviziodi assistenza nel caso gli interventi suggeriti nella precedente tabella nonrisolvano il problema. Gli indirizzi e/o numeri telefonici sono riportati nellibretto “Condizioni di garanzia / indiriz...
Page 42 - Chère cliente, cher client
42 Chère cliente, cher client Nous vous remercions d'avoir choisi un de nos produits.Tout au long de son utilisation, vous ferez l'expérience d'une combinaisonparfaite entre design fonctionnel et technologie d'avant-garde.Sa fabrication est basée sur les standards les plus élevés de l'excellence. Vo...
Page 43 - Sommaire
43 Sommaire Sécurité . . . . . . . . . . . . . . . . . . . . . . . . . . . . . . . . . . . . . . . . . . . . . . . 44 Elimination . . . . . . . . . . . . . . . . . . . . . . . . . . . . . . . . . . . . . . . . . . . . . 46 Information sur l’emballage de l’appareil . . . . . . . . . . . . . . . . . ....
Page 44 - Sécurité; Utilisation conforme à la destination; Avant la première mise en service; Sécurité des enfants
44 Sécurité La sécurité de nos appareils est conforme aux règles reconnues de latechnique et à la loi sur la sécurité des appareils. Nous nous voyonscependant obligés de vous familiariser avec les conseils de sécurité suivants: Utilisation conforme à la destination • L’appareil de congélation est co...
Page 45 - Dans le cadre du fonctionnement quotidien; En cas de dérangement
45 d’alimentation, enlever ou détruire les fermetures à coulisse ou à verrouéventuellement présentes. Vous évitez de la sorte que des enfants quijouent puissent s’enfermer dans l’appareil (Danger de suffocation !) ou nese mettent dans d’autres types de situation de danger mortel. •Cet appareil n'est...
Page 46 - Elimination; Information sur l’emballage de l’appareil
46 Elimination Information sur l’emballage de l’appareil Tous les matériaux utilisés sont non polluants ! Ils peuvent être déposés sansdanger à une décharge ou incinérés !Matériaux : Les matières plastiques peuvent également être recyclées et sontrepérées de la manière suivante:>PE< pour le po...
Page 47 - Installation; Emplacement
47 Installation Emplacement Placez de préférence votre appareilloin d’une source de chaleur(chauffage, cuisson ou rayonssolaires trop intenses).Veillez à ce que l’air circule librementtout autour de l’appareil. Si toutefois,vous désirez placer l’appareil dansune niche ou directement sous unélément, ...
Page 49 - Réversibilité de la porte
49 Réversibilité de la porte La porte de cet appareil est réversible: son sens d’ouverture peut êtremodifié en fonction du souhait de l’utilisateur. Attention ! Avant de procéder à la réversibilité de la porte, débranchez l’appareil. Pour changer le sens d'ouverture de la porte : Nous vous conseillo...
Page 50 - Utilisation de votre appareil; Avant la mise en service; Bandeau de commande
50 Utilisation de votre appareil A. Touche MARCHE/ARRET B. Touche de réglage de la température (moins de froid) C. Indicateur de température D. Touche de réglage de la température (plus de froid) E Voyant FROSTMATIC (jaune) F. Touche FROSTMATIC G. Voyant d'alarme (rouge) H. Touche arrêt alarme B C E...
Page 51 - Touches de réglage de la température; L’indicateur de température; Mise en service - Réglage de la température
51 Touches de réglage de la température Le réglage de la température se fait à l’aide des touches «+» et «-» .Les touches sont en relation avec l’indicateur de température. • Lorsqu’on appuie sur une des deux touches «+» (MOINS FROID) ou «-» (PLUS FROID), l’indicateur de température passe de l’affic...
Page 52 - Sélection du mode «Congélation» ou «Réfrigération»
52 Sélection du mode «Congélation» ou «Réfrigération» Si nécessaire, modifiez le mode de fonctionnement comme suit: 1. Maintenez la touche FROSTMATIC et la touche «+» (PLUS CHAUD)simultanément enfoncées pendant 5 secondes. • Lors de la commutation de «Congélation» vers «Réfrigération», «FC» (Freezin...
Page 57 - Calendrier de congélation; Dégivrage
57 • d’augmenteur l’autonomie de votre appareil en cas de coupure de courant, • de transporter des produits congelés ou surgelés, • de maintenir le froid au niveau le plus bas dans une glacière de pique nique, • de maintenir le froid dans les produits surgelés ou congelés durant la période de dégivr...
Page 58 - En cas d’absence prolongée ou de non-utilisation; Mettre l’appareil hors service
58 Nettoyage intérieur Il est recommandé de nettoyer votre appareil très régulièrement.A l’occasion d’un dégivrage, lavez le compartiment et le joint de porte àl’aide d’une éponge et d’un détergent doux. Rincez et séchezsoigneusement. Nettoyage extérieur De nombreux détergents spécifiques pour les s...
Page 59 - Remèdes en cas de dérangements
59 Que faire si ... Remèdes en cas de dérangements Le dérangement n’est peut-être qu’un petit défaut auquel vous pouvezremédier vous-même à l’aide des indications suivantes. N’effectuez pas detravaux vous-même si les informations suivantes ne vous aident pas demanière concrète. Avertissement! Les ré...
Page 62 - Dear Customer
62 Dear Customer Thank you for choosing one of our high-quality products.With this appliance you will experience the perfect combination of functionaldesign and cutting edge technology.Convince yourself that our appliances are engineered to deliver the bestperformance and control - indeed we are set...
Page 63 - Contents
63 Contents Safety . . . . . . . . . . . . . . . . . . . . . . . . . . . . . . . . . . . . . . . . . . . . . . . . .64 Disposal . . . . . . . . . . . . . . . . . . . . . . . . . . . . . . . . . . . . . . . . . . . . . . .66 Appliance Packaging Information . . . . . . . . . . . . . . . . . . . . . . ...
Page 64 - Safety; Intended use; Safety of children
64 Safety The safety aspects of our refrigerators/freezers comply with acceptedtechnical standards and the German Appliance Safety Law. Nevertheless, weconsider it our obligation to make you aware of the following safetyinformation: Intended use • The refrigerator is intended for use in the home. It...
Page 65 - Daily Operation; In case of malfunction
65 the fridge when playing (there is risk of suffocation!)or get themselvesinto other dangerous situations. • This appliance is not intended for use by persons (including children) with reduced physical, sensory or mental capabilities, or lack of experience andknowledge, unless they have been given ...
Page 66 - Disposal; Appliance Packaging Information
66 Disposal Appliance Packaging Information All materials are environmentally sound! They can be dumped or burned atan incinerating plant without danger!About the materials: The plastics can be recycled and are identified asfollows:>PE< for polyethylene, e.g. the outer covering and the bags in...
Page 67 - Installation Location; Remove transport safeguard
67 If installation next to a source of heat is unavoidable, the followingminimum clearances must be maintained at the sides of the appliance:– for electric cookers 3 cm;– for oil and coal fired ranges 30 cm.If these clearances cannot be maintained a heat insulating pad is requiredbetween the cooker ...
Page 68 - Rear spacers
68 Your appliance needs air For safety reasons, minimumventilationmust be as shown Fig. Attention: keep ventilationopenings clear of obstruction; 100 mm 10 mm 10 mm A B NP007 Rehingeing the door The side at which the door opens can be changed from the right side(factory adjustment) to the left side,...
Page 69 - Electrical connection
69 Electrical connection Before initial start-up, refer to the appliance rating plate to ascertain ifsupply voltage and current values correspond with those of the mains at theinstallation location.e.g.: AC 230 ... 240 V 50 Hz or 230 ... 240 V~ 50 Hz (i.e. 230 to 240 volts alternating current, 50 He...
Page 71 - Temperature setting buttons
71 Temperature setting buttons The temperature is adjusted using the „B“ and „D“ buttons. These buttonsare connected to the temperature display. • The temperature display is switched over from the display of the ACTUAL temperature (Temperature display is illuminated) to the display of theDESIRED tem...
Page 72 - Temperature Adjustment; Cooling drinks
72 Attention! If you are using the appliance as a freezing unit: Please wait prior to putting the foodstuff to be frozen, until the freezer interior temperaturehas attained -18 °C. Attention! If you are using this appliance as a cooling unit, after it has been used as a freezing unit: Please wait un...
Page 73 - FROSTMATIC
73 Temperature display The temperature display can indicate several pieces of information. • During normal operation, the temperature currently present in the freezer (ACTUAL temperature) is displayed. • When the temperature is being adjusted a flashing display indicates the freezer temperature curr...
Page 75 - Freezing and storing frozen food
75 Freezing and storing frozen food You can use your freezer for freezing fresh food yourself. Important! • The temperature in the freezer compartment must be –18 °C or colder before freezing food. • Please observe the freezing capacity given on the rating plate. The freezing capacity is the maximum...
Page 76 - Preparation of Ice Cubes; Ice pack; Freezer; Freezing Calendar
76 begin to defrost. 2. Press the fast freeze button 24 hours before introducing fresh food forfreezing of fresh food. The yellow light comes on. 3. Place frozen foods in the drawers sorted by type, as far as possible. Preparation of Ice Cubes 1. Fill the ice cube tray 3/4 full with cold water, plac...
Page 77 - Cleaning and Care
77 Cleaning and Care For hygienic reasons the appliance interior, including interior accessories,should be cleaned regularly. Warning! • The appliance may not be connected to the mains during cleaning. Danger of electrical shock! Before cleaning switch the appliance offand rem ve theplug from the ma...
Page 79 - Correcting Malfunctions
79 What to do if ... Correcting Malfunctions A malfunction may be caused by only a minor fault that you can rectifyyourself using the following instructions. Do not perform any other work onthe appliance if the following information does not provide assistance inyour specific case. Warning! Repairs ...


 AEG AREH30LF
User Manual
AEG AREH30LF
User Manual
 AEG AREI20XLF
User Manual
AEG AREI20XLF
User Manual
 AEG FFB72746PM
User Manual
AEG FFB72746PM
User Manual
 AEG PS254DB
User Manual
AEG PS254DB
User Manual
 AEG NIK85M00AZ
User Manual
AEG NIK85M00AZ
User Manual
 AEG DGE5662HB
User Manual
AEG DGE5662HB
User Manual
 AEG DGE5962HB
User Manual
AEG DGE5962HB
User Manual
 AEG HVB95450IB
User Manual
AEG HVB95450IB
User Manual
 AEG PL700
User Manual
AEG PL700
User Manual
 AEG W14120
User Manual
AEG W14120
User Manual
 AEG DC240
User Manual
AEG DC240
User Manual
 AEG T738A4OBC
User Manual
AEG T738A4OBC
User Manual
 AEG T858M6OBC
User Manual
AEG T858M6OBC
User Manual
 AEG T859M6OBC
User Manual
AEG T859M6OBC
User Manual
 AEG T959M6ORS
User Manual
AEG T959M6ORS
User Manual
 AEG IKE95771FB
User Manual
AEG IKE95771FB
User Manual
 AEG AREI9XLF
User Manual
AEG AREI9XLF
User Manual
 AEG A18SPC3
User Manual
AEG A18SPC3
User Manual
 AEG LF7384O4C
User Manual
AEG LF7384O4C
User Manual