Page 3 - iii; Information for your safety and; Turning the product off before cleaning
iii Information for your safety and comfort Read these instructions carefully. Keep this document for future reference. Follow all warnings and instructions marked on the product. Turning the product off before cleaning Unplug this product from the wall outlet before cleaning. Do not use liquid clea...
Page 4 - iv; Using electrical power; Product servicing
iv • Never use it under sporting, exercising, or any vibrating environment which will probably cause unexpected short current or damage rotor devices, lamp. Using electrical power • This product should be operated from the type of power indicated on the marking label. If you are not sure of the type...
Page 5 - Additional safety information
v • the power cord or plug is damaged, cut or frayed • liquid was spilled into the product • the product was exposed to rain or water • the product has been dropped or the case has been damaged • the product exhibits a distinct change in performance, indicating a need for service • the product does ...
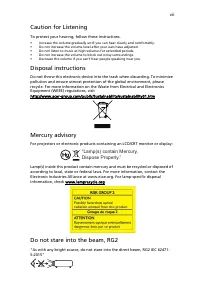
Page 7 - vii; Caution for Listening; Disposal instructions
vii Caution for Listening To protect your hearing, follow these instructions. • Increase the volume gradually until you can hear clearly and comfortably. • Do not increase the volume level after your ears have adjusted. • Do not listen to music at high volumes for extended periods. • Do not increase...
Page 8 - viii; First things first; Usage Notes; Precautions
viii First things first Usage Notes Do:• Turn off the product before cleaning. • Use a soft cloth moistened with mild detergent to clean the display housing. • Disconnect the power plug from AC outlet if the product is not being used for a long period of time. Don't:• Block the slots and openings on...
Page 9 - Contents
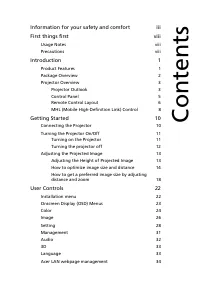
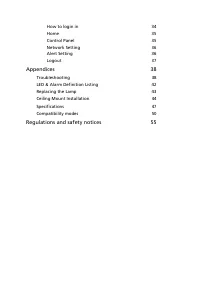
Information for your safety and comfort iii First things first viii Usage Notes viii Precautions viii Introduction 1 Product Features 1 Package Overview 2 Projector Overview 3 Projector Outlook 3 Control Panel 5 Remote Control Layout 6 MHL (Mobile High-Definition Link) Control 8 Getting Started 10 C...
Page 11 - Introduction; Product Features
1 Eng lis h Introduction Product Features This product is a single-chip DLP ® projector. Outstanding features include: • DLP ® technology • Full/4:3/16:9/L.Box aspect ratio supported • Enables projecting 3D content via DLP Link Technology: Blue-Ray 3D supported • Acer ColorBoost technology delivers ...
Page 12 - English; Package Overview
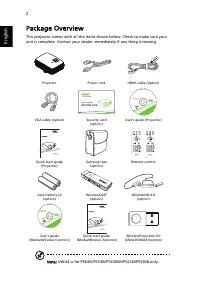
2 English Package Overview This projector comes with all the items shown below. Check to make sure your unit is complete. Contact your dealer immediately if any thing is missing. Note: UWA4 is for P5630i/P5530i/P5330Wi/P5230i/P5530B only. Projector Power cord HDMI cable (option) VGA cable (option) S...
Page 13 - Projector Overview; Projector Outlook
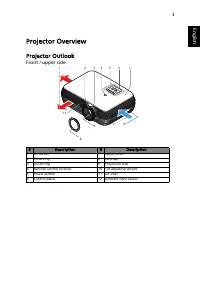
3 Eng lis h Projector Overview Projector Outlook Front / upper side # Description # Description 1 Air outlet 7 Lamp cover 2 Focus ring 8 Lens cap 3 Zoom ring 9 Projection lens 4 Remote control receiver 10 Tilt adjusting wheels 5 Power button 11 Air inlet 6 Control panel 12 Ambient light sensor 6 3 2...
Page 15 - Control Panel
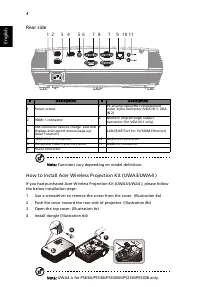
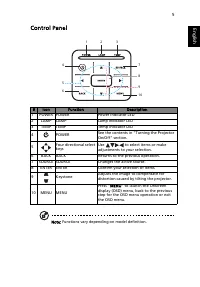
5 Eng lis h Control Panel Note: Functions vary depending on model definition. # Icon Function Description 1 POWER POWER Power Indicator LED 2 LAMP LAMP Lamp Indicator LED 3 TEMP TEMP Temp Indicator LED 4 POWER See the contents in "Turning the Projector On/Off" section. 5 Four directional sel...
Page 16 - Remote Control Layout
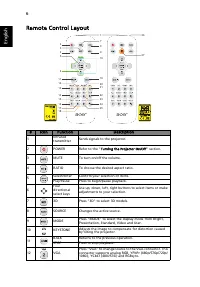
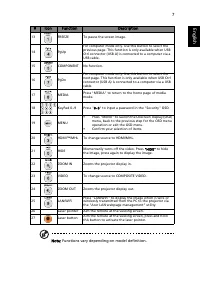
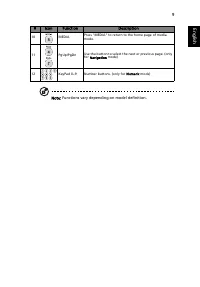
6 English Remote Control Layout # Icon Function Description 1 Infrared transmitter Sends signals to the projector. 2 POWER Refer to the "Turning the Projector On/Off" section. 3 MUTE To turn on/off the volume. 4 RATIO To choose the desired aspect ratio. 5 Select/Enter Confirm your selection ...
Page 20 - Getting Started; Connecting the Projector
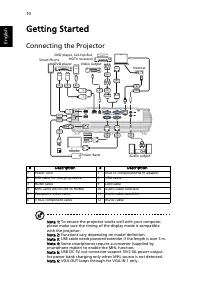
10 English Getting Started Connecting the Projector Note 1: To ensure the projector works well with your computer, please make sure the timing of the display mode is compatible with the projector. Note 2: Functions vary depending on model definition. Note 3: USB cable needs powered extender if the l...
Page 21 - Turning the Projector On/Off; Turning on the Projector
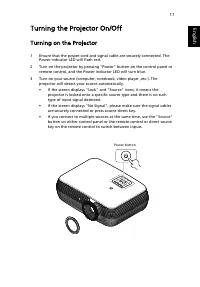
11 Eng lis h Turning the Projector On/Off Turning on the Projector 1 Ensure that the power cord and signal cable are securely connected. The Power indicator LED will flash red. 2 Turn on the projector by pressing "Power" button on the control panel or remote control, and the Power indicator ...
Page 22 - Turning the projector off
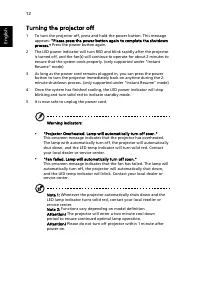
12 English Turning the projector off 1 To turn the projector off, press and hold the power button. This message appears: "Please press the power button again to complete the shutdown process." Press the power button again. 2 The LED power indicator will turn RED and blink rapidly after the p...
Page 23 - Adjusting the Projected Image; Adjusting the Height of Projected Image
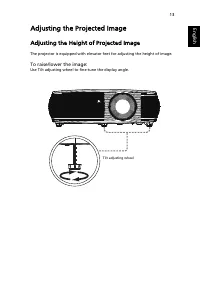
13 Eng lis h Adjusting the Projected Image Adjusting the Height of Projected Image The projector is equipped with elevator feet for adjusting the height of image. To raise/lower the image: Use Tilt adjusting wheel to fine-tune the display angle. Tilt adjusting wheel
Page 24 - How to optimize image size and distance
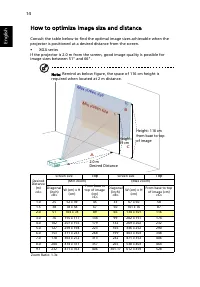
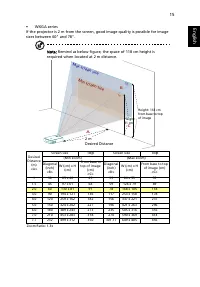
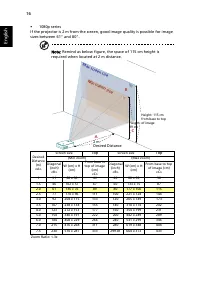
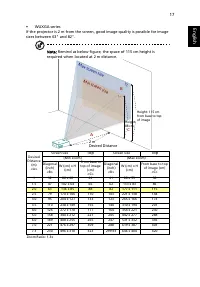
14 English How to optimize image size and distance Consult the table below to find the optimal image sizes achievable when the projector is positioned at a desired distance from the screen.• XGA series If the projector is 2.0 m from the screen, good image quality is possible for image sizes between ...
Page 28 - How to get a preferred image size by adjusting
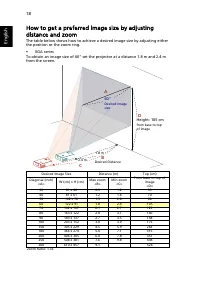
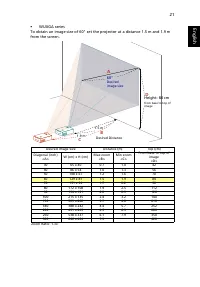
18 English How to get a preferred image size by adjusting distance and zoom The table below shows how to achieve a desired image size by adjusting either the position or the zoom ring.• XGA series To obtain an image size of 60" set the projector at a distance 1.8 m and 2.4 m from the screen. Des...
Page 32 - User Controls; Installation menu
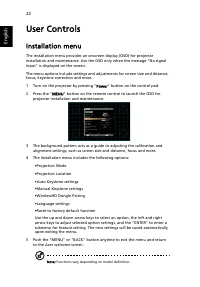
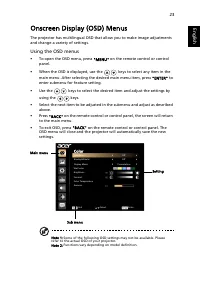
22 English User Controls Installation menu The installation menu provides an onscreen display (OSD) for projector installation and maintenance. Use the OSD only when the message "No signal input" is displayed on the screen. The menu options include settings and adjustments for screen size an...
Page 36 - Image
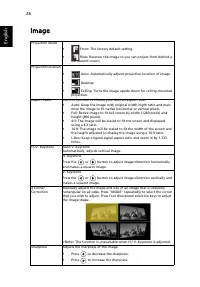
26 English Image Projection Mode • Front: The factory default setting. • Rear: Reverses the image so you can project from behind a translucent screen. Projection Location • Auto: Automatically adjusts projection location of image. • Desktop • Ceiling: Turns the image upside down for ceiling-mounted ...
Page 38 - Setting
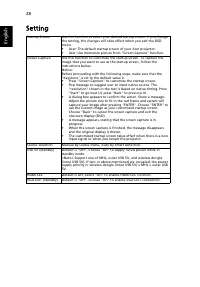
28 English Setting Startup Screen Use this function to select your desired startup screen. If you change the setting, the changes will take effect when you exit the OSD menu. • Acer: The default startup screen of your Acer projector. • User: Use memorize picture from "Screen Capture" functio...
Page 41 - Management
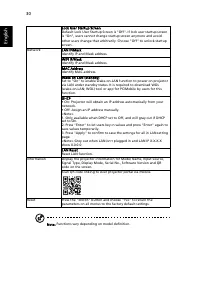
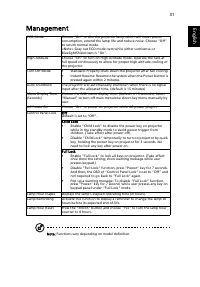
31 Eng lis h Management Note: Functions vary depending on model definition. ECO Mode Choose "On" to dim the projector lamp which will lower power consumption, extend the lamp life and reduce noise. Choose "Off" to return normal mode. <Note> Gray out ECO mode item while either L...
Page 42 - Audio
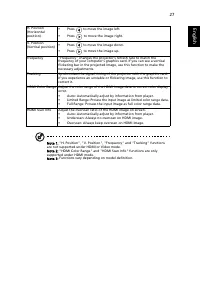
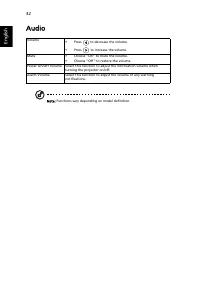
32 English Audio Note: Functions vary depending on model definition. Volume • Press to decrease the volume. • Press to increase the volume. Mute • Choose "On" to mute the volume. • Choose "Off" to restore the volume. Power On/Off Volume Select this function to adjust the notification...
Page 43 - Language
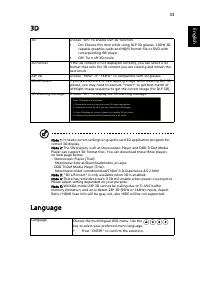
33 Eng lis h 3D Note 1: It needs correct settings on graphic card 3D application program for correct 3D display. Note 2: The SW players, such as Stereoscopic Player and DDD TriDef Media Player can support 3D format files. You can download these three players on web page below, - Stereoscopic Player ...
Page 44 - Acer LAN webpage management; How to login in
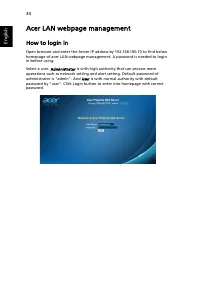
34 English Acer LAN webpage management How to login in Open browser and enter the Server IP address by 192.168.100.10 to find below homepage of acer LAN webpage management. A password is needed to login in before using. Select a user. Administrator is with high authority that can process more operat...
Page 45 - Home
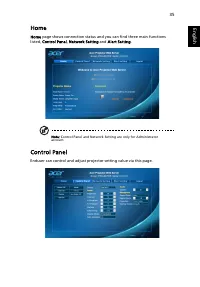
35 Eng lis h Home Home page shows connection status and you can find three main functions listed, Control Panel, Network Setting and Alert Setting. Note: Control Panel and Network Setting are only for Administrator account. Control Panel Enduser can control and adjust projector setting value via thi...
Page 46 - Network Setting; Alert Setting
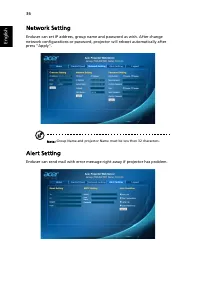
36 English Network Setting Enduser can set IP address, group name and password as wish. After change network configurations or password, projector will reboot automatically after press "Apply". Note: Group Name and projector Name must be less then 32 characters. Alert Setting Enduser can sen...
Page 47 - Logout
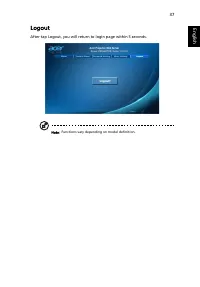
37 Eng lis h Logout After tap Logout, you will return to login page within 5 seconds. Note: Functions vary depending on model definition.
Page 48 - Appendices; Troubleshooting; Image Problems and Solutions
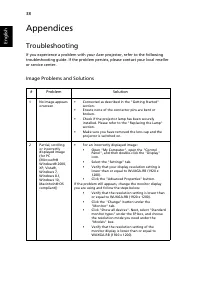
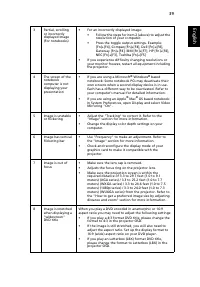
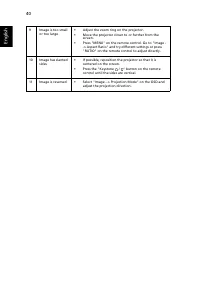
38 English Appendices Troubleshooting If you experience a problem with your Acer projector, refer to the following troubleshooting guide. If the problem persists, please contact your local reseller or service center. Image Problems and Solutions # Problem Solution 1 No image appears onscreen • Conne...
Page 52 - LED & Alarm Definition Listing; LED Messages
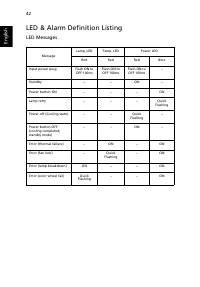
42 English LED & Alarm Definition Listing LED Messages Message Lamp_LED Temp_LED Power LED Red Red Red Blue Input power plug Flash ON to OFF 100ms Flash ON to OFF 100ms Flash ON to OFF 100ms -- Standby -- -- ON -- Power button ON -- -- -- ON Lamp retry -- -- -- Quick Flashing Power off (Cooling ...
Page 53 - Replacing the Lamp
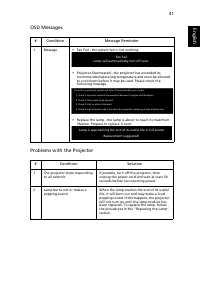
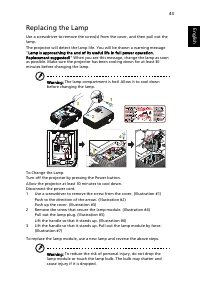
43 Eng lis h Replacing the Lamp Use a screwdriver to remove the screw(s) from the cover, and then pull out the lamp.The projector will detect the lamp life. You will be shown a warning message "Lamp is approaching the end of its useful life in full power operation. Replacement suggested!" Wh...
Page 54 - Ceiling Mount Installation
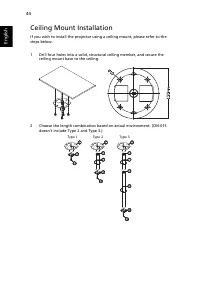
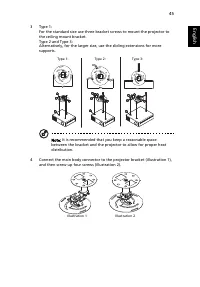
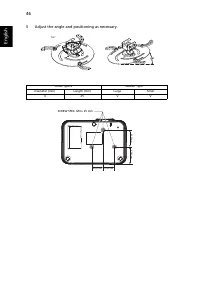
44 English Ceiling Mount Installation If you wish to install the projector using a ceiling mount, please refer to the steps below: 1 Drill four holes into a solid, structural ceiling member, and secure the ceiling mount base to the ceiling. 2 Choose the length combination based on actual environment...
Page 57 - Specifications
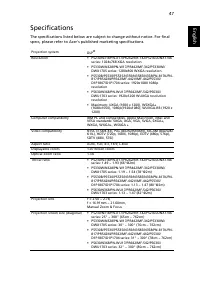
47 Eng lis h Specifications The specifications listed below are subject to change without notice. For final specs, please refer to Acer's published marketing specifications. Projection system DLP ® Resolution • P5230/N318/PN-X17/PR242/MF-142/P5230i/DNX1706 series: 1024x768 XGA resolution • P5330W/N3...
Page 60 - Compatibility modes; VGA Analog - PC Signal
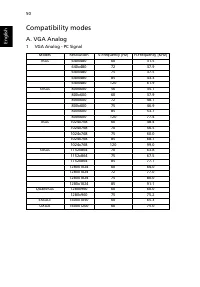
50 English Compatibility modes A. VGA Analog 1 VGA Analog - PC Signal Modes Resolution V.Frequency [Hz] H.Frequency [KHz] VGA 640x480 60 31.5 640x480 72 37.9 640x480 75 37.5 640x480 85 43.3 640x480 120 61.9 SVGA 800x600 56 35.1 800x600 60 37.9 800x600 72 48.1 800x600 75 46.9 800x600 85 53.7 800x600 ...
Page 61 - VGA Analog - Extended Wide timing
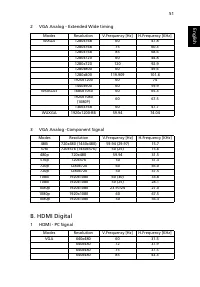
51 Eng lis h 2 VGA Analog - Extended Wide timing 3 VGA Analog -Component Signal B. HDMI Digital 1 HDMI - PC Signal Modes Resolution V.Frequency [Hz] H.Frequency [KHz] WXGA 1280x768 60 47.8 1280x768 75 60.3 1280x768 85 68.6 1280x720 60 44.8 1280x720 120 92.9 1280x800 60 49.6 1280x800 119.909 101.6 19...
Page 62 - HDMI - Extended Wide timing
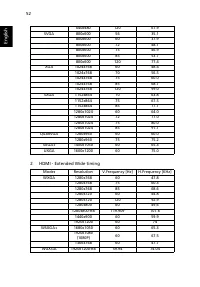
52 English 2 HDMI - Extended Wide timing 640x480 120 61.9 SVGA 800x600 56 35.1 800x600 60 37.9 800x600 72 48.1 800x600 75 46.9 800x600 85 53.7 800x600 120 77.4 XGA 1024x768 60 48.4 1024x768 70 56.5 1024x768 75 60.0 1024x768 85 68.7 1024x768 120 99.0 SXGA 1152x864 70 63.8 1152x864 75 67.5 1152x864 85...
Page 65 - Regulations and safety notices
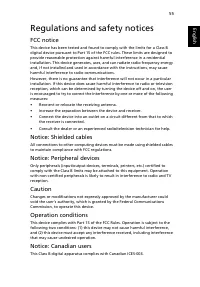
55 Eng lish Eng lis h Regulations and safety notices FCC notice This device has been tested and found to comply with the limits for a Class B digital device pursuant to Part 15 of the FCC rules. These limits are designed to provide reasonable protection against harmful interference in a residential ...
Page 66 - Remarque à l'intention des utilisateurs canadiens
56 English Remarque à l'intention des utilisateurs canadiens Cet appareil numérique de la classe B est conforme a la norme NMB-003 du Canada.Compliant with Russian regulatory certification Radio device regulatory notice Note: The regulatory information below is for models with wireless LAN and/or Bl...