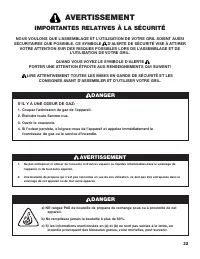
Page 2 - DANGER; IMPORTANT SAFETY; WARNINGS; a) Do not store a spare LP cylinder under or near this appliance.; WARNING
1 WE WANT YOU TO ASSEMBLE AND USE YOUR GRILL AS SAFELY AS POSSIBLE. THE PURPOSE OF THIS SAFETY ALERT SYMBOL IS TO ATTRACT YOUR ATTENTION TO POSSIBLE HAZARDS AS YOU ASSEMBLE AND USE YOUR GRILL. WHEN YOU SEE THE SAFETY ALERT SYMBOL PAY CLOSE ATTENTION TO THE INFORMATION WHICH FOLLOWS! READ ALL SAFETY ...
Page 3 - CALIFORNIA PROPOSITION 65 WARNING; This product can expose you to chemicals, including lead,; CONTAINS LEAD. MAY BE HARMFUL
2 General Warnings . . . . . . . . . . . . . . . . . . . . . . . . . . . . . . . . . . . . . . . . . . . . 3-4 LP Gas Cylinder (Tank) Specifi cations and Installation . . . . . . . . . . . . . . . . 4-6 Hose & Regulator Specifi cations and Installation . . . . . . . . . . . . . . . . . . . . 6-7...
Page 6 - • Always; LP gas cylinder (not supplied with this grill)
5 • Allow only qualifi ed licensed LP gas dealers to properly fi ll or repair your LP gas cylinder. • New tanks should be purged prior to fi lling; inform LP gas dealer if you are using a new tank. • DO NOT allow the cylinder to be fi lled beyond 80% capacity. Over-fi lled tanks can create a dangero...
Page 7 - HOSE & REGULATOR SPECIFICATIONS AND INSTALLATION:; Ensure the tank valve is
INSTALLING THE LP GAS CYLINDER (TANK) ONTO THE GRILL: 1. Check that the cylinder valve is closed by turning knob clockwise. Inspect cylinder valve rubber seal for cracks or deterioration. Do not use propane tank with damaged seal as a gas leak may occur. 2. Place cylinder into tank holder in bottom ...
Page 9 - Never perform a leak test with a match or open fl ame.; WHEN TO PERFORM A LEAK TEST:; Use caution and common sense when testing for leaks.
To prevent fi re or explosion hazard: • DO NOT smoke or permit ignition sources in the area while conducting a leak test. • Perform test OUTDOORS in a well ventilated area that is protected from the wind. • Never perform a leak test with a match or open fl ame. • Never perform a leak test while the ...
Page 10 - LIGHTING THE MAIN BURNERS:; LIGHTING INSTRUCTIONS:; Follow the instructions exactly.
6. If burner does not ignite using igniter, see “Match Lighting the Main Burners” section. 7. To turn off, turn each control knob clockwise until it locks in the “OFF” position. This does not turn off the gas fl ow from the cylinder. Note: If burner does not light or fl ame is too low, See “Trouble ...
Page 11 - LIGHTING THE SEAR BURNER:
MATCH LIGHTING THE MAIN BURNER: 1. Open lid before lighting burner.2. Make sure all control knobs are “OFF”.3. Place a paper match in the end of the matchlighter. Strike match and place through the cooking grate approximately 1/2” (1 to 2 cm) from the burner to be lit. 4. Turn burner control knob to...
Page 12 - MATCH LIGHTING THE SEAR BURNER:; DO NOT leave your grill unattended while “ON” or in use.; BREAKING IN YOUR GRILL:
5. If ignition does NOT occur in 5 seconds, turn control knob to “OFF”, wait 5 minutes to allow gas to dissipate and repeat lighting procedure. 6. To turn off, turn control knob clockwise until it locks in the “OFF” position. Note: If burner does not light or fl ame is too low, See “Trouble Shooting...
Page 13 - TURNING OFF THE GRILL:; USING OTHER FEATURES OF THE GRILL:; Read instructions on lighting your grill to light the side burner.
12 TURNING OFF THE GRILL: 1. Turn off cylinder valve. 2. Turn all burner control knobs to “OFF” position. Note:Turn off LP cylinder fi rst to prevent gas from being left in the system under pressure. CAUTION: • The cylinder valve should always be in the off, or closed, position when grill is not in ...
Page 14 - CLEANING INTERIOR OF GRILL:; INTERIOR OF GRILL LID:
13 WARNING: If a bristle brush is used to clean any of the cooking surfaces, ensure no loose bristles remain on the cooking surfaces prior to grilling as loose bristles may attach to food. CLEANING INTERIOR OF GRILL: • We recommend cleaning off food residue immediately after cooking by gently scrubb...
Page 16 - BEFORE STORING YOUR GRILL:; Never move a grill when hot or in use.; TRANSPORTING AND STORAGE:
15 BEFORE STORING YOUR GRILL: • Ensure that cylinder valve is fully closed. • Clean all surfaces. Lightly coat burners with cooking oil to prevent excess rusting. • If storing grill indoors, disconnect LP tank and leave LP tank OUTDOORS. • Place dust cap on cylinder valve outlet whenever the cylinde...
Page 18 - GRILLING TO PROPER TEMPERATURE:
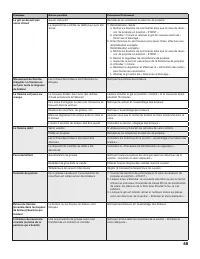
17 Problem Possible Cause Prevention/Cure Flame blows out High or gusting winds Do not use grill in high winds Low on LP gas Replace or refi ll LP gas tank Burner holes may be obstructed Refer to “Burner Assembly/Maintenance” instructions Flow limiting device tripped Refer to “Regulator Resetting Pr...
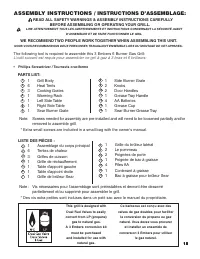
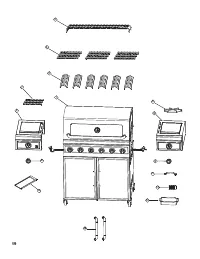
Page 19 - READ ALL SAFETY WARNINGS & ASSEMBLY INSTRUCTIONS CAREFULLY; WE RECOMMEND TWO PEOPLE WORK TOGETHER WHEN AS SEM BLING THIS UNIT.
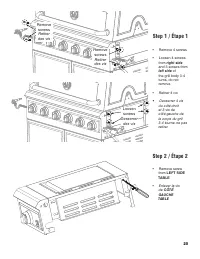
18 1 2 3 4 5 6 7 8 11 9 10 12 13 14 * Extra small screws are included in a small bag with the owner's manual. ASSEMBLY INSTRUCTIONS / INSTRUCTIONS D’ASSEMBLAGE: READ ALL SAFETY WARNINGS & ASSEMBLY INSTRUCTIONS CAREFULLY BEFORE ASSEMBLING OR OPERATING YOUR GRILL. LIRE ATTENTIVEMENT TOUS LES AVERT...
Page 21 - LEFT SIDE; Enlever la vis
20 • Remove 4 screws • Loosen 4 screws from right side and 3 screws from left side of the grill body 3-4 turns, do not remove. • Retirer 4 vis • Desserrer 4 vis du côté droit et 3 vis de côté gauche de le corps du gril 3-4 tourne, ne pas retirer. Step 1 / Étape 1 Loosen scre...
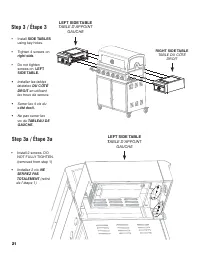
Page 22 - • Install; SIDE TABLES; Tighten 4 screws on; LEFT; GAUCHE; GAUCHE
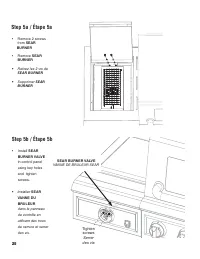
21 • Install SIDE TABLES using key holes. • Tighten 4 screws on right side . • Do not tighten screws on LEFT SIDE TABLE. • Installer les tables latérales DU CÔTÉ DROIT en utilisant les trous de serrure. • Serrer les 4 vis du côté droit. • Ne pas serrer les vis du TABLEAU DE GAUCHE. Step 3 / Étape 3 ...
Page 23 - RIGHT SIDE TABLE
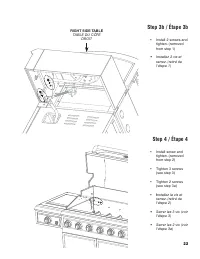
22 • Install screw and tighten. (removed from step 2) • Tighten 3 screws (see step 3) • Tighten 2 screws (see step 3a) • I nstallez la vis et serrez. (retiré de l'étape 2) • Serrer les 3 vis (voir l'étape 3) • Serrer les 2 vis (voir l'étape 3a) • Install 2 screws and tighten. (removed from step 1) •...
Page 24 - Tighten
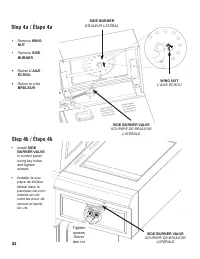
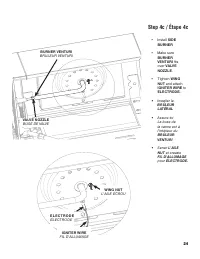
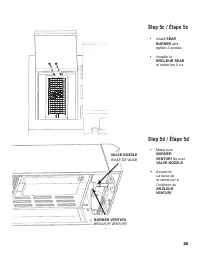
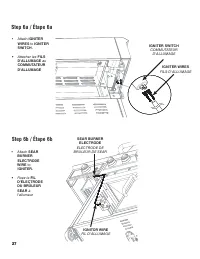
23 • Remove WING NUT • Remove SIDE BURNER • Retirer L'AILE ÉCROU • Retirer le côté BRÛLEUR SIDE BURNER BRÛLEUR LATÉRAL SIDE BURNER VALVE SOUPAPE DE BRÛLEUR LATÉRALE WING NUT L'AILE ÉCROU • Install SIDE BURNER VALVE in control panel using key holes and tighten screws. • I nstaller la sou- pape de brû...
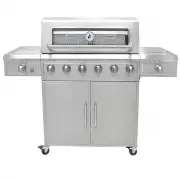
Page 32 - Model GAS9675AF Assembled
Model GAS9675AF Assembled Modèle GAS9675AF Assemblé 31
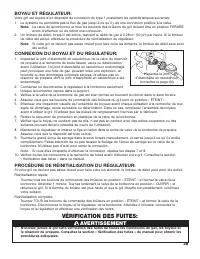
Page 33 - Coupez l’admission de gaz de l’appareil.; IMPORTANTES RELATIVES À LA SÉCURITÉ; AVERTISSEMENT
NOUS VOULONS QUE L’ASSEMBLAGE ET L’UTILISATION DE VOTRE GRIL SOIENT AUSSI SÉCURITAIRES QUE POSSIBLE. CE SYMBOLE D’ALERTE DE SÉCURITÉ VISE À ATTIRER VOTRE ATTENTION SUR DES RISQUES POSSIBLES LORS DE L’ASSEMBLAGE ET DE L’UTILISATION DE VOTRE GRIL. QUAND VOUS VOYEZ LE SYMBOLE D’ALERTE PORTER UNE ATTENT...
Page 34 - PROPOSITION POUR LA CALIFORNIE 65 AVERTISSEMENT; AVERTISSEMENT: CONTIENT DU PLOMB. PEUT ÊTRE NOCIF
TABLE DES MATIÈRES: Avertissements généraux. . . . . . . . . . . . . . . . . . . . . . . . . . . . . . . . . . . . . . . . . . 34 Bonbonne de propane (réservoir) – Spécifications et installation . . . . . . . . .35-37 Boyau et régulateur – Spécifications et installation. . . . . . . . . . . . . . . ...
Page 35 - AVERTISSEMENTS GÉNÉRAUX:
• Faites un test de vérification de fuites avant la première utilisation, même si le gril a été acheté entièrement assemblé et après chaque remplissage du réservoir. Vérifiez le joint d’étanchéité en caoutchouc du réservoir de propane à la recherche de tout dommage. • Vérifiez toujours le gril et le...
Page 36 - BONBONNE DE PROPANE (RÉSERVOIR) – SPÉCIFICATIONS ET INSTALLATION :; FAITES PREUVE DE PRUDENCE ET DE DILIGENCE PENDANT LE; DES BLESSURES CORPORELLES GRAVES OU DES DOMMAGES À LA PROPRIÉTÉ
BONBONNE DE PROPANE (RÉSERVOIR) – SPÉCIFICATIONS ET INSTALLATION : • N’entreposez PAS une bonbonne de propane (pleine ou vide) sous ou près du gril. Cela pourrait occasionner une pression excessive expulsée par le clapet de dégazage provoquant un incendie, une explosion ou des blessures corporelles ...
Page 37 - Bonbonne de propane (non fournie avec ce gril)
CARACTÉRISTIQUES DE LA BONBONNE (RÉSERVOIR) DE PROPANE: Bonbonne de propane (non fournie avec ce gril) La bonbonne de propane (propane liquide) spécifiquement conçue pour être utilisée avec ce gril doit avoir unedimension de 30,5 cm de diamètre x 45,7 cm de haut (12 x 18 po) et avoir une capacité de...
Page 38 - BOYAU ET RÉGULATEUR – SPÉCIFICATIONS ET INSTALLATION:; INSTALLATION DE LA BONBONNE (RÉSERVOIR) DE PROPANE AU GRIL:
BOYAU ET RÉGULATEUR – SPÉCIFICATIONS ET INSTALLATION: INSPECTION DU JOINT D’ÉTANCHÉITÉ EN CAOUTCHOUC D’UNEBONBONNE (RÉSERVOIR) DE PROPANE: • Inspectez le joint d’étanchéité en caoutchouc du réservoir de propane à la recherche de toute fissure, usure ou détérioration avant l’utilisation. Un joint d’é...
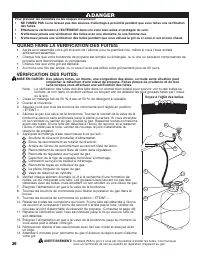
Page 39 - VÉRIFICATION DES FUITES:
BOYAU ET RÉGULATEUR: Votre gril est équipé d’un dispositif de connexion de type 1 possédant les caractéristiques suivantes:1. Le système ne permettra pas le flux de gaz jusqu’à ce qu’il y ait une connexion positive à la valve. Note: La valve de la bonbonne et tous les boutons des brûleurs du gril do...
Page 40 - QUAND FAIRE LA VÉRIFICATION DES FUITES:
QUAND FAIRE LA VÉRIFICATION DES FUITES: • Après avoir assemblé votre gril et avant de l’allumer pour la première fois, même si vous l’avez acheté entièrement assemblé. • Chaque fois que votre bonbonne de propane est remplie ou échangée, ou si une ou plusieurs composantes de propane sont déconnectées...
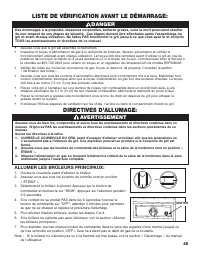
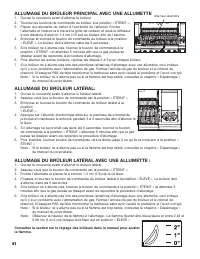
Page 41 - LISTE DE VÉRIFICATION AVANT LE DÉMARRAGE:; DIRECTIVES D’ALLUMAGE:; ALLUMER LES BRÛLEURS PRINCIPAUX:
LISTE DE VÉRIFICATION AVANT LE DÉMARRAGE: • Assurez-vous que le gril est assemblé correctement. • Inspectez le boyau d’alimentation de gaz à la recherche de brûlures, fissures, pincements et vérifiez le fonctionnement adéquat avant chaque utilisation. Le boyau doit être remplacé avant d’utiliser le ...
Page 43 - FONCTIONNEMENT DU GRIL:; PRÉPARATION DE VOTRE GRIL:; ALLUMAGE DU BRÛLEUR DU GRIL :
FONCTIONNEMENT DU GRIL: • Lisez et suivez tous les avertissements et directives se trouvant aux chapitres précédents de ce manuel. • N’utilisez jamais de charbon de bois, de pierres de lave ou de briquettes de bois dans un gril au gaz. Les pépites aromatiques doivent être placées dans un contenant m...
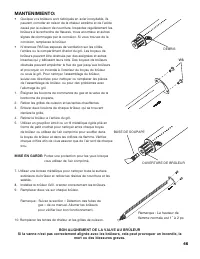
Page 45 - AUTRES CARACTÉRISTIQUES DU GRIL:; NETTOYAGE DE L’INTÉRIEUR DU GRIL:
• Lisez les directives d’allumage de votre gril pour allumer le brûleur latéral. • Ne fermez jamais le couvercle du brûleur latéral lorsque celui-ci est allumé. • Utilisez une casserole ayant un diamètre de 25,4 cm (10 po) ou moins et qui n’a PAS de poignée allongée lorsque vous cuisinez avec le brû...
Page 48 - TRANSPORT ET ENTREPOSAGE:
• Ne déplacez jamais un gril lorsqu’il est chaud ou en cours d’utilisation.• Assurez-vous que la valve de la bonbonne est fermée et que les boutons de brûleur sont en position « ÉTEINT ». • N’entreposez PAS une bonbonne de propane de rechange (pleine ou vide) sous ou près du gril.• Ne rangez jamais ...
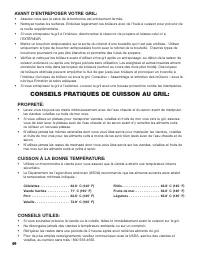
Page 50 - AVANT D’ENTREPOSER VOTRE GRIL:; CONSEILS PRATIQUES DE CUISSON AU GRIL:; CUISSON À LA BONNE TEMPÉRATURE:
AVANT D’ENTREPOSER VOTRE GRIL: • Assurez-vous que la valve de la bonbonne est entièrement fermée. • Nettoyez toutes les surfaces. Enduisez légèrement les brûleurs avec de l’huile à cuisson pour prévenir de la rouille supplémentaire. • Si vous entreposez le gril à l’intérieur, déconnectez le réservoi...
Page 51 - WARRANTY
L’entreprise Boltz Group déclare à l’acheteur initial que le 3 Embers® 6 Burner Gas Grill [barbecue au gaz à 3 braises et à 7 brûleurs] est exempt de tout défaut de main-d’œuvre ou de matériau, et le garantit pour : la durée de vie de l’appareil : dans le cas des brûleurs à tube en acier inoxydable;...