Brama BR-FDREF01-SS - User Manual
Brama BR-FDREF01-SS Refrigerator – User Manual, read for free online in PDF format. We hope this helps you resolve any issues you may have. If you have further questions, please contact us through the contact form.


Table of Contents:
- Page 2 – GENERAL OPERATING INSTRUCTIONS; READ ALL INSTRUCTIONS BEFORE USING THIS APPLIANCE; Protect Your Investment with an Extended Warranty!
- Page 3 – Table of Contents
- Page 4 – IMPORTANT SAFETY INSTRUCTIONS; For Children; CONNECTION” on page 5.
- Page 5 – ELECTRICAL CONNECTION
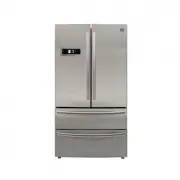
- Page 6 – Model
- Page 8 – INSTALLATION; Transport and placing of your refrigerator; Transport
- Page 9 – Start Using Your Refrigerator; Refrigerator compartment; , it fails to preserve the freshness of food for long. As a; Use of turnover beam
- Page 10 – Food suggested to store in refrigerator compartment; Snack food, food subject to tainting, dairy product; Freezer compartment; Ice storage box is used to store the ice.
- Page 11 – Taking-out and installation of the lower freezer drawer
- Page 12 – Big drawer; Note
- Page 13 – Take out, clean and install the ice cube box
- Page 14 – Door Handles; Firstly, take the handle set bolts out from the; Assembly instructions of the refrigerator door handle:; The assembly
- Page 15 – Making minor adjustments between doors; Raise the left door or the right door.; Installing the water line; The water pressure must be between. 0.17MPa
- Page 16 – OPERATION; Control buttons; Locking and unlocking; , the ice maker needs 135
- Page 17 – Energy saving mode
- Page 19 – CLEANING AND MAINTENANCE; Refrigerator’s Maintenance and Repair; Cleaning
- Page 20 – MAINTENANCE & TROUBLESHOOTING; Occurrence; Not working
- Page 21 – Shipping
- Page 22 – California; Proposition 65; Warning: The products sold on this ecommerce website and to the; Damage
- Page 24 – Storage Fees
- Page 28 – SERVICE & IMPORTANT NOTICE; Please do not place the unit within reach of children.; Contact
W W W . V I N O T E M P . C O M
A P R O U D H E R I T A G E O F E X P E R I E N C E & Q U A L I T Y
O W N E R ’ S M A N U A L
R E F R I G E R A T O R
H C - 7 6 7 W E ( B R - F D R E F 0 1 - S S )
"Loading the manual" means you need to wait until the file loads and becomes available for online reading. Some manuals are very large, and the time they take to appear depends on your internet speed.
Summary
2 W W W . V I N O T E M P . C O M ! ! GENERAL OPERATING INSTRUCTIONS Remove all external and internal packaging from your appliance. Be sure that all parts have been included before discarding any packaging materials. You may want to keep the box and packing materials for use at a later date. Upon r...
3 7 3 2 S o u t h R a c e t r a c k R o a d , H e n d e r s o n , N e v a d a 8 9 0 1 5 i n f o @ v i n o t e m p . c o m Table of Contents Important Safety Instructions ------------------------ 4 Electrical Connection ---------------------------------- 5 Specifications -----------------------------...
4 W W W . V I N O T E M P . C O M ! ! IMPORTANT SAFETY INSTRUCTIONS To reduce the risk of fire, electrical shock or injury when using your appliance, follow these basic precautions: Read these instructions carefully before using your refrigerator, and keep it carefully. If you follow the instruction...