Page 3 - IMPORTANT SAFETY INSTRUCTIONS; When using your steamer, basic safety precautions should; SAVE THESE INSTRUCTIONS.; This product is for household use only.
2 3 IMPORTANT SAFETY INSTRUCTIONS When using your steamer, basic safety precautions should always be followed, including the following: SAVE THESE INSTRUCTIONS. This product is for household use only. POLARIZED PLUG (120V models only) To reduce the risk of electric shock, this appliance has a polari...
Page 4 - G E T T I N G T O K N O W YO U R S T E A M E R
4 5 G E T T I N G T O K N O W YO U R S T E A M E R 1. Steam trigger 2. Continuous steam switch 3. Comfort grip handle 4. Removable water tank (Part # HGS200-01) 5. Power button (not shown) 6. Lint frame* (Part # HGS200-02) 7. Delicate fabric frame (Part # HGS200-03) 8. Upholstery frame (Part # HGS20...
Page 6 - FILLING THE WATER TANK
6 7 Frame Usage Lint Frame Garment Care Label: For any garments that call for medium to high heat and allow for use of steam. Tip: Frame helps remove lint, hair, and animal fur. Delicate Fabric Frame Garment Care Label: For any garments that call for low heat and allow for use of steam. Tip: For ite...
Page 7 - U S I N G T H E H A N D H E L D S T E A M E R
6 7 U S I N G T H E H A N D H E L D S T E A M E R 1. Read the manufacturer's fabric label to make sure the fabrics are suitable for steaming. • If you see “do not iron” or this icon , attach the delicate fabric frame and make sure to test on an inconspicuous area prior to steaming the entire garment...
Page 8 - C L E A N I N G A N D C A R E
8 9 8. When finished steaming, press and hold the power button until its blue light turns off (about 3 seconds) and unplug from outlet. (J) 9. Stand steamer on its base and allow it to completely cool off before storing. (K) To avoid mineral buildup, empty the tank after each use. Auto Shut-Off The ...
Page 9 - S T E A M I N G T I P S A N D T R I C K S
8 9 CLEANING FRAMES AND ACCESSORIES For all accessories, allow to fully dry before using again or storing. Accessories are not suitable for cleaning in a washing machine. • Lint frame: Wipe with damp cloth to clean. • Delicate frame: Wash with cold water and small amounts of gentle cleanser if neede...
Page 10 - TROUBLESHOOTING; Problem
10 11 TROUBLESHOOTING Problem Possible Cause Solution The steamer is plugged in but not heating. There's a power supply issue. Check that the plug is properly inserted into the outlet or try plugging the steamer into a different outlet. The auto shut-off has activated. Press the steam trigger or pre...
Page 12 - INSTRUCCIONES IMPORTANTES DE SEGURIDAD; básicas de seguridad, incluyendo las siguientes:; CONSERVE ESTAS INSTRUCCIONES.; Este aparato eléctrico es para uso doméstico solamente.
12 13 • LEA TODAS LAS INTRUCCIONES ANTES DE UTILIZAR EL APARATO. • A fin de reducir el riesgo de contacto con el agua caliente que sale de los escapes de vapor, revise el aparato antes de cada uso sosteniendolo lejos del cuerpo y operando el botón de vapor. • Utilice el vaporizador solamente con el ...
Page 13 - C O N O Z C A S U VA P O R I Z A D O R
12 13 C O N O Z C A S U VA P O R I Z A D O R El producto puede variar ligeramente del que aparece ilustrado. *Acessorio para pelusas incluido solo en modelos elegidos. 1. Gatillo de vapor 2. Interruptor de vapor continuo 3. Mango de agarre cómodo Comfort Grip™ 4. Tanque de agua removible (pieza no. ...
Page 14 - C Ó M O U S A R; P R E PA R A C I Ó N; N O TA S I M P O R TA N T E S
14 15 C Ó M O U S A R Este producto es solamente para uso doméstico. P R E PA R A C I Ó N • Retire toda etiqueta colgante y adherida al cuerpo o cable del vaporizador y la tira plástica alrededor del enchufe. • Retire y converve la literatura. • Lea todas las instrucciones antes de utilizar su vapor...
Page 15 - INSTALACIÓN DE LOS ACCESORIOS; Accesorio; LLENADO DEL TANQUE DE AGUA
14 15 INSTALACIÓN DE LOS ACCESORIOS El vaporizador viene con tres accesorios de uso opcional, recomendados para utilizar con una variedad de tejidos y tapicería. 1. Seleccione el accesorio adecuado utilizando la tabla a continuación. 2. Mientras el accesorio y el vaporizador están fríos, con gentile...
Page 16 - U S O D E L VA P O R I Z A D O R D E M A N O
16 17 3. Con gentileza, tire de la tapa de goma del tanque en la parte de arriba del tanque. (D) Consejo: El uso de agua destilada, purificada o filtrada es altamente recomendado y reducirá la acumulación de minerales. No utilice aceites, perfumes ni aditivos aromáticos. 4. Utilizando una taza de me...
Page 18 - L I M P I E Z A Y C U I DA D O
18 19 Limpieza con Vapor Alrededor del Hogar El uso de vapor para limpiar artículos del hogar que puedan tolerar vapor húmedo, caliente sin ocasionar daños resulta económico y no es tóxico. Este método natural de limpieza es beneficioso para aquellas personas alérgicas a limpiadores químicos o que e...
Page 19 - C O N S E J O S Y T R U C O S PA R A A P L I C A R VA P O R
18 19 ALMACENAMIENTO DEL VAPORIZADOR 1. Verifique que el vaporizador esté desenchufado y enfriado por completo. 2. Recoja y doble el cable en forma ovalada y suavemente sujételo con la tira de Velcro. (L) 3. Siempre almacene el vaporizador en posición vertical sobre su base para evitar goteos de agu...
Page 20 - RESOLUCIÓN DE PROBLEMAS; Problema
20 21 RESOLUCIÓN DE PROBLEMAS Problema Causa Posible Solución El vaporizador está enchufado pero no calienta. Hay un problema de suministro de energía. Verifique que el enchufe esté insertado adecuadamente en el tomacorriente o trate de enchufar el vaporizador a un tomacorriente diferente. La funció...
Page 21 - ¿ N E C E S I TA AY U DA?
20 21 ¿ N E C E S I TA AY U DA? Para servicio, reparaciones o preguntas relacionadas al producto, por favor llame al número del centro de servicio que se indica para el país donde usted compró su producto. NO devuélva el producto al fabricante. Llame o lleve el producto a un centro de servicio autor...
Page 22 - P Ó L I Z A D E G A R A N T Í A
22 23 P Ó L I Z A D E G A R A N T Í A (Válida sólo para México) DURACIÓN Spectrum Brands de México, SA de CV garantiza este producto por 2 años a partir de la fecha original de compra. ¿Qué cubre esta garantía? • Esta Garantía cubre cualquier defecto que presenten las piezas, componentes y la mano d...
Page 25 - RÈGLES DE SÉCURITÉ IMPORTANTES; règles de sécurité fondamentales, notamment les suivantes :; CONSERVER CES INSTRUCTIONS.; Cet appareil est conçu pour un usage domestique seulement.
24 25 • LIRE TOUTES LES INSTRUCTIONS AVANT D'UTILISER L'APPAREIL. • Pour réduire le risque de contact avec l’eau chaude sortant des évents à vapeur, vérifier l’appareil avant chaque utilisation, et ce, en le tenant loin du corps et en pressant la gâchette de jet de vapeur. • Utiliser le défroisseur ...
Page 27 - FAMILIARISATION AVEC LE DÉFROISSEUR À VAPEUR
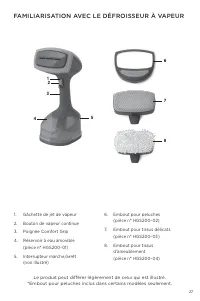
26 27 FAMILIARISATION AVEC LE DÉFROISSEUR À VAPEUR 1. Gâchette de jet de vapeur 2. Bouton de vapeur continue 3. Poignée Comfort Grip 4. Réservoir à eau amovible (pièce n° HGS200-01) 5. Interrupteur marche/arrêt (non illustré) 6. Embout pour peluches (pièce n° HGS200-02) 7. Embout pour tissus délicat...
Page 28 - U T I L I S AT I O N; P O U R C O M M E N C E R; R E M A R Q U E S I M P O R TA N T E S
28 29 U T I L I S AT I O N Cet appareil est conçu pour un usage domestique seulement. P O U R C O M M E N C E R • Retirer toutes les étiquettes et tous les autocollants apposés sur l’appareil ou son cordon ainsi que la bande de plastique entourant la fiche. • Retirer et conserver la documentation. •...
Page 29 - FIXATION DES EMBOUTS; Embout
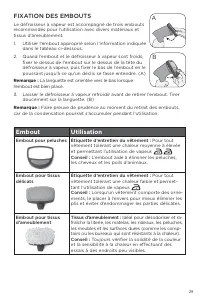
28 29 FIXATION DES EMBOUTS Le défroisseur à vapeur est accompagné de trois embouts recommandés pour l’utilisation avec divers matériaux et tissus d’ameublement. 1. Utiliser l’embout approprié selon l’information indiquée dans le tableau ci-dessous. 2. Quand l’embout et le défroisseur à vapeur sont f...
Page 32 - N E T T OYA G E E T E N T R E T I E N
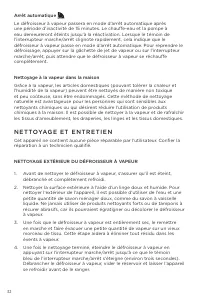
32 33 Arrêt automatique Le défroisseur à vapeur passera en mode d’arrêt automatique après une période d’inactivité de 15 minutes. Le chauffe-eau et la pompe à eau demeureront éteints jusqu’à la réactivation. Lorsque le témoin de l’interrupteur marche/arrêt clignote rapidement, cela indique que le dé...
Page 33 - T R U C S E T C O N S E I L S P O U R L E D É F R O I S S A G E
32 33 NETTOYAGE DES EMBOUTS ET DES ACCESSOIRES Laisser sécher complètement tous les accessoires avant de les utiliser de nouveau ou de les ranger. Les accessoires ne peuvent être lavés dans une laveuse. • Embout pour peluches : Nettoyer à l’aide d’un linge humide. • Embout pour tissus délicats : Lav...
Page 34 - DÉPANNAGE; Problème
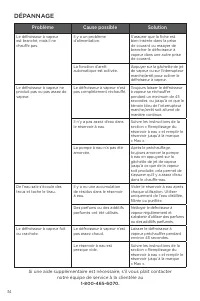
34 35 DÉPANNAGE Problème Cause possible Solution Le défroisseur à vapeur est branché, mais il ne chauffe pas. Il y a un problème d’alimentation. S’assurer que la fiche est bien insérée dans la prise de courant ou essayer de brancher le défroisseur à vapeur dans une autre prise de courant. La fonctio...