Page 3 - INDEX
ENGLISH » INDEX Technical data ��������������������������������������������������������������������������������������������������������������������������������������������������� 47 Technische Daten �����������������������������������������������������������������������������������������������������...
Page 5 - Opening the device voids your warranty.
1. INTRODUCTION We are delighted that you have chosen to use a be quiet! power supply from our SFX Power 3 / TFX Power 3 series in your PC� Please read and follow all the information contained in these instructions carefully prior to installation� Should you have any further questions, please contac...
Page 6 - Note
Before using the power supply, allow it to warm up to room temperature for one hour to prevent condensation accumulating in the power supply� 3. COMPATIBILITY The be quiet! SFX Power 3 / TFX Power 3 series power supplies are compatible with all recent popular power supply and motherboard specificati...
Page 7 - SAFETY FUNCTIONS; is automatically switched off.
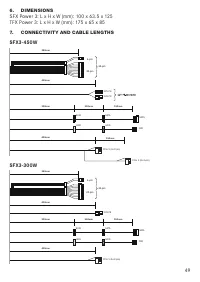
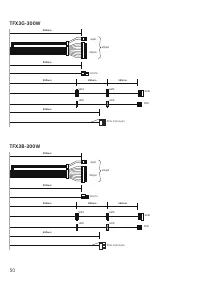
∙ Plug the 20/24-pin connector into the socket provided on the motherboard� If you have a 24-pin connection, place the remaining 4 pins in the correct position before you plug the connector into the socket� If you have a motherboard with a 20 -pin connector, fold the additional 4 pins to one side� ∙...
Page 8 - TROUBLESHOOTING; Caution; : There is a risk of fatal injury when working on power sources. If you; Opening the device will void your warranty.; check for these possible sources of error first:; FREQUENT PROBLEMS
6. TROUBLESHOOTING Please note: If you have an ATX system, the power supply is enabled by the motherboard in order to boot the PC� For this reason, please refer to the motherboard or case manual to check whether the on/off switch is connected correctly� Caution : There is a risk of fatal injury when...
Page 9 - immediately�; ACCESSORIES; Due to European directives* you are no longer allowed to dispose of
Problem: After installing a new graphics card, the PC will not power on, or it crashes frequently. You have installed a new higher performance graphics card in your system and now your PC fails to boot, or it crashes immediately with minimal workload� The power supply is inadequately dimensioned for...
Page 10 - MANUFACTURER’S DETAILS
10. WARRANTY ∙ 3 years manufacturer’s warranty for consumers (original purchase from authorised be quiet! dealers only)� ∙ Your original purchase receipt will be required before warranty performance is rendered� Please keep it in a safe place� ∙ Opening the device, manipulations and / or technical m...
Page 11 - von autorisiertem Fachpersonal geöffnet werden.; Durch das Öffnen des Gerätes erlischt die Garantie.
1. EINLEITUNG Wir freuen uns, dass Sie sich dazu entschieden haben, ein be quiet! Netzteil der SFX Power 3 / TFX Power 3 Serie in Ihrem Rechner einzusetzen� Vor der ersten Inbetriebnahme befolgen Sie bitte alle Punkte dieser Anleitung� Falls Sie weitere Fragen haben, richten Sie diese gerne an unser...
Page 12 - Tuches. Ein Öffnen des Gerätes führt zum Garantieverlust.; KOMPATIBILITÄT
Für den Fall, dass Sie Ihr Netzteil reinigen möchten, trennen Sie das Netzteil komplett vom Stromnetz und benutzen Sie keine feuchten Tücher oder Reinigungsmittel� Reinigen Sie das Netzteil nur von außen mit Hilfe eines trockenen Tuches. Ein Öffnen des Gerätes führt zum Garantieverlust. Nehmen Sie d...
Page 13 - Der Einbau Ihres neuen be quiet! SFX Power 3 / TFX Power 3 Netzteiles:; SICHERUNGSFUNKTIONEN
∙ Nun entfernen Sie die Schrauben an der Rückseite des Netzteiles und entnehmen Sie das Netzteil vorsichtig aus dem PC- Gehäuse� Achten Sie hierbei besonders darauf, dass sich keine Kabel an Komponenten verfangen und diese beschädigen� Der Einbau Ihres neuen be quiet! SFX Power 3 / TFX Power 3 Netzt...
Page 14 - FEHLERBEHEBUNG; Bitte beachten Sie; : Bei ATX-Systemen wird das Netzteil vom Mainboard aktiviert,; Achtung; können�; durchführen! Ein Öffnen des Gerätes führt zum Garantieverlust.; Steckdose nur für das Computernetzteil�
SCP (Kurzschlusssicherung) Die Sicherung bei Kurzschluss im Sekundärteil des Netzteils verhindert einen Defekt am Netzteil und an den am Netzteil angeschlossenen Komponenten� OPP (Überlastschutz) Diese Sicherung löst aus, sobald die gesamte Leistung, welche vom Netzteil abgenommen wird, die spezifiz...
Page 15 - ausgestattet ist�; HÄUFIGE PROBLEME; Problem: Die ausgelesenen Spannungen (über BIOS oder UEFI) sind zu; und muss nicht zwangsweise der Realität entsprechen�; mehr an oder stürzt bei jeder Gelegenheit ab.; Kundenservice in Verbindung�; ZUBEHÖR; Balken weist auf die Notwendigkeit der getrennten Sammlung hin�
Sie diesen Vorgang und schließen Sie nach jedem Neustart eines der Geräte an, bis Sie den vermeintlichen Defekt gefunden haben� Sollte das Netzteil wegen eines Kurzschlusses nicht reagieren, warten Sie bitte mindestens fünf Minuten mit dem erneuten Einschalten, da das Gerät mit einem Überlastungssch...
Page 16 - HERSTELLERANGABEN; unten stehenden kostenlosen Service-Hotline�
In Deutschland sind Sie gesetzlich** verpflichtet, ein Altgerät einer vom unsortierten Siedlungsabfall getrennten Erfassung zuzuführen. Die öffentlich- rechtlichen Entsorgungs-träger (Kommunen) haben hierzu Sammelstellen eingerichtet, an denen Altgeräte aus privaten Haushalten Ihres Gebietes für Sie...
Page 19 - COMPATIBILITÉ; spécifications des cartes mères et des alimentations :; INSTALLATION DE VOTRE NOUVEAU BLOC; Remarque; présentent le filetage requis.
Si vous souhaitez nettoyer votre bloc d’alimentation, veuillez le débrancher� Il est fortement déconseillé d’utiliser un chiffon humide ou des produits de nettoyage. Nettoyez uniquement l’extérieur du bloc d’alimentation à l’aide d’un chiffon sec. Nous vous rappelons que l’ouverture de votre bloc d’...
Page 20 - SYSTÈMES DE SÉCURITÉ; OCP (protection contre les surintensités); s‘éteint automatiquement.
∙ Retirez les vis se trouvant à l’arrière de l’alimentation et sortez-la avec précaution du boîtier PC� Pour ce faire, veillez à ce qu’aucun câble ne se prenne dans les composants et ne les endommage� Montage de votre nouveau bloc d’alimentation SFX Power 3 / TFX Power 3 : ∙ Placez le nouveau bloc d...
Page 21 - DÉPANNAGE; veuillez noter qu’avec un système ATX, l’alimentation est activée; Attention; : manipuler des éléments sous tension comporte un risque de
préserver l‘alimentation et les composants qui lui sont raccordés. OPP (protection contre les surcharges) Cette sécurité se déclenche dès que la puissance totale fournie par le bloc d‘alimentation est plus élevée que la charge maximale spécifiée. Cela peut être le cas si le bloc d‘alimentation ne fo...
Page 22 - protection contre les surcharges�; PROBLEMES LES PLUS FRÉQUENTS; élevées; la carte mère et ne reflète pas forcément la réalité.; démarre plus ou plante inopinément; notre service après-vente�; ACCESSOIRES; à déchets barré d’une croix�
du système tous les appareils qui ne sont pas nécessaires au démarrage de l’ordinateur� Remettez le système sous tension� Après chaque redémarrage réussi, répétez cette procédure en ayant rebranché l’un des appareils, jusqu’à identifier celui qui provoque la panne. Si le bloc d’alimentation ne réagi...
Page 23 - INFORMATIONS CONSTRUCTEUR; be quiet! est une marque appartenant à
Contribuez vous aussi à la protection de l’environnement� Lorsque votre appareil n’est plus utilisable, conformez-vous aux règles en vigueur dans votre localité et ne jetez pas votre appareil avec les déchets ménagers� Pour plus d'informations sur les lieux de collecte des équipements usagés, nous v...
Page 25 - WPROWADZENIE; Dane producenta�; WSKAZÓWKI DOTYCZĄCE BEZPIECZEŃSTWA; do wszystkich punktów niniejszej instrukcji� Tylko wtedy; Otworzenie urządzenia powoduje wygaśnięcie gwarancji.; obudowy�
1. WPROWADZENIE Cieszymy się, że zdecydowali się Państwo na zamontowanie w swoim komputerze zasilacza be quiet! serii SFX Power 3 / TFX Power 3. Proszę przeczytać informacje zawarte w niniejszej instrukcji obsługi przed instalacją. Dalsze pytania prosimy kierować do pracowników Działu Obsługi Klient...
Page 26 - Uwaga; wyciągnąć wszystkie kable podłączone do komputera.
W celu oczyszczenia zasilacza należy go całkowicie odłączyć z sieci. Nie należy stosować wilgotnych ściereczek ani środków czyszczących. Należy wyczyścić zasilacz jedynie z zewnątrz suchą ściereczką. Przed uruchomieniem zasilacz powinien leżeć godzinę w temperaturze pokojowej, aby zapobiec utworzeni...
Page 27 - Montaż nowego zasilacza be quiet! SFX Power 3 / TFX Power 3:; na bok�; FUNKCJE BEZPIECZEŃSTWA; podany limit�
żadna wtyczka starego zasilacza nie jest połączona z żadnym komponentem systemu. Teraz wyciągnąć śruby z tyłu zasilacza i ostrożnie go wyjąć z obudowy komputera. Zwrócić przy tym szczególną uwagę na to, aby kable nie wplątały się w komponenty systemu i nie uszkodziły ich. Montaż nowego zasilacza be ...
Page 28 - USUWANIE USTEREK; sprawdzić najpierw poniższe możliwe przyczyny błędów:
OPP (Zabezpieczenie przeciążeniowe) To zabezpieczenie uaktywnia się, gdy tylko całkowita moc pobierana od zasilacza jest wyższa, niż podane w specyfikacji obciążenie maksymalne. Taki przypadek może mieć miejsce, gdy zasilacz nie dysponuje mocą wystarczającą dla systemu ( jest niedowymiarowany)� 6. U...
Page 29 - wyposażone w zabezpieczenie przeciążeniowe.; CZĘSTE PROBLEMY; odpowiada rzeczywistym wartościom.; ponownie uruchomiony lub bardzo często zawiesza się; asortymentu�; AKCESORIA; opaski do przewodów, śruby do zamocowania zasilacza; WSKAZÓWKI DOTYCZĄCE RECYCLINGU; odpadów�
przynajmniej 5 minut zanim zostanie ponownie włączony, gdyż urządzenie jest wyposażone w zabezpieczenie przeciążeniowe. 7. CZĘSTE PROBLEMY Problem: Odczytane (przez Bios/UEFI) napięcia są zbyt niskie/wysokie W przypadku kontroli napięć zasilacza w BIOS/UEFI płyty głównej lub w systemie operacyjnym m...
Page 33 - COMPATIBILIDAD; de alimentación y placas base como:; INSTALACIÓN DE SU NUEVO BLOQUE DE; Observación; : para montar el bloque de alimentación en el PC, necesita un
de la garantía� Ponga el bloque de alimentación en funcionamiento cuando lleve una hora en un entorno ventilado; de lo contrario, se podría condensar humedad en el bloque de alimentación� 3. COMPATIBILIDAD Los bloques de alimentación de la serie SFX Power 3 / TFX Power 3 son compatibles con todas la...
Page 34 - FUNCIONES DE FUSIBLE
∙ Ahora extraiga los tornillos de la parte trasera del bloque de alimentación y retire con cuidado el bloque de alimentación de la caja del PC� Preste especial atención a que no se enganchen cables en los componentes y los dañen� Montaje del nuevo bloque de alimentación be quiet! SFX Power 3 / TFX P...
Page 35 - SOLUCIÓN DE ERRORES; Atención
alimentación, un defecto en el bloque de alimentación y en los componentes conectados a este� OPP (protección contra sobrecarga) Este fusible se activa en cuanto toda la potencia absorbida por el bloque de alimentación supera la carga máxima especificada. Este caso puede darse si el bloque de alimen...
Page 36 - PROBLEMAS FRECUENTES; a la realidad�; bloquea con frecuencia.; Si los problemas persisten, póngase en contacto; ACCESORIOS; Tornillos para fijar el bloque de alimentación; INDICACIONES PARA LA ELIMINACIÓN; basura especial cuando ya no lo quiera volver a usar�
encuentre el posible defecto� Si el bloque de alimentación no reacciona debido a un cortocircuito, espere al menos 5 minutos antes de encenderlo de nuevo, dado que el dispositivo está equipado con una protección contra sobrecarga� 7. PROBLEMAS FRECUENTES Problema: las tensiones leídas (a través del ...
Page 37 - DATOS DEL FABRICANTE
reciclar los dispositivos domésticos usados de forma gratuita� También es posible que estas empresas de recogida de basura vayan a buscar los dispositivos usados a los domicilios particulares� Infórmese asimismo del calendario de recogida de basura local o, en el ayuntamiento, de las posibilidades d...
Page 40 - СОВМЕСТИМОСТЬ; УСТАНОВКА НОВОГО БЛОКА ПИТАНИЯ
используйте влажную ткань или чистящие средства� Очистите внешнюю часть блока питания с помощью сухой ткани� Перед использованием блока питания, дайте ему прогреться до комнатной температуры в течение часа, чтобы предотвратить конденсат� 3. СОВМЕСТИМОСТЬ Серия блоков питания be quiet! SFX Power 3 / ...
Page 41 - ФУНКЦИИ БЕЗОПАСНОСТИ; ПОИСК НЕИСПРАВНОСТЕЙ
в правильном положении перед установкой� Если используется плата с 20-контактным разъемом, отведите дополнительный 4-контактный разъем в сторону� ∙ Теперь подключите разъем 12V-P4 / 12V-P8 для процессора на системной плате� 5. ФУНКЦИИ БЕЗОПАСНОСТИ Все блоки питания be quiet! оснащены полным спектром...
Page 42 - ЧАСТЫЕ ПРОБЛЕМЫ
жидкостей, немедленно отсоедините питание от сети и не используйте блок питания снова�Никогда не открывайте корпус блока питания� Высоковольтные компоненты блока питания могут по-прежнему быть под напряжением даже после длительного времени с момента отключения� Пожалуйста, проводите все необходимые ...
Page 44 - ПОДРОБНОСТИ О ПРОИЗВОДИТЕЛЕ
∙ Дата изготовления указана в серийном номере устройства в формате: X X XSYWWX X X X X X где Y – цифра от 0 до 9 указывает год производства ( 0-2020, 1-2021,2-2022,…,9-2029), WW - указывает неделю производства (от 01 до 53) 11. ПОДРОБНОСТИ О ПРОИЗВОДИТЕЛЕ Listan GmbH | Wilhelm-Bergner-Straße 11c | 2...
Page 45 - Limited Warranty; The following are not covered by the warranty:
Limited Warranty Per the terms and conditions of this limited warranty as given below, be quiet! warrants its new products to be free of defects resulting from faulty materials and faulty manufacturing for the length of the warranty period� I. APPLICABILITY This non-transferable warranty is applicab...
Page 46 - under local law� These rights may vary�; VII. NO OTHER WARRANTY; proof of purchase for warranty service�
IV. EXCLUSION OF DAMAGES be quiet!‘s sole obligation and liability under this warranty is lim-ited to the repair or replacement of a defective product at its option� be quiet! shall not, in any event, be liable for any special, incidental, indirect, or consequential damages whatsoever, including but...
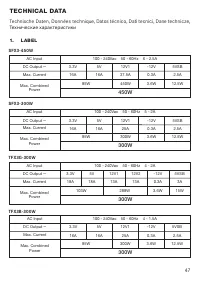
Page 47 - TECHNICAL DATA
1. LABEL TECHNICAL DATA Technische Daten, Données technique, Datos técnico, Dati tecnici, Dane technicze, Технические характеристики 100 - 240Vac 50 - 60Hz 6 - 2.5A 3.3V 5V 12V1 -12V 5VSB 16A 85W 16A 37.5A 450W 450W 0.3A 2.5A 3.6W 12.5W AC Input Max. Current Max. Combined Power DC Output ⎓ 100 - 240...
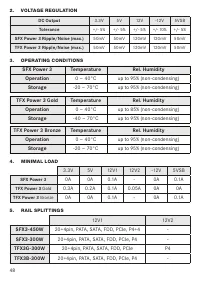
Page 48 - DC Output; SFX Power 3; TFX Power 3
2. VOLTAGE REGULATION DC Output 3�3V 5V 12V -12V 5VSB Tolerance +/- 5% +/- 5% +/- 5% +/- 10% +/- 5% SFX Power 3 Ripple/Noise (max.) 50mV 50mV 120mV 120mV 50mV TFX Power 3 Ripple/Noise (max.) 50mV 50mV 120mV 120mV 50mV SFX Power 3 Temperature Rel. Humidity Operation 0 ~ 40°C up to 95% (non-condensing...