Page 2 - Federal Communications Commission Statement
Federal Communications Commission Statement This device complies with Part 15 of the FCC Rules. Operation is subject to the following two conditions: (1) This device may not cause harmful interference, and (2) this device must accept any interference received, including interference that may cause u...
Page 3 - SPECIFICATIONS ARE SUBJECT TO CHANGE W ITHOUT PRIOR NOTICE.
DISCLAIMER No warranty or representation, either expressed or implied, is made with respect to the contents of this documentation, its quality, performance, merchantability, or fitness for a particular purpose. Informatio n presented in this documentation has been carefully checked for reliability; ...
Page 4 - WARNING; Remote Control Battery Safety Information
WARNING To reduce risk of fire or electric shock, do not expose this appliance to rain or moisture. W arranty will be void if any unauthorized modifications are done to the product. Do not drop the camera or subject it to physical shock. Use correct power supply voltage to avoid damaging camer...
Page 5 - Contents
Contents Package Contents ................................................................................................... 1 Optional Accessories ....................................................................................... 1 Product Introduction ...........................................
Page 7 - Package Contents; Optional Accessories
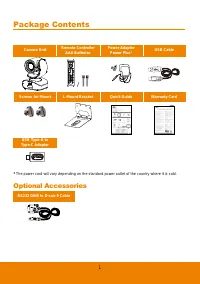
1 Package Contents Camera Unit Remote Controller AAA Batteries Power Adapter Power Plus* USB Cable / Screws for Mount L-Mount Bracket Quick Guide Warranty Card USB Type-A to Type-C Adapter * The power cord will vary depending on the standard power outlet of the country where it is sold. Optional Acc...
Page 8 - Product Introduction; Camera
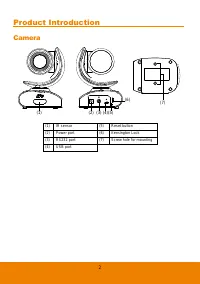
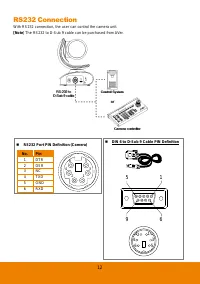
2 Product Introduction Camera (1) (2) (4) (3) (5) (6) (7) (1) IR sensor (5) Reset button (2) Power port (6) Kensington Lock (3) RS232 port (7) Screw hole for mounting (4) USB port
Page 9 - Remote Controller
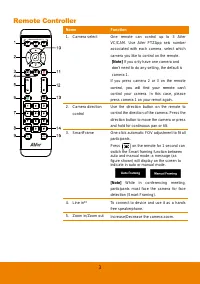
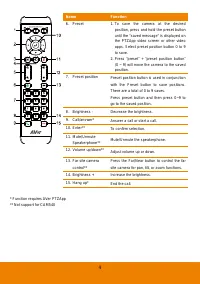
3 Remote Controller Name Function 1. Camera select One remote can control up to 3 AVer VC/CAM. Use AVer PTZApp sets number associated with each camera, select which camera you like to control on the remote. [Note] If you only have one camera and don’t need to do any setting, the default is camera 1....
Page 11 - Installation; Device Connection
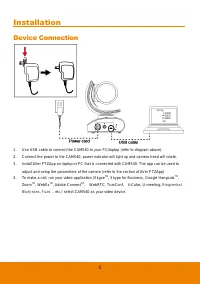
5 Installation Device Connection 1. Use USB cable to connect the CAM540 to your PC/laptop (refer to diagram above). 2. Connect the power to the CAM540; power indicator will light up and camera head will rotate. 3. Install AVer PTZApp on laptop or PC that is connected with CAM540. The app can be used...
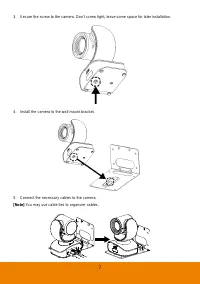
Page 12 - Wall Mount Installation
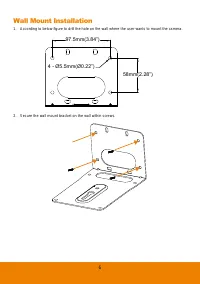
6 Wall Mount Installation 1. According to below figure to drill the hole on the wall where the user wants to mount the camera. 58mm(2.28”) 97.5mm(3.84”) 4 - Ø5.5mm(Ø0.22”) 2. Secure the wall mount bracket on the wall within screws.
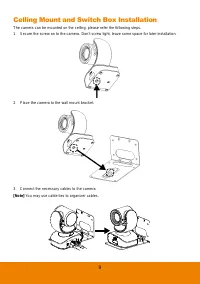
Page 15 - Celling Mount and Switch Box Installation
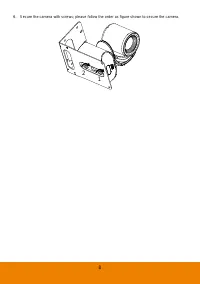
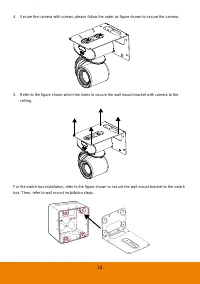
9 Celling Mount and Switch Box Installation The camera can be mounted on the celling, please refer the following steps. 1. Secure the screw on to the camera. Don ’t screw tight, leave some space for later installation. 2. Place the camera to the wall mount bracket. 3. Connect the necessary cables to...
Page 17 - Secure USB Cable; Pan and Tilt Angle
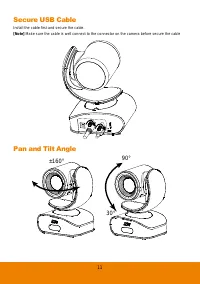
11 Secure USB Cable Install the cable first and secure the cable. [Note] Make sure the cable is well connect to the connector on the camera before secure the cable Pan and Tilt Angle ±160° 90° 30°
Page 19 - Make a Video Call
13 Make a Video Call 1. Make sure CAM540 and PC/laptop are well connected and power is on. 2. Run your video application (Skype TM , Skype for Business, Google Hangouts TM , Zoom TM , WebEx TM , Adobe Connect TM , WebRTC, TrueConf, V-Cube, U-meeting, Ringcentral, BlueJeans, Fuze …etc.) on your PC or...
Page 20 - AVer PTZApp; Install AVer PTZApp; Use AVer PTZApp
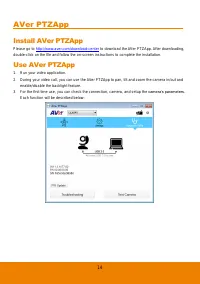
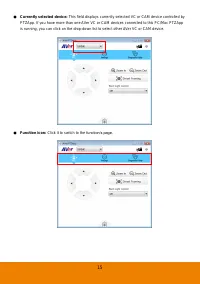
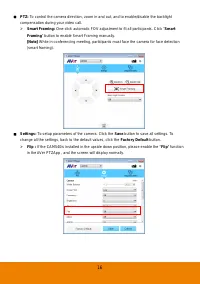
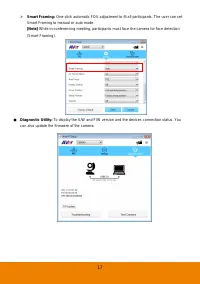
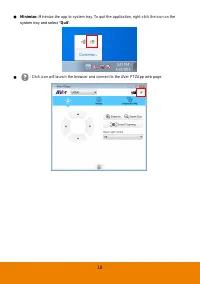
14 AVer PTZApp Install AVer PTZApp Please go to http://www.aver.com/download-center to download the AVer PTZApp. After downloading, double-click on the file and follow the on-screen instructions to complete the installation. Use AVer PTZApp 1. Run your video application. 2. During your video call, y...
Page 27 - Set the Camera Number
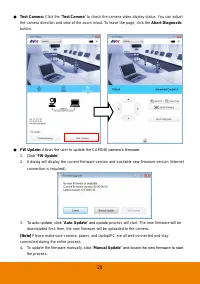
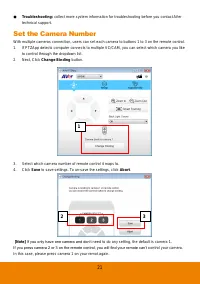
21 Troubleshooting: collect more system information for troubleshooting before you contact AVer technical support. Set the Camera Number With multiple cameras connection, users can set each camera to buttons 1 to 3 on the remote control. 1. If PTZApp detects computer connects to multiple VC/CAM, y...
Page 28 - Hotkey Control
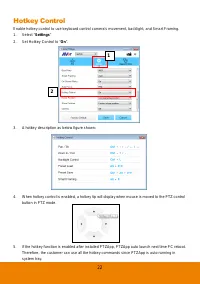
22 Hotkey Control Enable hotkey control to use keyboard control camera ’s movement, backlight, and Smart Framing. 1. Select “ Settings ” 2. Set Hotkey Control to “ On ”. 3. A hotkey description as below figure shown: 4. When hotkey control is enabled, a hotkey tip will display when mouse is moved to...
Page 29 - Home / Sleep Position
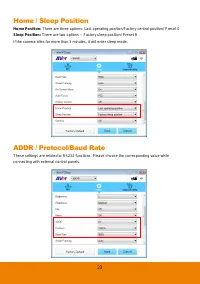
23 Home / Sleep Position Home Position: There are three options: Last operating position/Factory central position/ Preset 0 Sleep Position: There are two options -- Factory sleep position/ Preset 9 If the camera idles for more than 3 minutes, it will enter sleep mode. ADDR / Protocol/Baud Rate These...
Page 30 - OpenGL
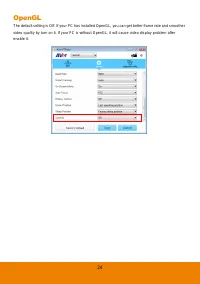
24 OpenGL The default setting is Off. If your PC has installed OpenGL, you can get better frame rate and smoother video quality by turn on it. If your PC is without OpenGL, it will cause video display problem after enable it.
Page 31 - Install EZLive; Use AVer EZLive
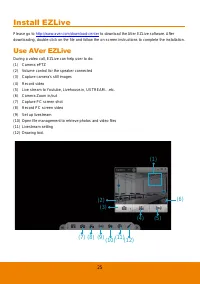
25 Install EZLive Please go to http://www.aver.com/download-center to download the AVer EZLive software. After downloading, double-click on the file and follow the on-screen instructions to complete the installation. Use AVer EZLive During a video call, EZLive can help user to do: (1) Camera ePTZ (2...