Page 2 - Assistant or Amazon Alexa.
Control your window fan from your smart devices simply by installing the AspenHome app and connecting to your Wi – Fi network. Find “AspenHome” APP in IOS and Android or Scan QR Code to download and enjoy optional scheduling functions & speeds from your smartphone or with voice control through A...
Page 4 - cells may cause injury.
Always completely secure the battery compartment. If the battery compartment does not close securely, stop using the product, remove the batteries, and keep it away from children. If you think batteries might have been swallowed or placed inside any part of the body, seek immediate medical attention...
Page 5 - TABLE OF CONTENTS
TABLE OF CONTENTS Technical Data.................................................... Installation Instructions...................................... Operating Instructions..................................... User Service / Cleaning Instructions.............. Troubleshooting............................
Page 7 - READ AND SAVE THESE INSTRUCTIONS; For 24” to 31” : Use up to 7” of right side, pull out expender screen.; Instructions Prior to Operation; the air coming in or the air going out.; TECHNICAL DATA
READ AND SAVE THESE INSTRUCTIONS ! THIS FAN IS DESIGNED AND RECOMMENDED FOR USE WITH THE SCREEN IN THE WINDOW For 24” to 31” : Use up to 7” of right side, pull out expender screen. For 32” to 36” : Use 5” extender panel on the left side. Adjust the pull outextender screen on the right Larger than 37...
Page 8 - INSTALLATION INSTRUCTIONS; located on the left side of the fan.
INSTALLATION INSTRUCTIONS The extender screen can be adjusted by pulling out the extender locks located on the top and bottom of the right side of the fan. Push the locks back into place to secure the extender screen at the desired length. The extender panels can be secured to the fan by simply slid...
Page 9 - For Double-Hung Windows; BE SURE FAN IS SECURELY INSTALLED IN YOUR WINDOW AT ALL TIMES.
INSTALLATION INSTRUCTIONS For Double-Hung Windows 1. window track. 2. Lower and secure window behind window grabber located on top of Fan. op en clo se op en clo se Timer (hr) COOL EXHAUST CIRCULATE Speed Temperature High Set Med Low Airflow Mode ! BE SURE FAN IS SECURELY INSTALLED IN YOUR WINDOW AT...
Page 10 - For Vertical, Slider and Casement Windows; extender panel to meet the edge of the window.
INSTALLATION INSTRUCTIONS For Vertical, Slider and Casement Windows 1. Position the Fan vertically in the window with the switch facing the center of the opening. 2. 3. Depending on the size of the window opening, adjust the built-in extender screen and/or slide the extender panel to meet the edge o...
Page 11 - OPERATING INSTRUCTIONS
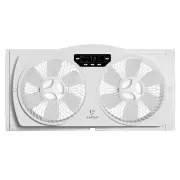
OPERATING INSTRUCTIONS Timer (hr) COOL EXHAUST CIRCULATE Speed Temperature High Set Med Low Airflow Mode Airflow Mode Speed Speed Temp Temp • COOL: indicates that 2 motors are rotating forward [supplying air] • EXHAUST: indicates that 2 motors are rotating in reverse [ventilation] • CIRCULATE: indic...
Page 12 - Start Up Instructions; indicating that the power is on and the unit is running normally.
OPERATING INSTRUCTIONS Start Up Instructions 1. Insert the power cord plug into a 120 V AC 60 Hz power outlet. The machine will emit a “B” sound, indicating that the power is on and the unit is running normally. 2. Press the power button: The first time you press the button to turn on the fan, it wi...
Page 13 - APP CONTROL; Please have a compatible IOS or Android device with WiFi enabled
OPERATING INSTRUCTIONS APP CONTROL Please have a compatible IOS or Android device with WiFi enabled How to connect: 1. Find “AspenHome” APP in IOS and Android or Scan QR Code to download to enjoy optional scheduling functions & speeds from your smartphone Make sure that the device is plugged in ...
Page 14 - AspenHome APP offers the following features:; Control airflow mode
OPERATING INSTRUCTIONS AspenHome APP offers the following features: Voice Control Google Assistant / Amazon Alexa and Aspen® smart window fan work together to help you easily control your smart device(s) by conveniently turning your voice into a remote control for your window fan. Use voice commands...
Page 15 - Download our AspenHome app in Android or IOS app market
OPERATING INSTRUCTIONS How to: Alexa Please follow the steps below to connect Alexa to your Aspen® Home products: 1. Download our AspenHome app in Android or IOS app market 2. Register AspenHome account in our app 3. Aspen® smart home device(s) must be nearby in order to connect 4. Configure your sm...
Page 16 - How to: Google Assisstant; Download our AspenHome app in Google Play or App Store
OPERATING INSTRUCTIONS How to: Google Assisstant Please follow the steps below to connect Google Assistant on Google Home to your Aspen® home products: 1. Download our AspenHome app in Google Play or App Store 2. Register AspenHome account in our app 3. Aspen® smart home device(s) must be nearby in ...
Page 17 - USER SERVICING / CLEANING INSTRUCTIONS; Battery Replacement
USER SERVICING / CLEANING INSTRUCTIONS Required 1 x CR2025 LITHIUM BATTERY 3V Battery Replacement 1. Remove battery cover from remote control 2. Insert 1 new battery, pressing it firmly into the slot 3. Replace the battery cover and secure it to lock position 1. 2. 3. CR2025 CR2025 CR2025 12
Page 18 - Do not use gasoline, thinner or benzene as a cleanser.; Washable Back Grills
USER SERVICING / CLEANING INSTRUCTIONS Follow these instructions to correctly and safely care and maintain your Aspen Smart Window Fan. Please remember: ! Always turn off the product and unplug the fan before cleaning or disassembling. ! Do not allow water to drip on or into the fan motor or other e...
Page 19 - Physically replace the fuse; other outlet device. Do not
USER SERVICING / CLEANING INSTRUCTIONS Physically replace the fuse 2. Open fuse cover. Slide open fuse access cover on top of attachment plug towards blades. 1. Grasp plug and remove from the receptacle or other outlet device. Do not unplug by pulling on cord. 3. Remove fuse carefully. Push the fuse...
Page 20 - Fan Blades and Front/Back Grills Removing Instructions
USER SERVICING / CLEANING INSTRUCTIONS Step 1: Pull out security locks on both sides. op en loc k op en loc k op en loc k COOL EXHAUST CIRCULAT High Med Low Airflow Mode Fan Blades and Front/Back Grills Removing Instructions Step 2: Turn the fan grill until the arrow sign aligns with the unlock posi...
Page 21 - Fan Blades and Front/Back Grills Reassembly Instructions
USER SERVICING / CLEANING INSTRUCTIONS Fan Blades and Front/Back Grills Reassembly Instructions Step 1: Securely fasten the blades back together by lining up the arrow sign on the blade with the pegs. Insert the blades until you hear a click to properly secure them. COOL EXHAUST CIRCULAT High Med Lo...
Page 22 - TROUBLESHOOTING; The airflow has decreased; Malfunction
TROUBLESHOOTING The airflow has decreased • Check that the air intake and exhaust are not blocked. • Check that the airflow screen of the window fan is locked. • Adjust the airflow to cool, exhaust or circulate. • Make sure the battery correctly installed. • Make sure the remote is pointed toward fr...
Page 23 - Contact customer service at:
• Please ensure the bottom edge of the window sash fits into the groove along the top of the fan. Make sure it’s completely secure. Refer to the Window Fan Installation section. • Fan can be installed in vertically or horizontally. Please note that when installing vertically, the built- in adjustabl...