Amaryllo ACC1308E51WH - User Manual
Amaryllo ACC1308E51WH Security Camera – User Manual, read for free online in PDF format. We hope this helps you resolve any issues you may have. If you have further questions, please contact us through the contact form.


Need Help?
To find troubleshooting
tips or to get support, scan
the QR code below or visit:
www.amaryllo.us/support
All devices come with a
limited one year warranty!
Scan the QR code below to
take you to Amaryllo's
legal page:
www.amaryllo.us/terms
Or if you need additional help, just contact us!
E-mail: [email protected]
Phone: 1-888-544-9125 (toll-free)
1
2
3
5
4
6
7
Camera Overview
Power on the Device
Three Ways to Install
Get the App
LED Indicator
Factory Reset
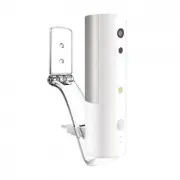
Mount Your Camera
USB Connector
Reset
WPS
Alarm
Speaker
1M-Pixel Camera
Light Detection
240˚ Auto Tracking
Power LED (Blue)
Microphone
Flash LED
(Intruder Warning Light)
PIR Sensor
Wi-Fi LED (Green)
8 GB Built-in Memory
5V/2A Adapter
1. Connect the USB cable
to a power outlet or
USB portable charger.
2. The blue LED light
will illuminate when
the device is powered on.
3. Wait for it to start flashing before
beginning installation.
4. After powering on, it will take 25 seconds to start
its calibration cycle.
1. First, make sure the device is
powered on and the calibration
is completed.
2. There is a small RESET hole.
Press and hold for about 3-5
seconds until you hear a beep.
All settings previously stored in the
device will be erased, and it will be
restored to the factory default.
3. After 25 seconds, the device will enter its calibration
mode and start rotating.
Reset button
(Using a paper clip)
Precautions
32 ~ 95°F (0 ~ 35°C)
Indoor Use Only
Do Not Manually Twist!
Remove the label
before use.
Over 30 degrees
<30º
USB power
plug
Screws
Anchors
Holder
Wall
1. Make sure that a power outlet
is within 2 meters.
Choose a location that will
offer you the best viewing angle.
2. Use a pencil to mark the hole locations. Make sure
the holes are slightly smaller than anchors.
3. Insert the anchors into the wall and secure the holder
to the wall with screws.
4. Insert the USB power plug through the holder opening
in the rear.
5. Plug the device into the USB adapter and adjust until
the proper angle is achieved.
★
Tighten the holder screw if you adjust the holder angle.
App Setup Complete
Congratulations!
Your Hermes is set up and ready to go. The Wi-Fi
LED indicator will be a solid green when the Internet
connection is successful.
★
Please be sure your device is running on the
latest firmware.
4” ~ 12” (10 ~ 30cm)
Horizontal alignment
90º
Hold your phone so
that it is parallel to
the camera lens.
Quick Setup
Hermes
Download the
free Amaryllo
app to get
started.
Green
Blue
Power Indicator (Blue LED)
Solid Blue LED:
Device is powered on.
Blinking Blue LED:
1. Camera is being accessed
remotely.
2. Camera is waiting for setup.
Wi-Fi Indicator (Green LED)
Blinking Green LED:
Camera is attempting to
connect to the Wi-Fi network.
Solid Green LED:
Device has connected to the Wi-Fi.
Set up Camera in the App
1. Make sure that your smart phone is connected to
the same Wi-Fi SSID network as
your camera.
2. Select Hermes
in the app,
then follow
the instructions shown in the app.
★
Please refer to the Tips & How To Page for more info
on how to share viewer or admin access to other
smartphone devices.
Use QR Code to Set up Device
1. Switch on your phone’s Wi-Fi. Connect your phone
to the same router as the camera.
Note: 2.4 GHz 802.11 b/g/n is required.
2. Enter the password of your Wi-Fi router.
3. Your device will automatically generate a QR code.
4. Place the camera 4” ~ 12” (10 ~ 30cm) in front of
the QR code or 8” ~ 12” (20 ~ 30cm) if using a tablet.
5. You will hear a beep when the QR code is read.
Used for mounting
on the wall.
Mounting Bracket
Plug into any power
socket.
USB Power Adapter
You can place it
anywhere.
Power Bank
"Loading the manual" means you need to wait until the file loads and becomes available for online reading. Some manuals are very large, and the time they take to appear depends on your internet speed.