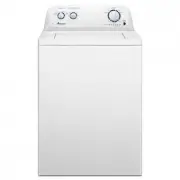
Amana NTW4516FW - Installation Manual
Amana NTW4516FW Washing Machine – Installation Manual, read for free online in PDF format. We hope this helps you resolve any issues you may have. If you have further questions, please contact us through the contact form.


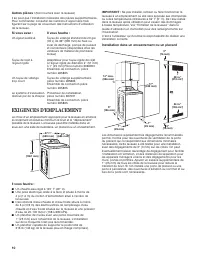
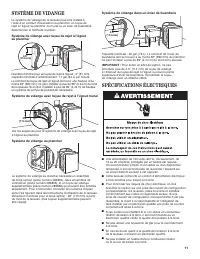

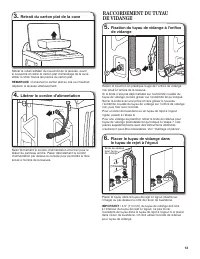
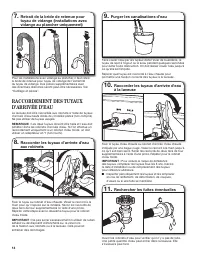
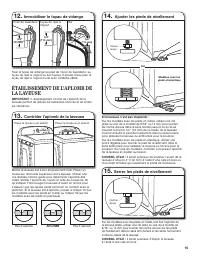
Table of Contents:
- Page 2 – Tools and Parts
- Page 3 – Recessed area or closet installation; DRAIN SYSTEM; Wall standpipe drain system
- Page 4 – Move washer
- Page 5 – CONNECT DRAIN HOSE; Remove packing tray from tub; Attach drain hose to drain port
- Page 6 – CONNECT INLET HOSES; Remove drain hose form
- Page 7 – LEVEL WASHER; Check levelness of washer; Secure drain hose; Tighten leveling feet; Adjust leveling feet
- Page 8 – Plug into a grounded 3 prong outlet
- Page 9 – Outillage nécessaire :
- Page 10 – EXIGENCES D’EMPLACEMENT; Installation dans un encastrement ou un placard
- Page 11 – SPÉCIFICATIONS ÉLECTRIQUES; Système de vidange dans un évier de buanderie; SYSTÈME DE VIDANGE; Système de vidange avec tuyau de rejet à l’égout
- Page 12 – INSTRUCTIONS D’INSTALLATION; INSTRUCTIONS DE LIAISON À LA TERRE; Déplacer la laveuse
- Page 15 – Contrôler l’aplomb de la laveuse; Immobiliser le tuyau de vidange; ÉTABLISSEMENT DE L’APLOMB DE; Serrer les pieds de nivellement; ou
- Page 16 – Brancher sur une prise à 3 alvéoles
WASHER INSTALLATION INSTRUCTIONS
INSTRUCTIONS POUR L’INSTALLATION DE LA LAVEUSE
WASHER SAFETY
Table of Contents
Table des matières
WASHER SAFETY ..............................................................1
INSTALLATION REQUIREMENTS .....................................2
Tools and Parts ..................................................................... 2
Location Requirements ....................................................... 2
Drain System ........................................................................ 3
Electrical Requirements ...................................................... 4
INSTALLATION INSTRUCTIONS .......................................4
Before you start: remove shipping materials .................... 4
Connect Drain Hose ............................................................. 5
Connect Inlet Hoses ............................................................. 6
Level Washer ........................................................................ 7
Complete Installation Checklist .......................................... 8
SÉCURITÉ DE LA LAVEUSE .............................................9
EXIGENCES D’INSTALLATION .........................................9
Outillage et pièces ................................................................. 9
Exigences d’emplacement ................................................. 10
Système de vidange ............................................................. 10
Spécifications électriques ................................................... 11
INSTRUCTIONS D’INSTALLATION .................................12
Avant de commencer : retrait du matériel d’expédition ... 12
Raccordement du tuyau de vidange................................... 13
Raccordement des tuyaux d’arrivée d’eau ........................ 14
Établissement de l’aplomb de la laveuse ........................... 15
Liste de vérification pour l’achèvement de l’installation .. 16
W10240509D
W10240510D-SP
INSTALLATION NOTES
Date of purchase:
_________________________________
Date of installation:
_______________________________
Installer:
________________________________________
Model number:
___________________________________
Serial number:
___________________________________
NOTES SUR L’INSTALLATION
Date d’achat :
____________________________________
Date d’installation :
_______________________________
Installateur :
_____________________________________
Numéro de modèle :
_______________________________
Numéro de série :
_________________________________
Para obtener acceso al instrucciones de instalación en español, o para obtener información adicional acerca
de su producto, visite:
www.whirlpool.com
"Loading the manual" means you need to wait until the file loads and becomes available for online reading. Some manuals are very large, and the time they take to appear depends on your internet speed.
Other Manuals for Amana NTW4516FW
Summary
2 Optional tools: Parts supplied: NOTE: All parts supplied for installation are in cardboard insert in the top of the washer. LOCATION REQUIREMENTS Select proper location for your washer to improve performance and minimize noise and possible “washer walk”. Install your washer in a basement, laundry ...
3 You will need: n A water heater set to 120° F (49° C). n A grounded electrical outlet located within 4 ft (1.2 m) of power cord on back of washer. n Hot and cold water faucets located within 3 ft (0.9 m) of hot and cold water fill valves on washer, and water pressure of 20-100 psi (138-690 kPa). n...
4 INSTALLATION INSTRUCTIONS Before you start: remove shipping materials It is necessary to remove all shipping materials for proper operation and to avoid excessive noise from washer. Move washer to within 4 ft (1.2 m) of its final location; it must be in a fully upright position. NOTE: To avoid flo...