Page 2 - SERVIZIO CLIENTI E MANUTENZIONE
INDICE 1. ISTRUZIONI DI SICUREZZA . . . . . . . . . . . . . . . . . . . . . . . . . . . . . . . . . . . . . . . . . . . . . . . . . . . . 3 2. DESCRIZIONE DEL PRODOTTO . . . . . . . . . . . . . . . . . . . . . . . . . . . . . . . . . . . . . . . . . . . . . . . 6 3. ACCESSORI . . . . . . . . . . . ....
Page 3 - ISTRUZIONI DI SICUREZZA; Sicurezza dei bambini e
1. ISTRUZIONI DI SICUREZZA Leggere attentamente le istruzioni forni-te prima di installare e utilizzare l'appa-recchiatura. Il produttore non è respon-sabile se un'installazione ed un uso noncorretto dell'apparecchiatura provocanolesioni e danni. Tenere sempre le istru-zioni a portata di mano in cas...
Page 6 - DESCRIZIONE DEL PRODOTTO
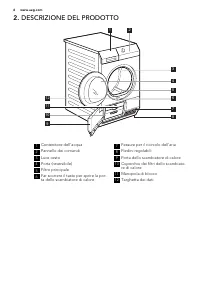
2. DESCRIZIONE DEL PRODOTTO 1 2 7 3 4 5 6 9 10 11 12 8 1 Contenitore dell'acqua 2 Pannello dei comandi 3 Luce cesto 4 Porta (reversibile) 5 Filtro principale 6 Far scorrere il tasto per aprire la por-ta dello scambiatore di calore 7 Fessure per il ricircolo dell'aria 8 Piedini regolabili 9 Porta del...
Page 7 - ACCESSORI; Kit di installazione in
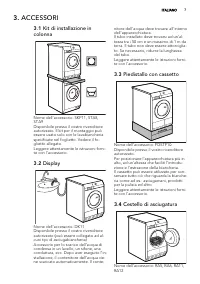
3. ACCESSORI 3.1 Kit di installazione in colonna Nome dell'accessorio: SKP11, STA8,STA9Disponibile presso il vostro rivenditoreautorizzato. Il kit per il montaggio puòessere usato solo con le lavabiancheriaspecificate nel foglietto. Vedere il fo-glietto allegato.Leggere attentamente le istruzioni fo...
Page 8 - PANNELLO DEI COMANDI; Display; Simbolo
Disponibile presso il vostro rivenditoreautorizzato (può essere collegato ad al-cuni tipi di asciugabiancheria). Verificarecon il rivenditore o sul sito Web se l'ac-cessorio sia compatibile con la propriaapparecchiatura.Il cestello permette di eseguire un’asciu-gatura sicura all’interno dell’asciuga...
Page 9 - PREPARAZIONE AL PRIMO UTILIZZO
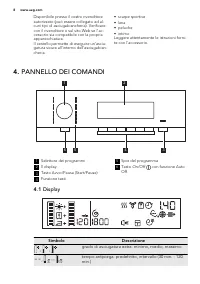
Simbolo Descrizione — - - - centrifuga iniziale biancheria (800 - 1.800 giri/minuto)predefinita segnale acustico attivato sicurezza bambini attivata funzione tempo attivata spia scarico del contenitore dell'acqua spia pulizia del filtro principale spia pulizia dei filtri dello scambiatore di calore ...
Page 12 - USO DELL'APPARECCHIATURA; Preparazione della
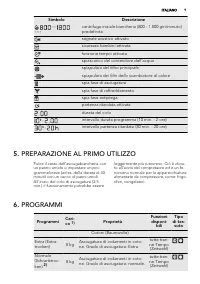
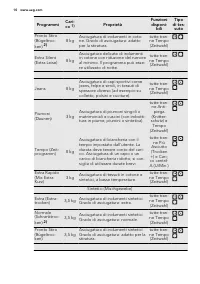
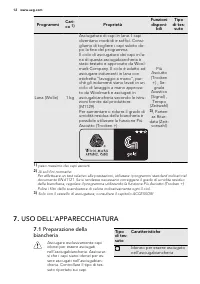
Programmi Cari-co 1) Proprietà Funzioni disponi- bili Tipo di tes- suto Lana (Wolle) 1 kg Asciugatura di capi in lana. I capidiventano morbidi e soffici. Consi-gliamo di togliere i capi subito do-po la fine del programma.Il ciclo di asciugatura dei capi in la-na di questa asciugabiancheria èstato te...
Page 13 - Caratteristiche; Carico della biancheria; Accensione
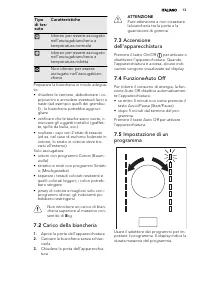
Tipodi tes-suto Caratteristiche Idoneo per essere asciugatonell'asciugabiancheria atemperatura normale Idoneo per essere asciugatonell'asciugabiancheria atemperatura ridotta Non idoneo per essereasciugato nell'asciugabian-cheria Preparare la biancheria in modo adegua-to:• chiudere le cerniere, abbot...
Page 15 - CONSIGLI E SUGGERIMENTI UTILI; Consigli ecologici
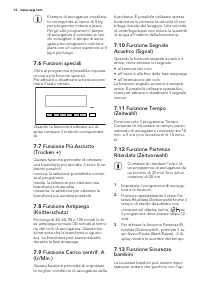
parecchiatura. La funzione sicurezzabambini blocca tutti i tasti e il selettoredei programmi (la funzione non blocca iltasto Auto/Off ). Per attivare la sicurezzabambini premere contemporaneamentei tasti Più Asciutto (Trocken +) e Antipie-ga (Knitterschutz) finché il simbolo non compare sul display....
Page 16 - Pulire il filtro principale
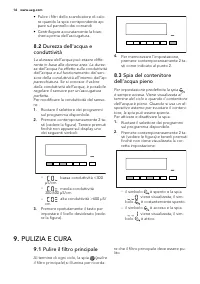
• Pulire i filtri dello scambiatore di calo- re quando la spia corrispondente ap-pare sul pannello dei comandi. • Centrifugare accuratamente la bian- cheria prima dell'asciugatura. 8.2 Durezza dell'acqua e conduttività La durezza dell’acqua può essere diffe-rente in base alle diverse aree. La durez-...
Page 18 - Svuotamento del
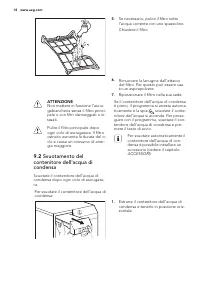
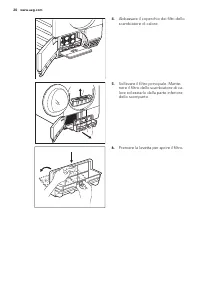
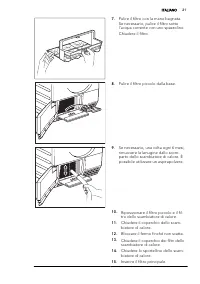
5. Se necessario, pulire il filtro sottol'acqua corrente con uno spazzolino.Chiudere il filtro. 6. Rimuovere la lanugine dall'attaccodel filtro. Per questo può essere usa-to un aspirapolvere. 7. Riposizionare il filtro nella sua sede. ATTENZIONE Non mettere in funzione l'asciu-gabiancheria senza il ...
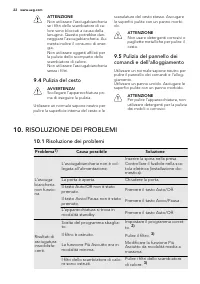
Page 22 - Pulizia del cesto; Pulizia del pannello dei; RISOLUZIONE DEI PROBLEMI; Risoluzione dei problemi; Problema
ATTENZIONE Non utilizzare l'asciugabiancheriase i filtri dello scambiatore di ca-lore sono bloccati a causa dellalanugine. Questo potrebbe dan-neggiare l'asciugabiancheria. Au-menta inoltre il consumo di ener-gia.Non utilizzare oggetti affilati perla pulizia dello scomparto delloscambiatore di calor...
Page 23 - Err
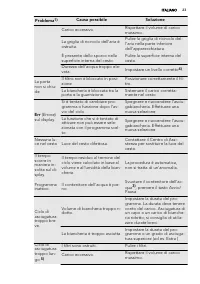
Problema 1) Causa possibile Soluzione Carico eccessivo. Rispettare il volume di caricomassimo. La griglia di ricircolo dell'aria èostruita. Pulire la griglia di ricircolo del-l'aria nella parte inferioredell’apparecchiatura. È presente dello sporco nellasuperficie interna del cesto. Pulire la superf...
Page 24 - DATI TECNICI
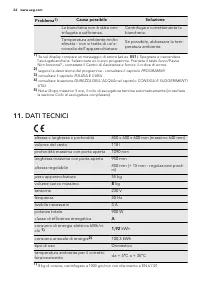
Problema 1) Causa possibile Soluzione La biancheria non è stata cen-trifugata a sufficienza. Centrifugare correttamente labiancheria. Temperatura ambiente moltoelevata - non si tratta di un'a-nomalia dell'apparecchiatura. Se possibile, abbassare la tem-peratura ambiente. 1) Se sul display compare un...
Page 25 - INSTALLAZIONE; Disimballo; Installazione sotto un
2) La somma del consumo di energia per asciugare: 150 kg della biancheria di cotone con il programma Normale + 280 kg con il programma Pronto Stiro + 150 kg della biancheria sintetica con il programma Normale . Questo è il consumo approssimativo per una famiglia di 4 persone che utilizzamediamente l...
Page 26 - CONSIDERAZIONI AMBIENTALI
13. CONSIDERAZIONI AMBIENTALI Riciclare i materiali con il simbolo .Buttare l'imballaggio negli appositicontenitori per il riciclaggio.Aiutare a proteggere l’ambiente e lasalute umana e a riciclare rifiutiderivanti da apparecchiatureelettriche ed elettroniche. Nonsmaltire le apparecchiature cheripor...
Page 27 - CUSTOMER CARE AND SERVICE
CONTENTS 1. SAFETY INSTRUCTIONS . . . . . . . . . . . . . . . . . . . . . . . . . . . . . . . . . . . . . . . . . . . . . . . . . . . . . 28 2. PRODUCT DESCRIPTION . . . . . . . . . . . . . . . . . . . . . . . . . . . . . . . . . . . . . . . . . . . . . . . . . . . . 30 3. ACCESSORIES . . . . . . . ...
Page 28 - SAFETY INSTRUCTIONS; Children and vulnerable
1. SAFETY INSTRUCTIONS Before the installation and use of the ap-pliance, carefully read the supplied in-structions. The manufacturer is not re-sponsible if an incorrect installation anduse causes injuries and damages. Alwayskeep the instructions with the appliancefor future reference. 1.1 Children ...
Page 30 - PRODUCT DESCRIPTION
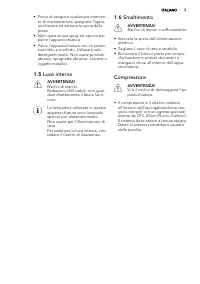
The type of light bulb or halogenlamp used for this appliance, isonly for household appliances.Do not use it for house lighting.To replace the internal light, con-tact the Service. 1.6 Disposal WARNING! Risk of injury or suffocation. • Disconnect the appliance from the mains supply. • Cut off the ma...
Page 31 - ACCESSORIES; Stacking kit
3. ACCESSORIES 3.1 Stacking kit Accessory name: SKP11, STA8, STA9Available from your authorized vendor.Stacking kit can be used only with thewashing machines specified in the leaf-let. See the leaflet attached.Read carefully the instructions suppliedwith the accessory. 3.2 Draining kit Accessory nam...
Page 32 - CONTROL PANEL; Symbol
Drying rack accessory let to dry safely inthe tumble dryer:• sport shoes• wool • soft toys• lingerieRead carefully the instructions suppliedwith the accessory. 4. CONTROL PANEL 1 2 3 5 6 4 1 The programme dial 2 The display 3 The Start/Pause push button 4 The function push buttons 5 The programme in...
Page 33 - BEFORE FIRST USE
Symbol Description time drying function activated drain the water container indicator clean the primary filter indicator clean the heat exchanger filters indicator drying cycle phase indicator cooling cycle phase indicator crease guard cycle phase indicator delay start activated cycle time - time pr...
Page 36 - USING THE APPLIANCE; Preparing the laundry
Programmes Load 1) Properties Availablefunctions Fabric mark Wool (Wolle) 1 kg To dry the cloths made of wool .The cloths become soft and cosy.We recommend to remove thecloths immediately after the pro-gramme end.The default wool drying cycle ofthis tumble drying machine hasbeen tested and approved ...
Page 37 - Property; Loading the laundry
Fabricmark Property Applicable to dry in thetumble dryer at decreasedtemperature Not applicable to dry in thetumble dryer Correctly prepare the laundry:• close zips, button up duvet covers and attach loose ties or ribbons (e.g. rib-bons of aprons) - laundry can tangle • make sure the pockets are emp...
Page 39 - HINTS AND TIPS
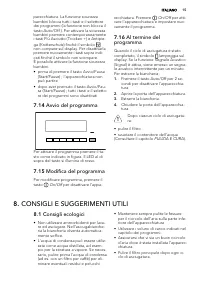
7.14 Starting a programme To activate the programme push thebutton as on the illustration. The LEDabove the button illuminates in red col-our. 7.15 Change a programme To change a programme, push the On/Off button to deactivate appliance. Push the On/Off to activate the appli- ance and then set the p...
Page 40 - Cleaning the primary filter
3. Push the button again and again un-til you set necessary level (see the il-lustration). 4. To memorise the setting push at thesame time 2 buttons as are specifiedin the point 2. 8.3 Water container full — indication By default the indication is always on. It comes into the view at the end of thec...
Page 41 - Draining the condensed
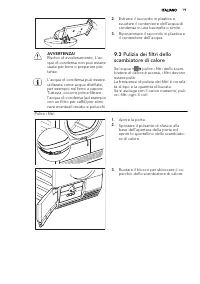
1 2 3. Open the filter. 4. Use a moist hand to clean the filter. 5. If necessary clean the filter withwarm water using a brush.Close the filter. 6. Remove fluff from the filter socket.For this a vacuum cleaner can beused. 7. Put the filter inside the filter socket. CAUTION! Do not operate the tumble...
Page 42 - Cleaning the heat
water container and press the start but-ton. To drain the condensed watercontainer automatically you caninstall draining accessory (seechapter: ACCESSORIES ) To drain the condensed water container: 1. Pull the condensed water containerand keep it in horizontal position. 2. Move the plastic connectio...
Page 45 - Cleaning the drum
9. If necessary, one time for each 6months, remove the fluff from theheat exchanger compartment. Youcan use a vacuum cleaner. 10. Put the small filter and heat ex-changer filter back. 11. Close the heat exchanger cover. 12. Lock the blockage until it snaps. 13. Close the heat exchanger filterscover....
Page 46 - TROUBLESHOOTING; Troubleshooting; Problem
10. TROUBLESHOOTING 10.1 Troubleshooting Problem 1) Possible cause Remedy The tumbledryer doesnot operate. The tumble dryer is not con-nected to mains supply. Connect in at mains socket.Check fuse in fuse box (domes-tic installation). The loading door is opened. Close the loading door. The Auto/Off ...
Page 47 - TECHNICAL INFORMATION
Problem 1) Possible cause Remedy Abnormallyelapsingtime on thedisplay. The time to end is calculatedon the basis of the volume anddampness of the laundry. The automatic procedure —this is not the appliance mal-function. Programmeinactive. The water container is full. Drain the water container 3) , p...
Page 48 - INSTALLATION; Unpacking
adjustable height 850 mm (+ 15 mm - feet regulation) the appliance weight 55 kg maximum load volume 8 kg voltage 230 V frequency 50 Hz necessary fuse 4 A total power 900 W energy efficiency class A energy consumption kWh/cycle 1) 1,92 kWh annual energy consumption 2) 108,3 kWh type of use Domestic p...
Page 49 - The load door reversal; ENVIRONMENT CONCERNS
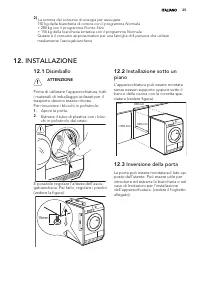
> 850 mm 600 mm 600 mm 12.3 The load door reversal The load door can be installed by theuser in the opposite side. It can help toeasily put and remove the laundry or ifthere is a limit to install the appliance.(see separate leaflet). 13. ENVIRONMENT CONCERNS Recycle the materials with thesymbol ....