Page 2 - SERVIZIO CLIENTI E MANUTENZIONE
INDICE 1. ISTRUZIONI DI SICUREZZA . . . . . . . . . . . . . . . . . . . . . . . . . . . . . . . . . . . . . . . . . . . . . . . . . . . . 3 2. DESCRIZIONE DEL PRODOTTO . . . . . . . . . . . . . . . . . . . . . . . . . . . . . . . . . . . . . . . . . . . . . . . 5 3. ACCESSORI . . . . . . . . . . . ....
Page 3 - ISTRUZIONI DI SICUREZZA; Norme di sicurezza
1. ISTRUZIONI DI SICUREZZA Per la vostra sicurezza e per garantireun impiego corretto, prima di installa-re e utilizzare per la prima volta l'ap-parecchiatura, vi consigliamo di legge-re con attenzione il manuale per l'u-tente, inclusi i suggerimenti e le avver-tenze. Per evitare errori ed incidenti...
Page 4 - Installazione
AVVERTENZA! • Rischio di incendio! Per evita- re il rischio di auto combu-stione, non arrestare mai l'a-sciugabiancheria prima deltermine del ciclo di asciuga-tura. Nel caso sia assoluta-mente necessario, fare atten-zione perché la biancheria eil cesto possono essere mol-to caldi. • Non bisogna lasc...
Page 5 - DESCRIZIONE DEL PRODOTTO
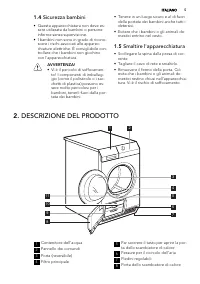
1.4 Sicurezza bambini • Questa apparecchiatura non deve es- sere utilizzata da bambini o personeinferme senza supervisione. • I bambini non sono in grado di ricono- scere i rischi associati alle apparec-chiature elettriche. È consigliabile con-trollare che i bambini non giochinocon l'apparecchiatura...
Page 6 - ACCESSORI; Kit di installazione in
9 Coperchio dei filtri dello scambiato-re di calore 10 Manopola di blocco 11 Targhetta dei dati 3. ACCESSORI 3.1 Kit di installazione in colonna Nome dell'accessorio: SKP11, STA8,STA9Disponibile presso il vostro rivenditoreautorizzato. Il kit per il montaggio puòessere usato solo con le lavabiancher...
Page 7 - Cestello di asciugatura; PANNELLO DEI COMANDI; Display; Simbolo
3.4 Cestello di asciugatura Nome dell'accessorio: RA5, RA6, RA11,RA12 Disponibile presso il vostro rivenditoreautorizzato (può essere collegato ad al-cuni tipi di asciugabiancheria). Verificarecon il rivenditore o sul sito Web se l'ac-cessorio sia compatibile con la propriaapparecchiatura.Il cestell...
Page 8 - PREPARAZIONE AL PRIMO UTILIZZO; PROGRAMMI
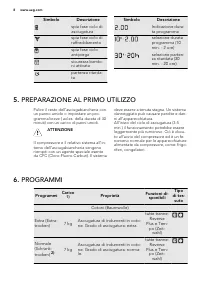
Simbolo Descrizione spia fase ciclo diasciugatura spia fase ciclo diraffreddamento spia fase cicloantipiega sicurezza bambi-ni attivata partenza ritarda-ta Simbolo Descrizione Indicazione dura-ta programma - selezione durataprogramma (10min. - 2 ore) - selezione parten-za ritardata (30min. - 20 ore)...
Page 11 - USO DELL'APPARECCHIATURA; Preparazione della; Caratteristiche; Caricare la biancheria; Accensione
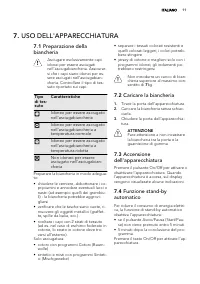
7. USO DELL'APPARECCHIATURA 7.1 Preparazione della biancheria Asciugare esclusivamente capiidonei per essere asciugatinell’asciugabiancheria. Assicurar-si che i capi siano idonei per es-sere asciugati nell’asciugabian-cheria. Controllare il tipo di tes-suto riportato sui capi. Tipodi tes-suto Caratt...
Page 14 - CONSIGLI E SUGGERIMENTI UTILI; Consigli ecologici
8. CONSIGLI E SUGGERIMENTI UTILI 8.1 Consigli ecologici • Non utilizzare ammorbidenti per lava- re ed asciugare. Nell’asciugabianche-ria la biancheria diventa automatica-mente soffice. • L'acqua di condensa può essere utiliz- zata come acqua distillata, ad esem-pio per la stiratura a vapore. Se nece...
Page 15 - PULIZIA E MANUTENZIONE; Pulire il filtro principale
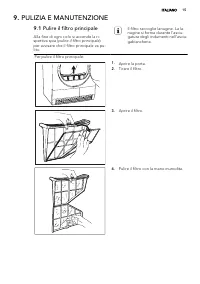
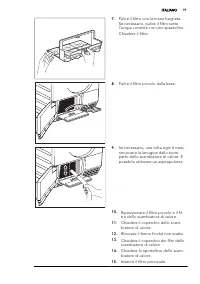
9. PULIZIA E MANUTENZIONE 9.1 Pulire il filtro principale Alla fine di ogni ciclo si accende la ri-spettiva spia ( pulire il filtro principale ) per avvisare che il filtro principale va pu-lito. Il filtro raccoglie lanugine. La la-nugine si forma durante l'asciu-gatura degli indumenti nell'asciu-gab...
Page 16 - Svuotamento del
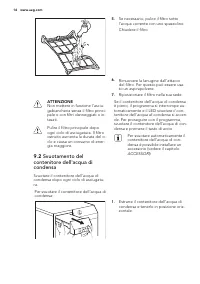
5. Se necessario, pulire il filtro sottol'acqua corrente con uno spazzolino.Chiudere il filtro. 6. Rimuovere la lanugine dall'attaccodel filtro. Per questo può essere usa-to un aspirapolvere. 7. Riposizionare il filtro nella sua sede. ATTENZIONE Non mettere in funzione l'asciu-gabiancheria senza il ...
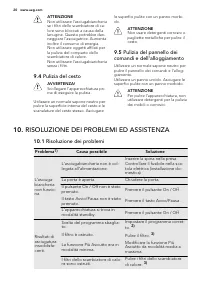
Page 20 - Pulizia del cesto; Pulizia del pannello dei; RISOLUZIONE DEI PROBLEMI ED ASSISTENZA; Risoluzione dei problemi; Problema
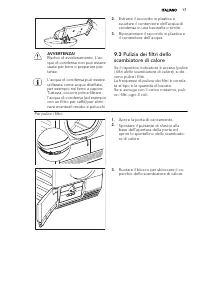
ATTENZIONE Non utilizzare l'asciugabiancheriase i filtri dello scambiatore di ca-lore sono bloccati a causa dellalanugine. Questo potrebbe dan-neggiare l'asciugatrice. Aumentainoltre il consumo di energia.Non utilizzare oggetti affilati perla pulizia del comparto delloscambiatore di calore.Non utili...
Page 21 - Err
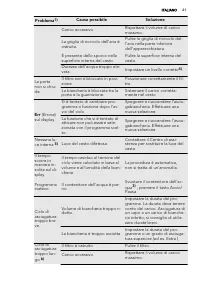
Problema 1) Causa possibile Soluzione Carico eccessivo. Rispettare il volume di caricomassimo. La griglia di ricircolo dell'aria èostruita. Pulire la griglia di ricircolo del-l'aria nella parte inferioredell’apparecchiatura. È presente dello sporco nellasuperficie interna del cesto. Pulire la superf...
Page 22 - DATI TECNICI
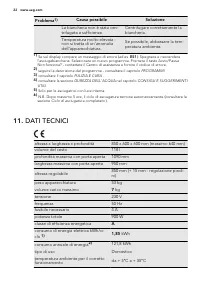
Problema 1) Causa possibile Soluzione La biancheria non è stata cen-trifugata a sufficienza. Centrifugare correttamente labiancheria. Temperatura molto elevata -non si tratta di un'anomaliadell'apparecchiatura. Se possibile, abbassare la tem-peratura ambiente. 1) Se sul display compare un messaggio ...
Page 23 - INSTALLAZIONE; Posizionamento
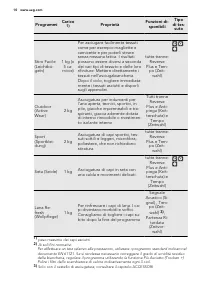
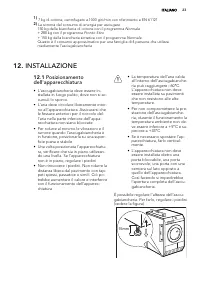
1) 7 kg di cotone, centrifugato a 1000 giri/min con riferimento a EN 61121 2) La somma del consumo di energia per asciugare: 150 kg della biancheria di cotone con il programma Normale + 280 kg con il programma Pronto Stiro + 150 kg della biancheria sintetica con il programma Normale . Questo è il co...
Page 24 - Disimballo; Installazione sotto un; CONSIDERAZIONI AMBIENTALI
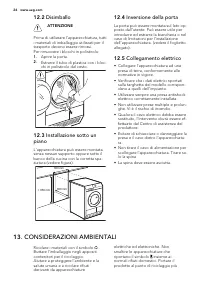
12.2 Disimballo ATTENZIONE Prima di utilizzare l'apparecchiatura, tuttii materiali di imballaggio utilizzati per iltrasporto devono essere rimossi.Per rimuovere i blocchi in polistirolo: 1. Aprire la porta. 2. Estrarre il tubo di plastica con i bloc-chi in polistirolo dal cesto. 12.3 Installazione s...
Page 26 - CUSTOMER CARE AND SERVICE
CONTENTS 1. SAFETY INSTRUCTIONS . . . . . . . . . . . . . . . . . . . . . . . . . . . . . . . . . . . . . . . . . . . . . . . . . . . . . 27 2. PRODUCT DESCRIPTION . . . . . . . . . . . . . . . . . . . . . . . . . . . . . . . . . . . . . . . . . . . . . . . . . . . . 29 3. ACCESSORIES . . . . . . . ...
Page 27 - SAFETY INSTRUCTIONS; General safety
1. SAFETY INSTRUCTIONS In the interest of your safety and toensure the correct use, before instal-ling and first using the appliance, readthis user manual carefully, including itshints and warnings. To avoid unneces-sary mistakes and accidents, it is im-portant to ensure that all people usingthe app...
Page 28 - Installation
WARNING! • Risk of fire! To prevent from the risk of self combustiondo not stop a tumble dryerbefore the end of the dryingcycle unless all items arequickly removed and spreadout so that the heat is dissi-pated. • Lint must not be allowed toaccumulate around the tum-ble dryer. • Risk of electric shoc...
Page 29 - Discard the appliance; PRODUCT DESCRIPTION
WARNING! • Danger of suffocation! The packaging components (e.g.plastic film, polystyrene) canbe dangerous to children -Keep them out of children’sreach. • Keep all detergents in a safe place out of children’s reach. • Make sure that children or pets do not climb inside the drum. 1.5 Discard the app...
Page 30 - ACCESSORIES; Stacking kit
3. ACCESSORIES 3.1 Stacking kit Accessory name: SKP11, STA8, STA9Available from your authorized vendor.Stacking kit can be used only with thewashing machines specified in the leaf-let. See the leaflet attached.Read carefully the instructions suppliedwith the accessory. 3.2 Draining kit Accessory nam...
Page 31 - CONTROL PANEL; Symbol
Drying rack accessory let to dry safely inthe tumble dryer:• sport shoes• wool • soft toys• lingerieRead carefully the instructions suppliedwith the accessory. 4. CONTROL PANEL 1 10 12 2 4 5 6 7 8 9 11 3 1 The programme dial 2 The On/Off (Ein/Aus) push button 3 Programme indicators 4 The Dry Plus (T...
Page 34 - USING THE APPLIANCE; Preparing the laundry
Pro- grammes Load 1) Properties Availablefunctions Fabric mark Active Wear 2 kg To dry outdoor pieces of cloth-ing, technical, sports, pile fabrics,waterproof and breathable jack-ets, shell jacket teamed with a re-movable fleece or inner insula-tion. all except Reverse Plus and Anticrease (Knitter- ...
Page 35 - Property; Loading the laundry
Fabricmark Property Applicable to dry in thetumble dryer at standardtemperature Applicable to dry in thetumble dryer at decreasedtemperature Not applicable to dry in thetumble dryer Correctly prepare the laundry:• close zips, button up duvet covers and attach loose ties or ribbons (e.g. rib-bons of ...
Page 37 - HINTS AND TIPS
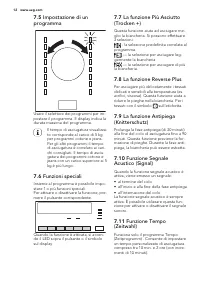
7.14 Starting a programme To activate the programme push theStart/Pause button. The LED above thepush button changes the colour to red. 7.15 Change a programme To change a programme, push the On/Off (Ein/Aus) button to deactivate appli-ance. Push the On/Off (Ein/Aus) to acti-vate the appliance and t...
Page 38 - Cleaning the primary filter
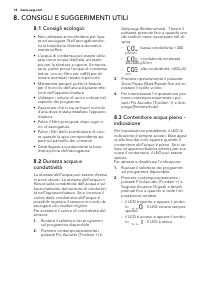
3. Push the Start Pause button againand again until you set necessarylevel. 4. To memorise the setting push at thesame time the Dry Plus (Trocken +)and the Anticrease (Knitterschutz)buttons. 8.3 Water container full — indication By default the indication LED is alwayson. It comes into the view at th...
Page 39 - Draining the condensed
4. Use a moist hand to clean the filter. 5. If necessary clean the filter withwarm water using a brush.Close the filter. 6. Remove fluff from the filter socket.For this a vacuum cleaner can beused. 7. Put the filter inside the filter socket. CAUTION! Do not operate the tumble dryerwithout the primar...
Page 40 - Cleaning the heat
To drain the condensed water container: 1. Pull the condensed water containerand keep it in horizontal position. 2. Move the plastic connection out anddrain the condensed water containerinto a sink or equivalent receptacle. 3. Move plastic connection in and in-stall water container. WARNING! Risk of...
Page 43 - TROUBLE SHOOTER AND SERVICE; Troubleshooting; Problem
CAUTION! Do not operate the tumble dryerwhen the heat exchanger filtersare blocked with fluff. This couldcause the damage to the tumbledryer. This also increases energyconsumption.Do not use sharp objects toclean the heat exchanger com-partment.Do not operate the tumble dryerwithout the filters. 9.4...
Page 45 - TECHNICAL INFORMATION
2) follow the programme description — see PROGRAMMES chapter 3) see CARE AND CLEANING chapter 4) see section WATER HARDNESS in HINTS AND TIPS chapter 5) Only the tumble dryers with drum light. 6) Note: After maximum 5 hours the drying cycle ends automatically (see Drying cycle complete section). 11....
Page 46 - INSTALLATION; Appliance positioning
12. INSTALLATION 12.1 Appliance positioning • The tumble dryer must be installed in a clean position, where dirt does notcollect. • Air must flow freely around the appli- ance. Make sure that the front airflowslots in the bottom of the applianceare not blocked . • To keep vibration and noise at the ...
Page 47 - ENVIRONMENT CONCERNS
> 850 mm 600 mm 600 mm 12.4 The load door reversal The load door can be installed by theuser in the opposite side. It can help toeasily put and remove the laundry or ifthere is a limit to install the appliance.(see separate leaflet). 12.5 Electrical connection • Connect the machine to an earthed ...