Page 2 - SERVIZIO CLIENTI E MANUTENZIONE
INDICE 1. ISTRUZIONI DI SICUREZZA . . . . . . . . . . . . . . . . . . . . . . . . . . . . . . . . . . . . . . . . . . . . . . . . . . . . 3 2. DESCRIZIONE DEL PRODOTTO . . . . . . . . . . . . . . . . . . . . . . . . . . . . . . . . . . . . . . . . . . . . . . . 5 3. ACCESSORI . . . . . . . . . . . ....
Page 3 - ISTRUZIONI DI SICUREZZA; Sicurezza dei bambini e
1. ISTRUZIONI DI SICUREZZA Leggere attentamente le istruzioni forni-te prima di installare e utilizzare l'appa-recchiatura. Il produttore non è respon-sabile se un'installazione ed un uso noncorretto dell'apparecchiatura provocanolesioni e danni. Tenere sempre le istru-zioni a portata di mano in cas...
Page 5 - DESCRIZIONE DEL PRODOTTO
• Prima di eseguire qualunque interven- to di manutenzione, spegnere l'appa-recchiatura ed estrarre la spina dallapresa. • Non usare acqua spray né vapore per pulire l'apparecchiatura. • Pulire l'apparecchiatura con un panno inumidito e morbido. Utilizzare solodetergenti neutri. Non usare prodottiab...
Page 6 - ACCESSORI; Kit di installazione in
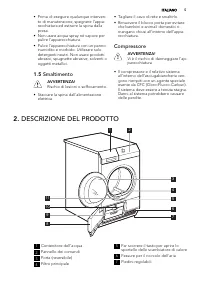
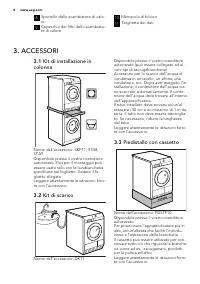
8 Sportello dello scambiatore di calo-re 9 Coperchio dei filtri dello scambiato-re di calore 10 Manopola di blocco 11 Targhetta dei dati 3. ACCESSORI 3.1 Kit di installazione in colonna Nome dell'accessorio: SKP11, STA8,STA9Disponibile presso il vostro rivenditoreautorizzato. Il kit per il montaggio...
Page 7 - Cestello di asciugatura; PANNELLO DEI COMANDI; PREPARAZIONE AL PRIMO UTILIZZO
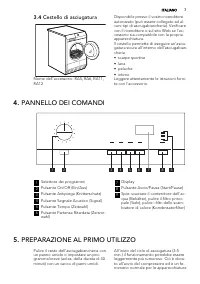
3.4 Cestello di asciugatura Nome dell'accessorio: RA5, RA6, RA11,RA12 Disponibile presso il vostro rivenditoreautorizzato (può essere collegato ad al-cuni tipi di asciugabiancheria). Verificarecon il rivenditore o sul sito Web se l'ac-cessorio sia compatibile con la propriaapparecchiatura.Il cestell...
Page 8 - PROGRAMMI
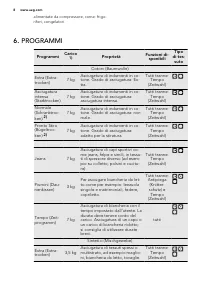
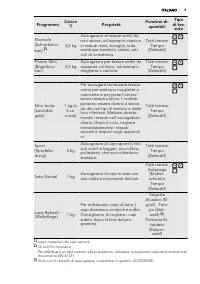
alimentate da compressore, come: frigo-riferi, congelatori. 6. PROGRAMMI Programmi Carico 1) Proprietà Funzioni di- sponibili Tipo di tes- suto Cotoni (Baumwolle) Extra (Extra-trocken) 7 kg Asciugatura di indumenti in co-tone. Grado di asciugatura: Ex-tra. Tutti tranne: Tempo (Zeitwahl) Asciugaturai...
Page 10 - USO DELL'APPARECCHIATURA; Caratteristiche
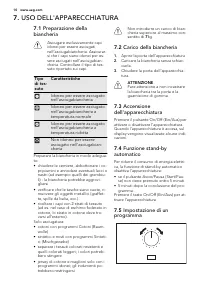
7. USO DELL'APPARECCHIATURA 7.1 Preparazione della biancheria Asciugare esclusivamente capiidonei per essere asciugatinell’asciugabiancheria. Assicurar-si che i capi siano idonei per es-sere asciugati nell’asciugabian-cheria. Controllare il tipo di tes-suto riportato sui capi. Tipodi tes-suto Caratt...
Page 12 - CONSIGLI E SUGGERIMENTI UTILI
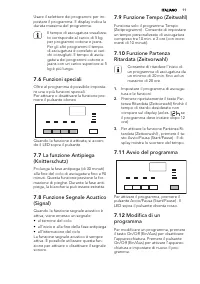
7.13 Funzione Sicurezza bambino La sicurezza bambini può essere impo-stata per evitare che giochino con l’ap-parecchiatura. La funzione sicurezzabambino blocca tutti i pulsanti e il selet-tore programma (questa funzione nonblocca il pulsante On/Off (Ein/Aus) ). Perattivare la sicurezza bambini preme...
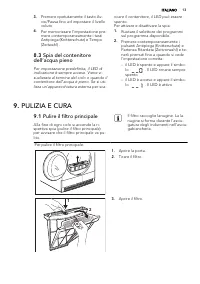
Page 13 - Pulire il filtro principale
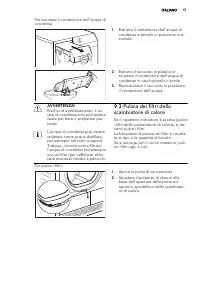
3. Premere ripetutamente il tasto Av-vio/Pausa fino ad impostare il livellovoluto. 4. Per memorizzare l'impostazione pre-mere contemporaneamente i tastiAntipiega (Knitterschutz) e Tempo(Zeitwahl) . 8.3 Spia del contenitore dell’acqua pieno Per impostazione predefinita, il LED diindicazione è sempre ...
Page 14 - Svuotamento del
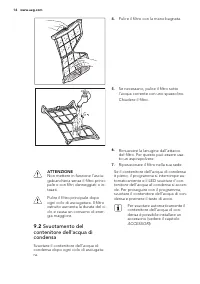
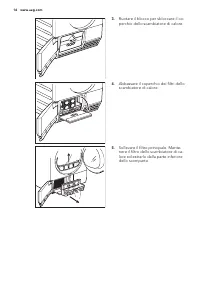
4. Pulire il filtro con la mano bagnata. 5. Se necessario, pulire il filtro sottol'acqua corrente con uno spazzolino.Chiudere il filtro. 6. Rimuovere la lanugine dall'attaccodel filtro. Per questo può essere usa-to un aspirapolvere. 7. Riposizionare il filtro nella sua sede. ATTENZIONE Non mettere i...
Page 18 - Pulizia del cesto; Pulizia del pannello dei
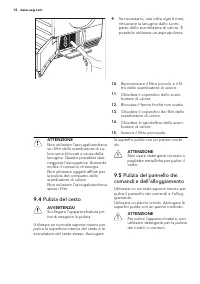
9. Se necessario, una volta ogni 6 mesi,rimuovere la lanugine dallo scom-parto dello scambiatore di calore. Èpossibile utilizzare un aspirapolvere. 10. Riposizionare il filtro piccolo e il fil-tro dello scambiatore di calore. 11. Chiudere il coperchio dello scam-biatore di calore. 12. Bloccare il fe...
Page 19 - RISOLUZIONE DEI PROBLEMI; Risoluzione dei problemi; Problema; Err
10. RISOLUZIONE DEI PROBLEMI 10.1 Risoluzione dei problemi Problema 1) Causa possibile Soluzione L'asciuga-biancherianon funzio-na. L'asciugabiancheria non è col-legata all’alimentazione. Inserire la spina nella presa.Controllare il fusibile nella sca-tola elettrica (installazione do-mestica) La por...
Page 20 - DATI TECNICI
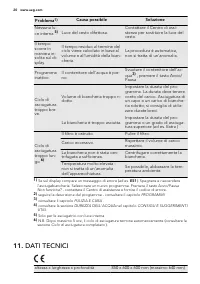
Problema 1) Causa possibile Soluzione Nessuna lu-ce interna 5) Luce del cesto difettosa. Contattare il Centro di assi-stenza per sostituire la luce delcesto. Il temposcorre inmaniera in-solita sul di-splay. Il tempo residuo al termine delciclo viene calcolato in base alvolume e all’umidità della bia...
Page 21 - INSTALLAZIONE; Disimballo
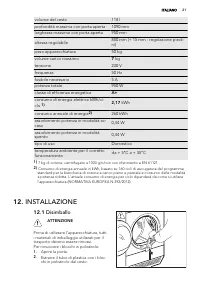
volume del cesto 118 l profondità massima con porta aperta 1090 mm larghezza massima con porta aperta 950 mm altezza regolabile 850 mm (+ 15 mm - regolazione piedi-ni) peso apparecchiatura 50 kg volume carico massimo 7 kg tensione 230 V frequenza 50 Hz fusibile necessario 5 A potenza totale 950 W cl...
Page 22 - CONSIDERAZIONI AMBIENTALI
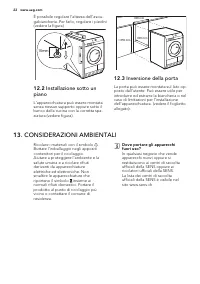
È possibile regolare l’altezza dell’asciu-gabiancheria. Per farlo, regolare i piedini(vedere la figura). 15mm 12.2 Installazione sotto un piano L'apparecchiatura può essere montatasenza nessun supporto oppure sotto ilbanco della cucina con la corretta spa-ziatura (vedere figura). > 850 mm 600 mm ...
Page 23 - CUSTOMER CARE AND SERVICE
CONTENTS 1. SAFETY INSTRUCTIONS . . . . . . . . . . . . . . . . . . . . . . . . . . . . . . . . . . . . . . . . . . . . . . . . . . . . . 24 2. PRODUCT DESCRIPTION . . . . . . . . . . . . . . . . . . . . . . . . . . . . . . . . . . . . . . . . . . . . . . . . . . . . 26 3. ACCESSORIES . . . . . . . ...
Page 24 - SAFETY INSTRUCTIONS; Children and vulnerable
1. SAFETY INSTRUCTIONS Before the installation and use of the ap-pliance, carefully read the supplied in-structions. The manufacturer is not re-sponsible if an incorrect installation anduse causes injuries and damages. Alwayskeep the instructions with the appliancefor future reference. 1.1 Children ...
Page 26 - Compressor; PRODUCT DESCRIPTION
• Disconnect the appliance from the mains supply. • Cut off the mains cable and discard it.• Remove the door catch to prevent children and pets to get closed in theappliance. Compressor WARNING! Risk of damage of the appliance. • The compressor and its system in the tumble dryer is filled with the s...
Page 27 - ACCESSORIES; Stacking kit
3. ACCESSORIES 3.1 Stacking kit Accessory name: SKP11, STA8, STA9Available from your authorized vendor.Stacking kit can be used only with thewashing machines specified in the leaf-let. See the leaflet attached.Read carefully the instructions suppliedwith the accessory. 3.2 Draining kit Accessory nam...
Page 28 - CONTROL PANEL; BEFORE FIRST USE; Programmes
Drying rack accessory let to dry safely inthe tumble dryer:• sport shoes• wool • soft toys• lingerieRead carefully the instructions suppliedwith the accessory. 4. CONTROL PANEL 1 2 3 4 5 6 7 8 9 1 The programme dial 2 The On/Off (Ein/Aus) push button 3 The Anticrease (Knitterschutz) pushbutton 4 The...
Page 30 - USING THE APPLIANCE; Preparing the laundry
Programmes Load 1) Properties Availablefunctions Fabric mark Easy Iron(Leichtbü-geln) 1 kg (or 5 shirts) To dry easy care fabrics suchshirts and blouses; for minimumironing effort. The results canbe different for to the differenttypes of fabric and its finish. Putfabrics in the tumble dryerstraight....
Page 31 - Property
Fabricmark Property Not applicable to dry in thetumble dryer Correctly prepare the laundry:• close zips, button up duvet covers and attach loose ties or ribbons (e.g. rib-bons of aprons) - laundry can tangle • make sure the pockets are empty - re- move metal items (paper clips, safetypins, etc.). • ...
Page 33 - HINTS AND TIPS; Ecological hints; Cleaning the primary filter
8. HINTS AND TIPS 8.1 Ecological hints • Do not use fabric softener to wash and then dry. In the tumble dryer laundrybecomes soft automatically. • Use the condensate as distilled water, e.g. for steam ironing. If it is necessaryclean the condensate before (e.g. witha coffee filter) to remove possibl...
Page 35 - Draining the condensed; Cleaning the heat
6. Remove fluff from the filter socket.For this a vacuum cleaner can beused. 7. Put the filter inside the filter socket. CAUTION! Do not operate the tumble dryerwithout the primary filter or withdamaged or blocked filter. Clean the primary filter after eachdrying cycle. Clogged filter in-creases the...
Page 38 - Cleaning the drum
9. If necessary, one time for each 6months, remove the fluff from theheat exchanger compartment. Youcan use a vacuum cleaner. 10. Put the small filter and heat ex-changer filter back. 11. Close the heat exchanger cover. 12. Lock the blockage until it snaps. 13. Close the heat exchanger filterscover....
Page 39 - TROUBLESHOOTING; Troubleshooting; Problem
10. TROUBLESHOOTING 10.1 Troubleshooting Problem 1) Possible cause Remedy The tumbledryer doesnot operate. The tumble dryer is not con-nected to mains supply. Connect in at mains socket.Check fuse in fuse box (domes-tic installation). The loading door is opened. Close the loading door. The On/Off bu...
Page 40 - TECHNICAL INFORMATION
Problem 1) Possible cause Remedy Abnormallyelapsingtime on thedisplay. The time to end is calculatedon the basis of the volume anddampness of the laundry. The automatic procedure —this is not the appliance mal-function. Programmeinactive. The water container is full. Drain the water container 3) , p...
Page 41 - INSTALLATION; Unpacking
adjustable height 850 mm (+ 15 mm - feet regulation) the appliance weight 50 kg maximum load volume 7 kg voltage 230 V frequency 50 Hz necessary fuse 5 A total power 950 W energy efficiency class A+ energy consumption kWh/cycle 1) 2,17 kWh annual energy consumption 2) 260 kWh left—on mode power abso...
Page 42 - ENVIRONMENT CONCERNS
15mm 12.2 Installation under a counter The appliance can be installed as free-standing or below the kitchen counterwith correct space (see picture). > 850 mm 600 mm 600 mm 12.3 The load door reversal The load door can be installed by theuser in the opposite side. It can help toeasily put and remo...